
Atomic Wind Blocks (Experimental)
📝 Note: This is part of the Otter Blocks plugin, which you can get from here.
⚠️ Experimental Feature: Atomic Wind Blocks is an experimental feature that is still under active development. Behavior, block names, and available options may change in future versions. It is strongly recommended to test this feature on a staging site before enabling it on a live production site.
Atomic Wind Blocks is an experimental set of five new Gutenberg blocks introduced in Otter Blocks. These blocks use a utility-first CSS approach powered by Tailwind CSS, so you style them by applying utility classes rather than through the visual style controls found on classic blocks. This guide explains how to enable the feature and provides an overview of each block and its supporting capabilities.
📝 Note: Atomic Wind Blocks are supplementary and do not replace the classic Otter Blocks. Your existing Otter blocks remain fully available and supported, and enabling Atomic Wind does not change them. Atomic Wind blocks are styled with Tailwind utility classes instead of the visual style controls (color pickers, spacing sliders, typography panels) you may be used to, so their editing experience is intentionally different — see How to edit Atomic Wind content in imported pages below.
In this article
How to Enable Atomic Wind Blocks
Atomic Wind Blocks must be manually enabled from the Otter Settings panel before the blocks become available in the editor.
- In your WordPress Dashboard, navigate to Otter Blocks.
- Click on the Dashboard tab.
- Locate the Enable Atomic Wind Blocks toggle and turn it on. The setting saves automatically.
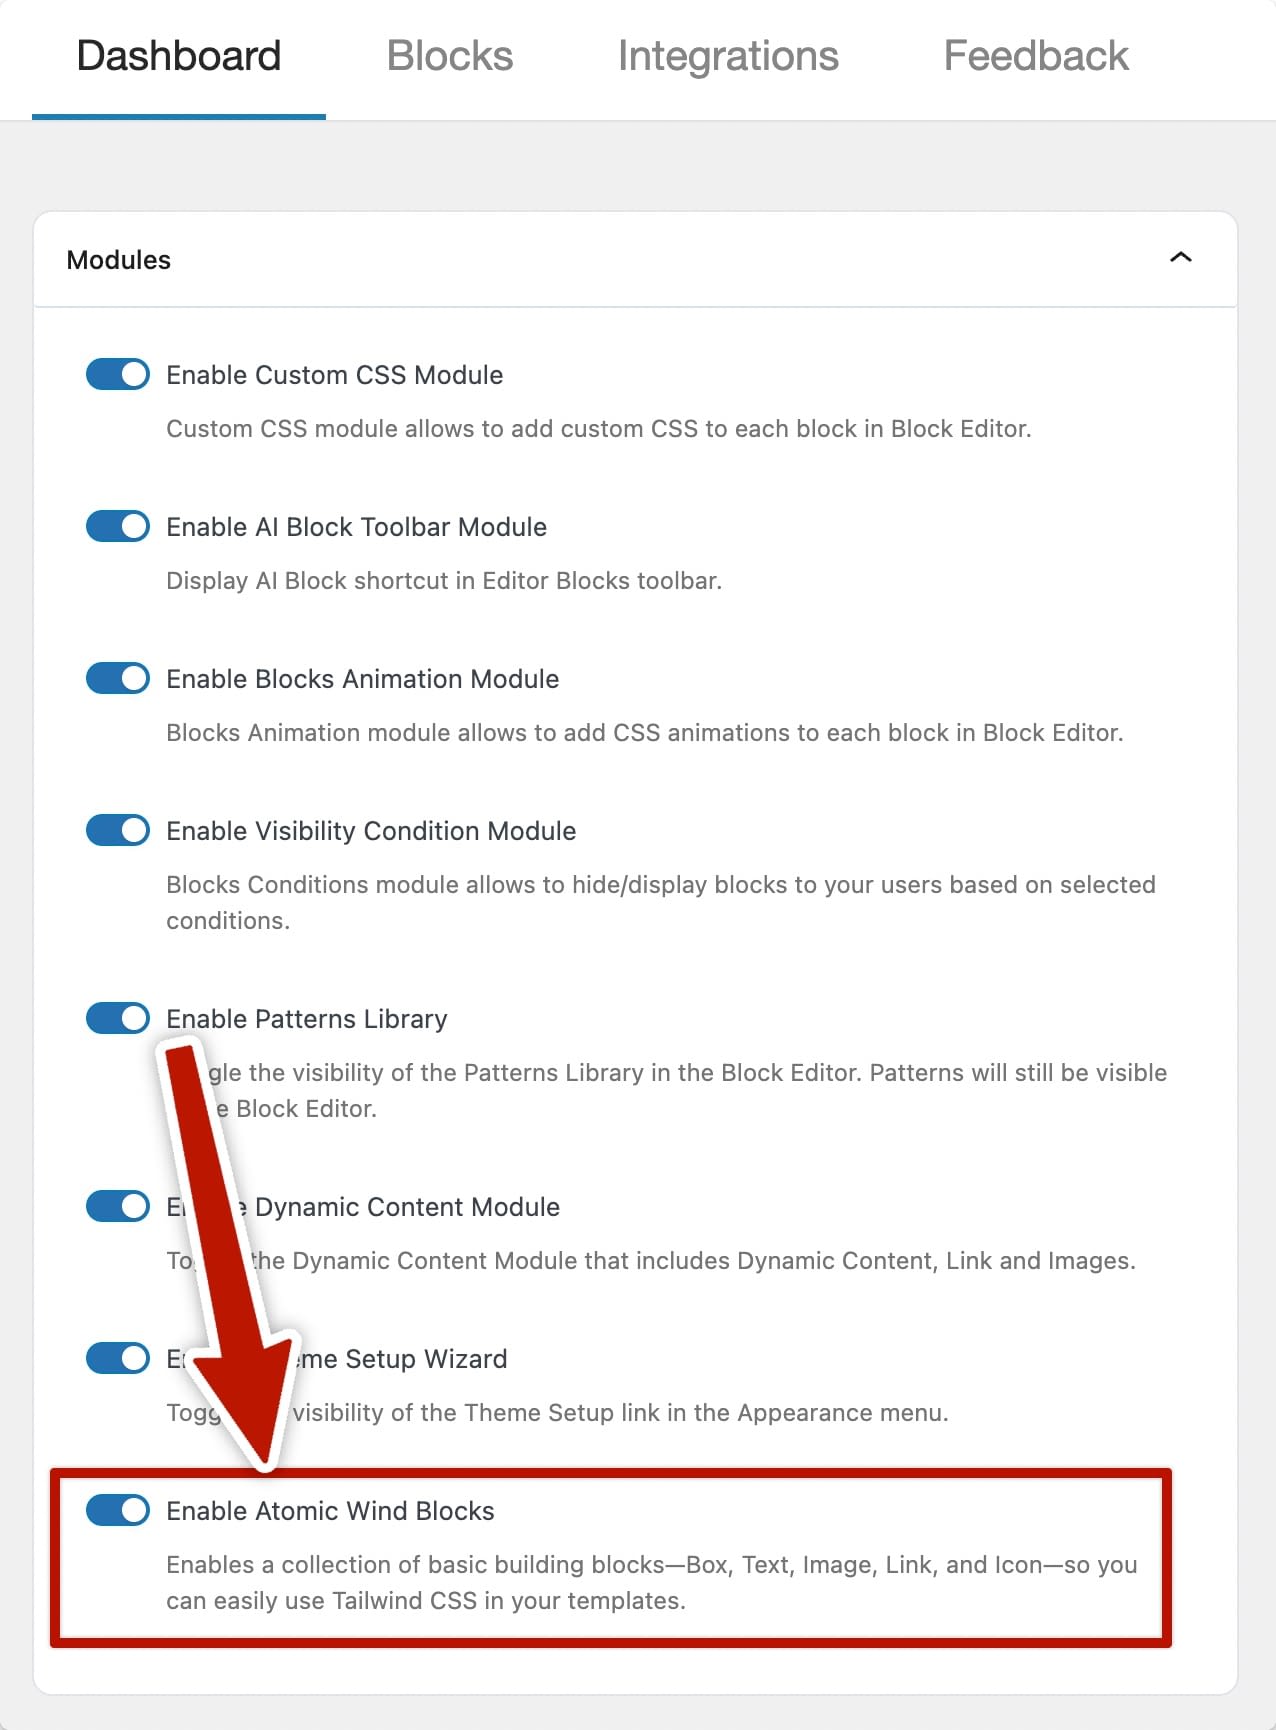
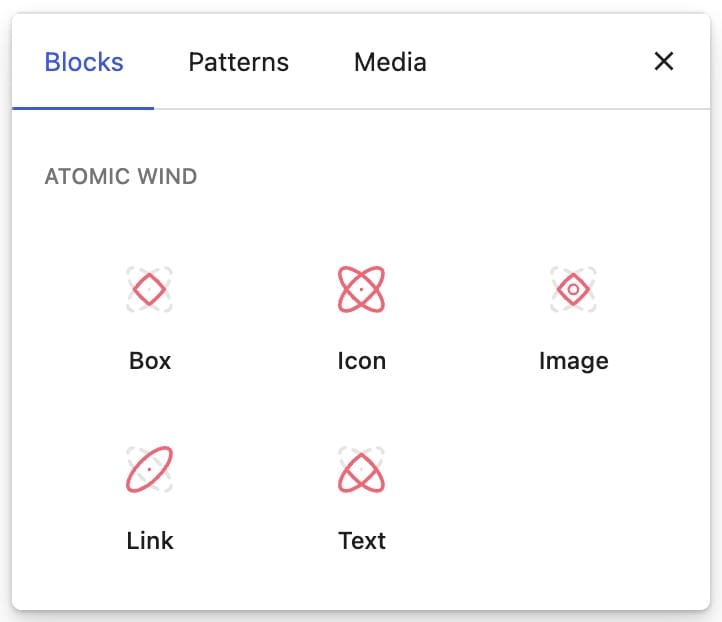
Once enabled, a new Atomic Wind category will appear in the Gutenberg block inserter, containing the five new blocks.
Included Blocks
The Atomic Wind category adds five new blocks to your editor:
- Box — A flexible layout container for grouping and arranging other blocks. Use it to build structured sections with full control over spacing, background, and borders.
- Icon — A flexible icon block that lets you insert and style icons independently of other elements.
- Image — A high-performance image block optimized for speed and visual quality, with extended styling options compared to the default WordPress image block.
- Link — A versatile block for creating buttons and inline text links, with full styling control over appearance and interactive states.
- Text — A block for headings and paragraphs, designed to give you precise typographic control using the Tailwind-based styling system.
Imported templates and Starter Sites using Atomic Wind blocks
If you import a Gutenberg template or a Neve Starter Site, the underlying Atomic Wind block types are Box, Text, Image, Link, and Icon. In List View, Otter may show more descriptive labels based on the block's tag, text, link text, image alt text, or custom block name, which makes nested templates easier to navigate.
Because Atomic Wind uses foundational building blocks instead of the classic Otter-style block names, the structure in the editor can look different even when the imported page is working correctly.
📝 Note: If you need to reuse an Atomic Wind section or move it to another page, use the JSON export/import workflow instead of standard copy-paste to avoid missing images or raw HTML output. See Moving Atomic Wind sections between pages for details.
How to edit Atomic Wind content in imported pages
- Open the page in the Block Editor and enable List View to quickly see nested blocks.
- Expand parent Box blocks until you find the exact inner block you want to edit.
- Select the inner Text, Image, Link, or Icon block to edit content directly.
- Use the block toolbar and right sidebar for the options each block exposes — for example, the image source and alt text on an Image block, the HTML tag on a Box block, or the link target on a Link block. These blocks do not provide the dedicated color, spacing, and typography controls found on classic Otter and WordPress blocks.
- To change layout, spacing, typography, color, borders, and other visual styles, apply Tailwind utility classes. Open the block settings, go to Advanced > Additional CSS Classes, and add classes such as
mb-5(for example, a margin-bottom utility). You can also manage these classes from the Atomic Wind class editor panel, opened from the block's toolbar options or the editor's options menu.
Moving Atomic Wind sections between pages
Atomic Wind sections imported from Neve Starter Sites or Gutenberg templates are deeply nested block structures — a parent Box block can contain many layers of inner boxes, images, text, links, and icons. Because Atomic Wind is still an experimental feature, standard browser or editor copy-paste does not always preserve these nested structures reliably when you move them between pages.
When is normal copy-paste safe?
- Copying a single, simple block such as a standalone Text or Icon block usually works fine.
- Copying small individual elements between two pages on the same site generally succeeds.
When should you avoid copy-paste?
- Moving a full imported section (for example, a hero, card grid, or pricing table built with nested Box blocks) between pages.
- Copying blocks to a completely different site.
- Any time the pasted result contains raw block markup, missing images, or broken styles.
For reliable results with complex or nested sections, use the JSON export/import workflow described below.
Use JSON export/import instead of standard copy-paste
Otter Blocks provides a built-in Export as JSON / Import Blocks from JSON feature that correctly serializes the full block structure and is the recommended way to move Atomic Wind sections between pages.
Before you start: Otter Blocks must be active on both the source and the destination site.
To export a block or section:
- Open the source page in the Block Editor.
- Open List View and locate the parent Box block that contains the section you want to move.
- Select that parent block by clicking it in List View.
- Open the block options menu (the ⋮ three-dot icon in the block toolbar or in List View) and click Export as JSON.
- A file named
blocks-export.jsonwill download to your computer. This file contains the full serialized block structure.
To import the section on the destination page:
- Open the destination page in the Block Editor.
- Click the + block inserter and search for Import Blocks from JSON.
- Add the Import Blocks from JSON block to the page.
- Upload the
blocks-export.jsonfile you downloaded. The section will appear in the editor. - Review the imported blocks in List View to confirm the structure looks correct.
- Click Update or Publish to save the page.
- Visit the page on the front end to confirm images and styles load correctly. If styles look stale, clear your site's caching plugin.
💡 Tip: You can also select multiple blocks before exporting — hold Shift and click additional blocks in List View to include them in the same export file.
Troubleshooting copied Atomic Wind blocks
If you used standard copy-paste and the result does not look right, the following symptoms and fixes apply:
| Symptom | What to do |
|---|---|
| Pasted content appears as raw block markup or HTML code | Delete the pasted content and use the JSON export/import workflow instead. |
| Images are missing after pasting | Images may not transfer by reference across different pages or sites. Use JSON export/import; also confirm the original images are accessible on the destination site. |
| The editor preview looks broken or unstyled | Save the destination page after importing so Otter can regenerate the Tailwind CSS for the new blocks, then reload the editor. |
| Styles are still missing on the front end after saving | Clear your caching plugin (for example Otter Cache, WP Rocket, or your hosting's built-in cache) and reload the front-end page. |
| Imported section still looks broken after using JSON import | Confirm that Otter Blocks is active on the destination site, that the Enable Atomic Wind Blocks toggle is turned on in Otter Blocks > Dashboard, and that the page has been saved so the CSS regenerates. If the issue persists, contact support with the exact page URL and a description of the missing elements. |
Tailwind-Based Styling Approach
Atomic Wind Blocks use a utility-first CSS approach inspired by Tailwind CSS. Instead of writing custom CSS or relying on a theme's predefined styles, you apply small, composable utility classes directly through the block's settings panel.
Key points about how styling works:
- Styles are generated using the Tailwind CSS pipeline, meaning only the CSS classes you actually use are included in the output — keeping page load times low. After you save a post or page that uses Atomic Wind blocks, Otter warms the generated CSS in the background so the styles should be ready before the page is first visited.
- You control layout, spacing, typography, color, borders, and more by applying Tailwind utility classes to each block, rather than through the separate visual controls you may be used to on classic Otter or WordPress blocks.
- Because styles are utility-first, the blocks are theme-independent — they look consistent regardless of the active WordPress theme.
📝 Note: The Tailwind-based styling system is what makes these blocks "atomic" — each style property is controlled individually, giving you a high degree of flexibility. This is different from how standard Gutenberg blocks apply styles.
Key Features
Atomic Wind Blocks ship with several supporting features that extend what you can do with each block:
- Animations — Add built-in entrance and state-based animations to blocks without any custom code. Choose from a variety of animation effects that trigger as elements enter the viewport or respond to user interaction.
- States — Define distinct styles for interactive states such as Hover, Focus, and others. This makes it straightforward to build interactive buttons, links, and containers that respond visually to user actions.
- Query Builder — Use the advanced query builder to power dynamic content display. This feature gives you fine-grained control over which content is shown based on conditions, making it suitable for building dynamic layouts and templates.
Interactivity & State Management (Experimental)
📝 Note: State management support is experimental. Its behavior may change as we continue improving it.
Atomic Wind blocks support state-based interactivity, which lets blocks communicate with each other on the page. A block configured as a State Trigger can activate or deactivate other blocks — such as tabs, accordions, or conditionally displayed content — without requiring any custom code.
Setting Up a State Trigger
To configure a block as a State Trigger, open its settings in the block editor sidebar and locate the State & Visibility section. You can then configure the following options:
- State Trigger — A name that identifies which state this block controls. Other blocks that react to this state must use the same key.
- Action — Choose what happens when the trigger is activated:
- Toggle — Switches the state between active and inactive each time the trigger is used.
- Set Value — Changes the state to a specific value you define in the Value field. Use this when you have multiple triggers that each activate a different state (for example, tab buttons).
- Active by Default — Enable this option to mark the block as the active state when the page first loads. Only one trigger per state key should have this enabled.
Example Use Cases
- Tabs — Set up multiple Link or Box blocks as State Triggers using the same state key, each with the Set Value action and a different state value. Each block in the tab content area can then listen to the matching state value to show or hide itself.
- Accordion — Use a Link or Text block as a Toggle trigger to expand and collapse a content area.
- Conditional content — Show different content blocks based on which State Trigger the visitor has activated.
Troubleshooting
- The Atomic Wind block category is not visible in the editor — Make sure you have saved the settings after enabling the toggle. Try refreshing the editor page after saving.
- Styles are not applying as expected — Otter warms the generated CSS after you save the page, but you may still need to clear your site's caching plugin to see the latest output.
- The feature is causing unexpected behavior on your site — As an experimental feature, conflicts with other plugins or themes are possible. Disable the toggle in Otter Blocks > Dashboard to turn off Atomic Wind Blocks and restore the previous state.
I can't edit an Atomic Wind element
- Make sure you selected the inner content block (Text, Image, Link, or Icon) and not only the parent Box container.
- Open List View and expand nested containers so you can target the exact block that contains the content.
- Confirm the block toolbar and settings sidebar are visible in the editor.
- If the element still appears uneditable, note the exact page URL and block name, then contact support with those details.
⚠️ Important: Always test experimental features on a staging environment first. Enabling Atomic Wind Blocks on a live site before verifying compatibility may result in layout or style issues that are visible to your visitors.