
How to Test and Verify Cache Performance
Testing and verifying the cache performance of your website is essential for maintaining optimal speed, efficiency, and reliability. A properly configured cache minimizes server load, enhances user experience, and improves SEO performance. The steps below provide a structured approach to effectively test and verify cache performance.
The Super Page Cache plugin includes a built-in Test Cache feature. In current versions, the dashboard test uses a browser-driven warmup and verification flow, then checks Cloudflare response headers captured by the browser. This makes the dashboard result more reliable than older server-side-only checks.
If the dashboard still reports an issue, use the manual browser checks below to confirm what visitors receive. Manual checks are especially useful when firewall rules, DNS routing, REST restrictions, or Cloudflare rules prevent the automated verification flow from completing. For issue-specific troubleshooting, see Troubleshooting "Cloudflare integration has an issue".
In this article
1. Verify Cache is Working
Step 1: Inspect Response Headers
- Open your website in a browser.
- Right-click on the page and select Inspect or press
Ctrl+Shift+I(Windows) /Cmd+Shift+I(Mac) to open the browser's developer tools. - Go to the Network tab and reload the page.
- Click on the main request (usually the site URL) and look at the Response Headers. Check for caching-related headers, such as:
CF-Cache-Status: HIT(indicates the page was served from Cloudflare cache)X-WP-SPC-Disk-Cache: HIT(indicates the page was served from disk cache)Cache-ControlorExpires(provides caching rules)
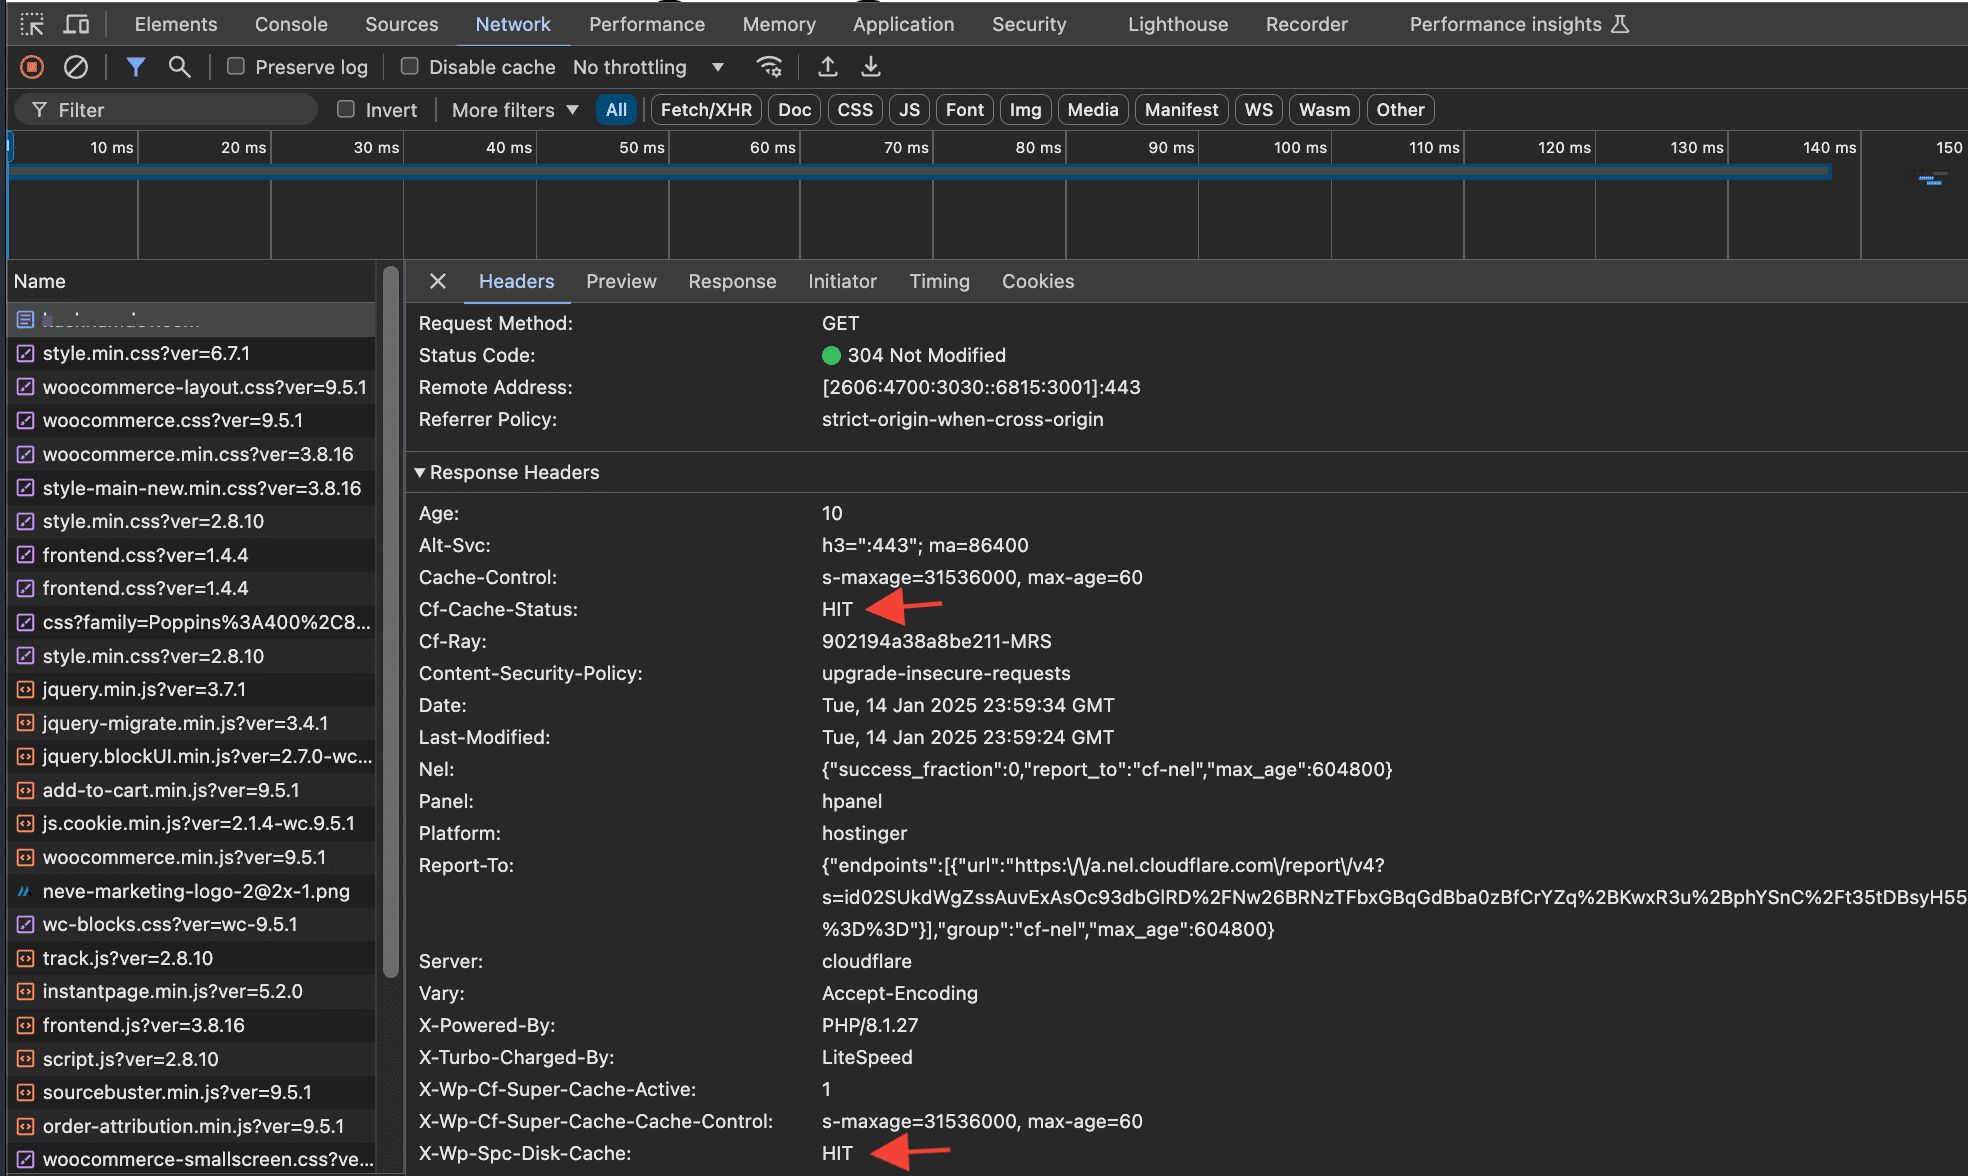
📝 Note: After a purge or during the first verification pass, Cloudflare may show MISS or EXPIRED before the page becomes a HIT. Reload the page once or twice and check again. If DYNAMIC or BYPASS persists, review your Cloudflare cache rule, response cookies, and cache exclusions.
Step 2: Use a Cache Testing Tool
- Use online tools like GTmetrix, Pingdom, or WebPageTest.
- Analyze the results to ensure:
- Reduced time to first byte (TTFB).
- Cached assets are served with appropriate cache headers.
2. Analyze Frontend Performance
Step 1: Test Speed with and without Cache
- Open your website in an incognito/private browser window.
- Measure load times using browser developer tools’ Performance tab or online speed testing tools like Google PageSpeed Insights.
Step 2: Ensure Cache Validation
- Clear your browser cache.
- Reload the page and check if assets like images, CSS, and JavaScript are served from cache.
3. Check for Cache Invalidation
Make a small update to your website (e.g., edit a post or change a widget). Reload the updated page and ensure the changes are reflected. If changes do not appear, verify that cache invalidation rules are configured correctly.
Tips for Accurate Cache Testing
- Clear Browser Cache: Always clear your browser cache before testing.
- Test on Multiple Devices: Use different browsers, devices, and network conditions.
- Monitor Regularly: Cache performance can degrade over time due to changes in website content or server configuration.
- Enable CDN Integration: For optimal performance, combine caching with a Content Delivery Network (CDN) to reduce latency further.
By following these steps, you can test and verify that your website’s caching is functioning effectively, ensuring improved performance and user experience.