Optimizing Super Page Cache for Large Sites
On sites with tens of thousands of posts or pages, certain default Super Page Cache settings can trigger severe CPU spikes and server overload. This guide explains which settings cause those spikes and walks you through the changes that keep your cache effective while dramatically reducing server strain.
📝 Note: This guide focuses specifically on performance tuning for large-scale sites (10,000+ posts/pages). For initial plugin setup, see the Super Page Cache setup guide. For cron-based automation, see How to Automate Cache Purging and Preloading.
In this article
Signs of Cache-Related CPU Overload
Before making any changes, confirm that the plugin's cache operations are the source of the problem rather than unrelated server issues.
Symptoms to look for
- CPU usage spikes sharply immediately after a post is saved or published.
- The server becomes slow or unresponsive for several seconds to minutes following a cache purge.
- Preloading activity (visible in server logs or a monitoring tool) kicks off automatically after every edit and runs for an extended period.
- Hosting dashboards or tools like New Relic, Query Monitor, or server error logs show high I/O or CPU activity tied to cache rebuild processes.
Diagnostic steps
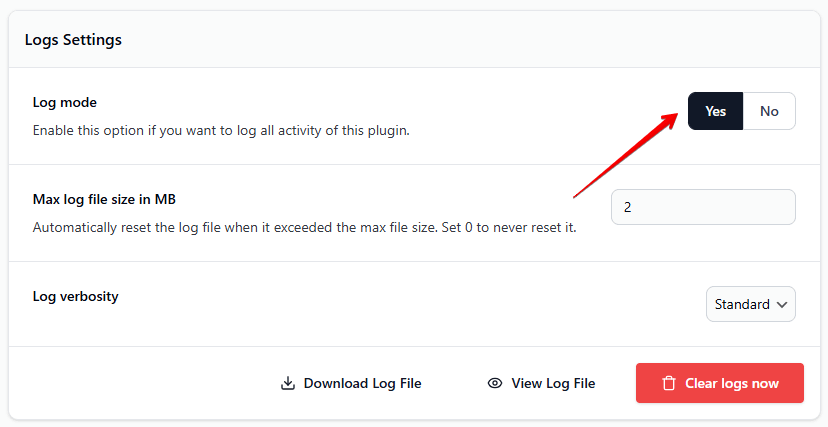
- Enable logging inside the plugin. Go to Settings > Super Page Cache, open the General tab, and enable Show Advanced Settings. Save. Then go to the Advanced tab, scroll to the Logs Settings section, and enable Log Mode. Save the settings.
- Edit or update any post on your site.
- Open the log file (a download link appears in the Logs Settings section once logging is active) and look for entries showing a full-cache purge or preloader start immediately after the update.
- Cross-reference the log timestamps with your server's CPU or I/O usage graph to confirm the correlation.
If the log shows a full-cache purge or a preloader run triggered by every post edit, the settings described in the next section are the likely cause.
Key Settings to Optimize for Scale
The four settings below are the most common causes of CPU overload on large sites. Work through each one in order.
⚠️ Important: Test all changes on a staging environment before applying them to production. Each change shifts how the cache behaves, and you should verify your content still updates correctly after saving.
1. Switch from "Purge whole cache" to smart purging
Why it causes spikes: When Purge whole cache is selected, every post save triggers a full-cache purge across your entire site. On a 40,000-page site, this means the server must rebuild the cache for every URL — a massive I/O operation that repeats on every edit.
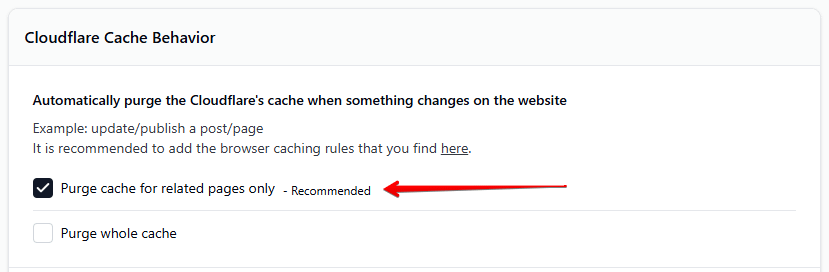
What smart purging does instead: The Purge cache for related pages only option clears only the URLs directly related to the post being edited — the post itself, its category pages, tag pages, and the homepage. This is effective for almost all publishing workflows and reduces the purge footprint from thousands of URLs to fewer than a dozen.
Steps:
- Go to Settings > Super Page Cache, open the General tab, and enable Show Advanced Settings. Save.
- Go to the Advanced tab and scroll to the Cloudflare Cache Behavior section.
- Under Automatically Purge Cloudflare's Cache When Something Changes, select Purge cache for related pages only.
- Click Save Settings.
2. Disable "Automatically Preload Pages You Have Purged From Cache"
Why it causes spikes: When this option is on, a full site crawl starts automatically every time the cache is purged. On a large site this means a crawler immediately begins fetching tens of thousands of pages in the background, placing a sustained load on the server after every purge event.
What to do instead: Disable automatic preloading and run the preloader manually or on a scheduled cron job during off-peak hours (for example, overnight). This gives you full control over when the server handles the preload workload.
Steps:
- Go to Settings > Super Page Cache, open the Advanced tab (enable Show Advanced Settings on the General tab if the Advanced tab is not visible).
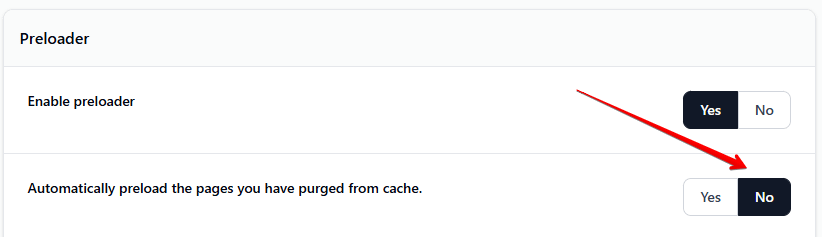
- Scroll to the Preloader section.
- Disable Automatically Preload Pages You Have Purged From Cache.
- Click Save Settings.
- To run the preloader on a schedule, see How to Automate Cache Purging and Preloading.
💡 Tip: You can still trigger a manual preload at any time by using the Start the Preloader via Cronjob URL in the Preloader section of the Advanced tab, or by triggering it from the WordPress admin toolbar. This is useful after a large content update or theme change where you want to warm the cache immediately but on your own schedule.
3. Keep the purge queue active
Why disabling it causes spikes: When the purge queue is disabled, every cache purge request is handled synchronously — immediately, in full, blocking other processes. On large sites with frequent edits or simultaneous updates, this causes a pile-up of purge operations that hits the server all at once.
What the purge queue does: By default, the plugin batches purge requests and executes them after a short delay, spreading the server load over time instead of delivering it in a single burst.
Steps:
- Go to Settings > Super Page Cache, open the Advanced tab.
- Scroll to the Cache section.
- Make sure Disable Cache Purging Using Queue is not enabled (leave it unchecked).
- Click Save Settings.

⚠️ Important: If the purge queue is disabled (i.e., Disable Cache Purging Using Queue is checked), even smart/granular purging can overwhelm the server when many posts are updated in quick succession. Always keep this option unchecked on large sites.
4. Disable Disk Page Cache (if not essential)
Why it causes spikes: Enable Disk Page Cache stores a static HTML file for each page on your web server. On a site with tens of thousands of pages, initial cache generation — or a full rebuild after a purge — means the server writes thousands of HTML files in a short period, causing a significant CPU and I/O spike.
When to disable it: If your site uses Cloudflare as the primary cache layer (the main use case for Super Page Cache), disk caching is not required. Cloudflare handles caching at the edge, and disabling disk caching removes the on-server static file generation entirely.
When to keep it: If your site does not use Cloudflare, or if you rely on disk caching as a secondary layer, do not disable it. Instead, focus on the other three settings above.
Steps (if applicable):
- Go to Settings > Super Page Cache, open the General tab.
- Disable Enable Disk Page Cache.
- Click Save Settings.

Verification and Monitoring
After applying the changes above, confirm that your site behaves as expected and that the CPU load has improved.
Check that content updates correctly after an edit
- Edit a post and click Update.
- Open the post URL in an incognito or private browsing window (to bypass any browser cache).
- Confirm that the updated content is visible. If it is, smart purging is working correctly.
- Check a related page — such as the category page or homepage — and confirm it also reflects any relevant change (for example, a new post appearing in a list).
Monitor CPU after the changes
- Make several post edits in quick succession.
- Check your server's CPU usage graph in your hosting control panel or monitoring tool during and after the edits.
- CPU usage should remain flat or show only a small, brief spike — not the sustained high load seen before.
Test the preloader manually
- Navigate to Settings > Super Page Cache, open the Advanced tab, and scroll to the Preloader section.
- Use the Start the Preloader via Cronjob URL to trigger a manual preload run.
- Monitor server CPU during the preload run to establish a baseline for acceptable load.
- If the load is still too high, reduce the number of URLs included in the preloader by adjusting which sitemaps or page types are included under Preloader Operation and Preload All URLs Into the Following Sitemaps.
Re-enabling features safely
Once your server is stable, you can experiment with re-enabling individual features to find the right balance for your site:
- Consider re-enabling Automatically Preload Pages You Have Purged From Cache only if your hosting plan can handle the crawl load, and only at off-peak hours using a scheduled cron job rather than the automatic trigger.
- Enable Disk Page Cache can be re-enabled if you later need an on-server cache layer, but monitor CPU closely during the initial cache-warming period.
- Keep Purge cache for related pages only and the purge queue active permanently on large sites — there is no practical benefit to full-cache purges or synchronous processing at this scale.
Troubleshooting
Content is not updating after switching to smart purging
If visitors still see outdated content after an edit, smart purging may not be clearing all the relevant URLs.
- Check the plugin log (Settings > Super Page Cache > Advanced > Logs Settings) to see which URLs were purged after the edit.
- If key pages (such as a custom homepage or a featured post section) are not being purged, try switching temporarily to Purge whole cache under Automatically Purge Cloudflare's Cache When Something Changes to confirm whether the content then updates. If it does, you may need to add those custom URLs to the purge list via the plugin's settings or contact support.
- As a one-time fix, use the Purge CF Cache button in the WordPress admin toolbar to clear everything, then monitor whether smart purging keeps content fresh going forward.
CPU spikes persist after changes
If CPU usage is still high after applying all four settings above:
- Verify the changes were actually saved by revisiting each settings tab.
- Check whether another plugin (such as a backup plugin, search index rebuilder, or WooCommerce stock updater) is triggering cache purges independently. Check the plugin log for unexpected purge events.
- If disk caching (Enable Disk Page Cache) is still active and set to use cURL mode (found in Advanced > Cache > Use cURL), disabling cURL mode will also reduce load, as cURL-based cache generation fetches each page individually using server resources.
Preloader runs are still too slow or resource-intensive
- Reduce the maximum number of pages the preloader processes per run. The
SWCFPC_PRELOADER_MAX_POST_NUMBERPHP constant (default:50) can be lowered inwp-config.phpto limit how many pages are preloaded in a single batch. - Schedule the preloader to run during low-traffic hours using a cron job. See How to Automate Cache Purging and Preloading for setup instructions.