Zelle Pro Documentation
Zelle Pro (formerly Zerif Pro) is a one-page parallax WordPress theme with a fully customizable front page built of configurable sections.
⚠️ Zelle Pro is in maintenance mode
Zelle Pro (formerly Zerif Pro) is no longer actively developed. It continues to work, and updates or bug fixes will only be released for security concerns.
To download or update Zelle Pro you need an active license. If your subscription has expired or was canceled, the theme files and updates stay unavailable in your account until you renew it — see How to manually renew your plan or subscription. If a recent renewal is not yet reflected in your account, check Why is my license key invalid.
If you are building a new site, or want a theme that is still actively developed, consider switching to Neve for a modern block-editor workflow, or Hestia for a similar Customizer-based experience.
Download the Sample Content or try the Admin Demo.
In this article
Getting Started
Video Tutorial
Install & Configure Your New Theme
Watch a video about setting the front and blog pages.  After your purchase, go to Purchase History to download the theme. You will need your login credentials to access the site which will be emailed to you. If you didn't receive any email from us, please contact our support team by raising a ticket so they can assist you with your login concerns. Once the theme has been downloaded, navigate to Appearance > Themes > Add New > Upload, in your WordPress dashboard. Now, click the Choose File button, select the archive of your theme from your local computer and press the Install Now button. In a few seconds, WordPress will upload and extract the theme archive for you. Click the Activate link under the message for successful theme installation. Please enter the license key for the theme so you can get started working on your site. You can follow the instructions on the link below:
How to activate my license key Now, navigate to Settings > Reading settings, and make sure that you are using Your latest posts option. If you've done all this, then you can visit your website and it will look similar to our theme demo. IMPORTANT: The settings need to be set in Your latest posts so it will look like the one in the demo. Otherwise, you won't be able to see the theme sections.
Setting Up A Blog Page
 Navigate to Pages > Add New, in your WordPress dashboard. In the screen that comes, title your page as Blog, and scroll down to find the Page Attributes metabox. In Page Attributes, click on the Template option and pick either Blog template or Blog template with large images, based on your preference. Publish the page, and now you can use this page as your Blog page. Zelle Pro comes with
Blog Options where you can choose to place a sidebar on your Blog page. This also has a Grid Layout setting where you can set if you would like to appear your blogs in a number of columns. You can set this up from your **Customizer **> Blog Options.
Configuring Menu
Zelle theme focuses on the one-page parallax design. And to do that, we have divided the front-page of our theme in multiple sections. And linking those sections from the Menu is very simple, all you need to do is assign section anchor to the menu. Navigate to Appearance > Menus, in your WordPress dashboard**.** And create anchors to the sections, as seen below:  Here are all the anchors:
- Our Focus - #focus
- About Us - #aboutus
- Portfolio - #works
- Our Team - #team
- Packages - #pricingtable
- Testimonials - #testimonials
- Bottom Ribbon - #ribbon_bottom
- Right Ribbon - #ribbon_right
- Shortcodes - #shortcodes-section
- Contact - #contact
- Subscribe - #subscribe
- Latest News - #latestnews
- **Google Maps **- #map
Customization
Zelle Pro uses WordPress' Customizer API, so it's really simple to customize. Just navigate to Appearance > Customize, in your WordPress Dashboard, and there you can find all the customization options.
Setting Up Background
 Zelle theme supports multiple background options, which can be configured from Appearance > Customize > Background. First, you need to select which type of background you wanna use (image/slider/video) and then you need to select it from its respective section.
Adding Logo & Customizing Big Title Section
 You can add a logo to your website from Appearance > Customize > Site Identity, in your WordPress dashboard. And to customize the Big Title section, you navigate to Customize > Big Title section. There you will find all the options, such as adding text to the areas, adding background/parallax images, sections settings, and such. A new feature has been added to this section where you can choose layouts that will allow you to add widgets. You can add a video, gallery, contact form, etc.
Very Top Bar
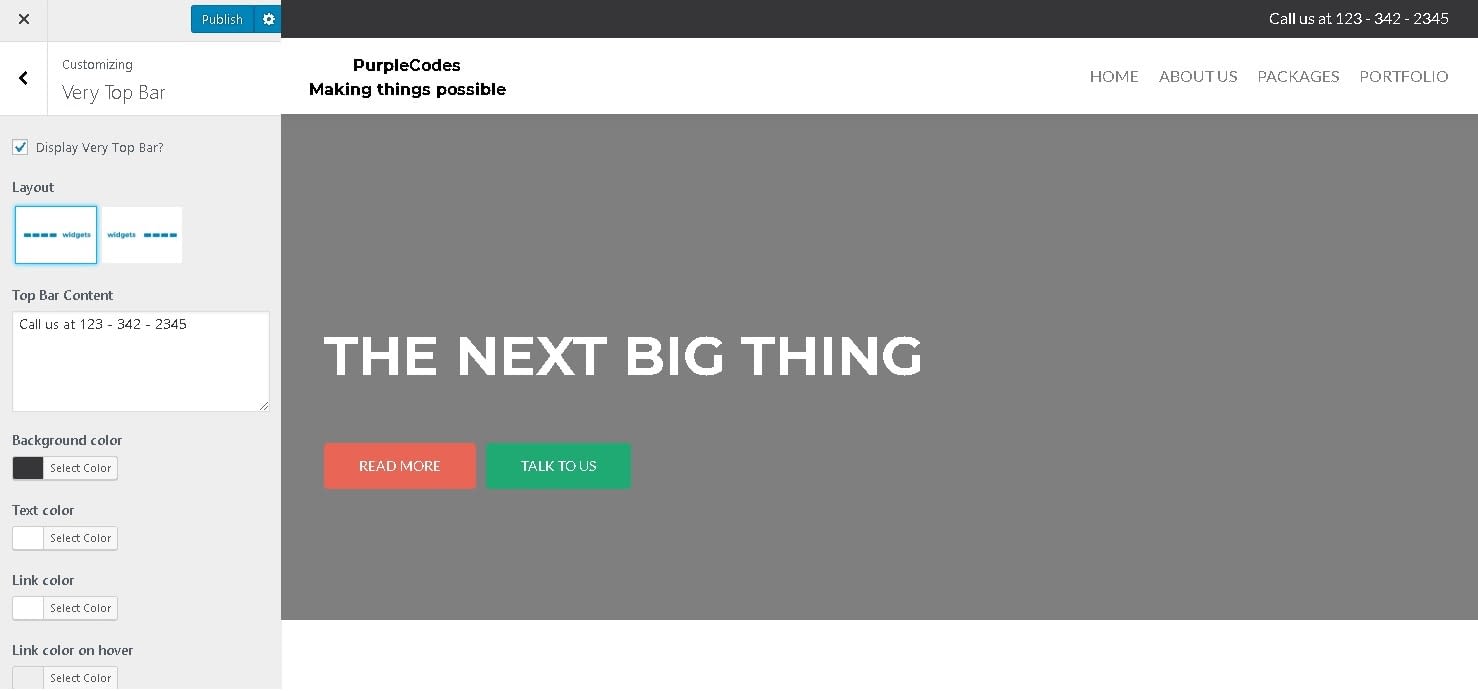 This is one of Zelle Pro's new features. You can add another menu here or a simple text like your phone number or working hours. If you can't think of anything yet for this section, you can disable it by unchecking the Display Very Top Bar option. For more information about configuring the very top bar please follow our guide here.
Customizing Colors
 To customize the colors you can navigate to Appearance > Customize, in your WordPress dashboard. For general colors, you can click on the Colors panel, and for homepage sections, you can navigate to [Section Name] > Colors, in the Customizer.
Our Focus Section
 To customize Our Focus section navigate to Appearance > Customize > Our Focus Section. There are four panels in this customizer section, which Settings, Header, Colors &** Our focus section widgets**. In the Settings panel, you can choose if you want to display the section or not, and the Header panel allows you to edit the section's title/subtitle. Colors panel is for customizing colors of the section. And to add content to the section, you will have to add Our Focus widget from Our focus section widgets.
Portfolio Section
 First, you need to make sure that it's enabled from Appearance > Customize > Portfolio section. If it is, then you need to navigate back to your Dashboard and add some items to your Portfolio. The option to add items to your Portfolio is available in your Dashboard menu. There should be, at least, one portfolio item, in order for the Portfolio section to show up. Portfolio section also has a new options display portfolio items in an overlay upon clicking, instead of taking you to a new page. Don't forget to update to the latest version. And make sure that you've added a Featured Image to your Portfolio item. If there isn't a Featured Image then it won't appear on the front page.
About Us Section
 To customize About Us section navigate to Appearance > Customize > About us Section. There are multiple panels in this customizer section, such as Settings, Main Content, Colors &** Features**. In Settings panel, you can choose if you want to display the section or not, and Main Content panel allows you to edit section's content. Colors panel is for customizing colors of the section. And to edit the feature knobs on the right, there are multiple Feature options.
Happy Clients Section
 Happy Clients section can be also customized from Appearance > Customize > About us section. To add the client's logo to this section, you need to click on the About us section widgets panel and add Clients widget to your site.
Our Team Section
 To customize Our Team section navigate to Appearance > Customize > Our Team Section. There are four panels in this customizer section, which Settings, Header, Colors &** Our team section widgets**. In the Settings panel, you can choose if you want to display the section or not, and the Header panel allows you to edit section's title/subtitle. Colors panel is for customizing colors of the section. And to add content to the section, you will have to add Our Team widget from Our team section widgets.
Testimonials Sections
 To add Testimonials of your clients to your website, you can navigate to Appearance > Customize > Testimonials Section. There you can find all the options to customize the section, just as header text, colors, and adding the main widgets. And yes, it should be "clients say," There are four panels in this customizer section, which Settings, Header, Colors &** Testimonials section widgets**. In the Settings panel, you can choose if you want to display the section or not, and the Header panel allows you to edit section's title/subtitle. Colors panel is for customizing colors of the section. And to add content to the section, you will have to add Testimonials widget from Testimonials section widgets. Testimonials section also has an option to change its default design to Pinterest design.
Ribbon Sections
 Zelle Pro theme comes with two ribbon sections - BottomButton Ribbon & RightButton Ribbon. To customize them you can navigate to Appearance > Customize > Ribbon sections, and there you can find two ribbons. And the ribbon will only appear on your site when you will add some text to it.
Shortcodes Section
This Shortcodes Section allows the user to create a section just the way he wants it and needs it. In this tutorial, we added a shortcode from WooCommerce so that it will display the recent products from the shop, but the shortcode options are multiple. If you consider adding more than just one shortcode and want the anchor to take you to a specific part of the section, you can use the inspect* element* function on part of the section and there you will find a dynamic id which generates in a different way depending on the shortcode added.
Contact Section
 Zelle Pro theme comes with a built-in contact form, which makes it easier for you to get emails from your viewers without installing any additional plugins. This form can be configured from Appearance > Customize > Contact Us Section. There you can configure the email which you want to use to receive these emails, in the Settings tab. Additional from the display and email settings, you can add your reCaptcha keys to Settings tab to enable reCaptcha to prevent spam. To have access to a more powerful form, Zelle Pro is integrated with WPForms which is replacing the default form when the plugin is installed. Apart from that, Zelle Pro also has a dedicated field that can be used for adding any shortcode. This way, you could use the contact form plugin that best suits your needs. Another way to configure the default contact form text is through the
Main Content tab, and colors in Colors tab.
Packages Section
 If you want to display your packs or packages in an elegant pricing table then you can do it by navigating to Appearance > Customize > Packages Section. Just like other sections, in the** Settings** panel, you can choose if you want to display the section or not, and Header panel allows you to edit section's title/subtitle. Colors panel is for customizing colors of the section. And to add content to the section, you will have to add Packages widget from Packages section widgets.
Google Map Section
 If you want to display a map so that people could find your business/location easily then it can also be done within our one-page design. Just navigate to Appearance > Customize > Google Map Section, and there you just need to enable to Map section and put down your location. That's it!
Latest News Section
 Latest News section displays your latest blog posts on the front page of your site. You can configure the display settings from Appearance > Customize > Latest News Section. In the Settings panel, you can choose if you want to display the section or not, and the Header panel allows you to edit section's title/subtitle. Colors panel is for customizing colors of the section. And to add content, you can navigate to Posts > Add New, in your WordPress dashboard. Make sure to add a featured image to your blog posts. And the number of blog posts displaying can be configured from Settings > Reading settings. It's 8, by default.
Subscribe Section
 You can also add your email list sign up form to your website, using our Subscribe Section with Sendinblue.com. First, you will have to create an account on sendinblue.com and get your API from there from this page. After setting up your free account, navigate to **Plugins > Add New. **Search and install the Sendinblue plugin, as seen in the above GIF. Install the plugin, and put your API in its options panel to complete the Sendinblue setup. Now to add this to your front page, navigate to Appearance > Customize > Subscribe Section, and add Sendinblue widget from Subscribe section widgets. And you can configure all the settings for the section from this area.
Order the Frontpage Sections
In Zelle Pro, you have access to rearrange the homepage sections as you like. The frontpage is split into 13 sections and you can assign one of the available sections as you like depending on what you want to achieve. Now tread carefully as you can assign a section more than once in different parts of the frontpage and this will render it more than once resulting in duplicated content. If you end up with such a case just assign a section that is not visible instead of the duplicate.
Additional Topics
The Shop Page
Zelle Pro is a multi-functional WordPress theme. You can create an online shop using this theme as it is compatible with the WooCommerce plugin. You can choose to place a sidebar on your Shop page which will be made available once you have the WooCommerce installed. This setting can be found from your **Customizer **> WooCommerce > Product Catalog.
Suggested Image Sizes
- Background Image/Slider/Video: 2048×1365px, 20mb mp4 video
- Our Focus - 150x150px
- Our Team - 174x174px
- Testimonial - 73x73px
- Client Logo - 130x50px
Translate Zelle
Single Language: Zelle works with translation plugins like Loco Translate. How to translate Zelle with Loco Translate. We also have translations available for plenty of popular languages
here. You can simply download and use the translated .po and .mo files. Multiple Languages: To translate the Zelle in multiple languages, you can use the plugins like Polylang or WPML. Following links explaining in detail on how it works: