Neve Pro Documentation
Neve Pro is the premium add-on for the Neve theme, unlocking advanced header and footer builders, WooCommerce enhancements, custom layouts, and more.
In this article
Neve Pro is the premium add-on of the Neve theme.
Make sure you first follow Neve's documentation to understand all its features.
How to install and activate Neve Pro
To get started follow the steps below:
- Make sure the Neve theme is installed and activated. Need help with this? Follow the steps here.
- Download Neve Pro (Plugin) from your Purchase History. The file should be a .zip
- In your WordPress Dashboard, navigate to Plugins.
- Click on Add New Plugin, upload the .zip file and click on the Install Now button.
- After the install is done, click on Activate. Welcome to Neve PRO!
💡 Can't find the .zip file? Your browser might automatically unzip files on your computer. Check this doc for the solution.
Neve Pro Pricing: There are three different plans for Neve Pro: Personal, Business and Agency. See here what is included in each of them.
Premium Starter Sites
Neve PRO brings in a lot of Starter Sites to the library, both created in the WordPress editor ( Gutenberg ) and in Elementor.
💡 Attention: The premium Starter Sites are part of the Business and Agency plans only.
Blog page
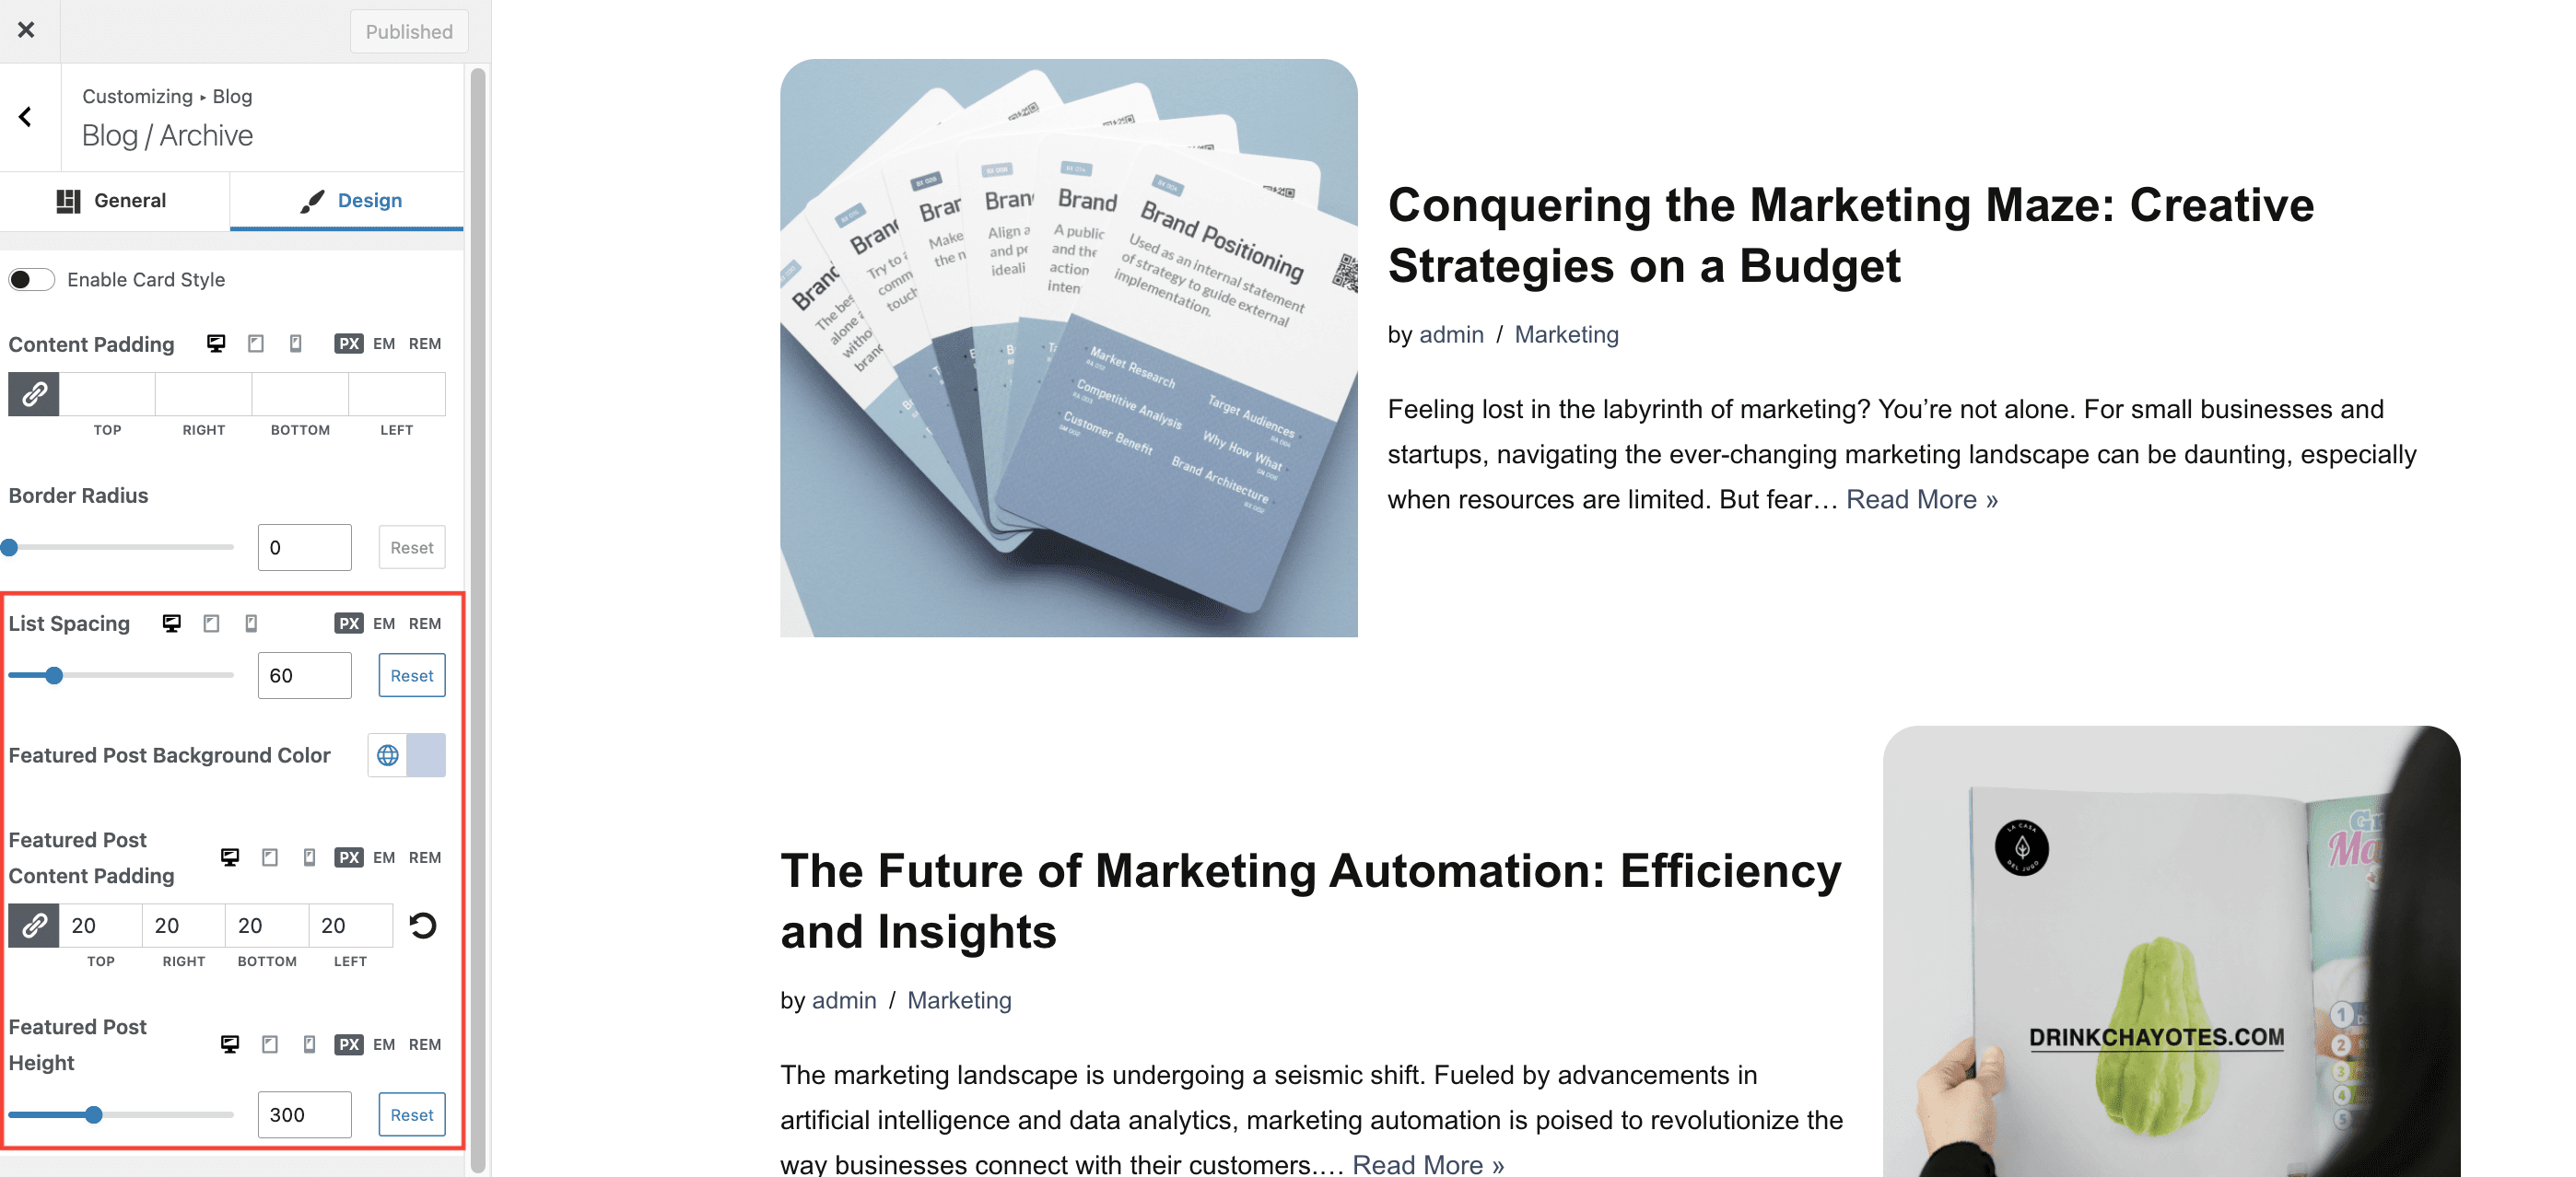
Neve PRO brings new options for the Blog page. To access those navigate to Appearance > Customize > Blog > Blog/Archive:
- Options to customize the featured images of each post: Image Hover Effect, Image Position (the position of the image, alongside the text) and Image Width. The options can be found under Thumbnail in the Post Content Order option.
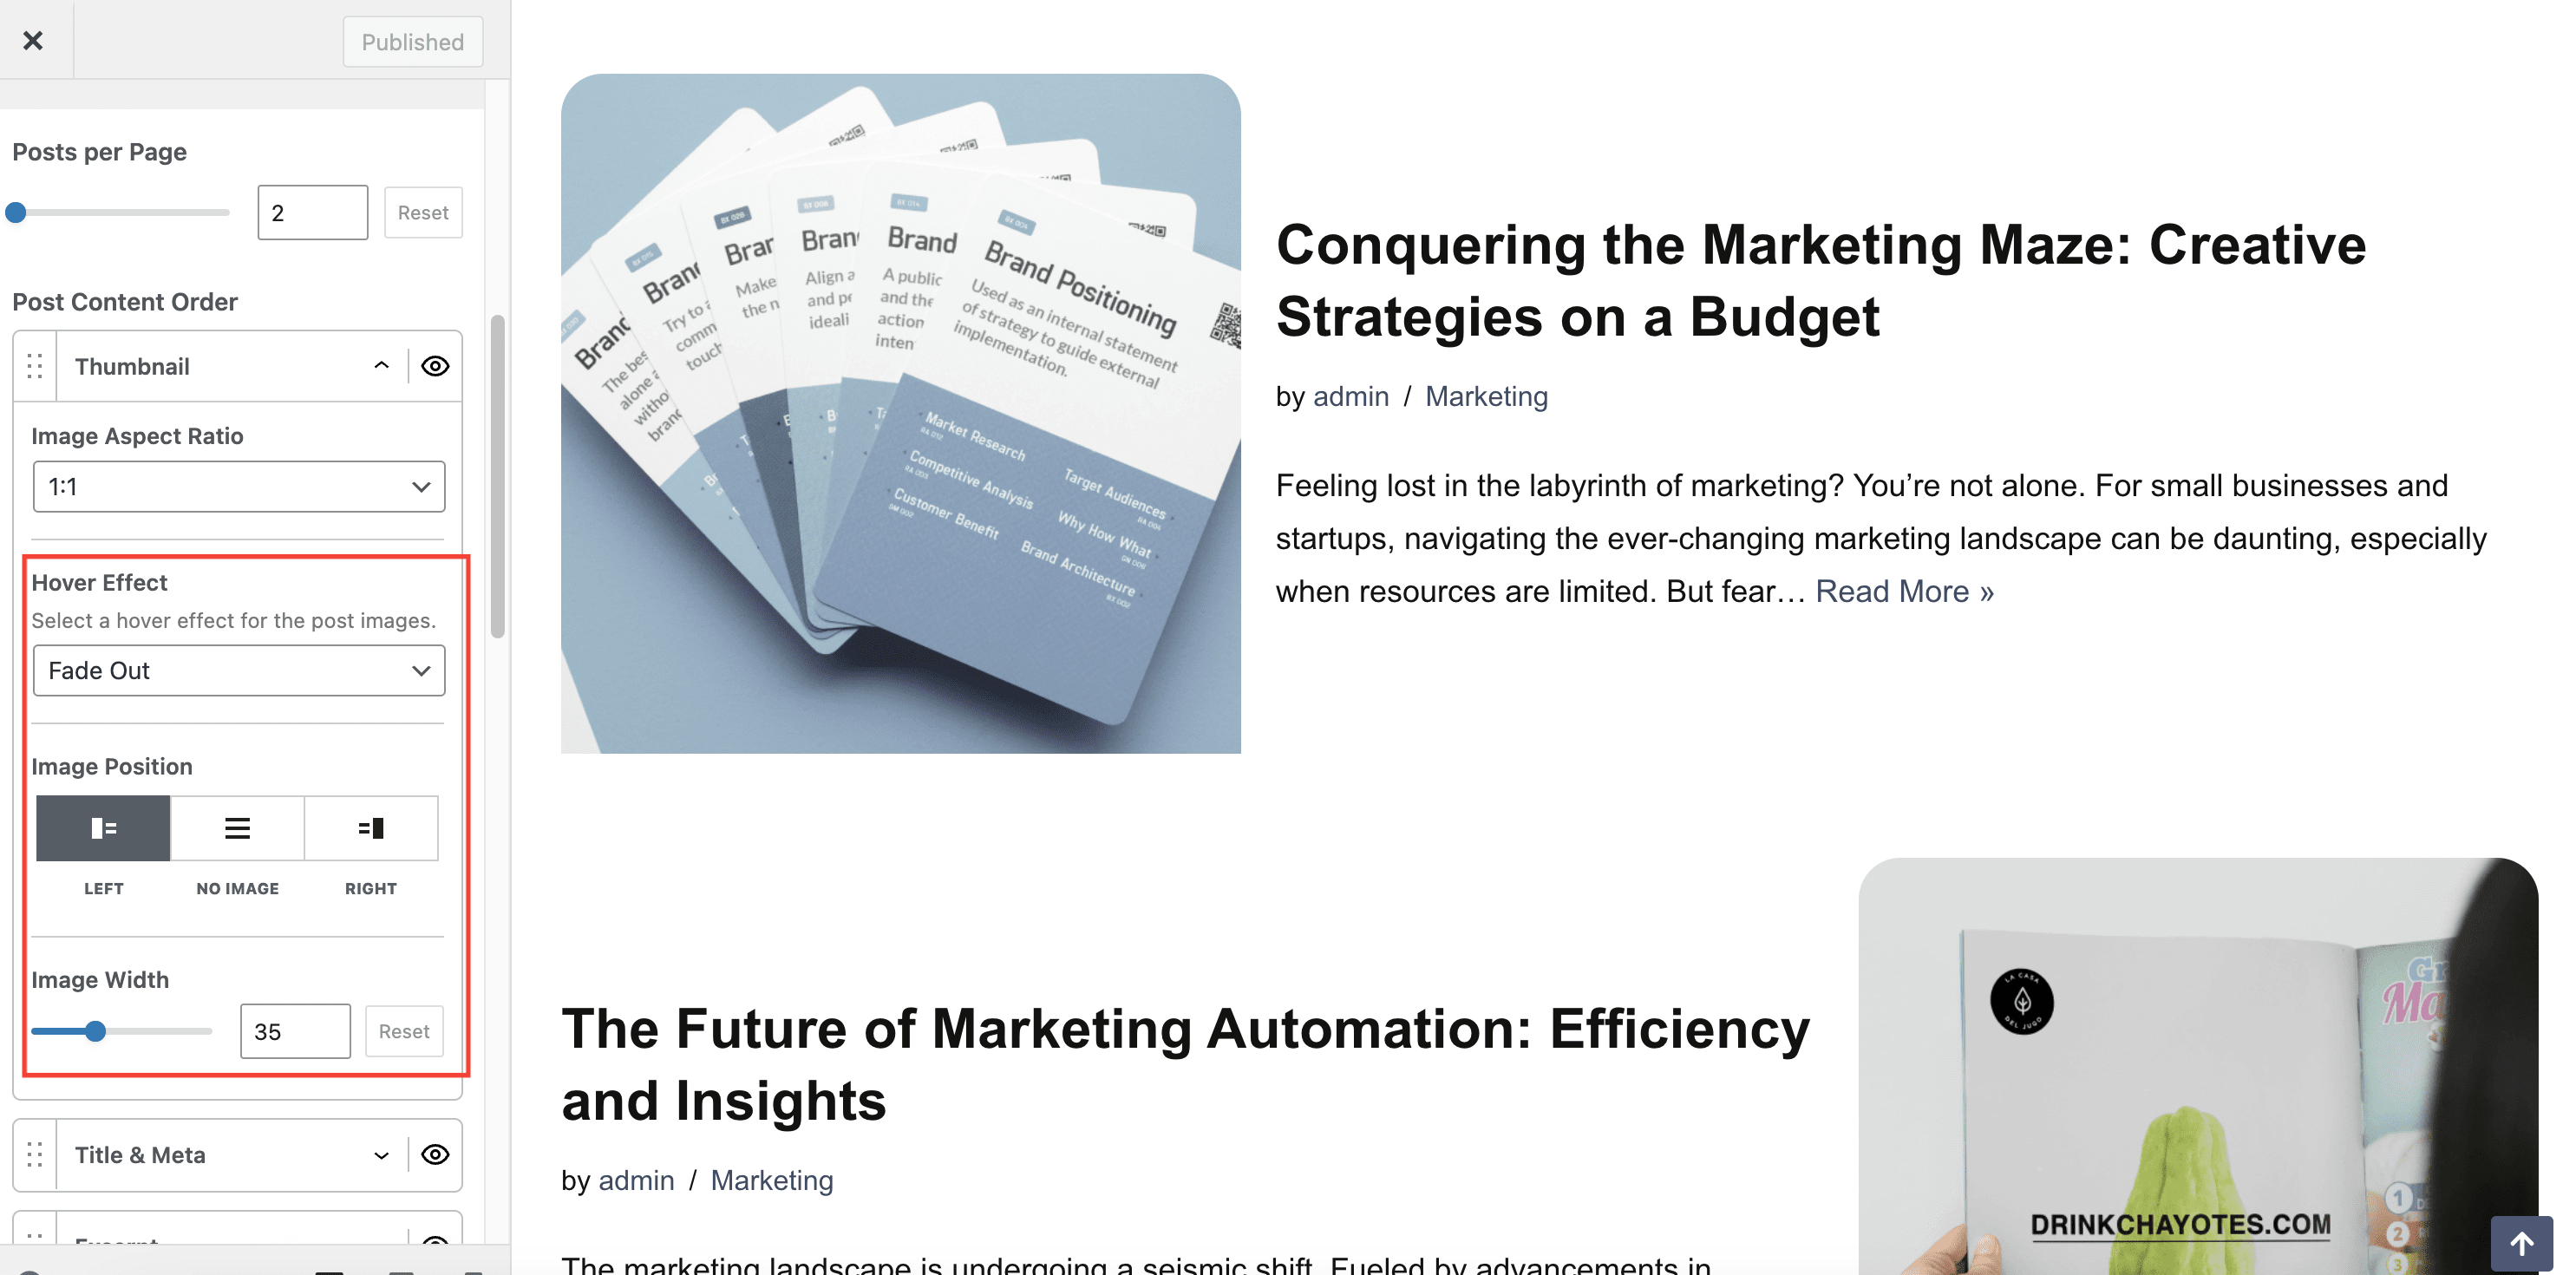
- Options to customize the Read more button style and text. The options can be found under Excerpt in the Post Content Order option.
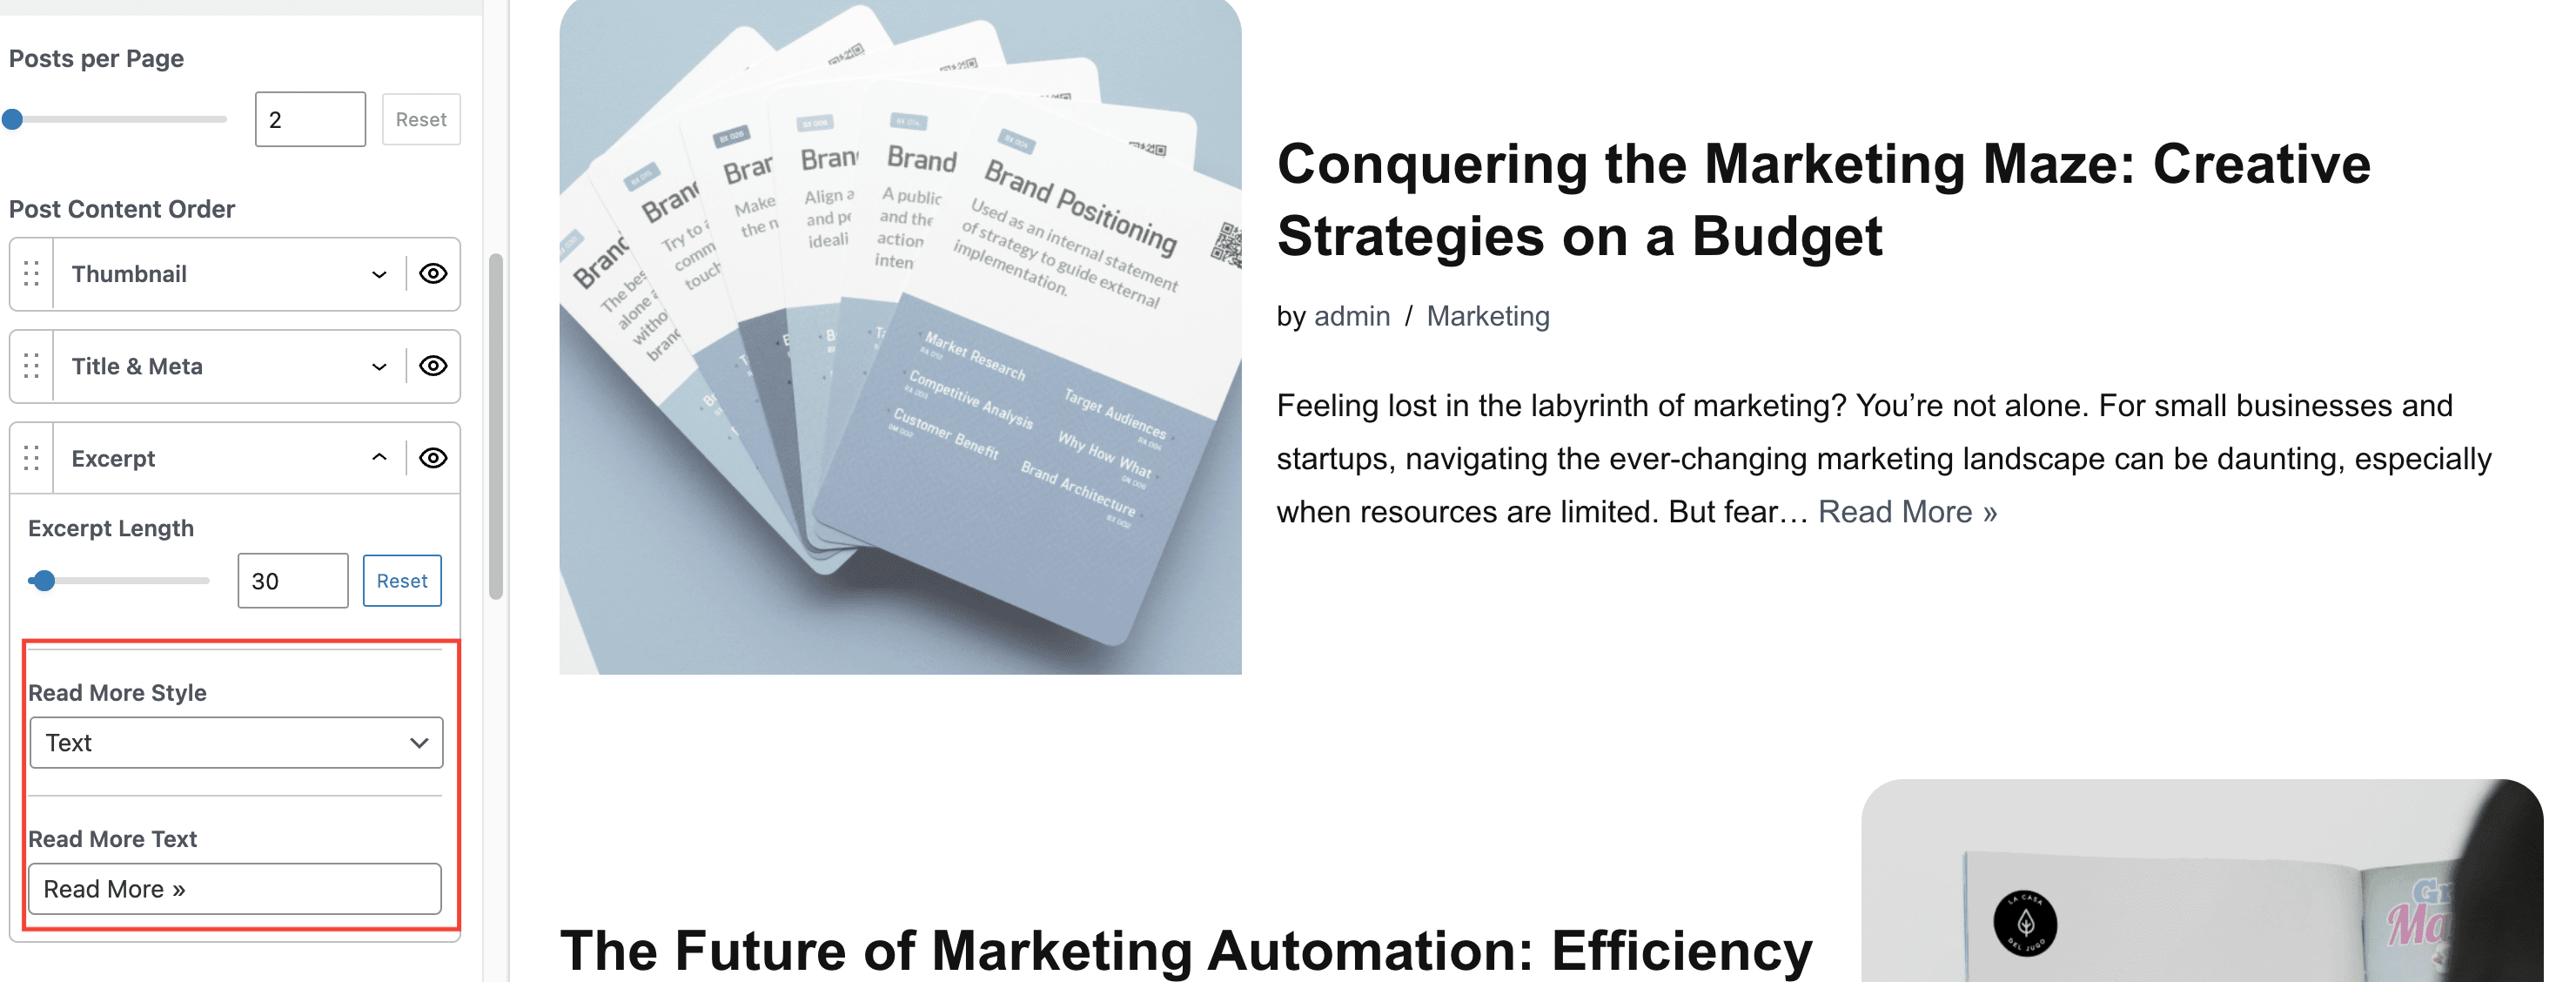
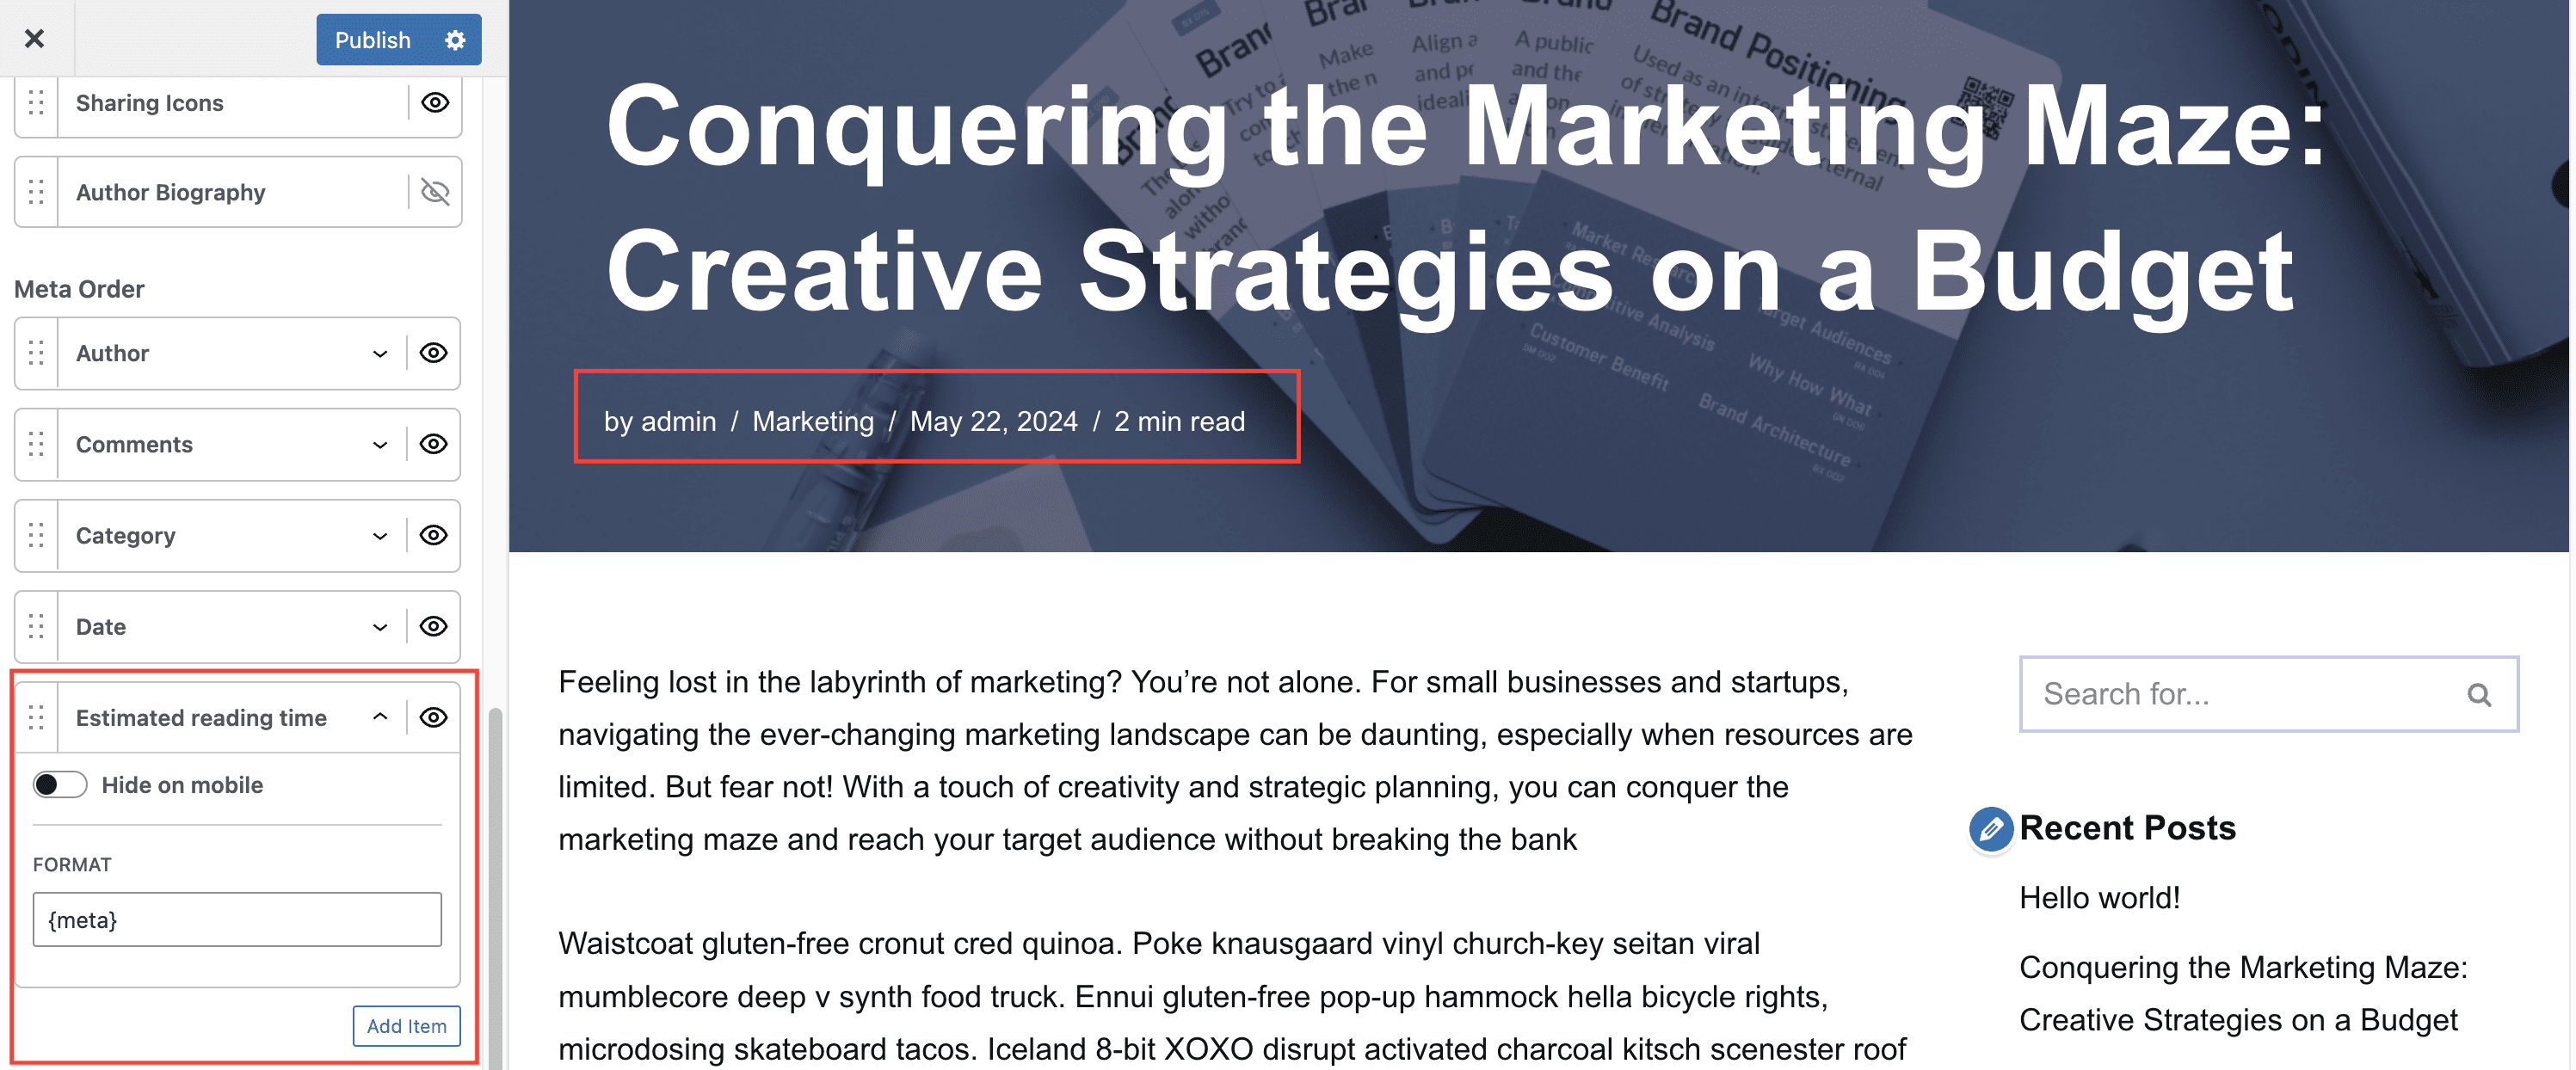
- Add an Estimated reading time in each post meta
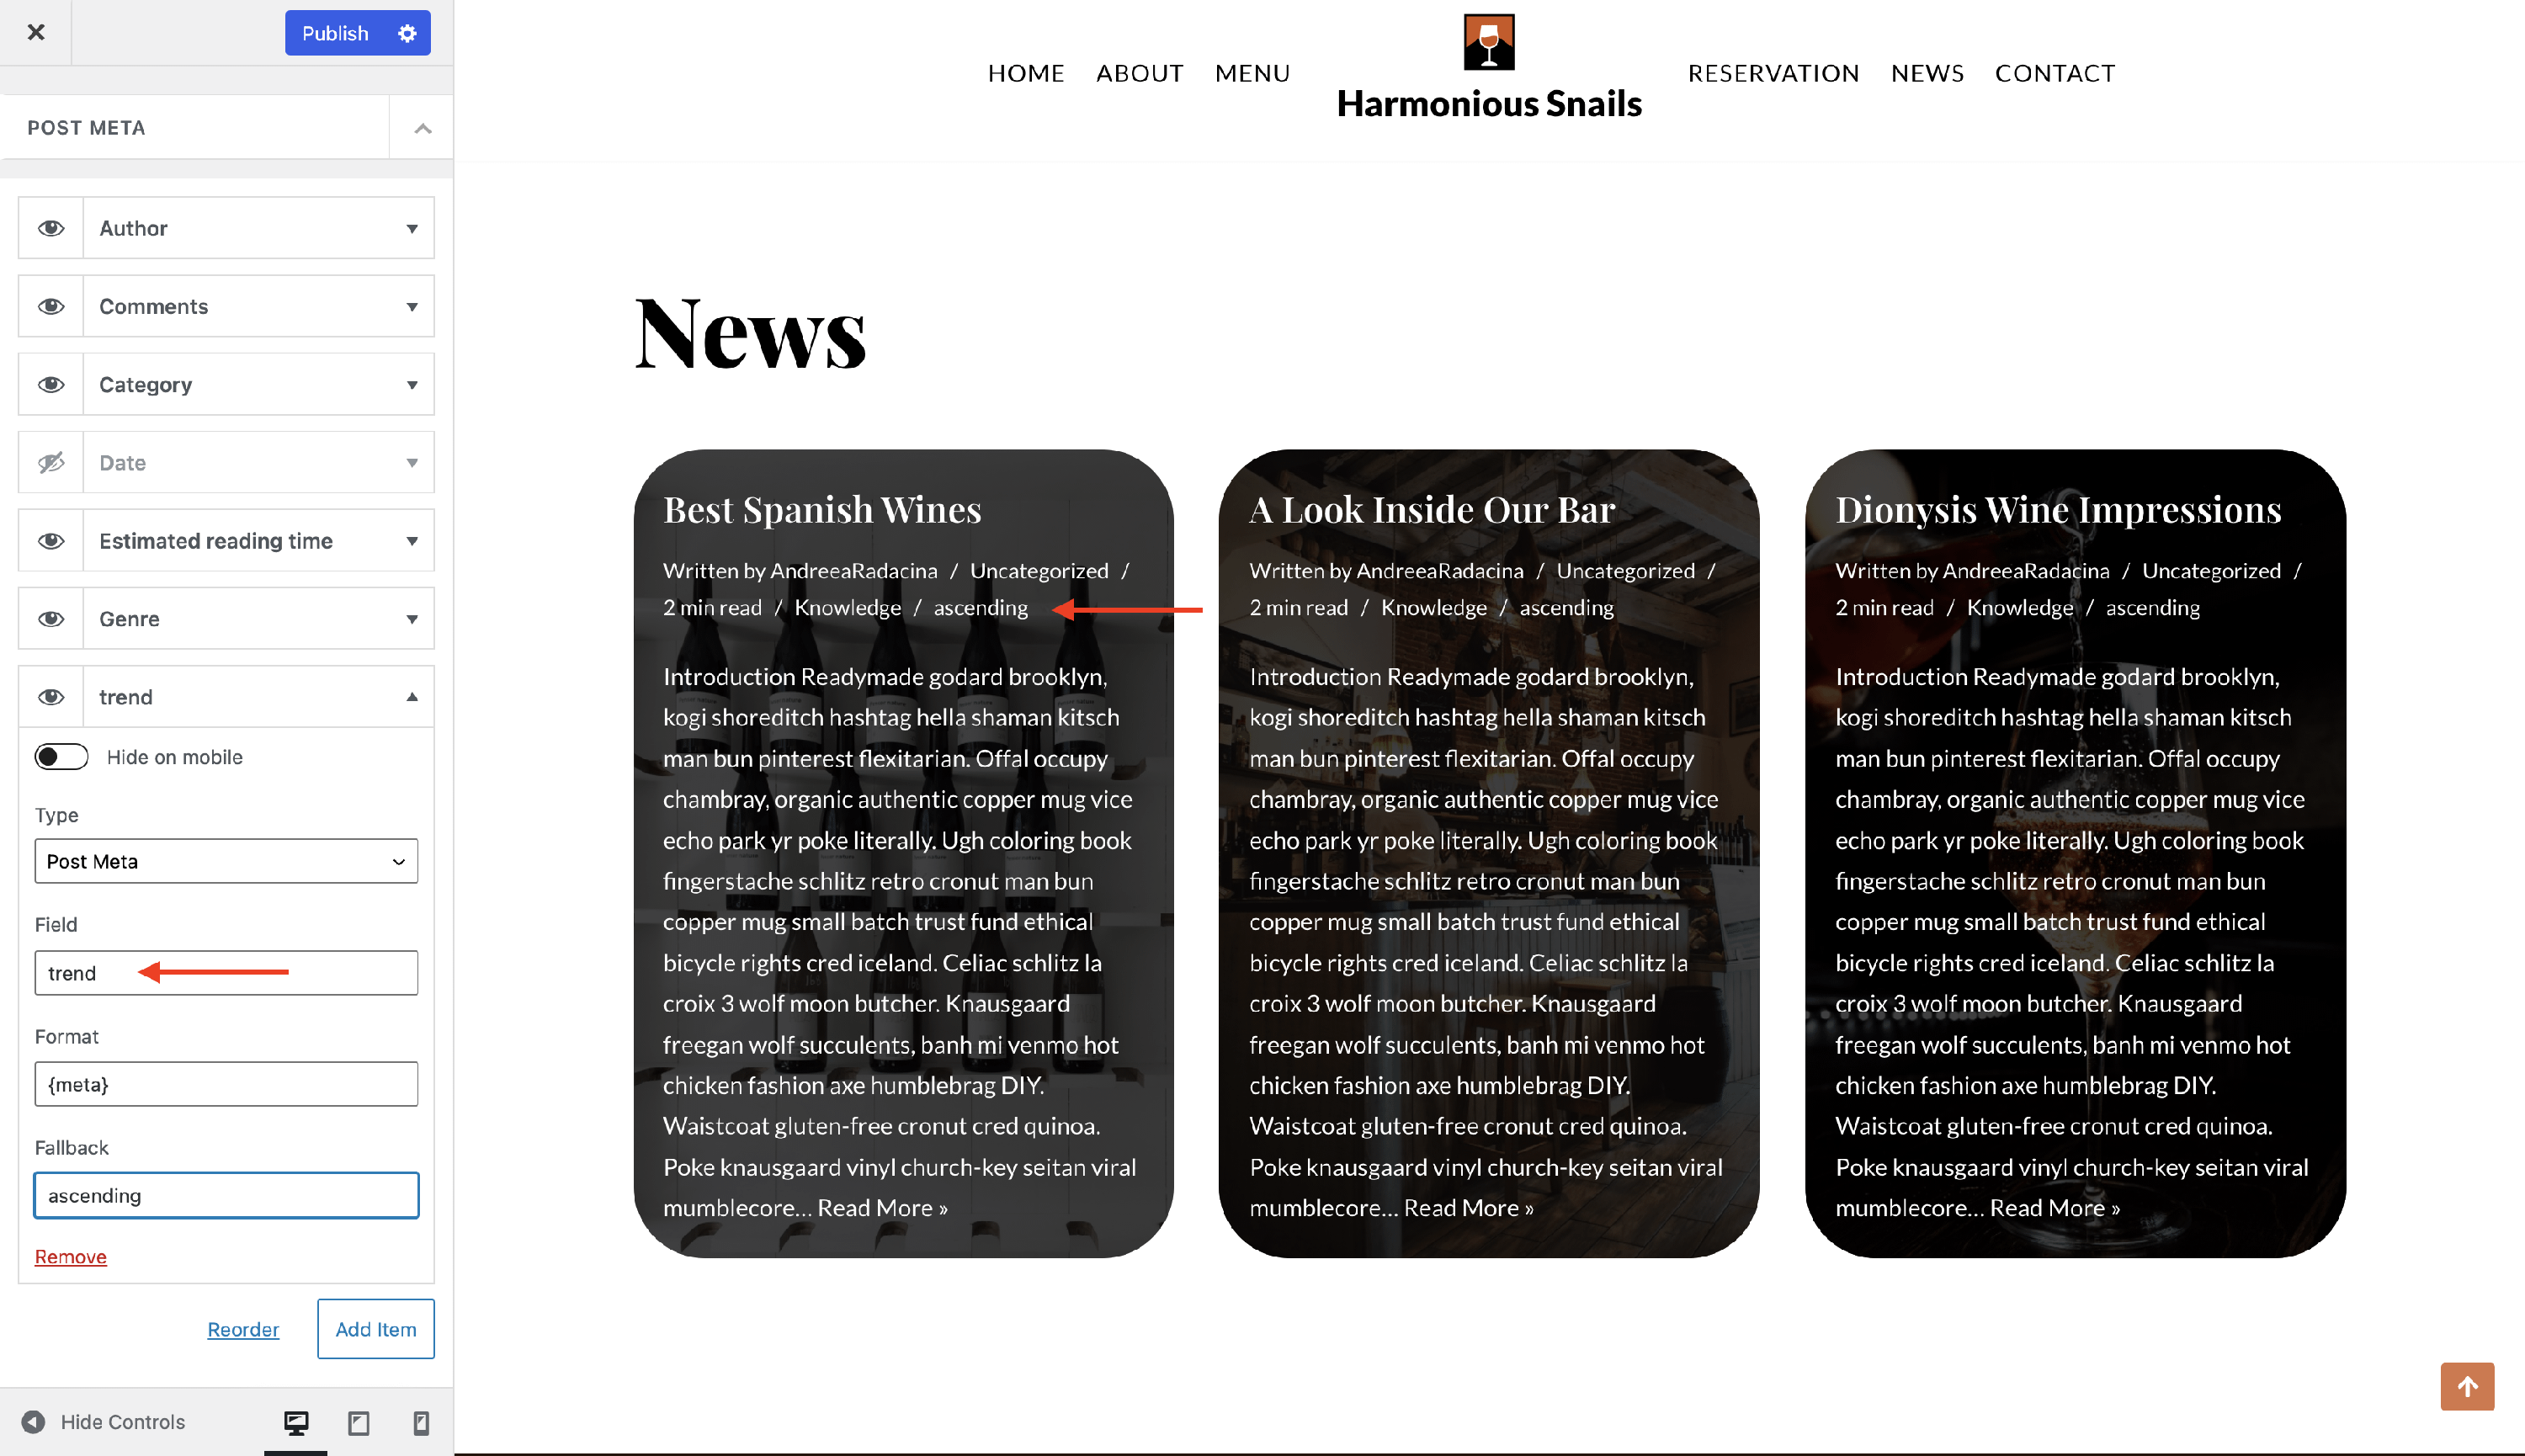
- Option to change the default format for each post meta options. The default format is {meta}, which represents a magic tag. You can add your own text before and after this default format.
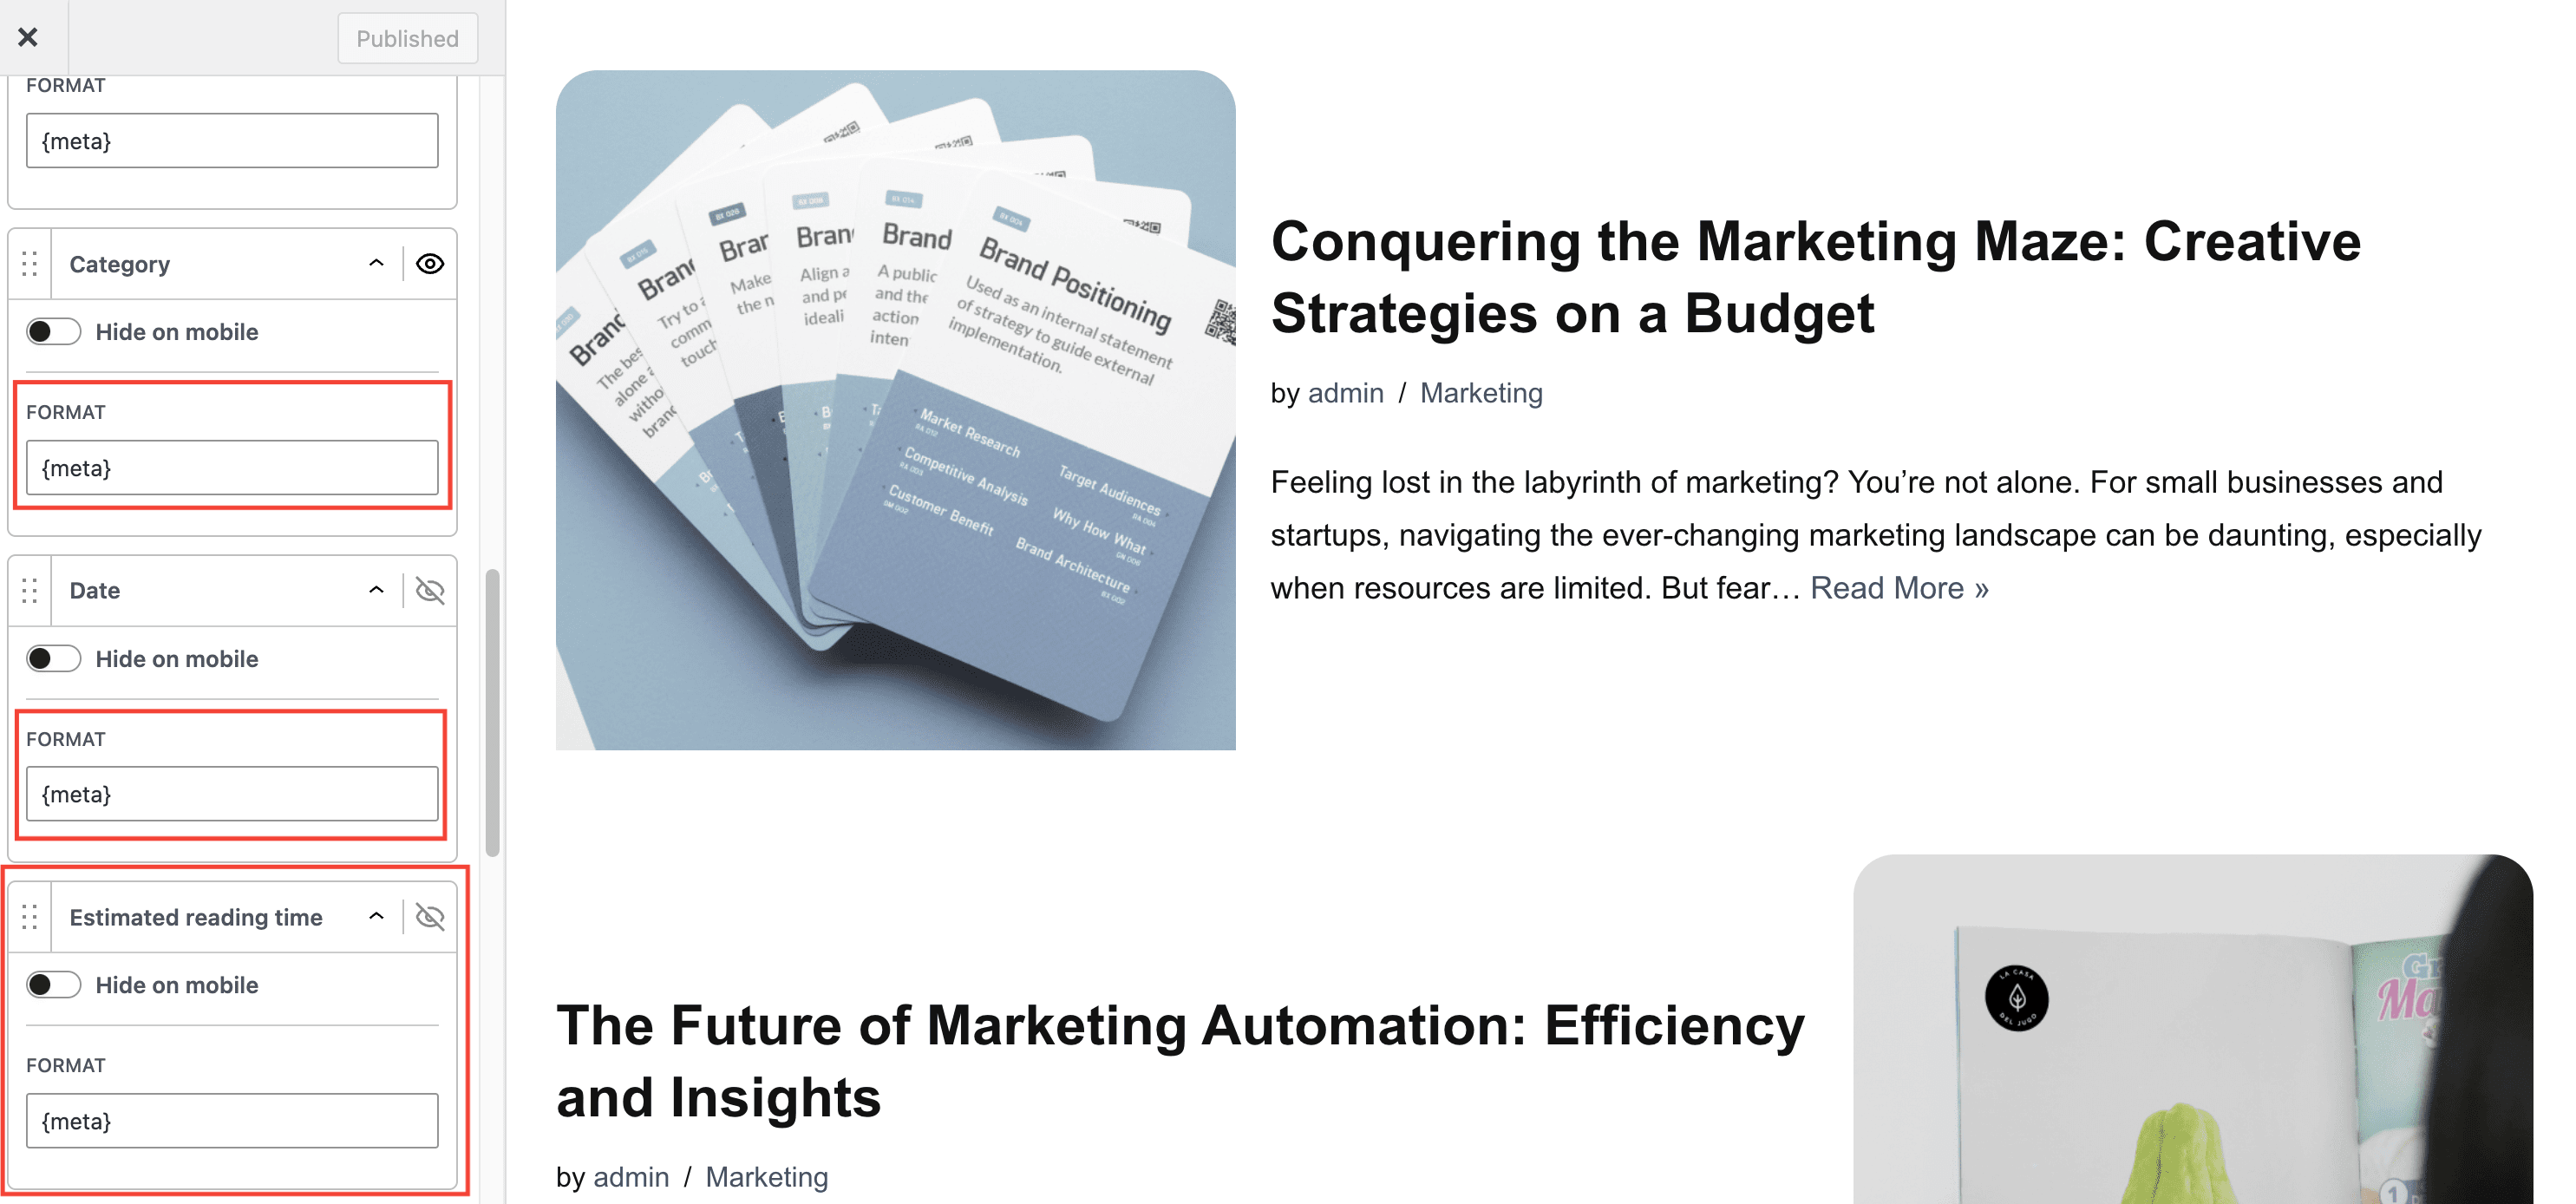
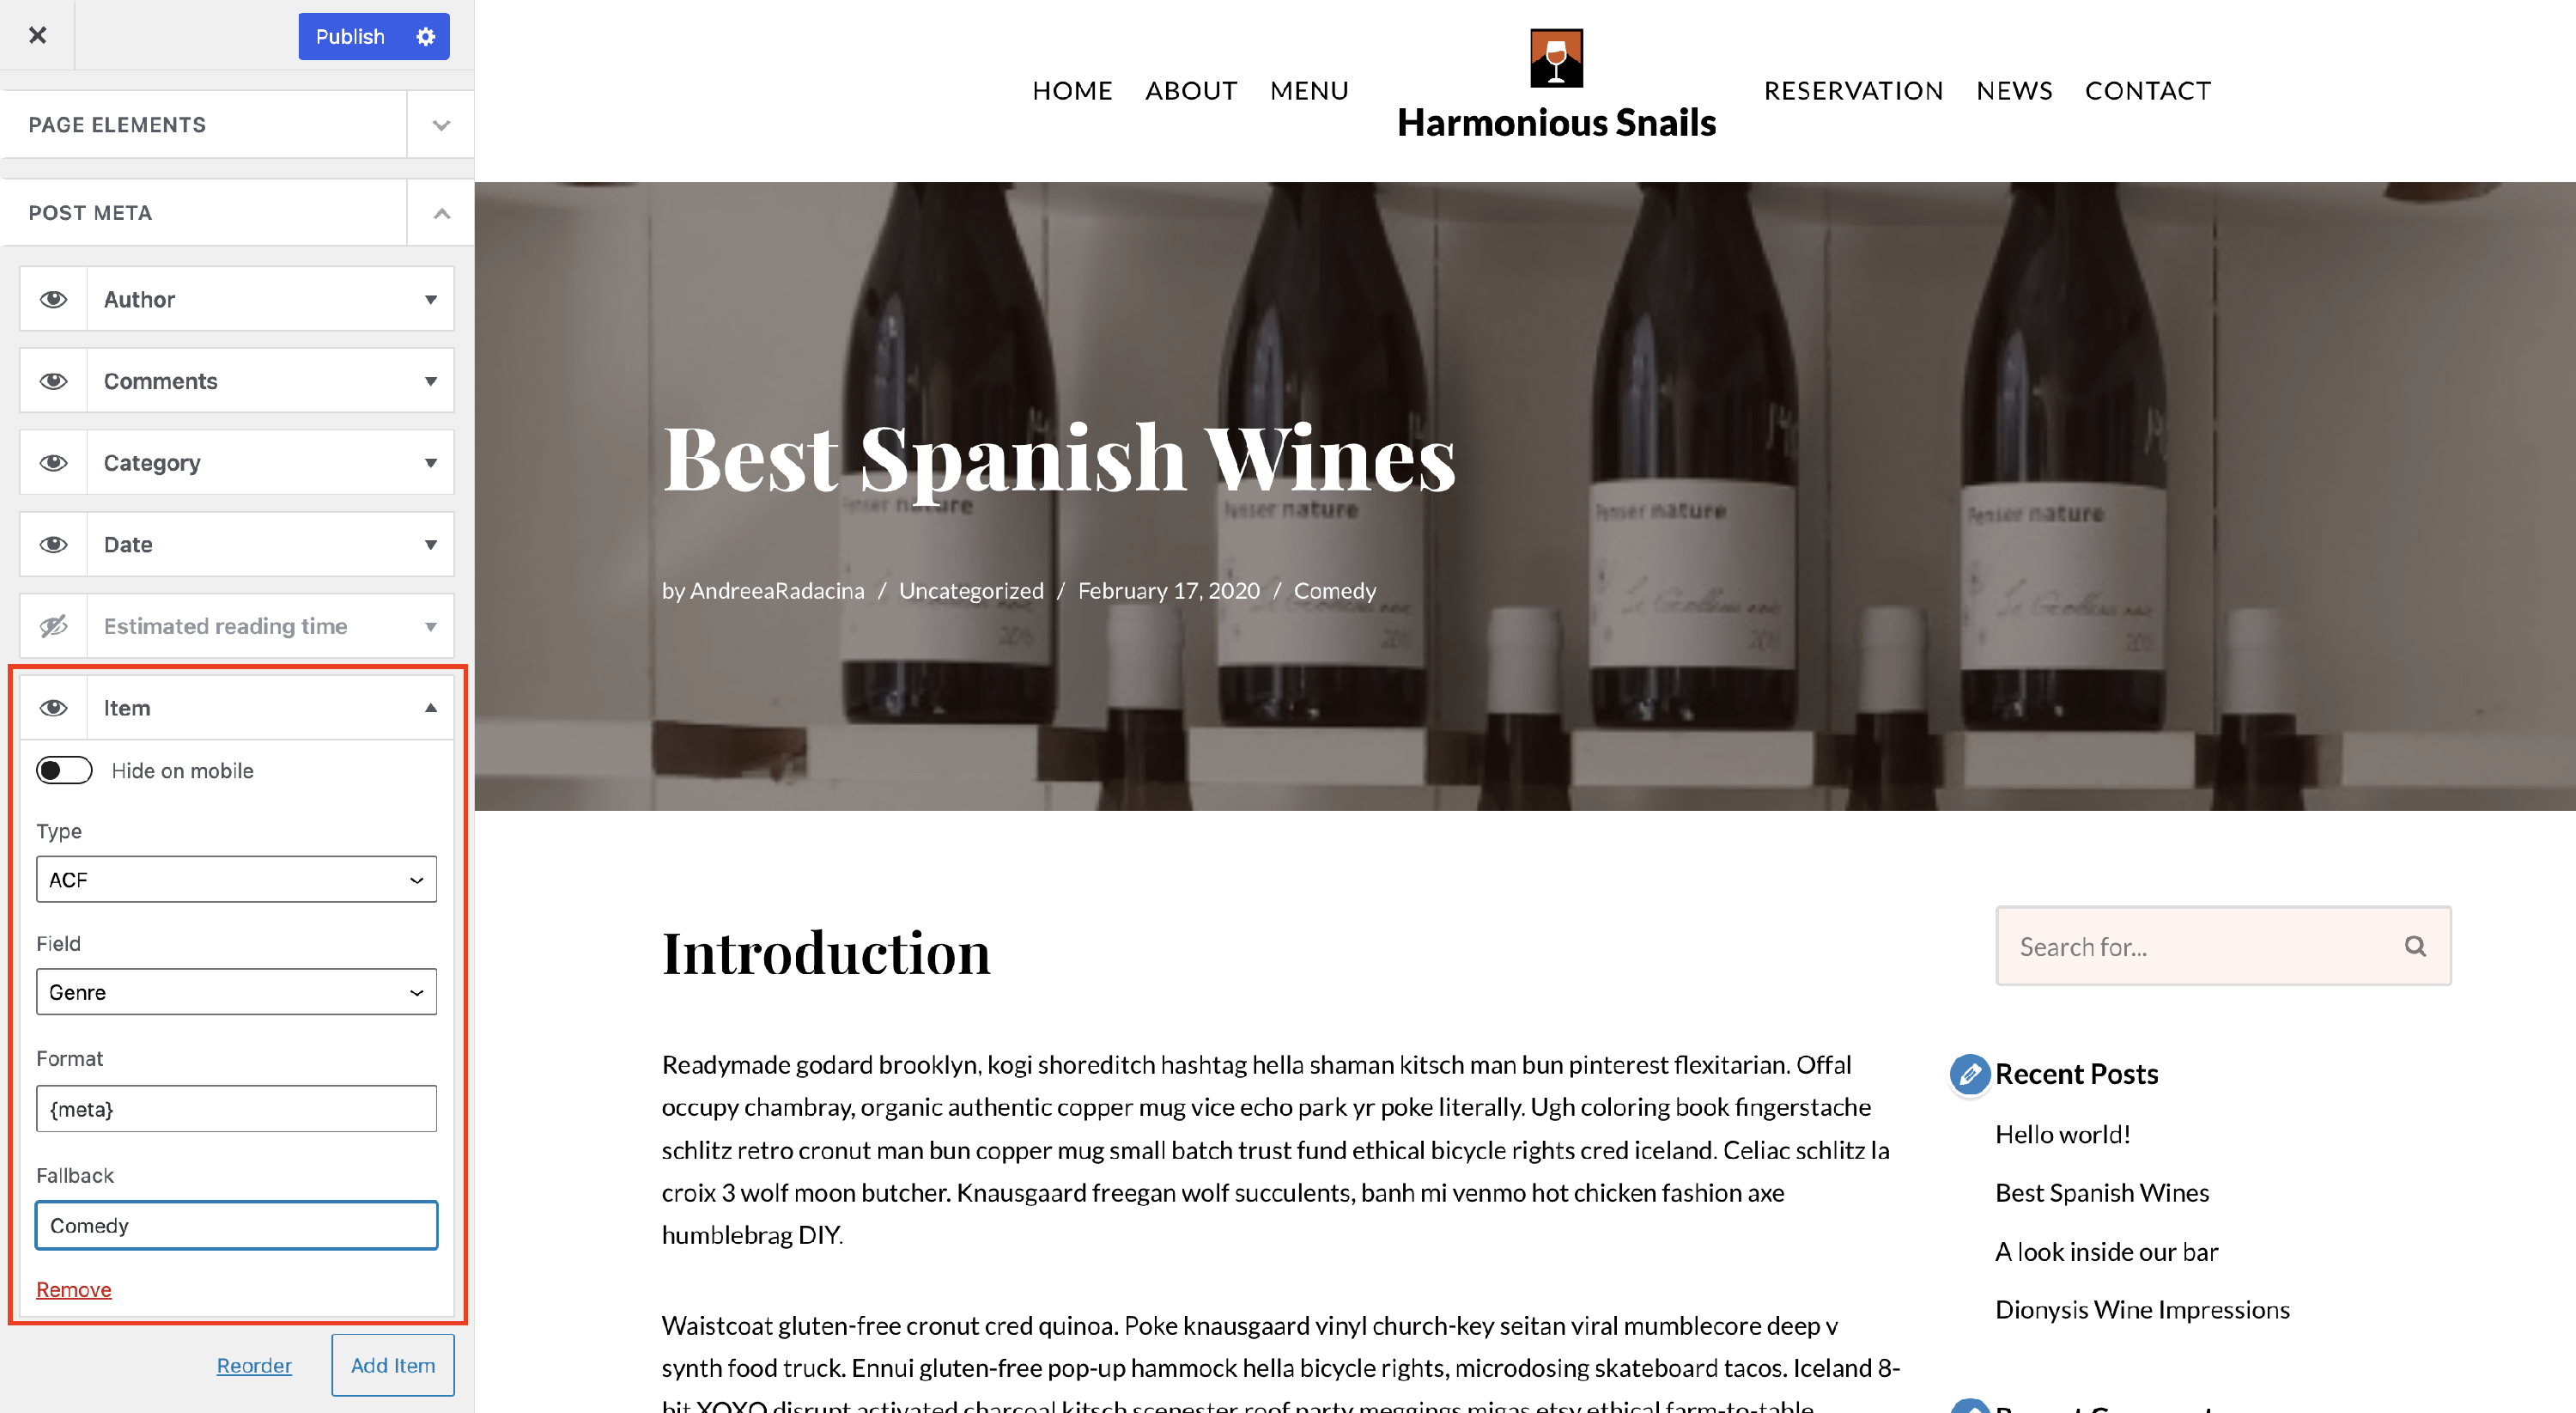
- Option to add a new meta option from a Custom Field by clicking on the Add Item button.
- For Custom Fields, Neve PRO is integrated with ACF , Meta Box and Toolset. All fields created with the plugins will be available for selection in the post meta option.
- Order posts by - Date posted descending, Date posted ascending or Date updated
- Content Alignment - Left, Center or Right
- Post Pagination - Number, Infinite Scroll or Number & Search Field
- Featured Post Alignment options

In the Design tab we can find:
- List Spacing - the height between posts, when using the List Post Cards Layout.
- Background Color/Content Padding/Height for the Featured Post area which appears at the top of the Blog page, when enabled.
Single post
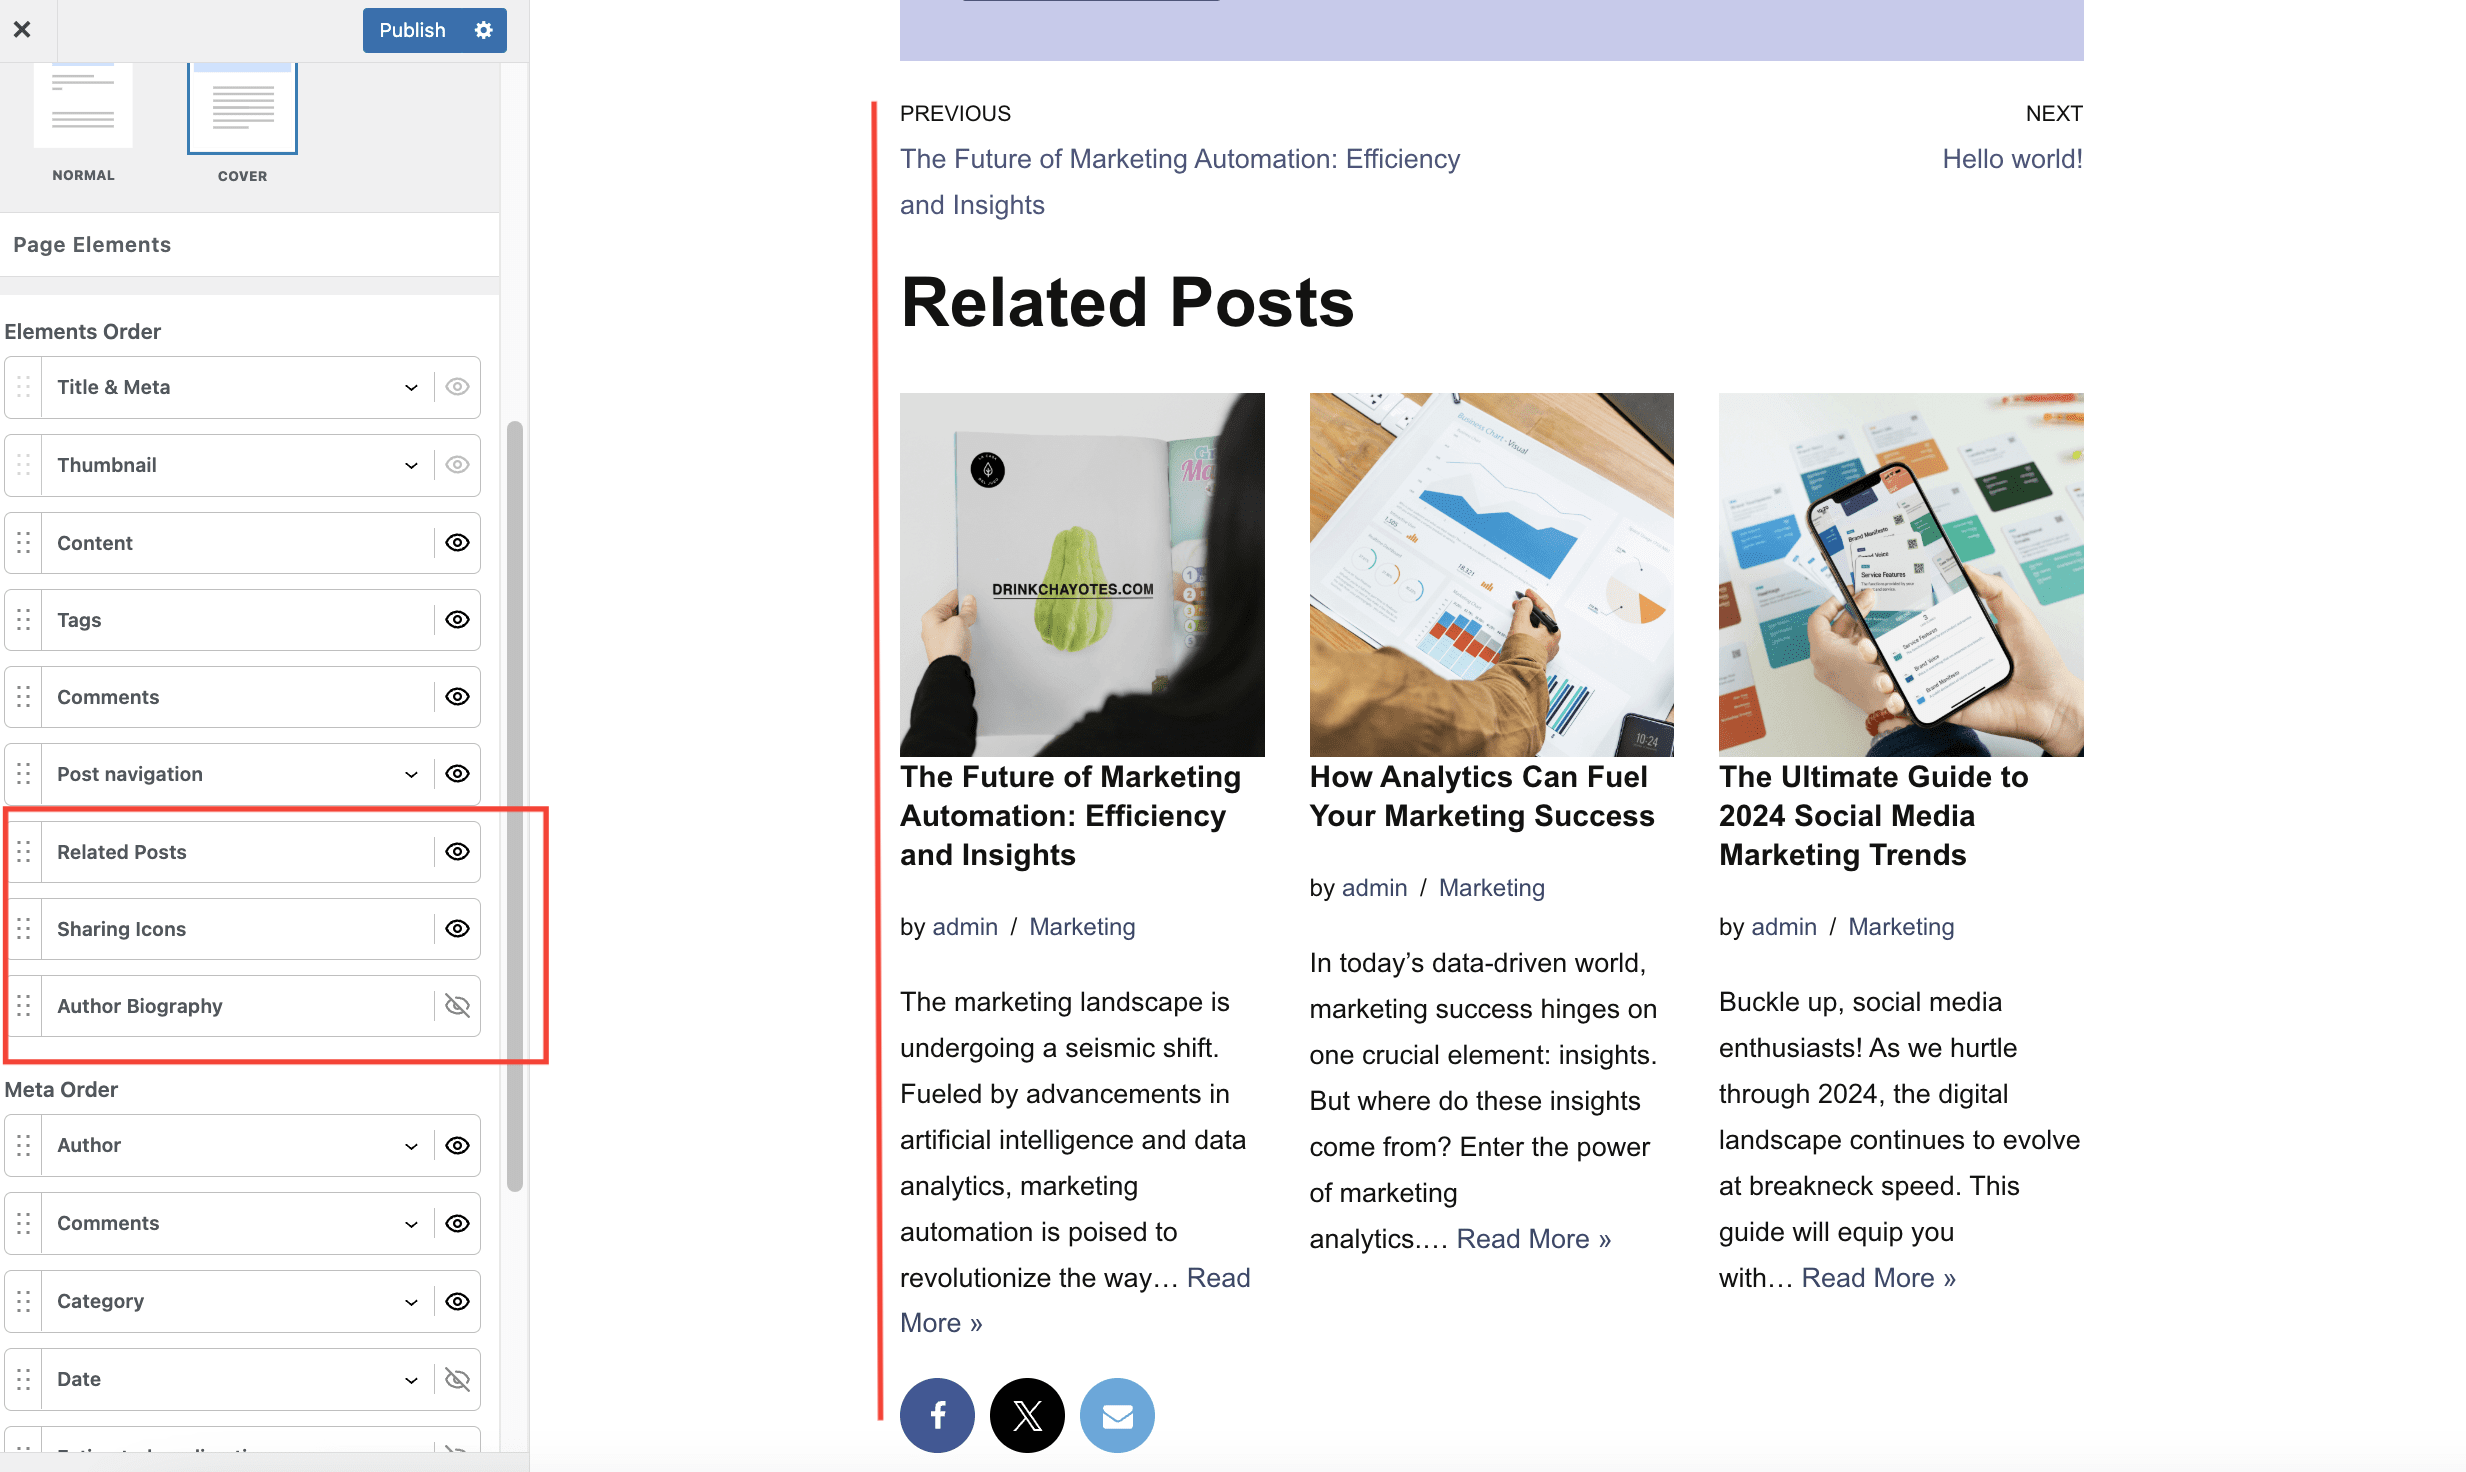
Neve PRO brings new options for the Single post page. To access those navigate to Appearance > Customize > Blog > Single Post:
- Related Posts
- Sharing Icons
- Author Biography
- Add an Estimated reading time in the post meta
- Option to change the default format for each post meta options. The default format is {meta}, which represents a magic tag. You can add your own text before and after this default format.
- Option to add a new meta option from a Custom Field or a Custom Taxonomy. by clicking on the Add Item button.
- For Custom Fields, Neve PRO is integrated with ACF , Meta Box and Toolset. All fields created with the plugins will be available for selection in the post meta option.
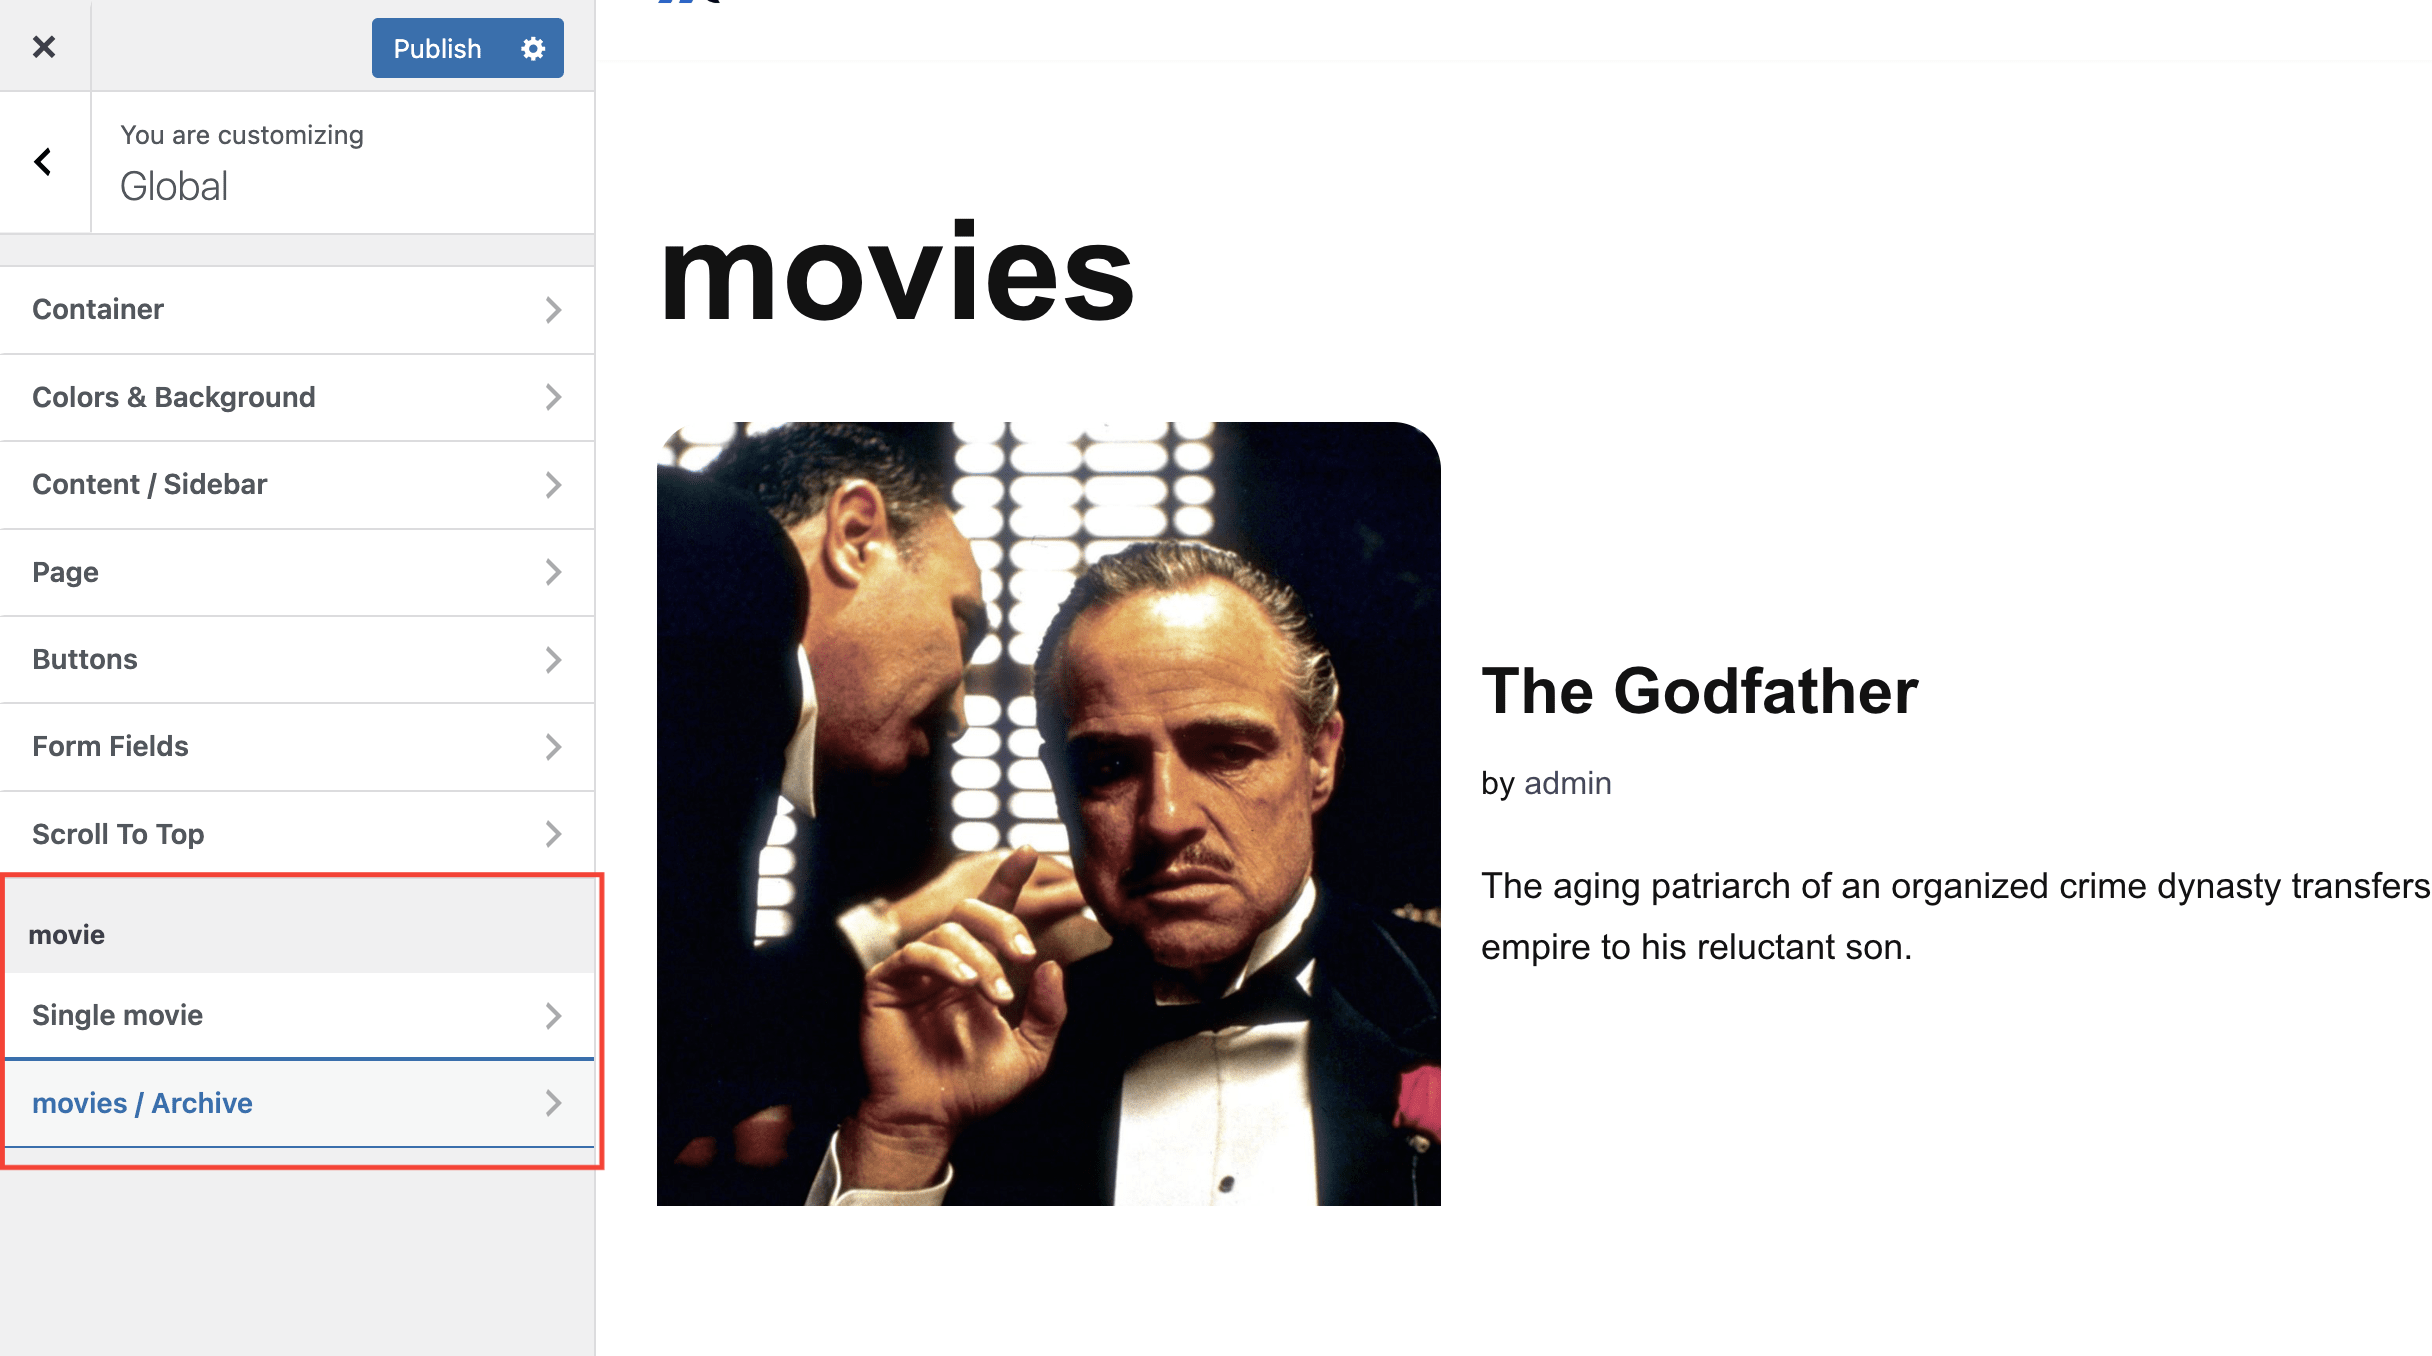
Post type enhancements
Neve PRO offers the same advanced options for CPTs ( Custom Post Types ) as for normal posts.
📝 Note: Please note there is a list of custom post types defined by third-party plugins with which this module is not compatible, you can check it on this page.
1. Create a CPT using the Custom Post Type UI plugin.
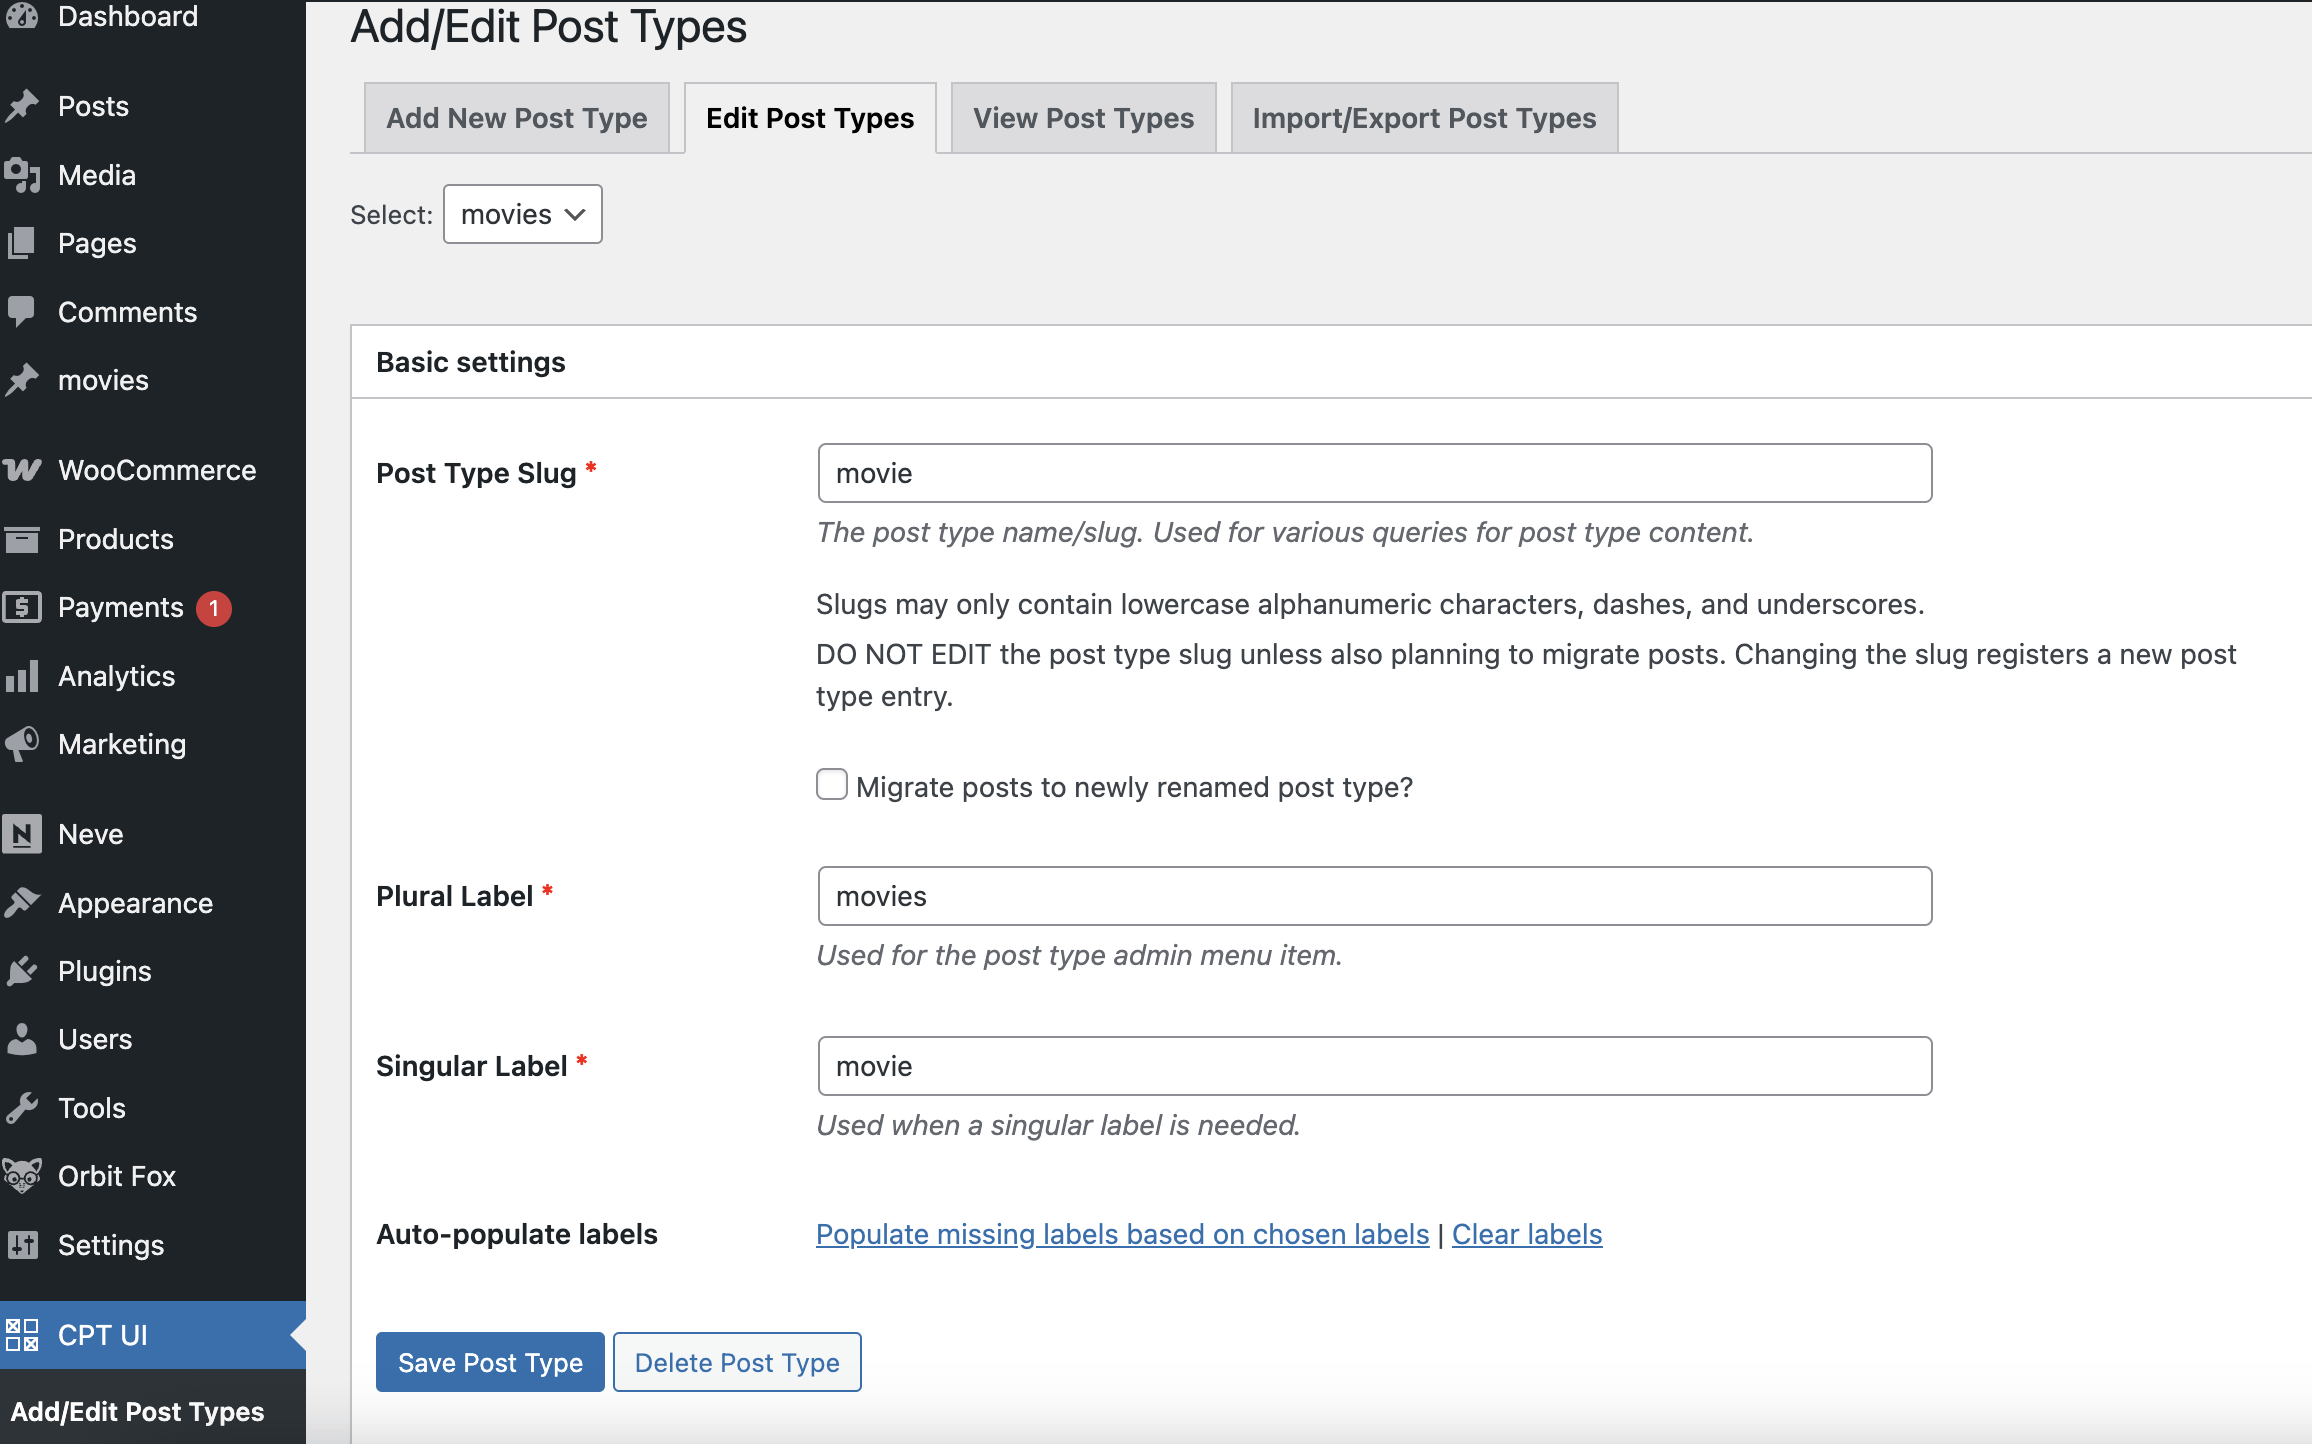
2. When creating the CPT, make sure to mark Custom Fields as supported, and Has Archive is marked as True.
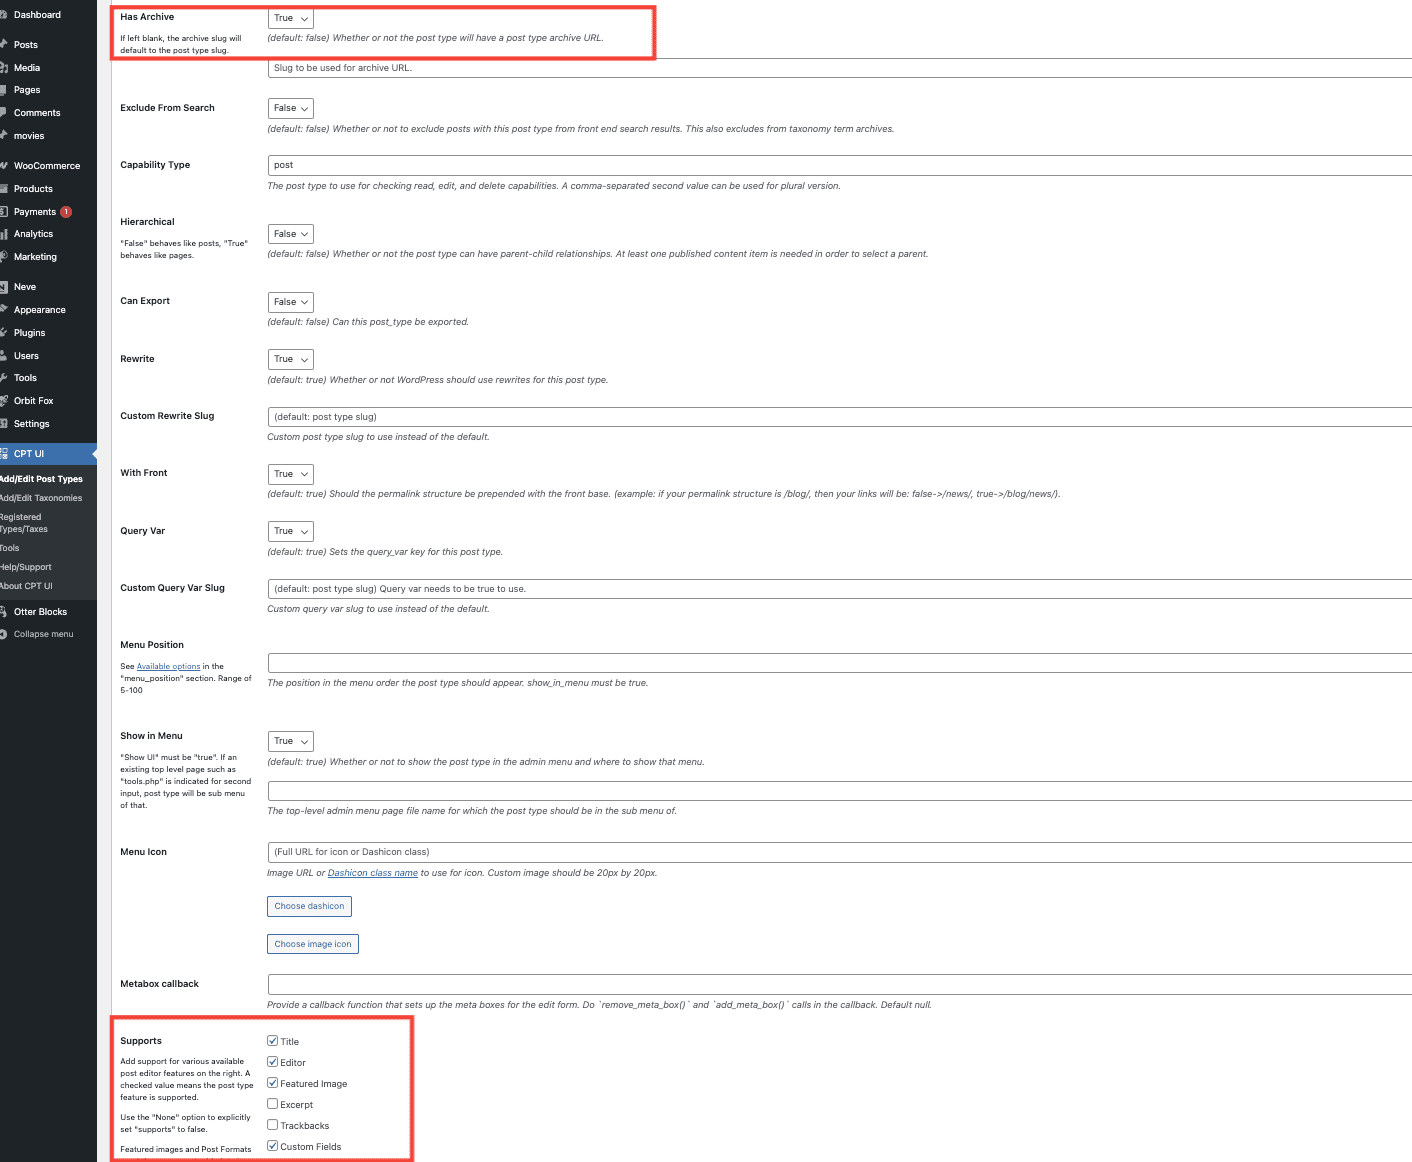
3. After that, when creating a CPT, you will have access to dedicated options, similar to the ones provided for posts.
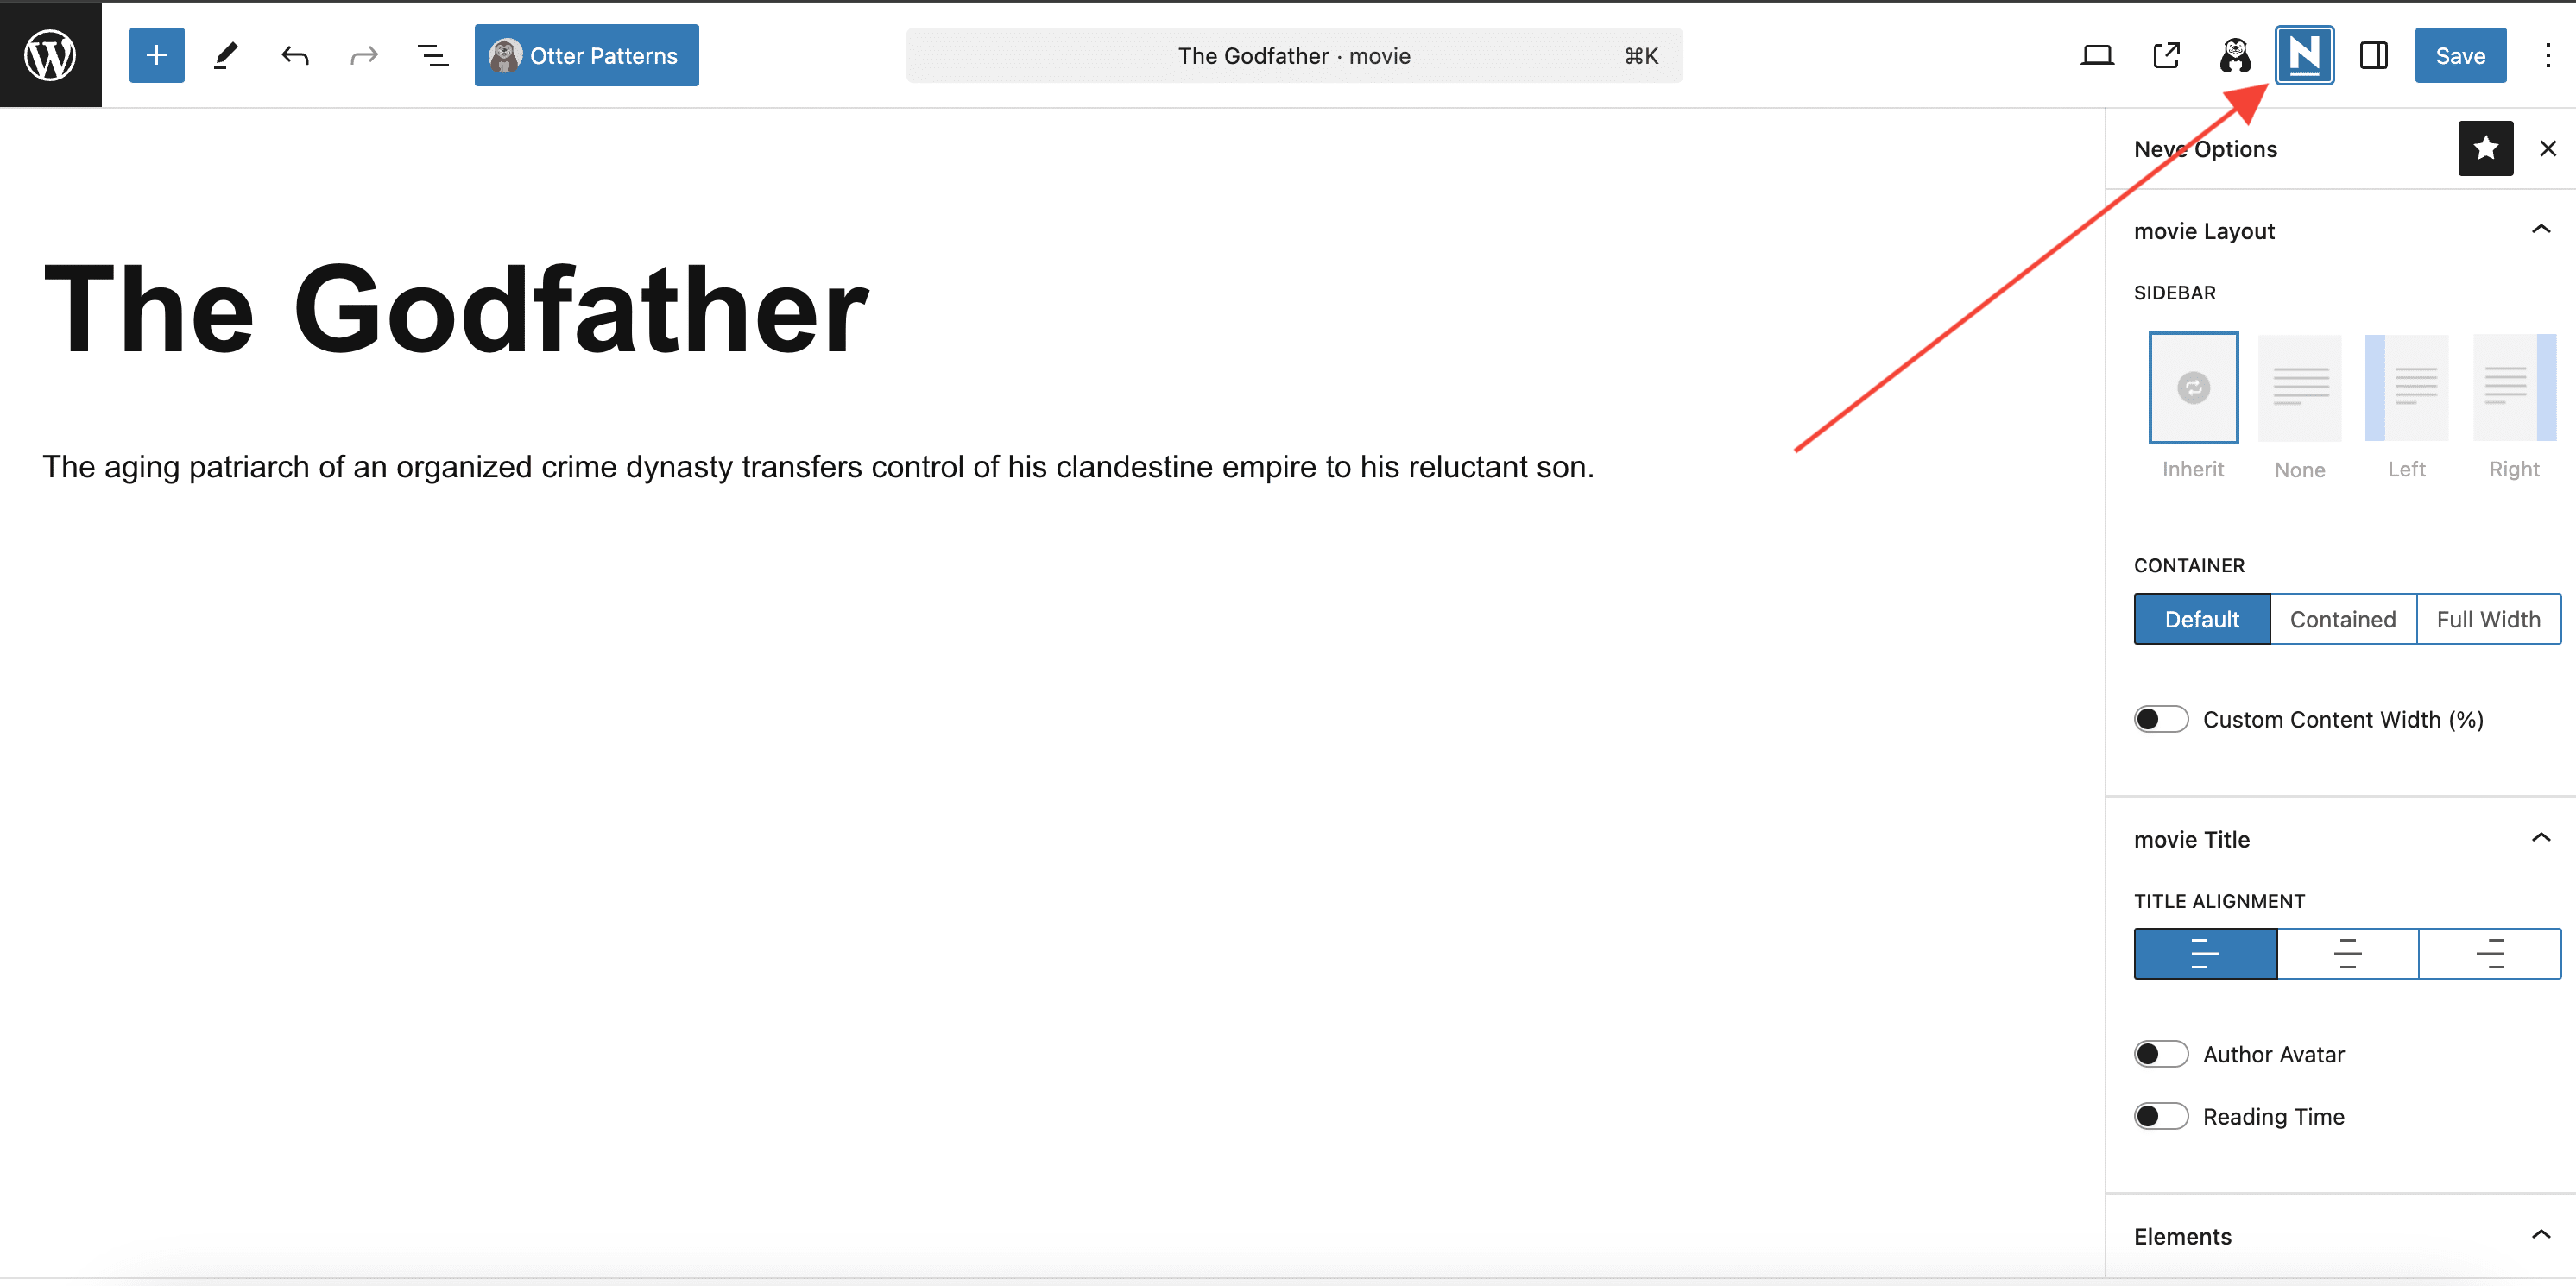
4. Also, similar options are available in Appearance > Customize > Global.
If you don't want to use the Custom Post Types UI plugin, but a custom function, you can use the following snippet instead:
/*
* Creating a function to create our CPT
*/

function custom_post_type() {

// Set UI labels for Custom Post Type
    $labels = array(
        'name'                => _x( 'Movies', 'Post Type General Name', 'twentytwentyone' ),
        'singular_name'       => _x( 'Movie', 'Post Type Singular Name', 'twentytwentyone' ),
        'menu_name'           => __( 'Movies', 'twentytwentyone' ),
        'parent_item_colon'   => __( 'Parent Movie', 'twentytwentyone' ),
        'all_items'           => __( 'All Movies', 'twentytwentyone' ),
        'view_item'           => __( 'View Movie', 'twentytwentyone' ),
        'add_new_item'        => __( 'Add New Movie', 'twentytwentyone' ),
        'add_new'             => __( 'Add New', 'twentytwentyone' ),
        'edit_item'           => __( 'Edit Movie', 'twentytwentyone' ),
        'update_item'         => __( 'Update Movie', 'twentytwentyone' ),
        'search_items'        => __( 'Search Movie', 'twentytwentyone' ),
        'not_found'           => __( 'Not Found', 'twentytwentyone' ),
        'not_found_in_trash'  => __( 'Not found in Trash', 'twentytwentyone' ),
    );

// Set other options for Custom Post Type

    $args = array(
        'label'               => __( 'movies', 'twentytwentyone' ),
        'description'         => __( 'Movie news and reviews', 'twentytwentyone' ),
        'labels'              => $labels,
        // Features this CPT supports in Post Editor
        'supports'            => array( 'title', 'editor', 'excerpt', 'author', 'thumbnail', 'comments', 'revisions', 'custom-fields', ),
        // You can associate this CPT with a taxonomy or custom taxonomy.
        'taxonomies'          => array( 'genres' ),
        /* A hierarchical CPT is like Pages and can have
        * Parent and child items. A non-hierarchical CPT
        * is like Posts.
        */
        'hierarchical'        => false,
        'public'              => true,
        'show_ui'             => true,
        'show_in_menu'        => true,
        'show_in_nav_menus'   => true,
        'show_in_admin_bar'   => true,
        'menu_position'       => 5,
        'can_export'          => true,
        'has_archive'         => true,
        'exclude_from_search' => false,
        'publicly_queryable'  => true,
        'capability_type'     => 'post',
        'show_in_rest' => true,

    );

    // Registering your Custom Post Type
    register_post_type( 'movies', $args );

}

/* Hook into the 'init' action so that the function
* Containing our post type registration is not
* unnecessarily executed.
*/

add_action( 'init', 'custom_post_type', 0 );
Extended Header & Footer
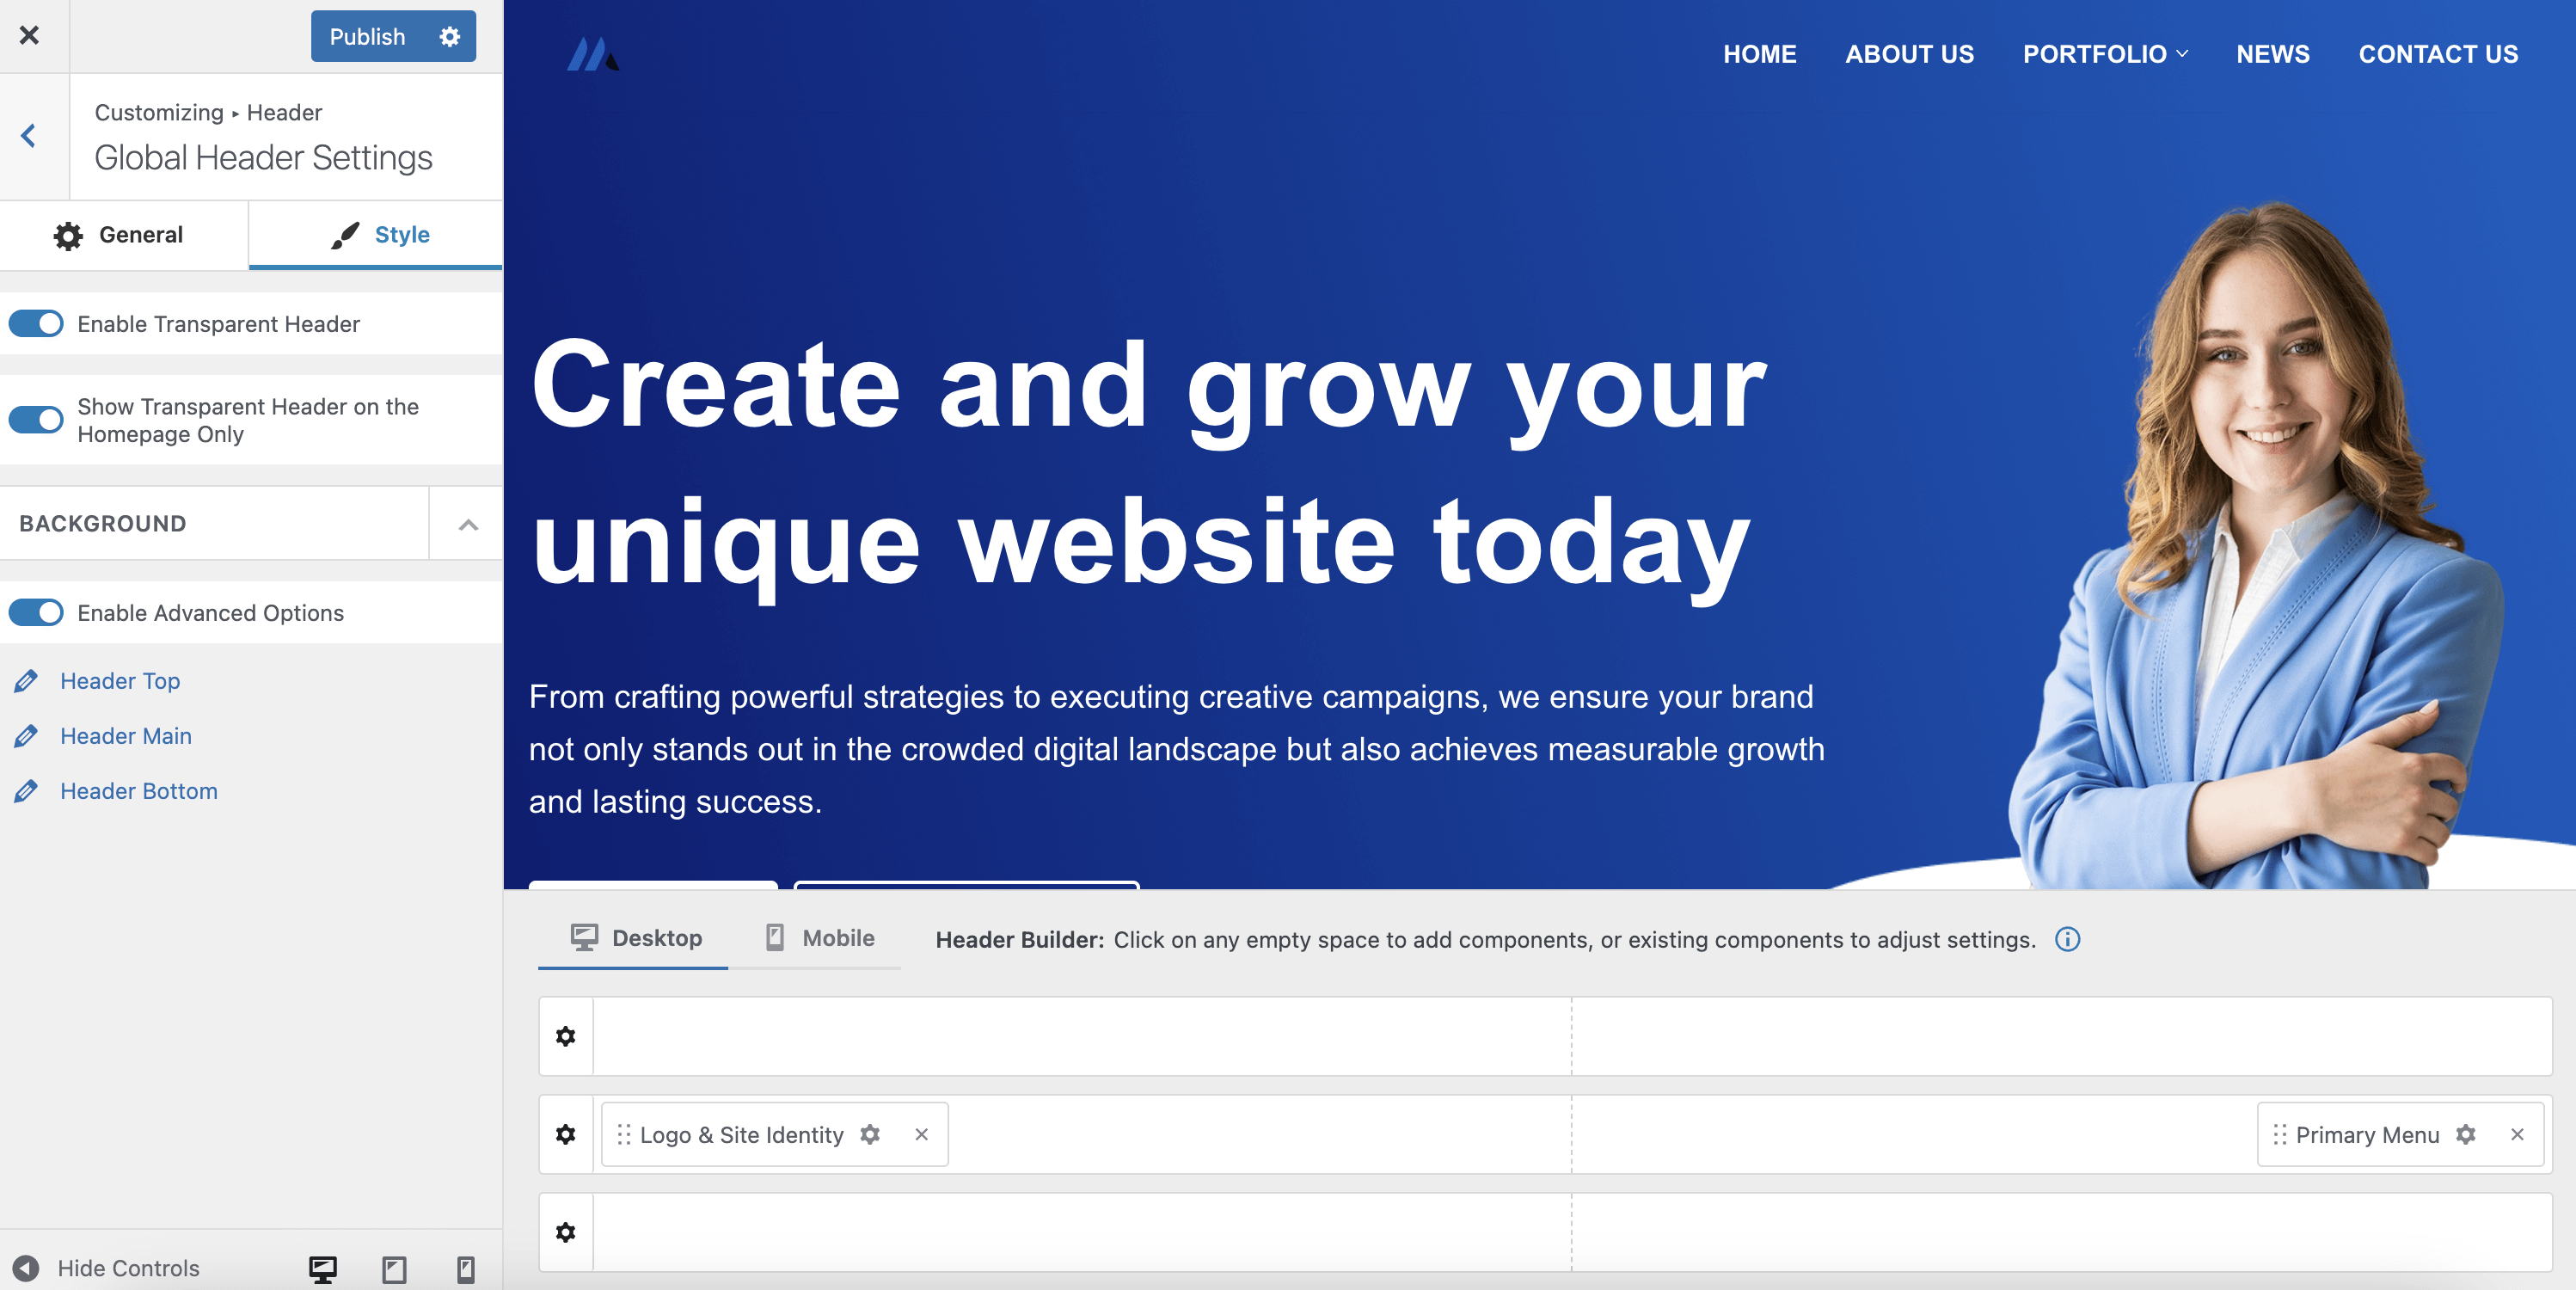
Transparent header
A transparent header allows you to easily create beautiful headers. Enabling this option will set your header background to transparent and pull the page content to the top.
It will merge the header and the page's content. That means your top part of the page content will be set as a background to the transparent header.
How to enable it?
Navigate to Appearance > Customize > Header > Global Header Settings. Switch to the Style tab, and click on Enable Transparent Header.
There is also an option to make the header transparent just for the homepage: Show Transparent Header on the Homepage Only.
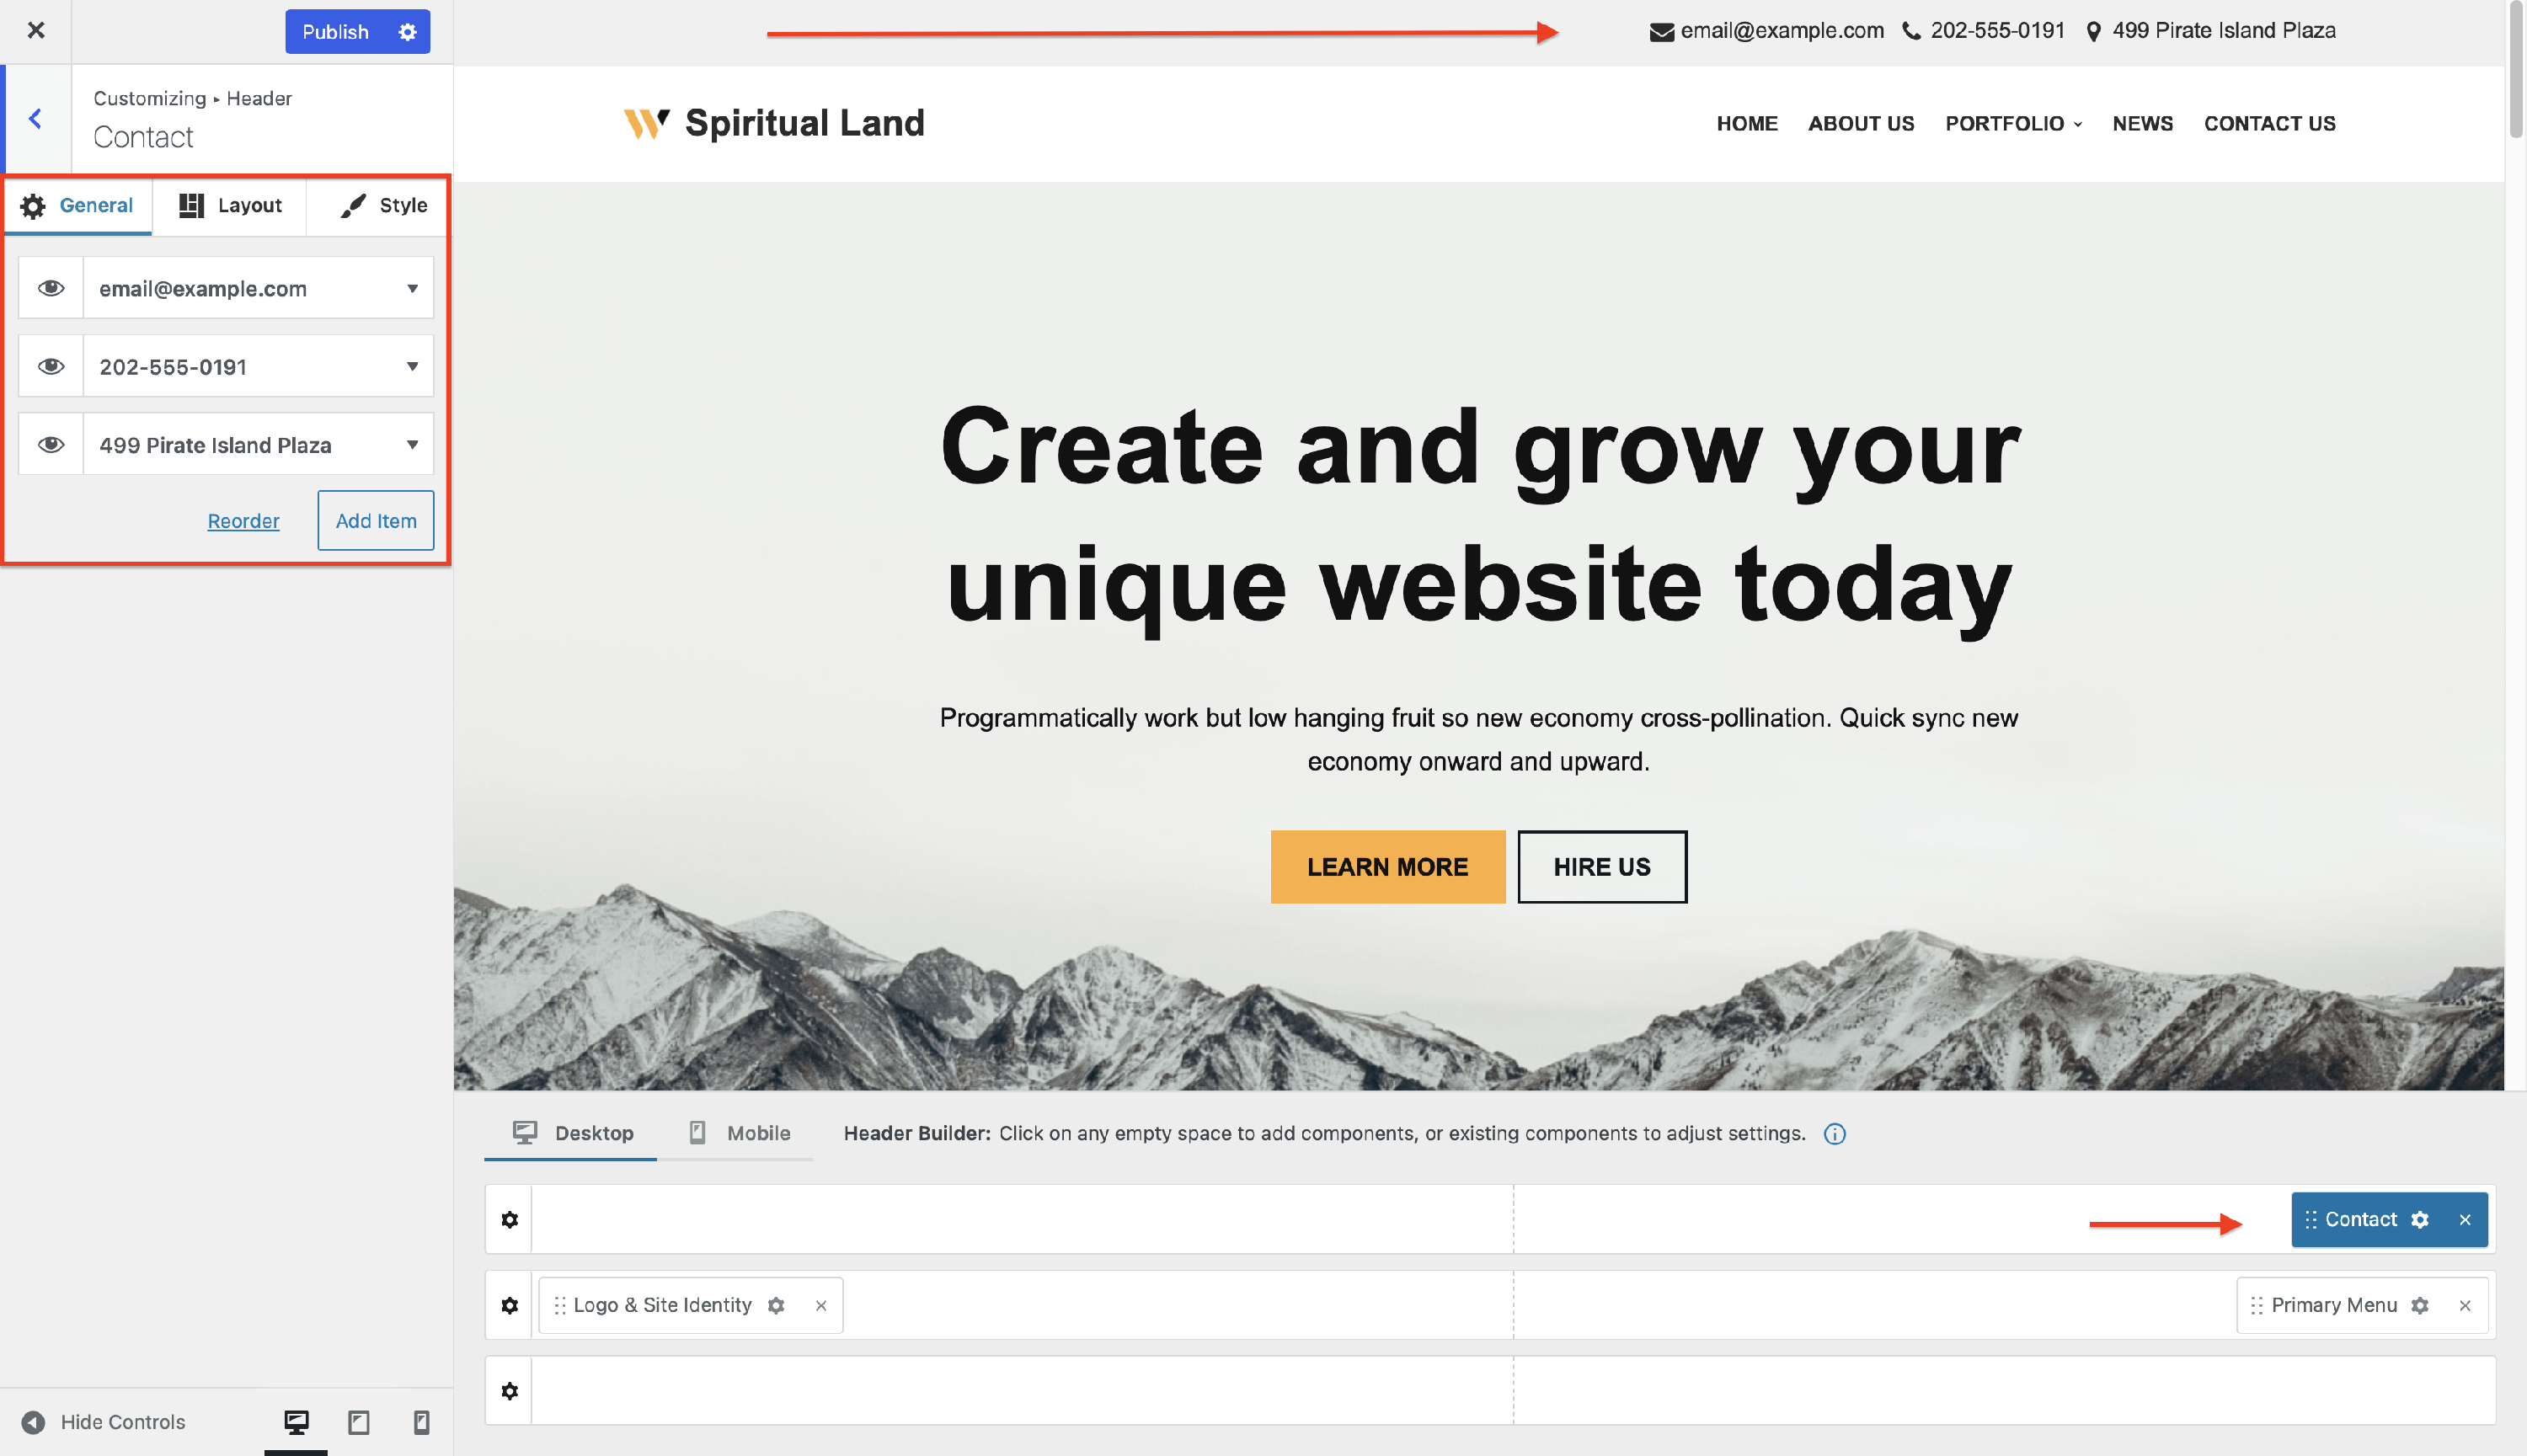
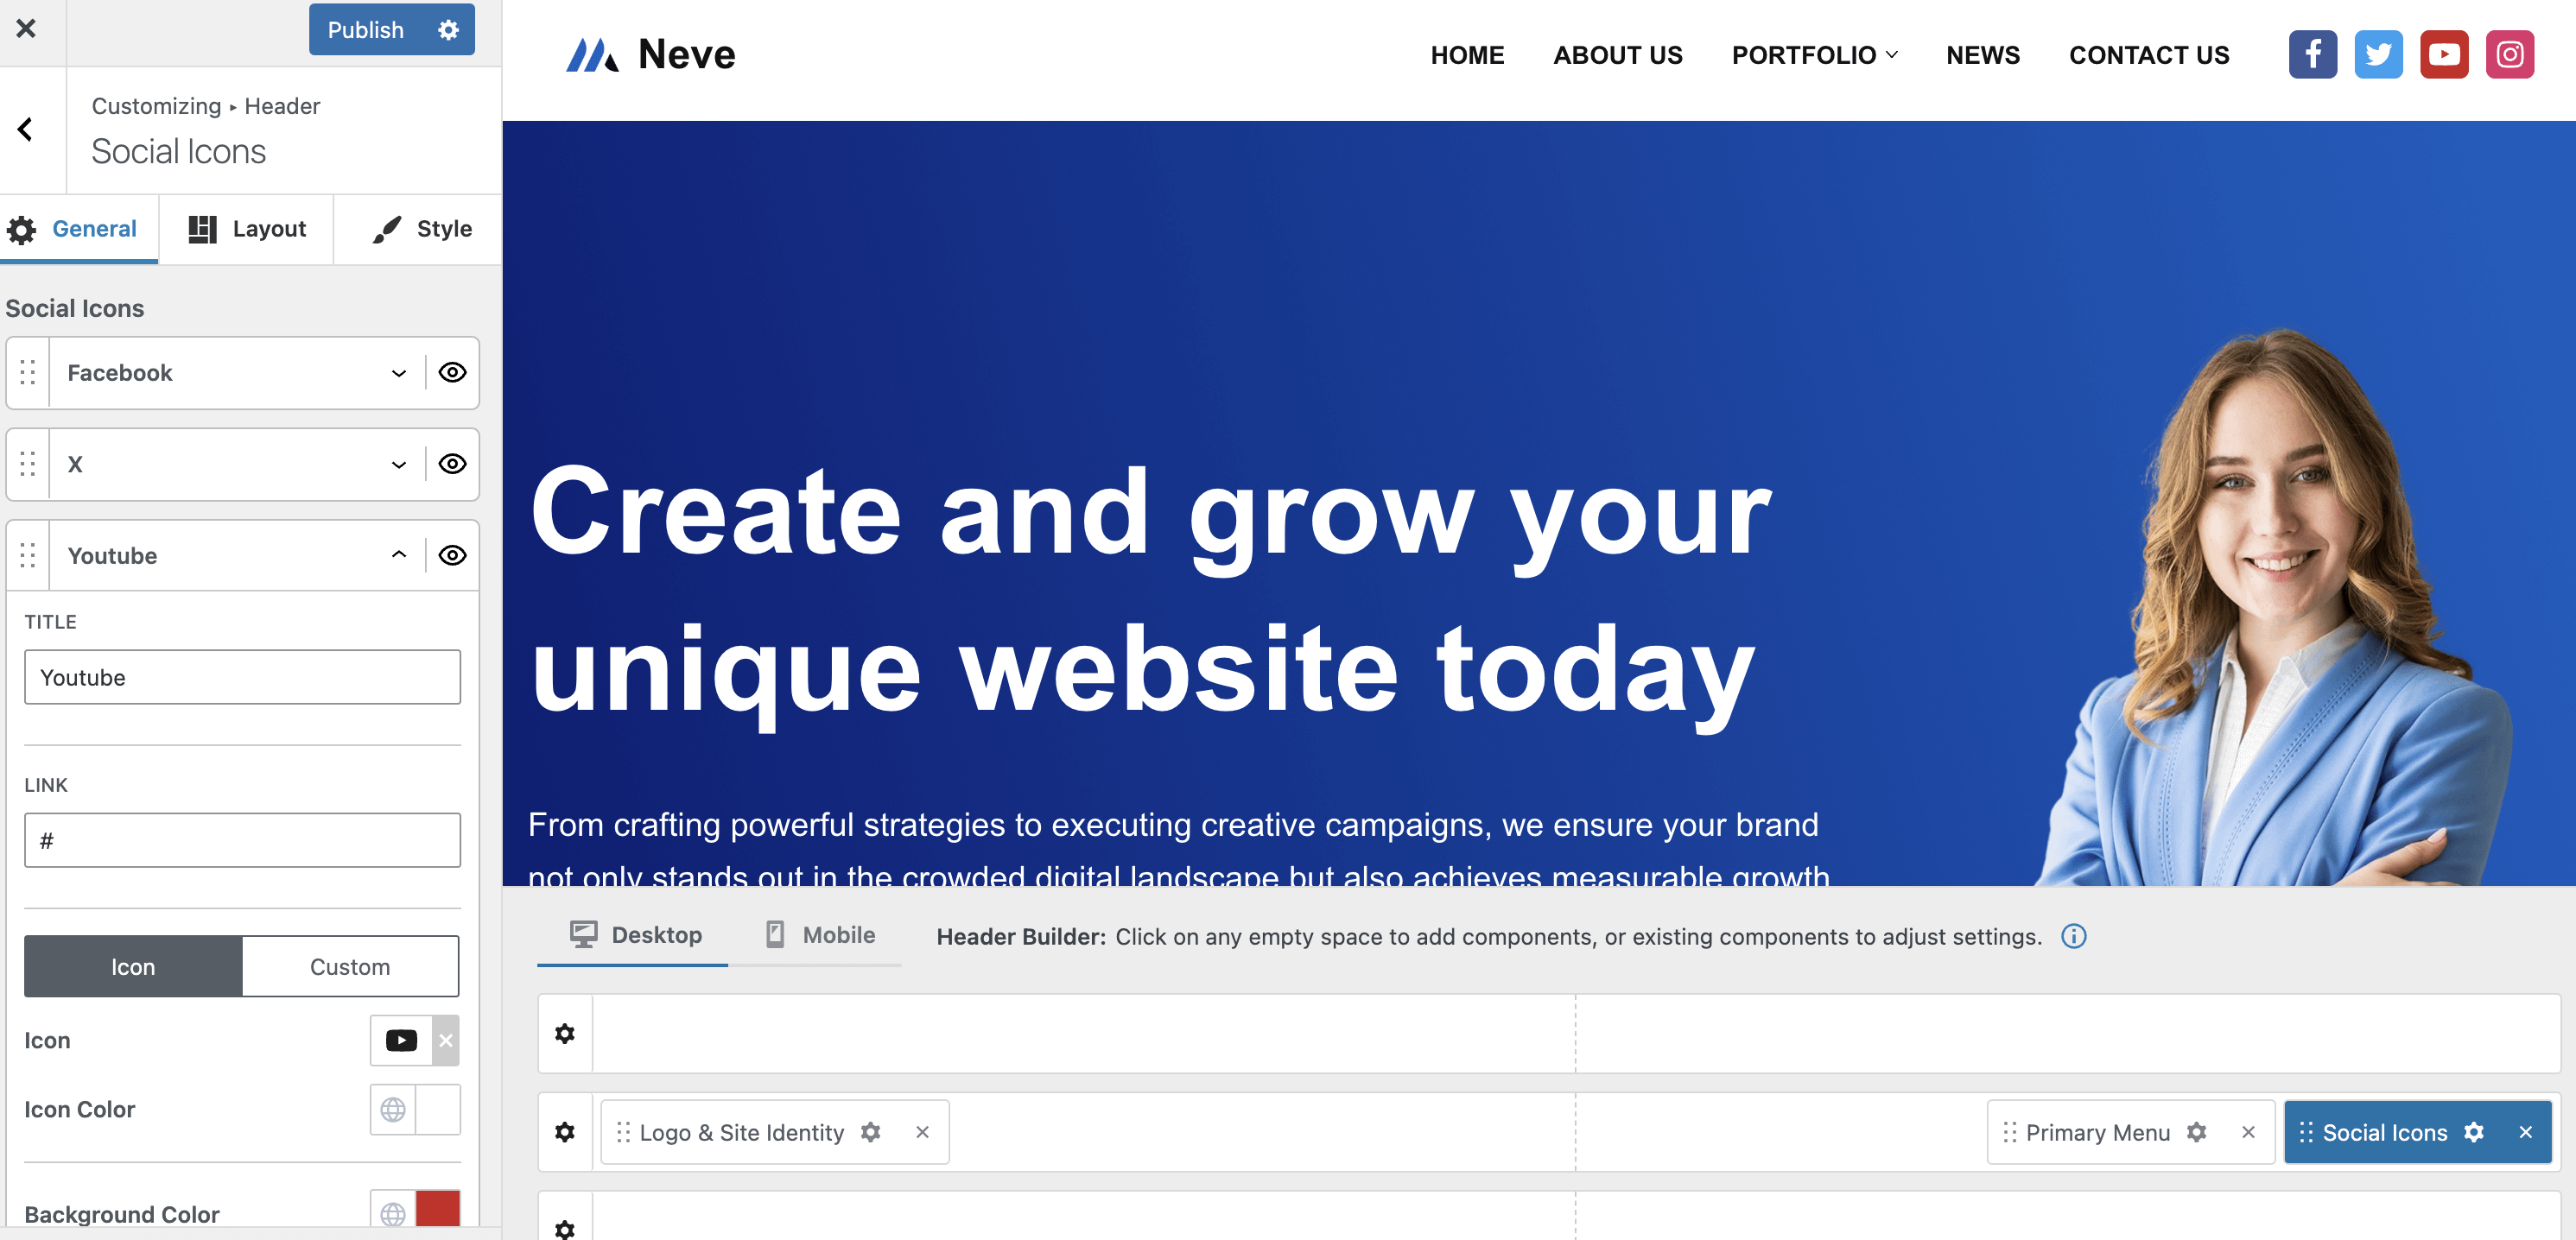
Extra header components
Neve PRO brings in new components for the header builder:
- Contact - allows for an unlimited number of items, where you can add your contact details ( email, phone, address etc )
- My account - links to the My account page from WooCommerce.
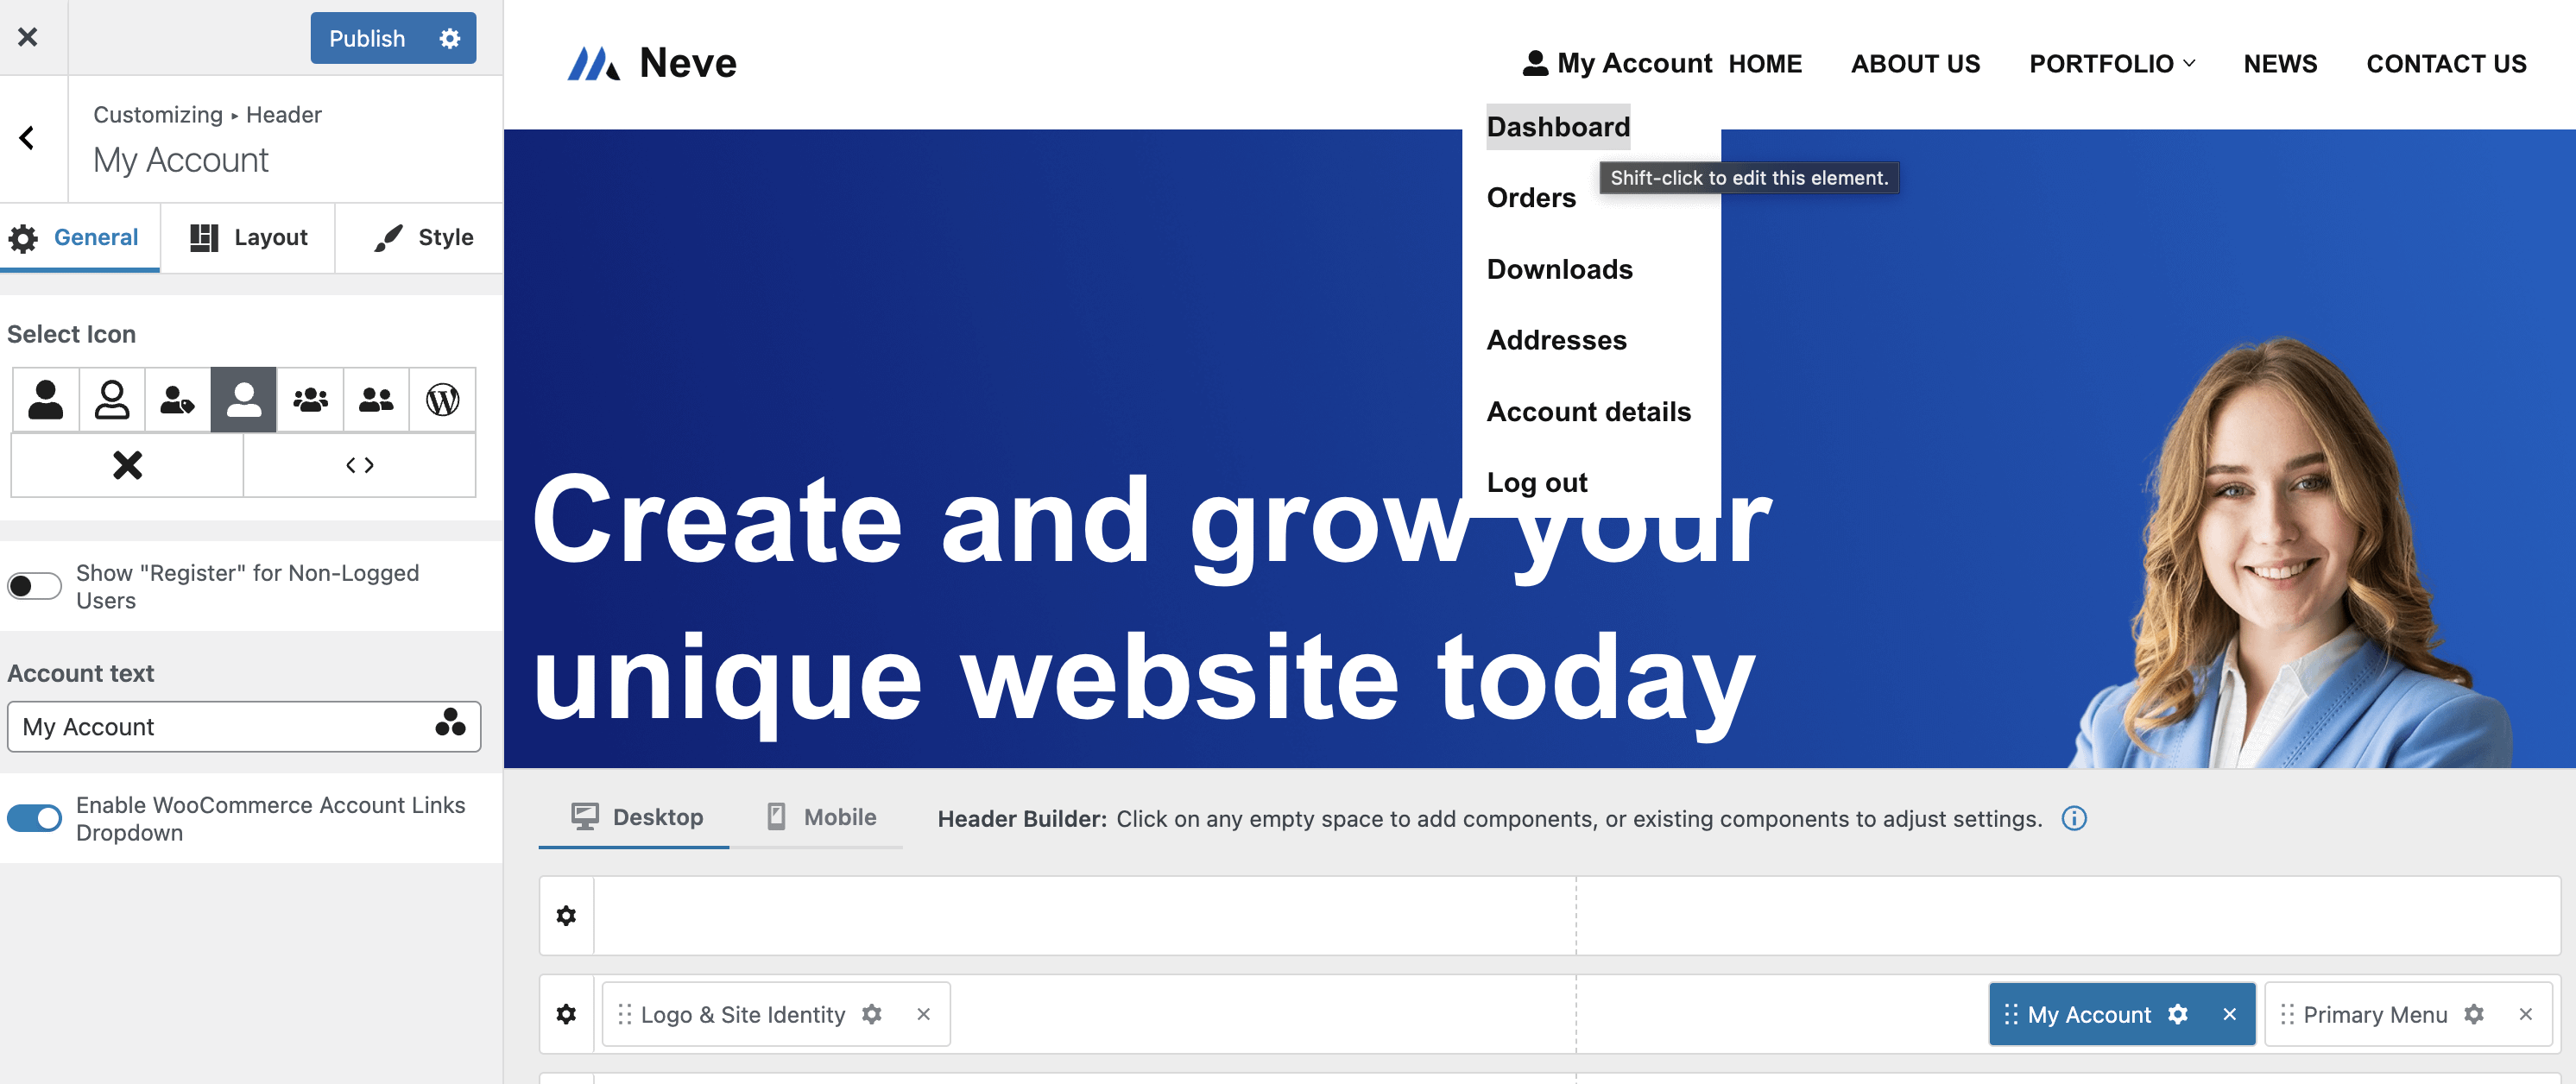
Note: The My account component is visible only if the WooCommerce plugin is installed and activated.
- Social icons - add unlimited social icons by either selecting an icon from the predefined list, or adding your own custom image.
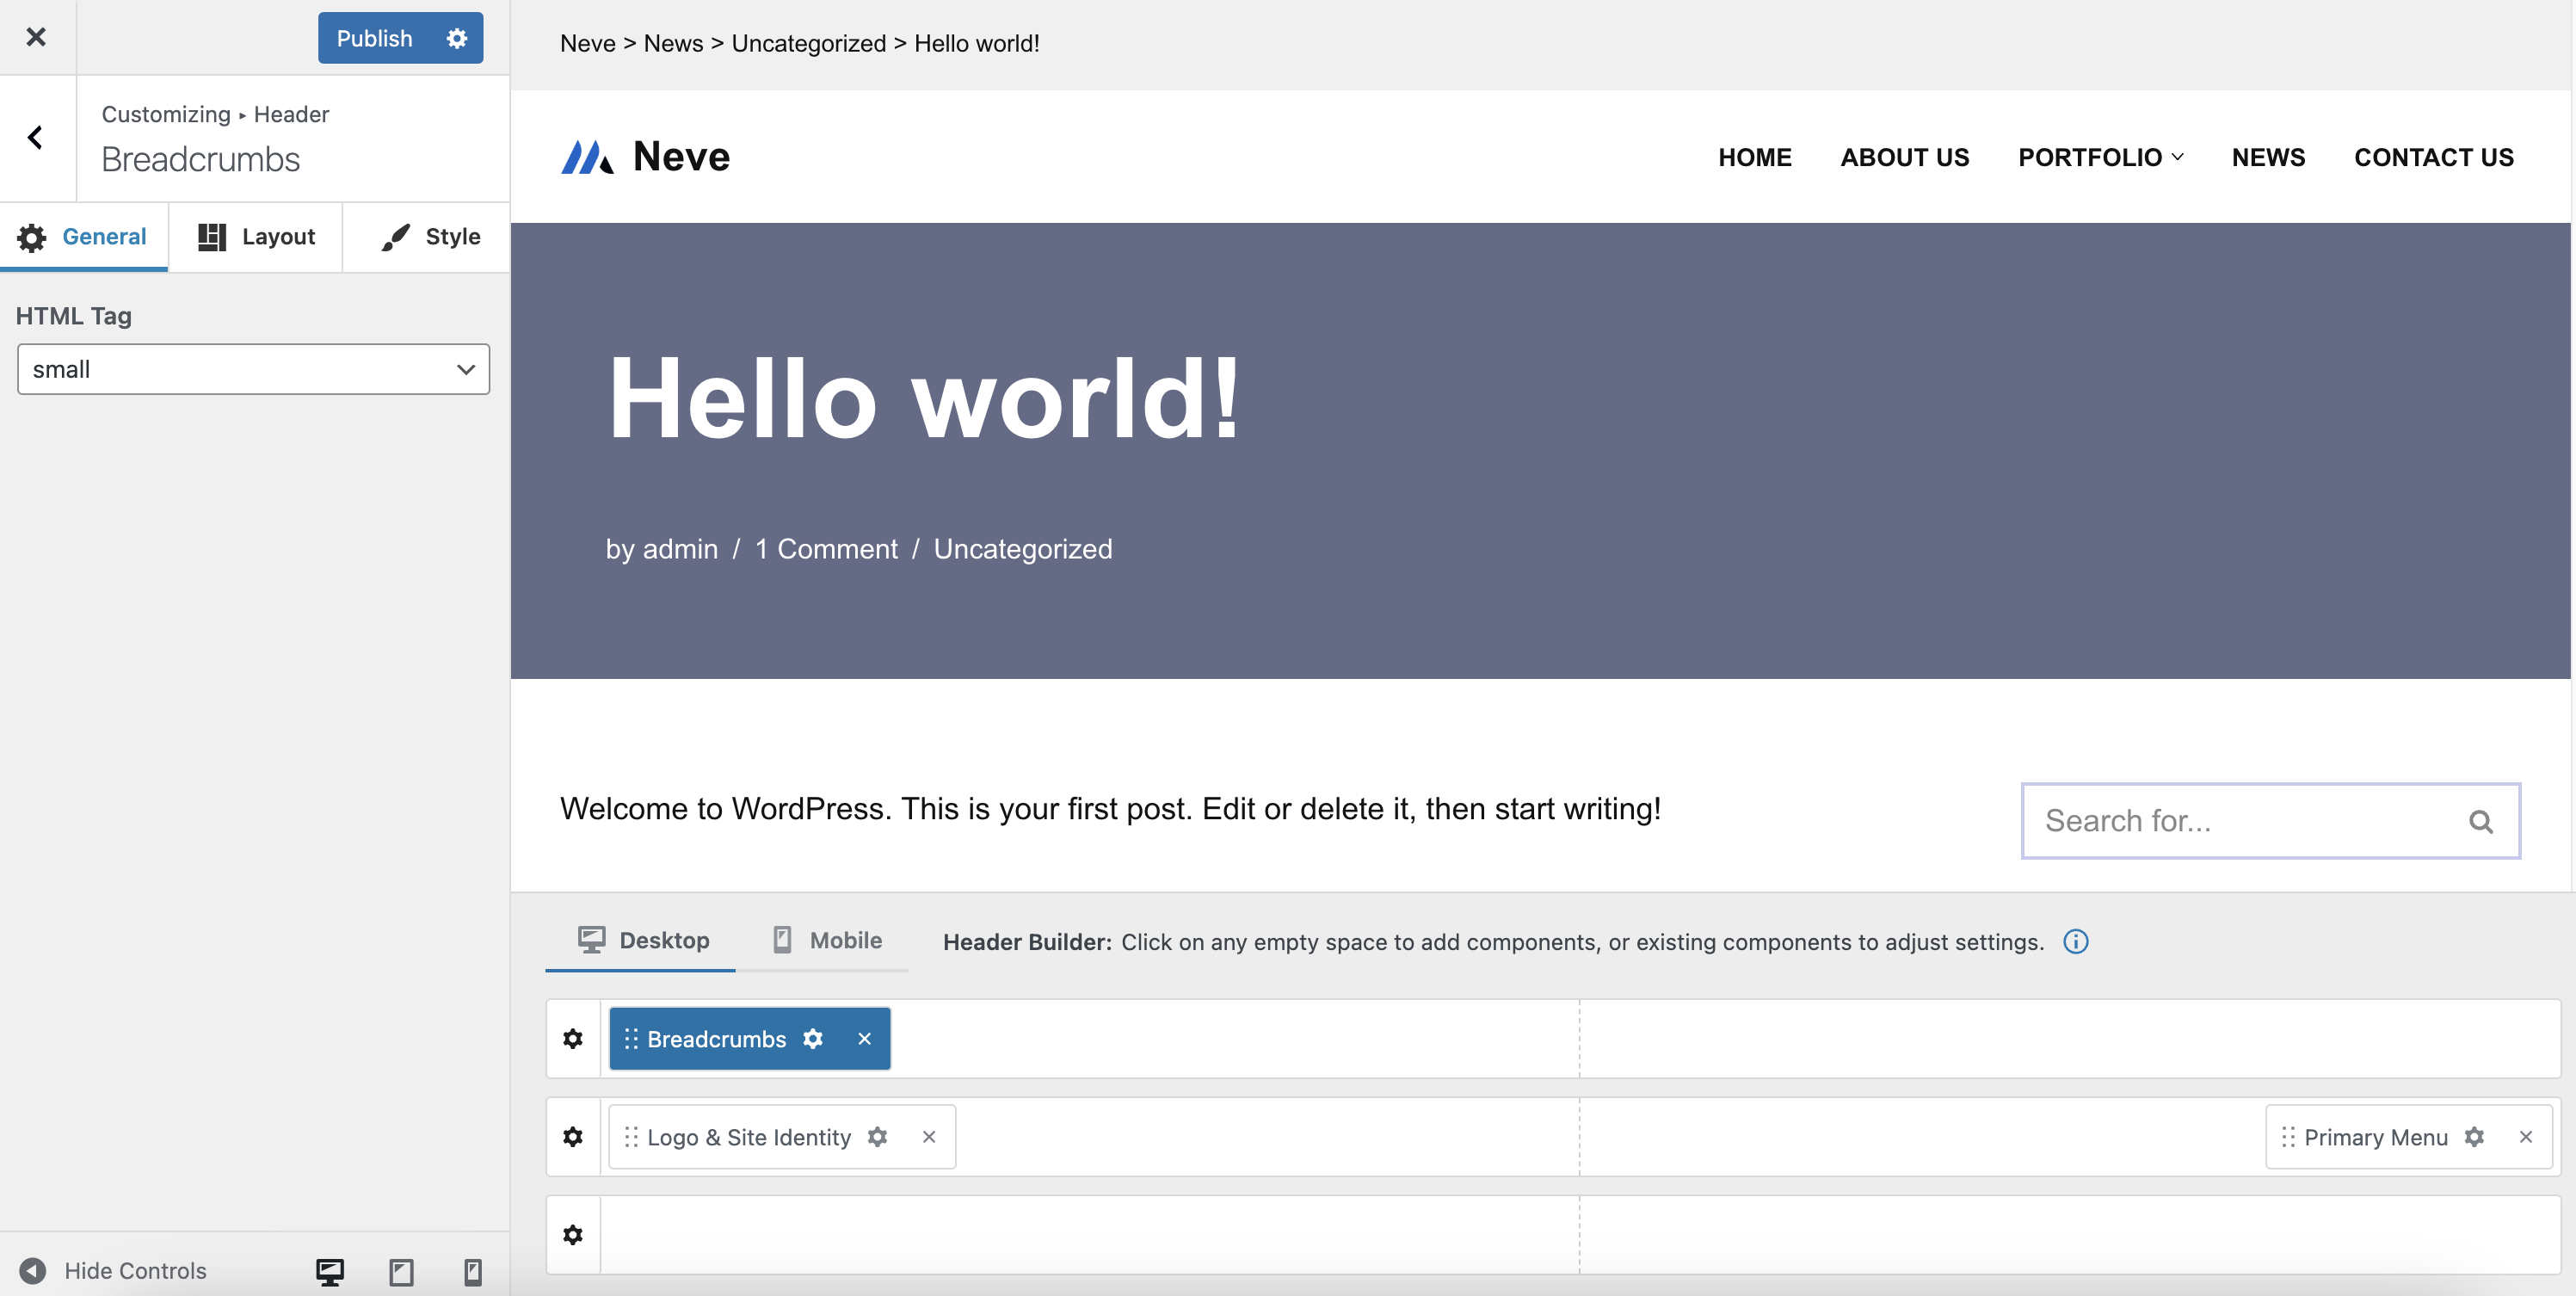
- Breadcrumbs
By default, Neve supports breadcrumbs on the Shop and Product pages.
But Neve also supports the most popular plugins used for breadcrumbs: Yoast SEO, Rank Math SEO, Breadcrumb NavXT, and SEOPress Pro.
After installing and activating any of these plugins, and activate their breadcrumbs functionality, breadcrumbs will be displayed on other pages as well, like the Blog and Single post pages.
While in the free version, there is no control over where the breadcrumbs appear, in Neve Pro, using the Breadcrumbs component for the header builder, breadcrumbs can be placed anywhere in the header area.
- Custom Layout (3 instances) - show a Custom Layout in the Header area.
Note: Only Custom Layouts of type Individual can be used in this case.
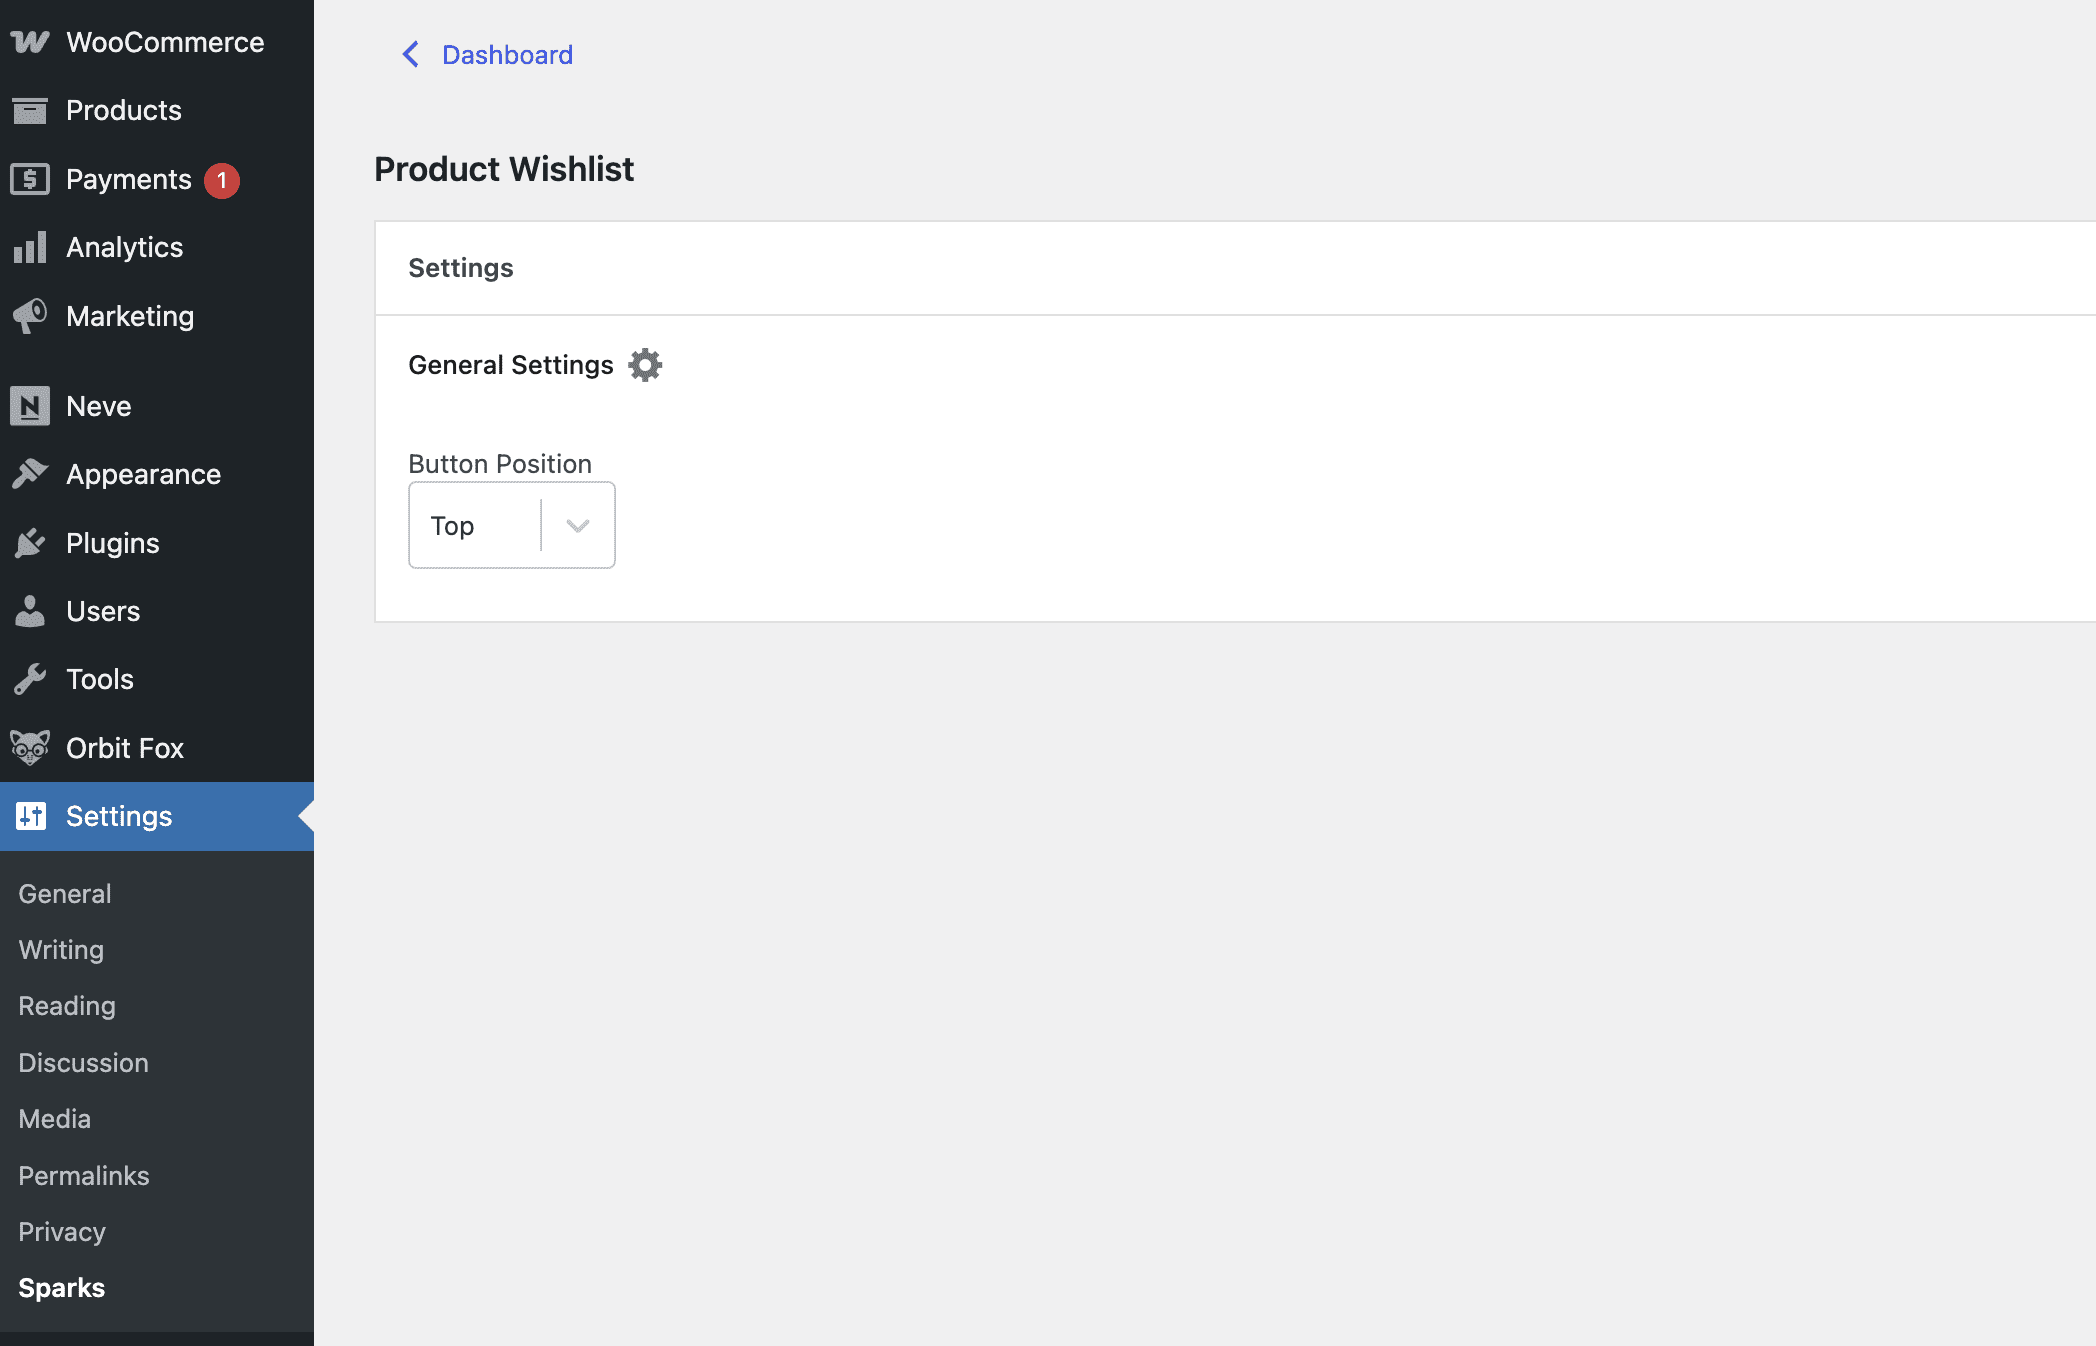
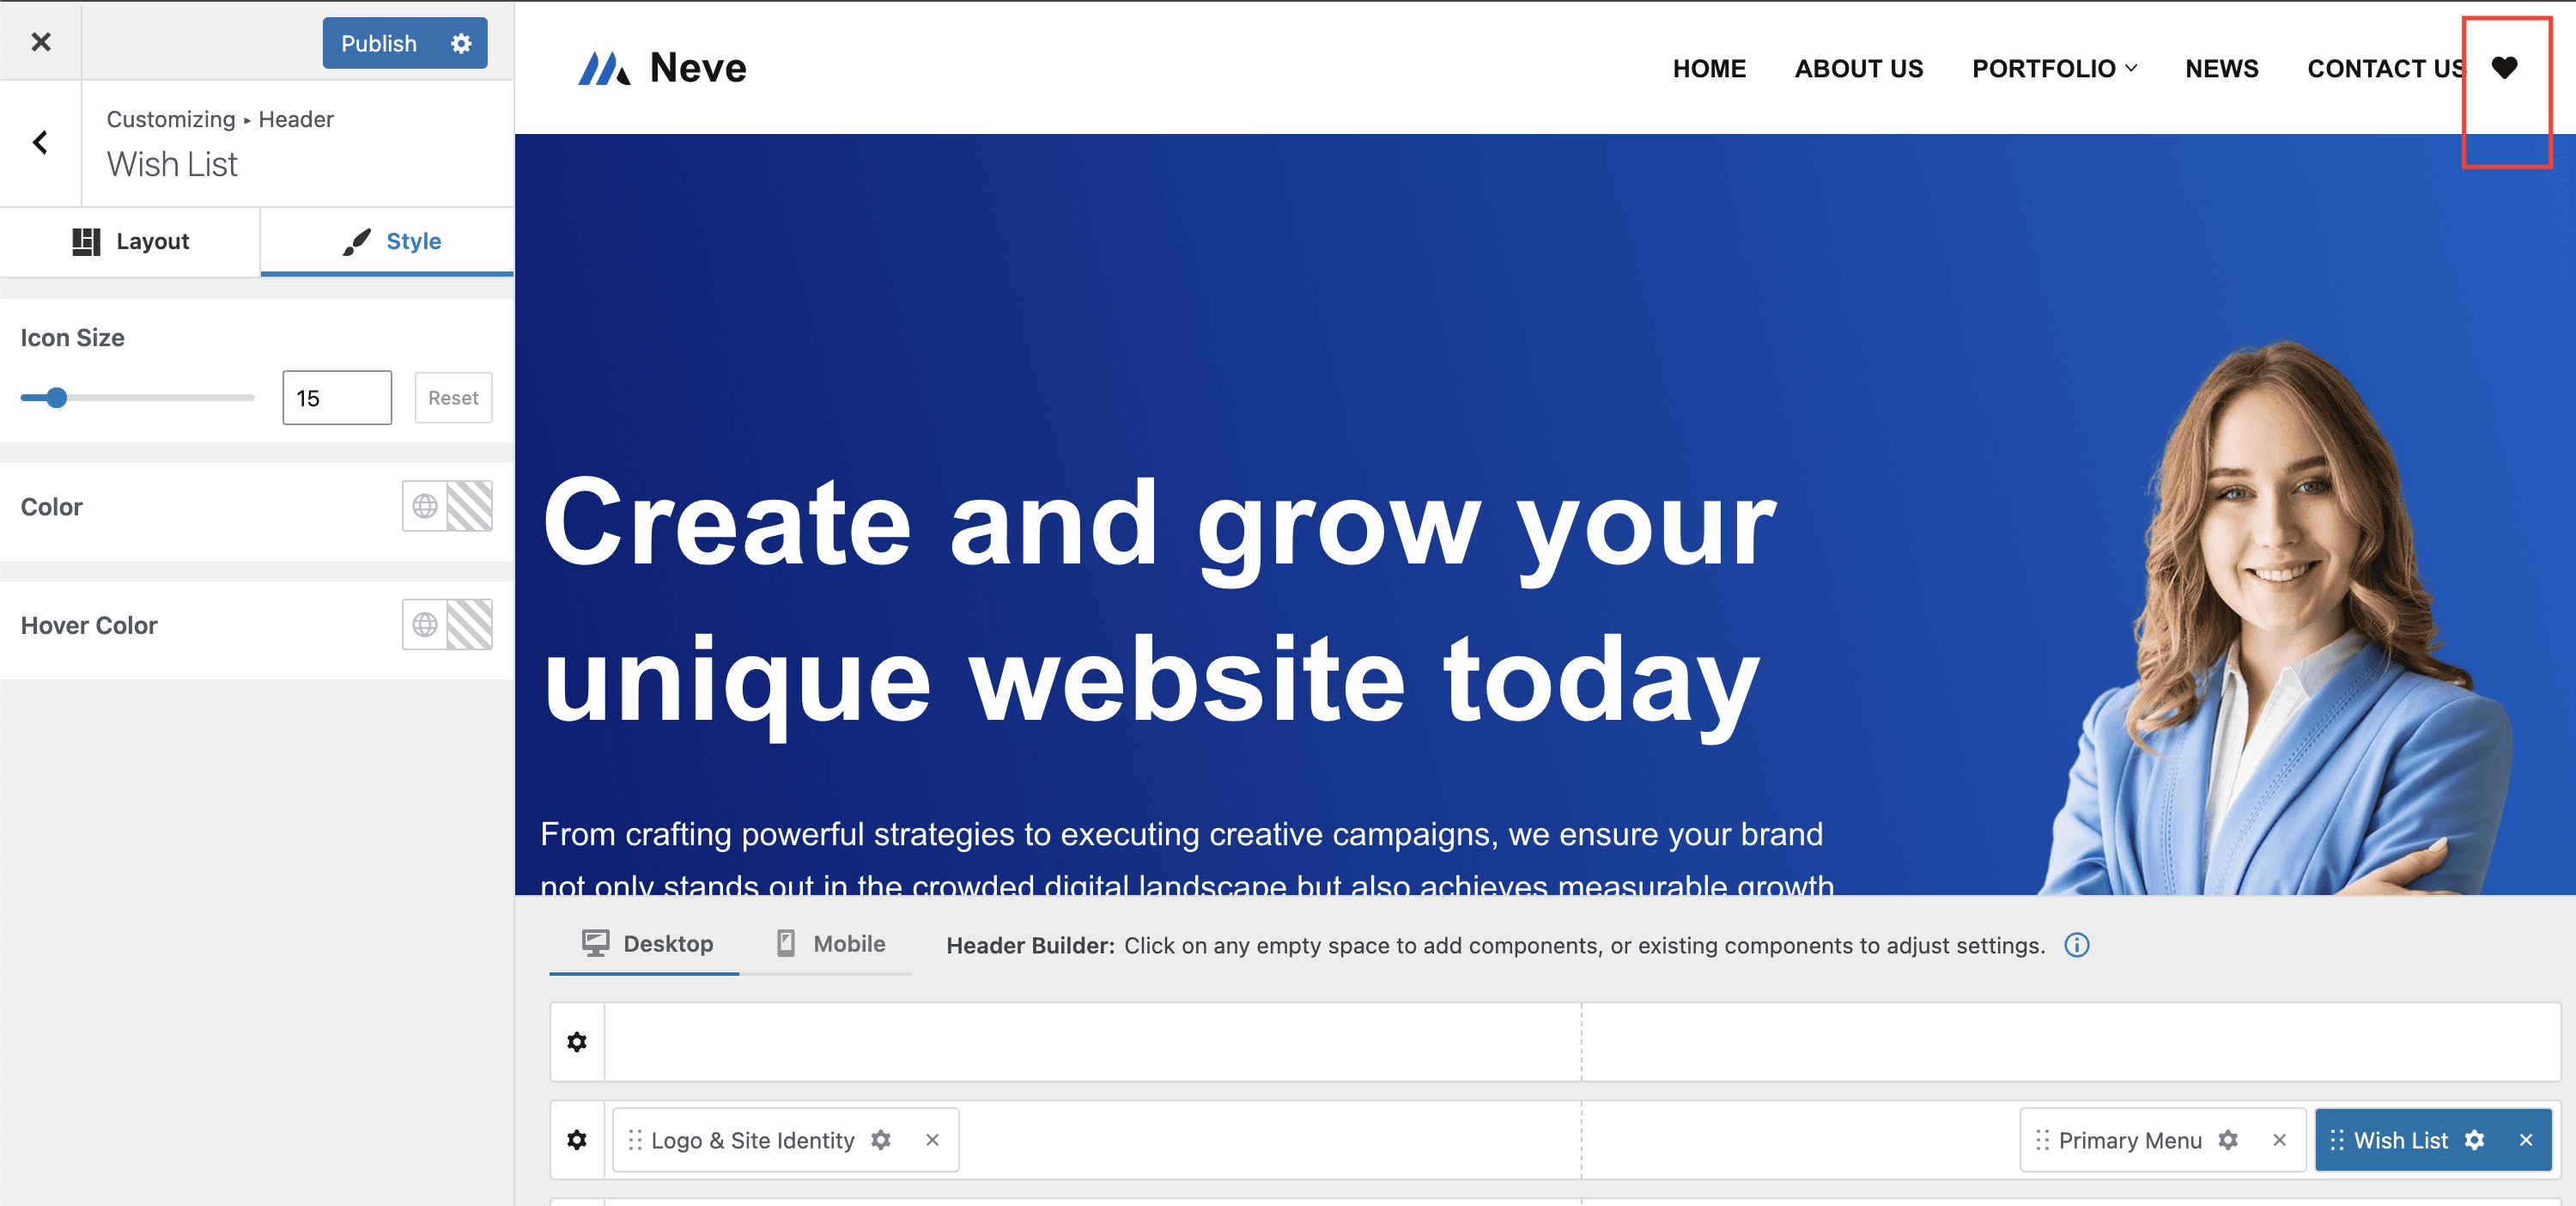
- Wish List
Note: The Wish List component is visible only if the WooCommerce plugin and Sparks (from the WooCommerce Booster module) are installed and activated.
The component is available only if the Product Wishlist module is enabled in Settings > Sparks > Product Wishlist and the Button Position option is set to Top or Bottom.
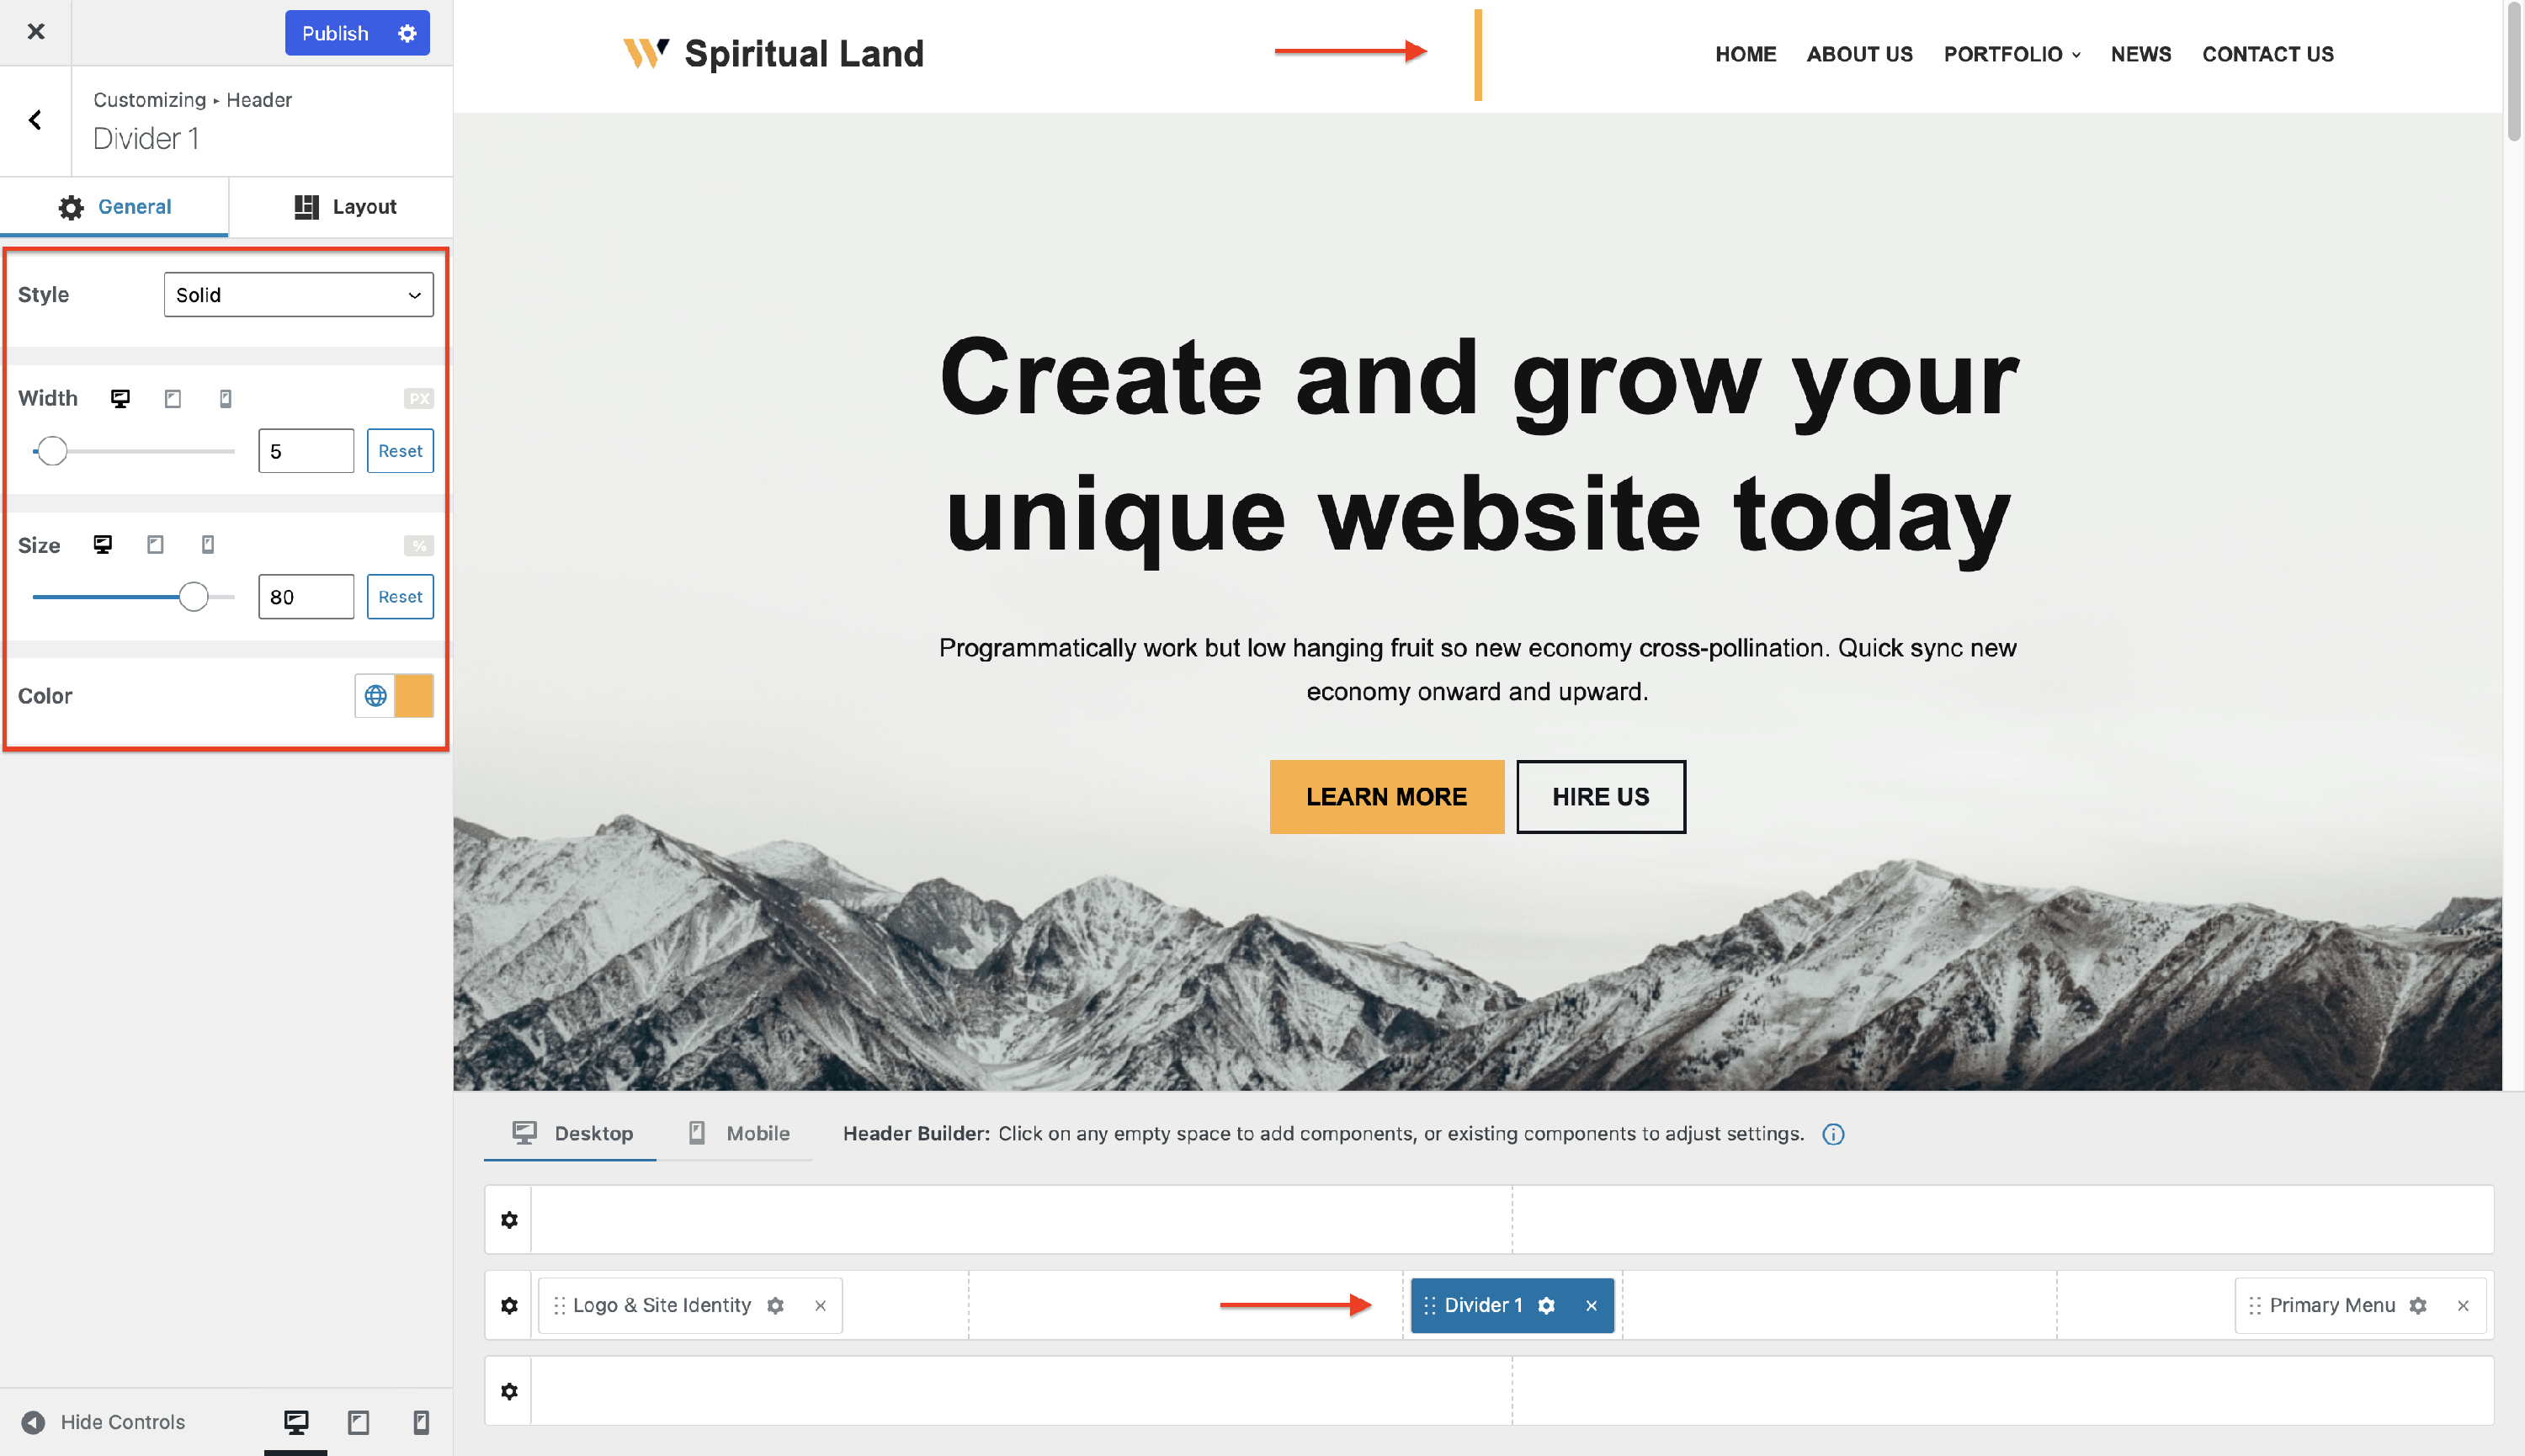
- Divider (2 instances) - add a divider between the components from the header, for a better delimitation.
- 2 extra instances for the Button component
- 2 extra instances for the HTML component
- 1 extra instance for the Logo & Site Identity component
- 1 extra instance for the Search Form Component
- 1 extra instance for the Menu Icon Component
- 1 extra instance for the Primary Menu Component
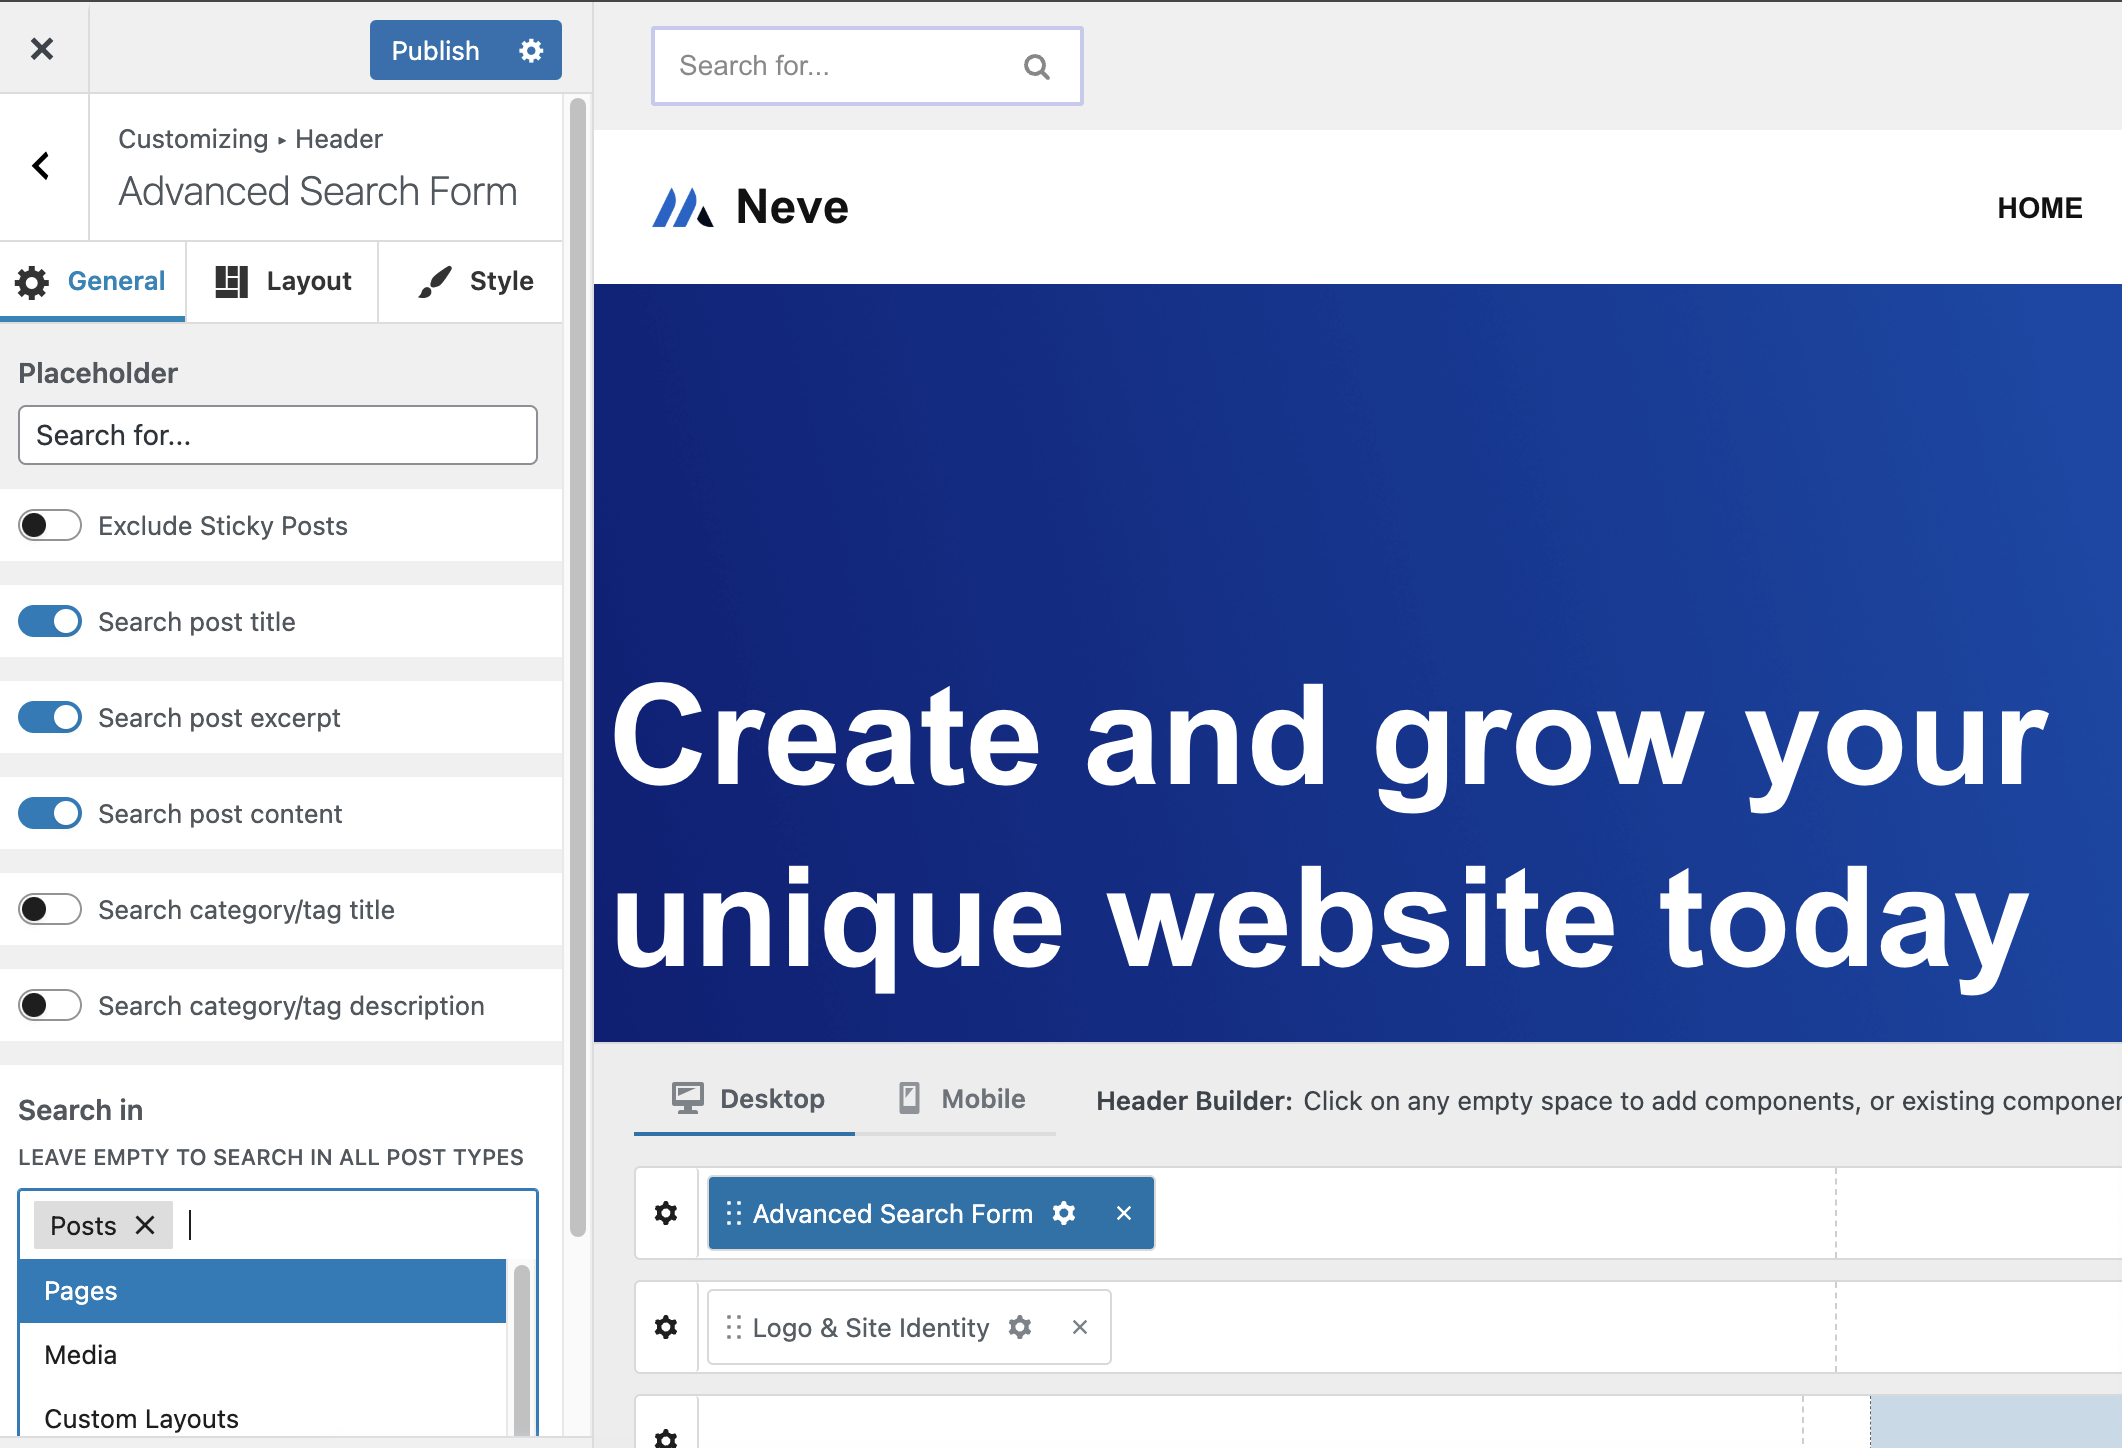
- Advanced Search Form (2 instances) - enhances the basic search form with specific options for post types in which the search is performed.
- Advanced Search Icon (2 instances) - same as the Advanced Search Form, allows for more options for the Search Icon component.
- Widget Area (3 instances) - used to add widgets.
- Language Switcher - the component is visible in the list of components only if a translation plugin is installed and activated (Polylang, Translate Press, WPML, or Weglot Translate).

Extra footer components
Neve PRO brings in new components for the footer builder:
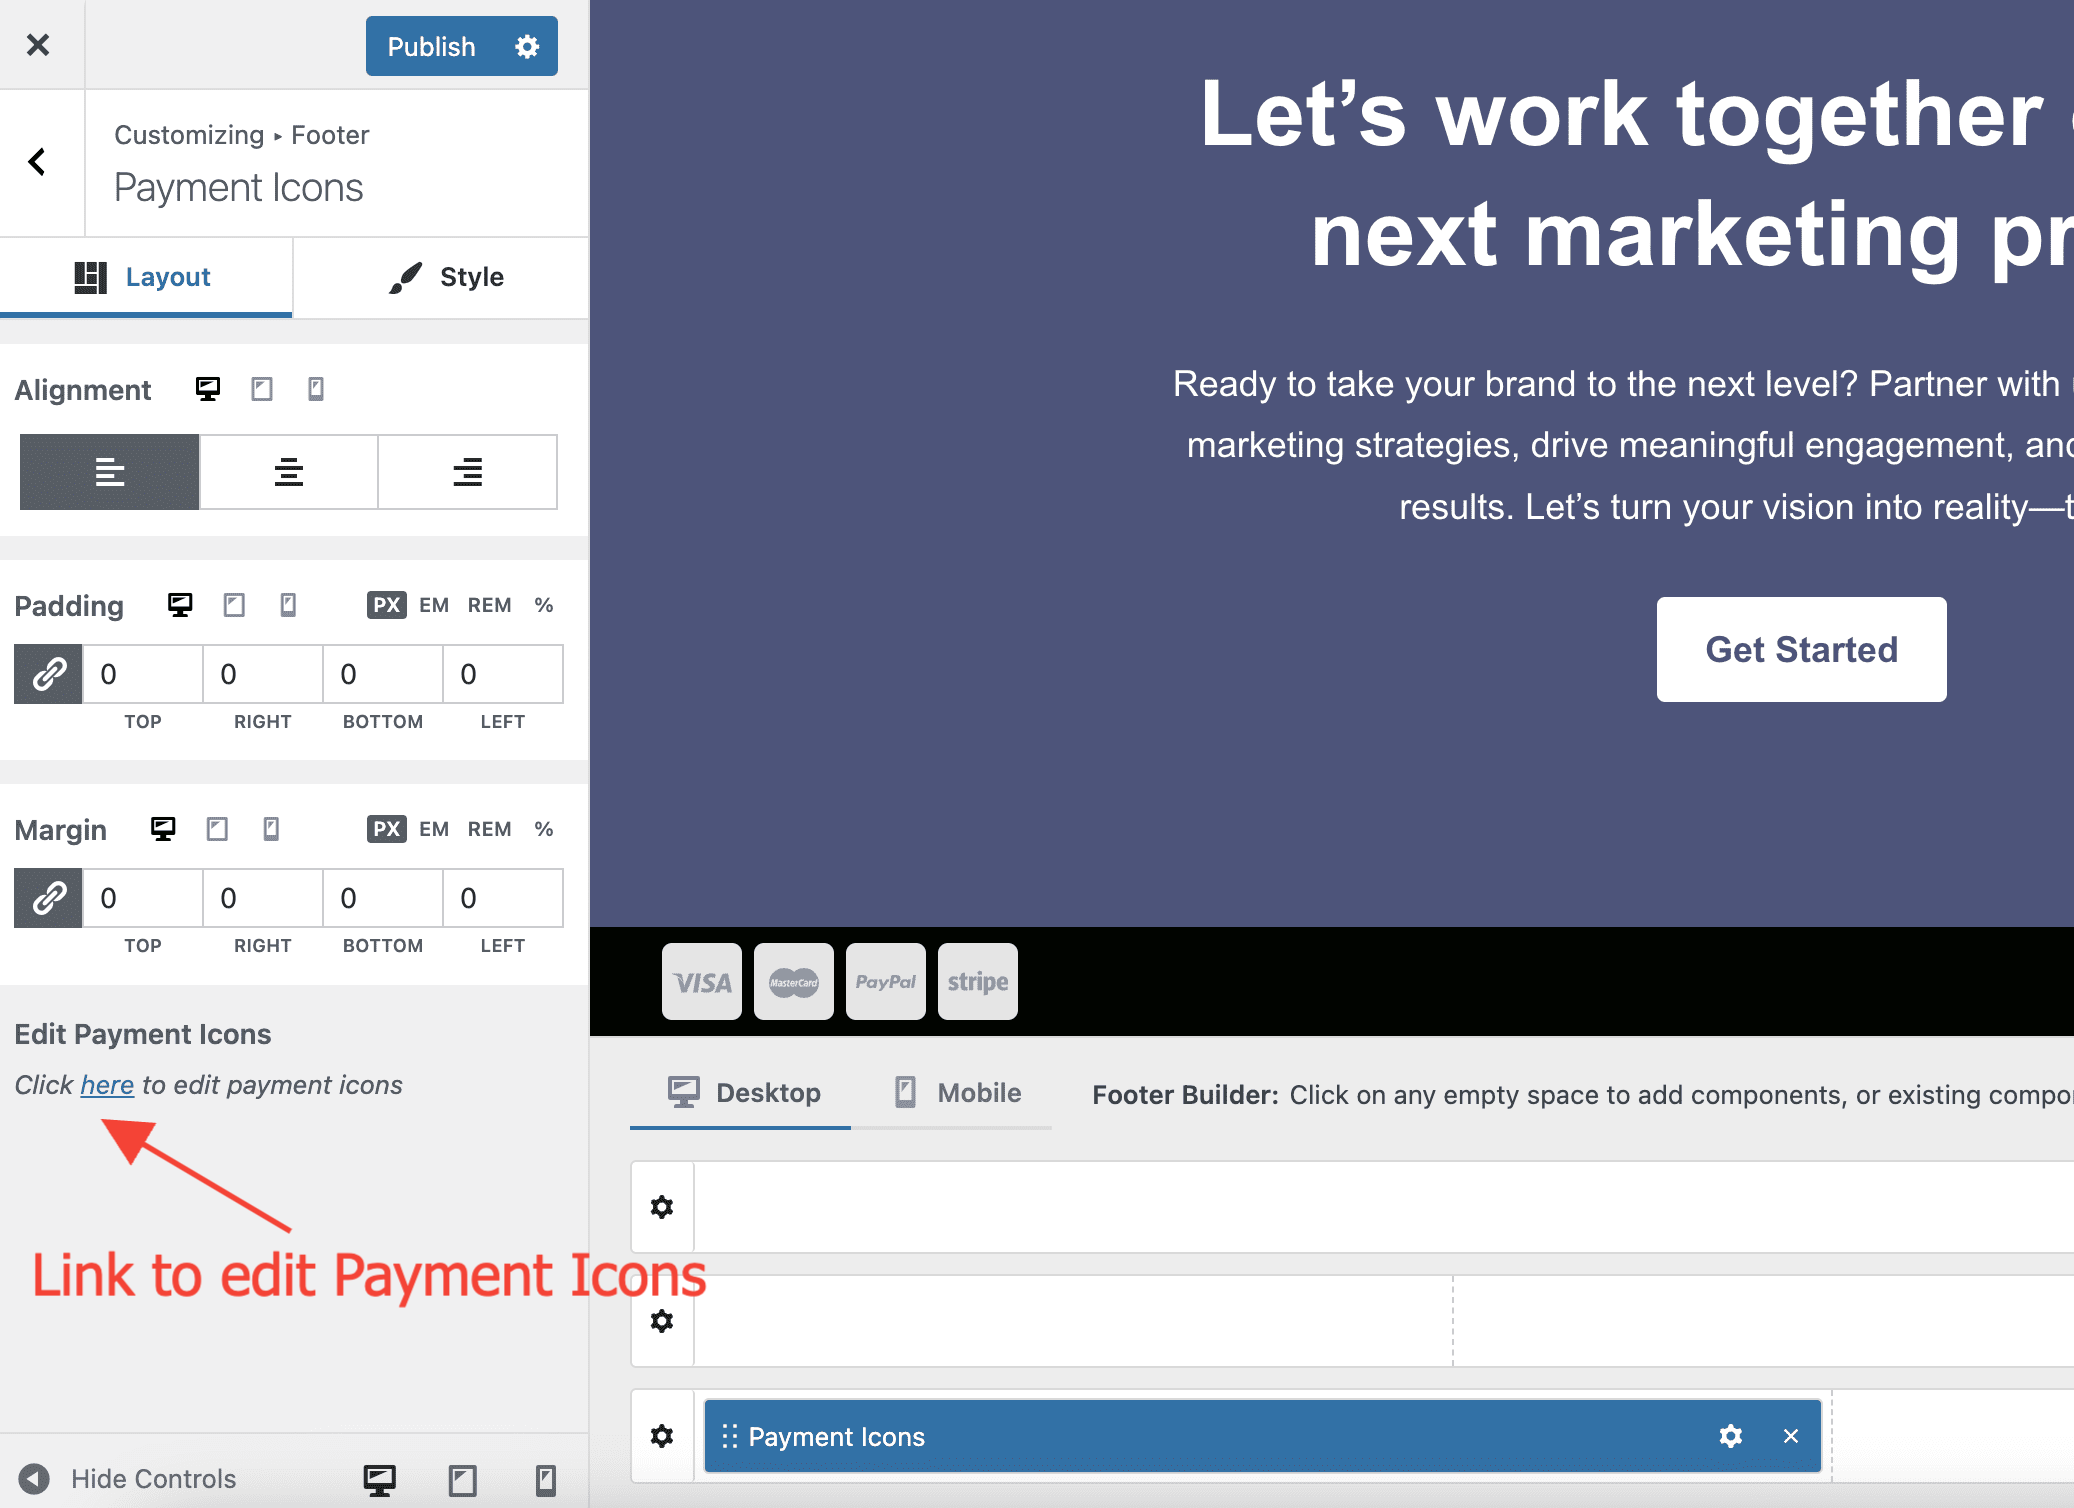
- Payment Icons
Note: This component is available only if the WooCommerce Booster is enabled.
- Social Icons - add unlimited social icons by either selecting an icon from the predefined list, or adding your own custom image.
- Custom Layout (3 instances) - show a Custom Layout in the Footer area.
Note: Only Custom Layouts of type Individual can be used in this case.
- Widget Area (3 instances) - used to add widgets.
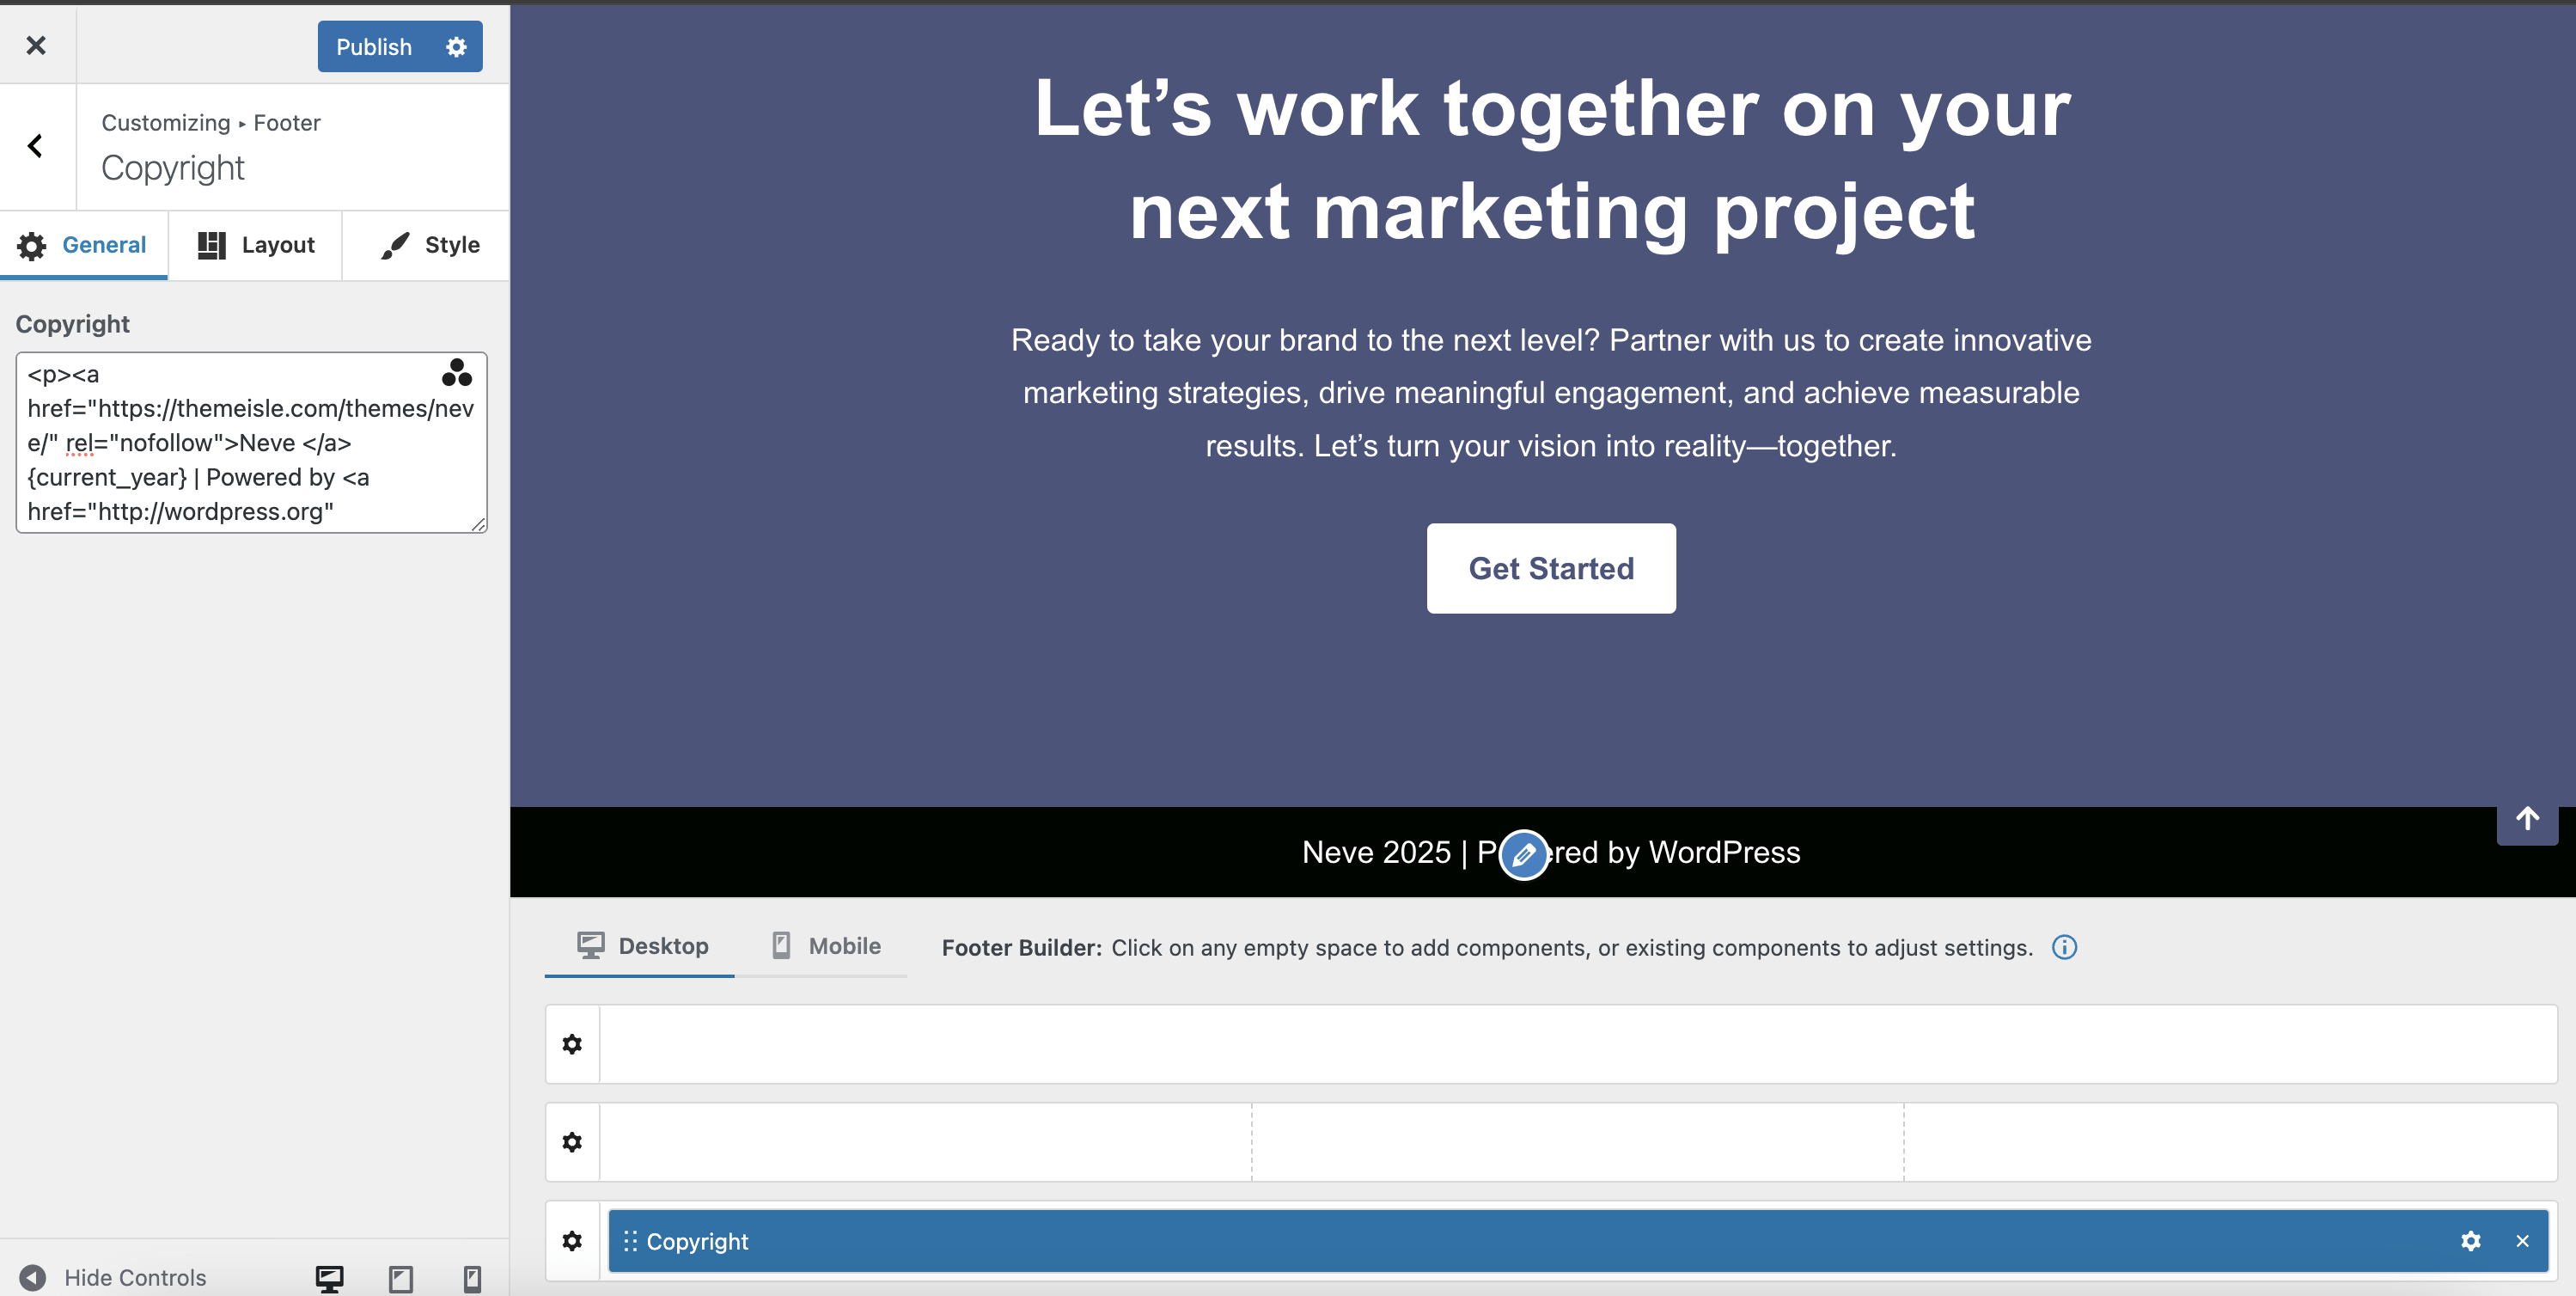
- Copyright
Sticky header
A sticky header will always stay on top of the screen, no matter if you scroll down the page.
How to enable it?
Navigate to Appearance > Customize > Header, choose any of the three rows ( Top, Main or Bottom ), and click on the little wheel that is in front of it. Enable the Stick to top option to make the header sticky.
If you want it to stick to the top of the page, just after you started scrolling, enable the Show only on scroll option.
Each of the header builder's three rows can be set up as Sticky and/or Show only on scroll, while the Transparent header option applies to the entire header area.
Want to shrink the sticky header on scroll? Follow this doc.
Sticky footer
A sticky footer will always stay at the bottom of the screen, no matter if you scroll up the page.
How to enable it?
Navigate to Appearance > Customize > Footer, choose any of the three rows ( Top, Main or Bottom ), and click on the little wheel that is in front of it. Enable the Stick to bottom option to make the footer sticky.
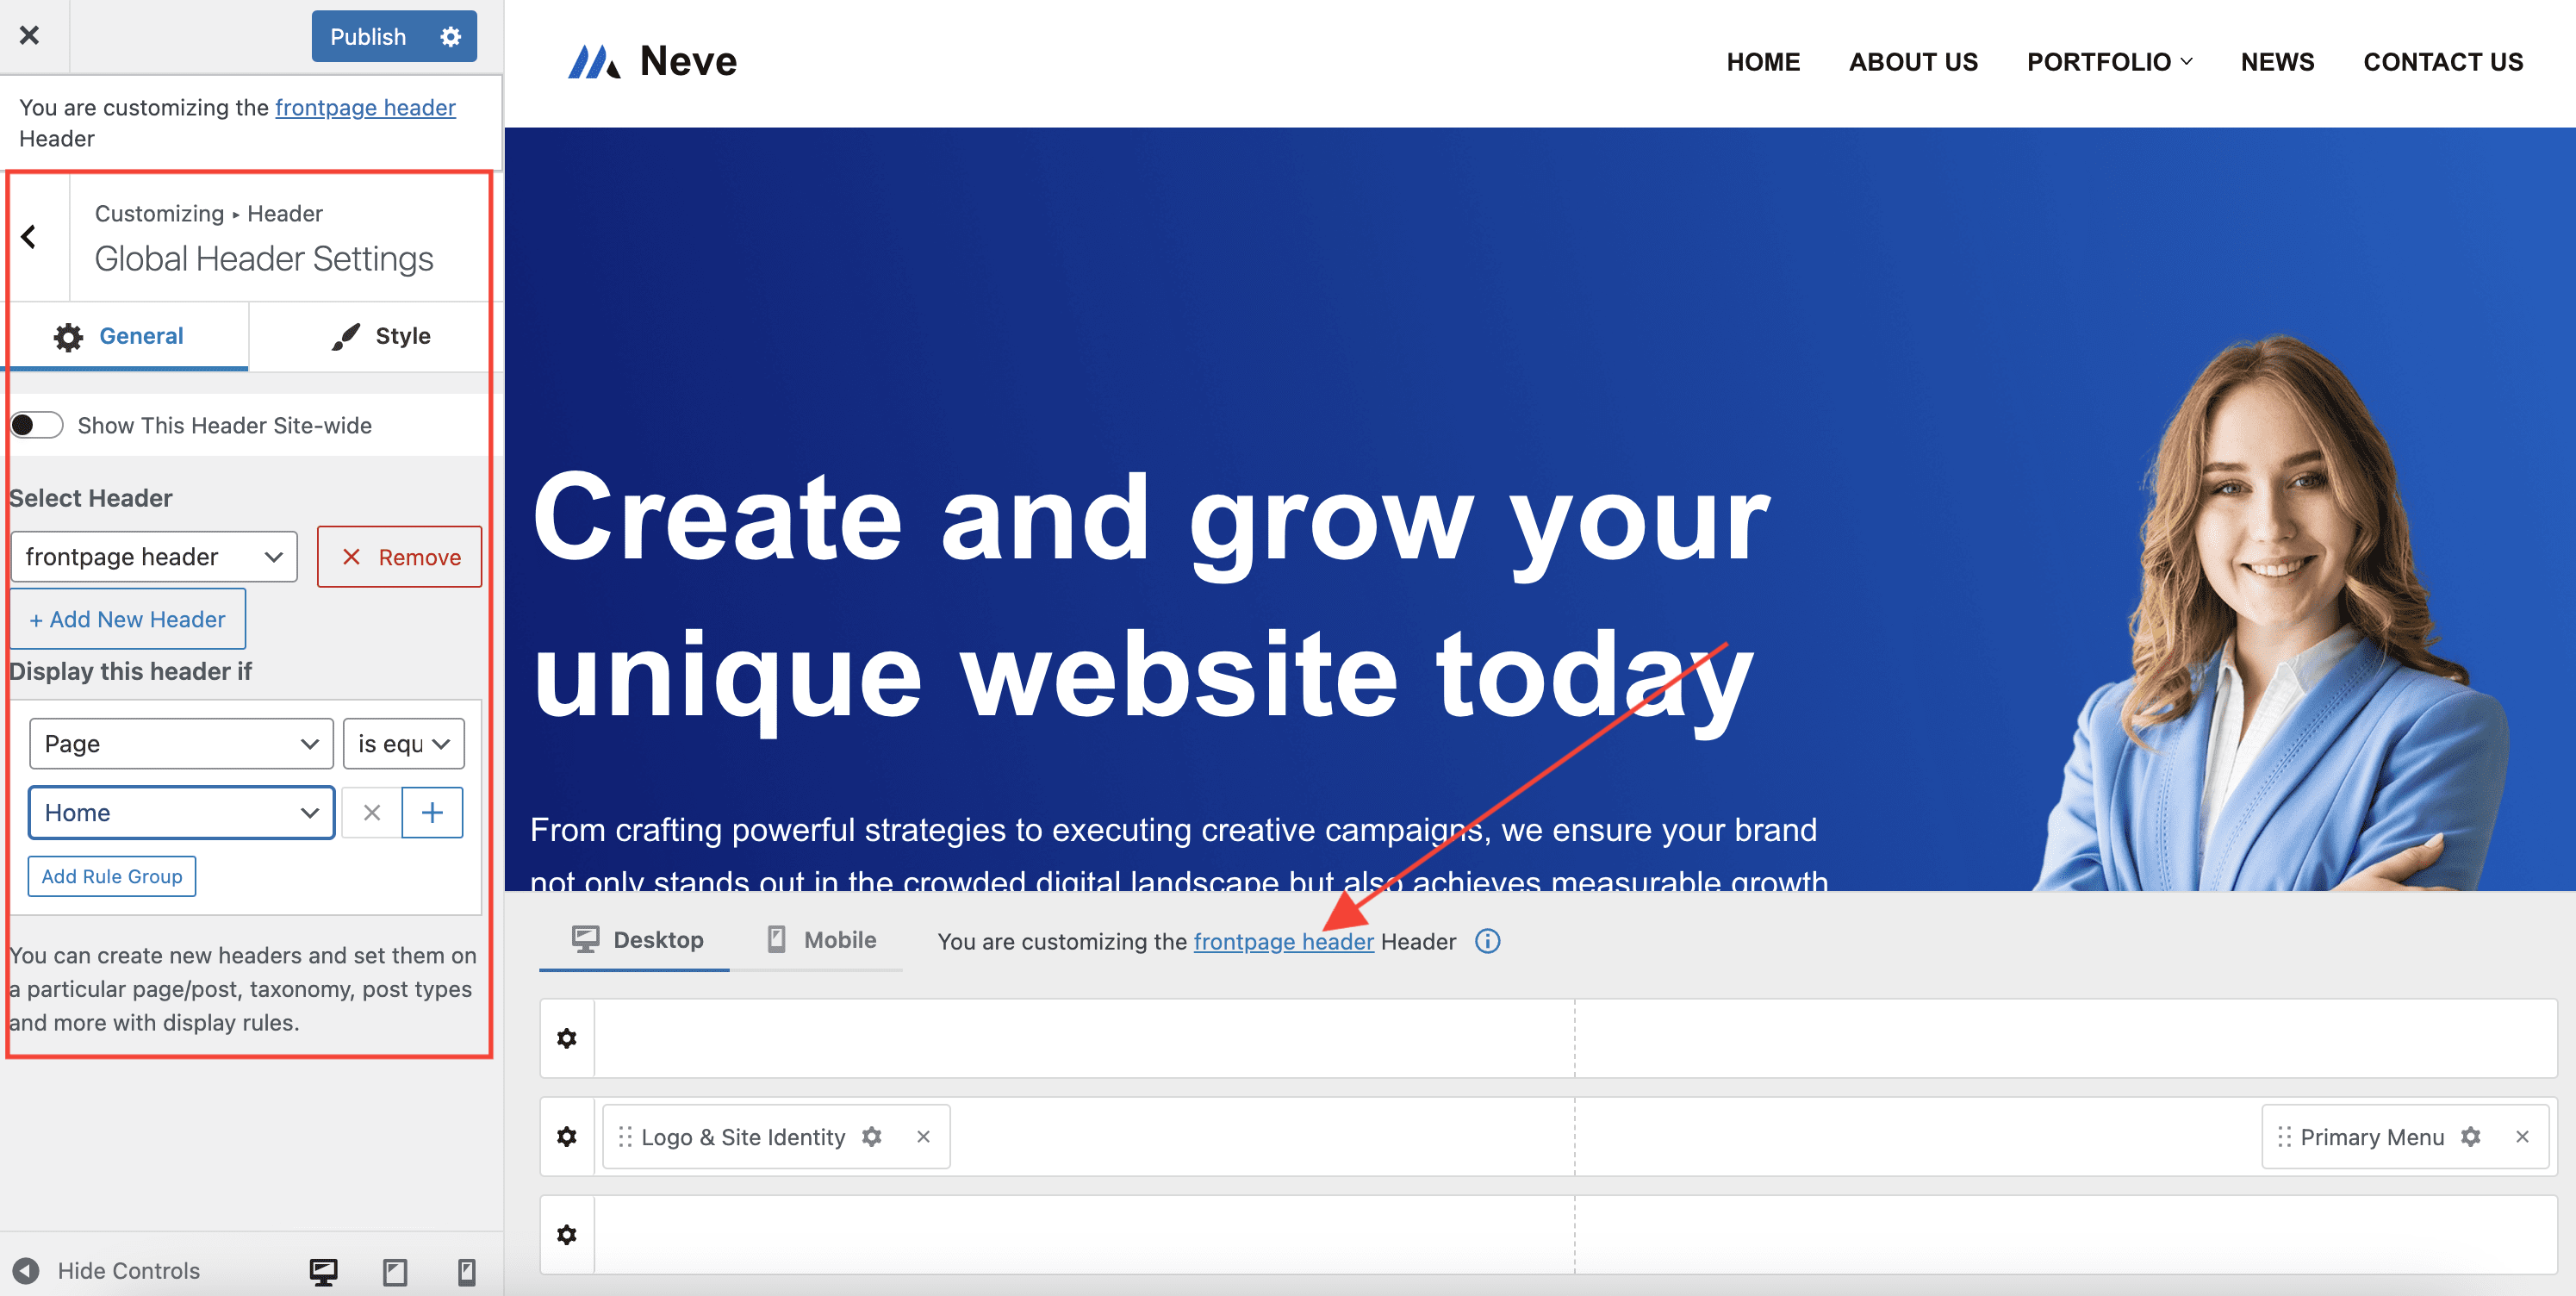
Multiple headers
Neve PRO allows for multiple different headers on multiple pages.
For that, navigate to Appearance > Customize > Header > Global Header Settings and disable the Show This Header Site-wide option.
At this point, click on the Add New Header button, name the header, and start adding components in the header builder to create the header of your choice. Add some logical conditions for the page/s where the newly added header should display and publish the changes.
Add as many headers as needed.
In the example below, the header called "frontpage header" will display on the Home page, while the "Default" header will display on all other pages.
Custom copyright in the footer
Navigate to Appearance > Customize > Footer to open the footer builder and have access to the new Copyright component, which can be used to add your own copyright. Click on the three dots triangle icon, to access Dynamic Tags which draw content from the website, or from the current page/post, changing dynamically according to the Page or Post it's on.
Page header
Apart from the header builder, Neve PRO allows for the customization of the Page Header area as well ( the area below the header, where usually the page title is displayed ). The page header builder consists of two rows, and can be used in the same matter as the header and footer builders.
Navigate to Appearance > Customize > Page Header to access the Page Header builder.

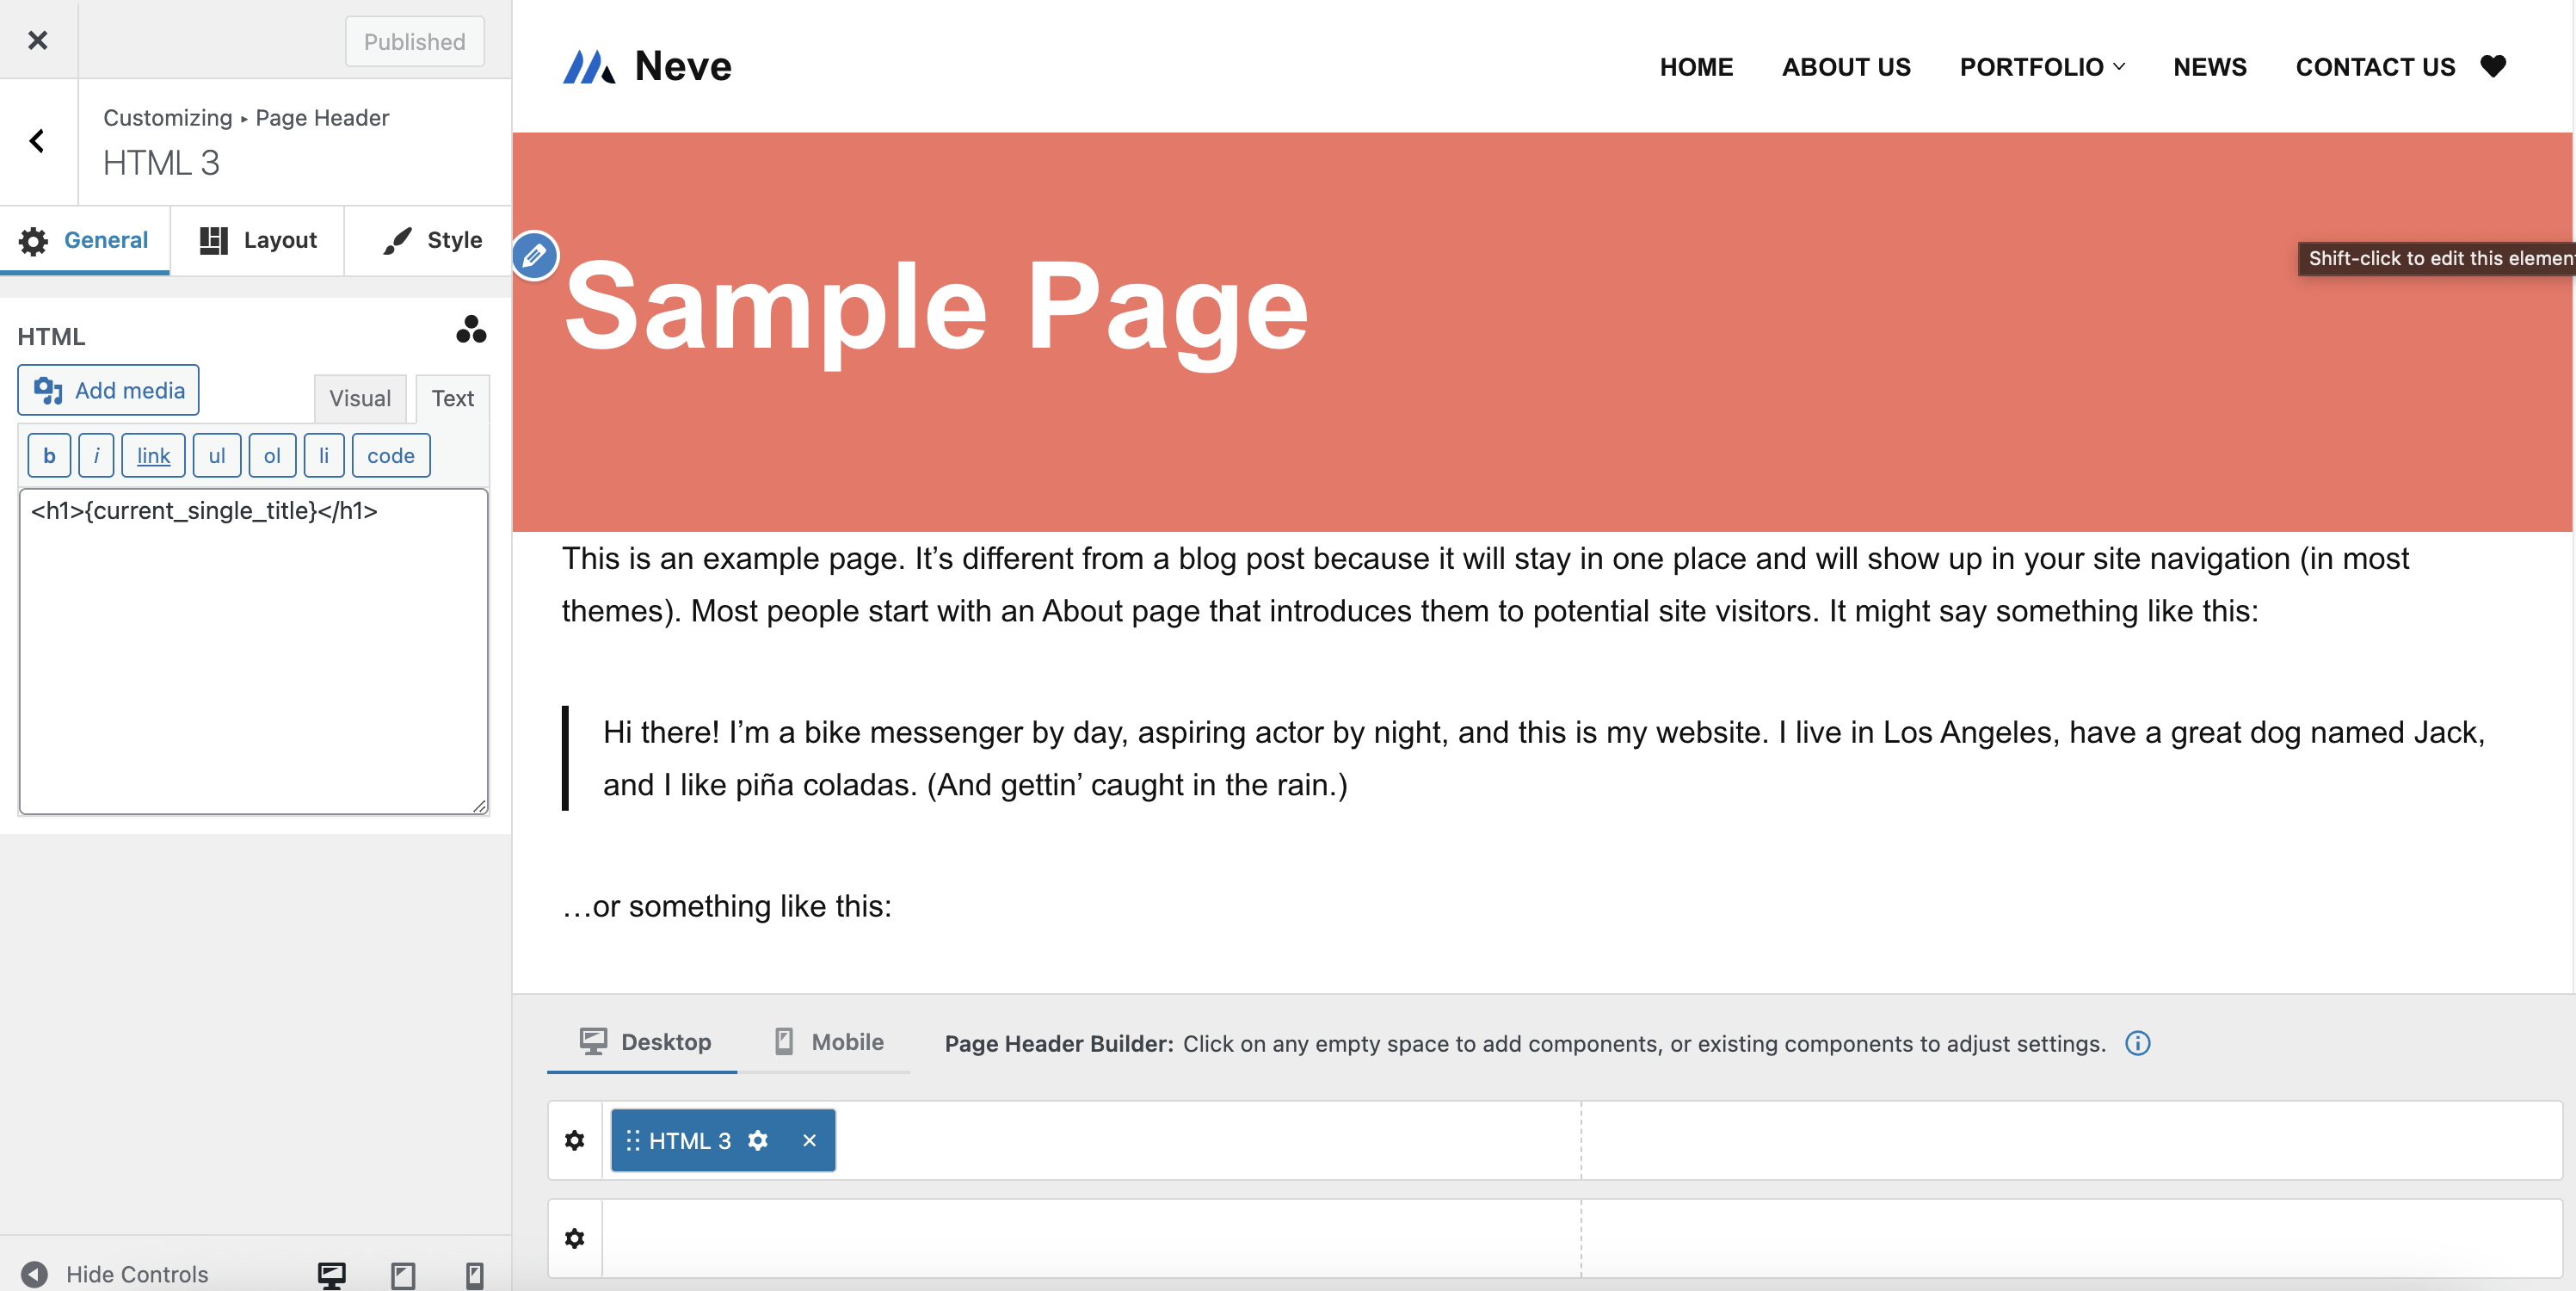
Available components for the page header builder:
- Button (3 instances)
- HTML (3 instances)
- Secondary Menu
- Custom Layout (3 instances)
- Widget Area (3 instances)
- Divider (2 instances)
Note: Please note that by default, the Page Header will be visible on all pages. To display it only on certain pages, use the options available in the Global Page Header Settings.
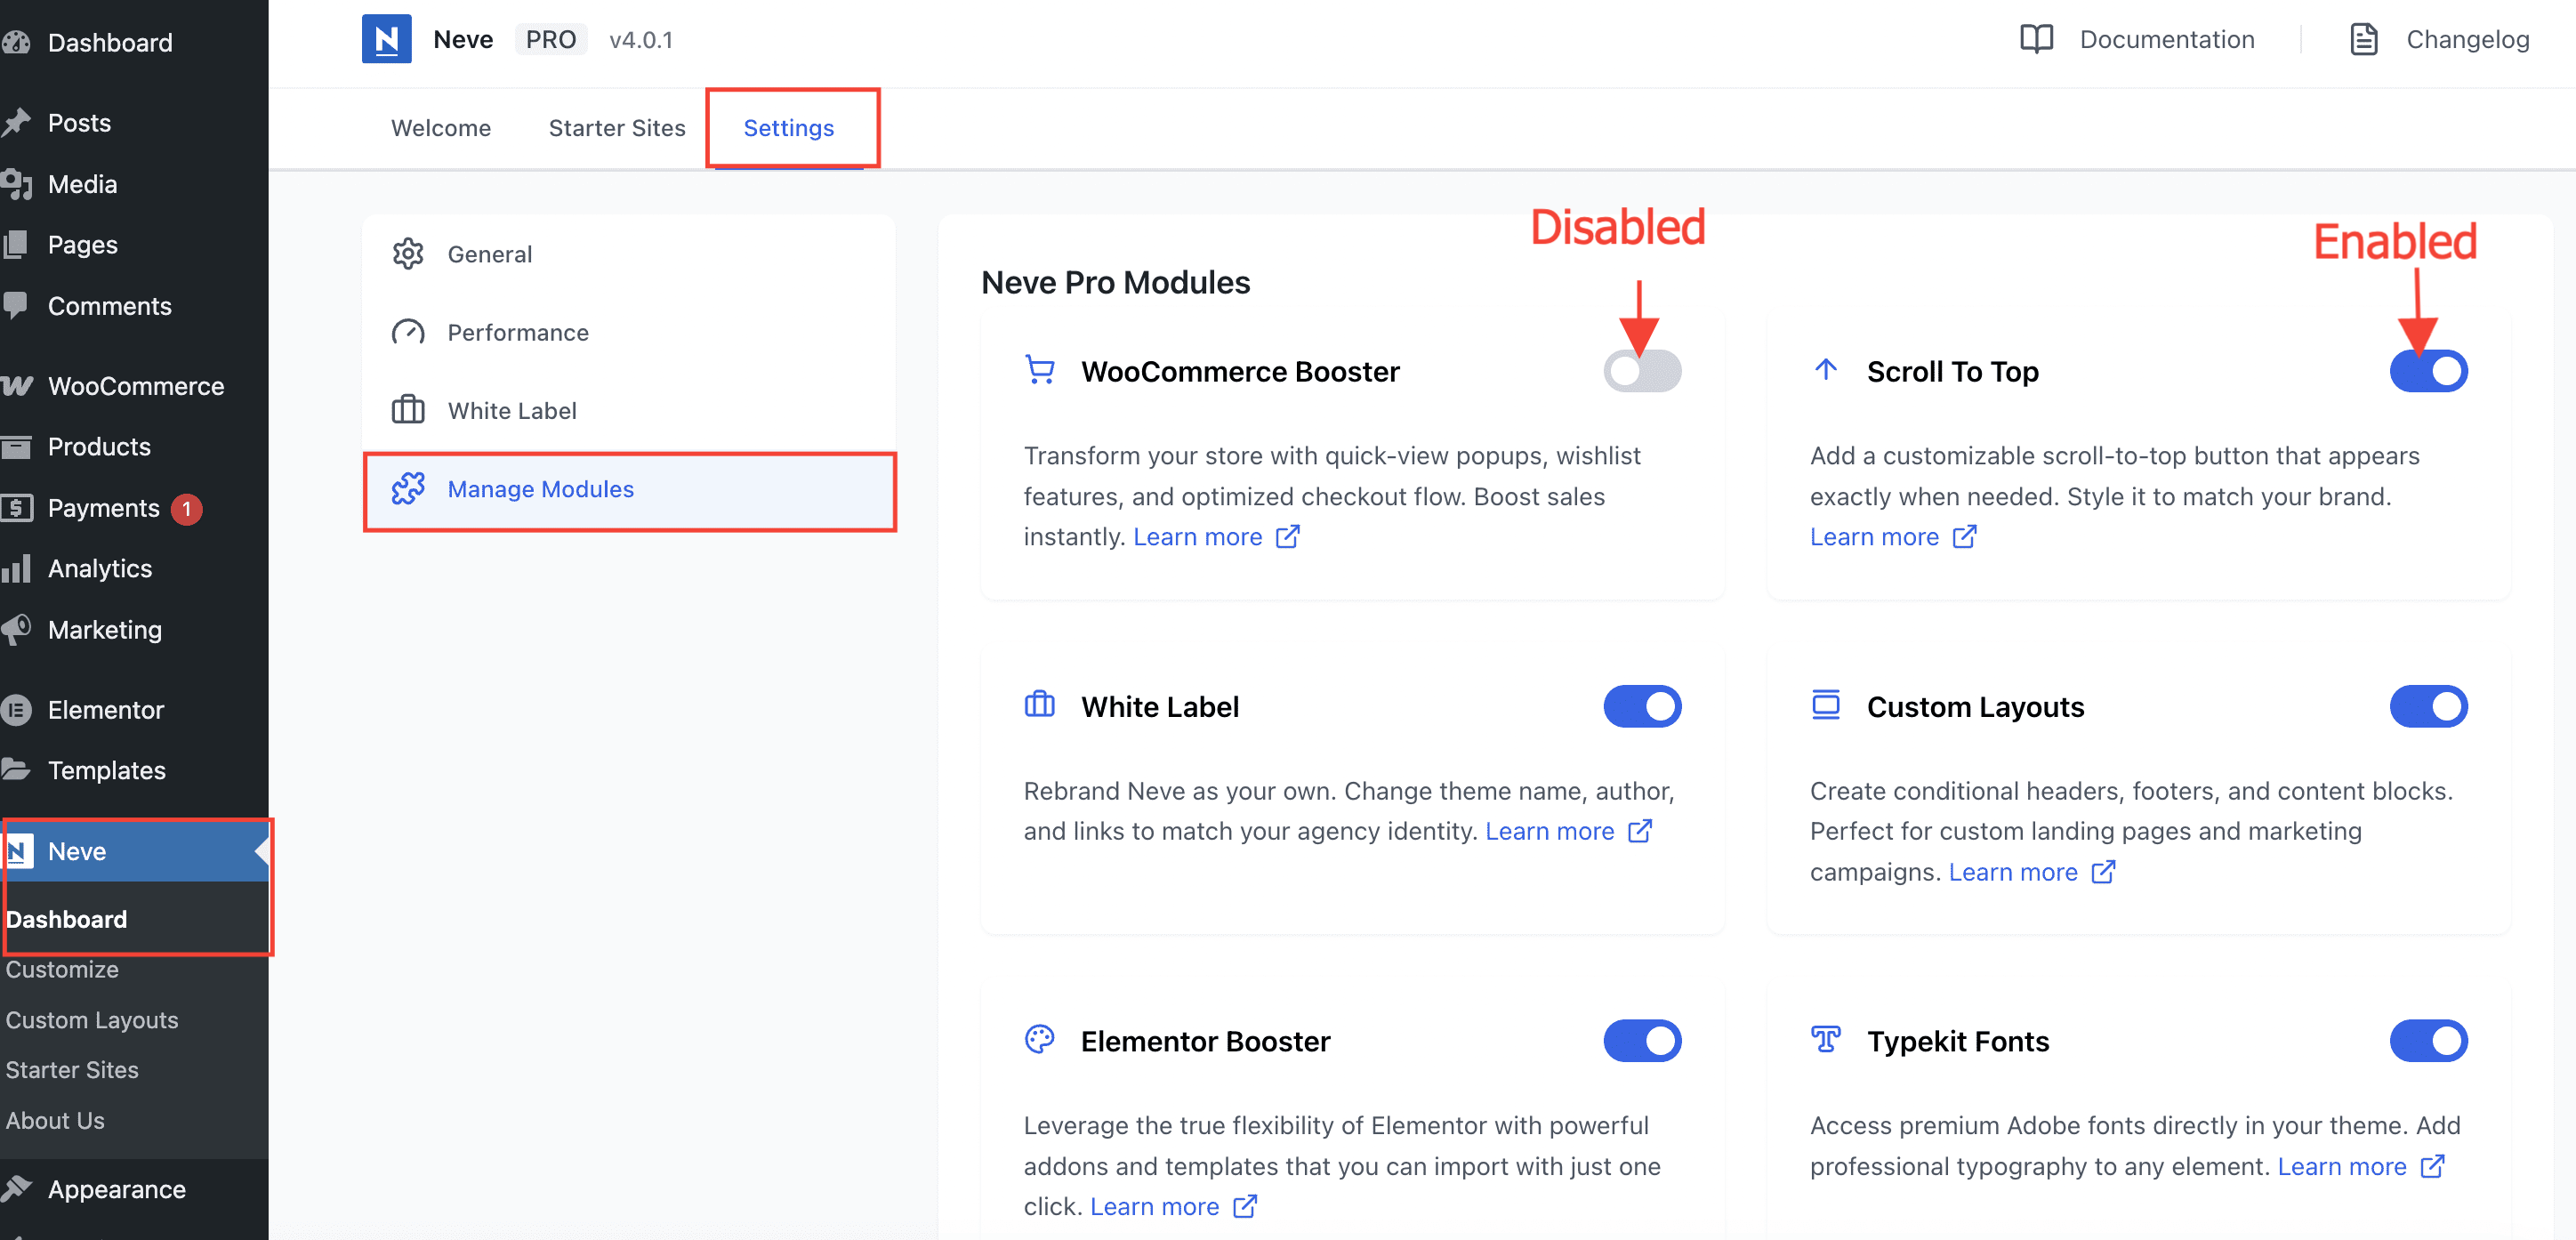
Enable or disable modules
Part of Neve PRO options consists of modules which can be enabled/disabled if used or not.
To enable/disable modules, navigate to Neve > Dashboard > Settings > Manage Modules.
Custom Layouts
Important: The Custom Layouts module is part of all three Neve PRO plans: Personal, Business and Agency.
Using the Module
1. Navigate to Neve > Custom Layouts.
2. Click on the Add New button.
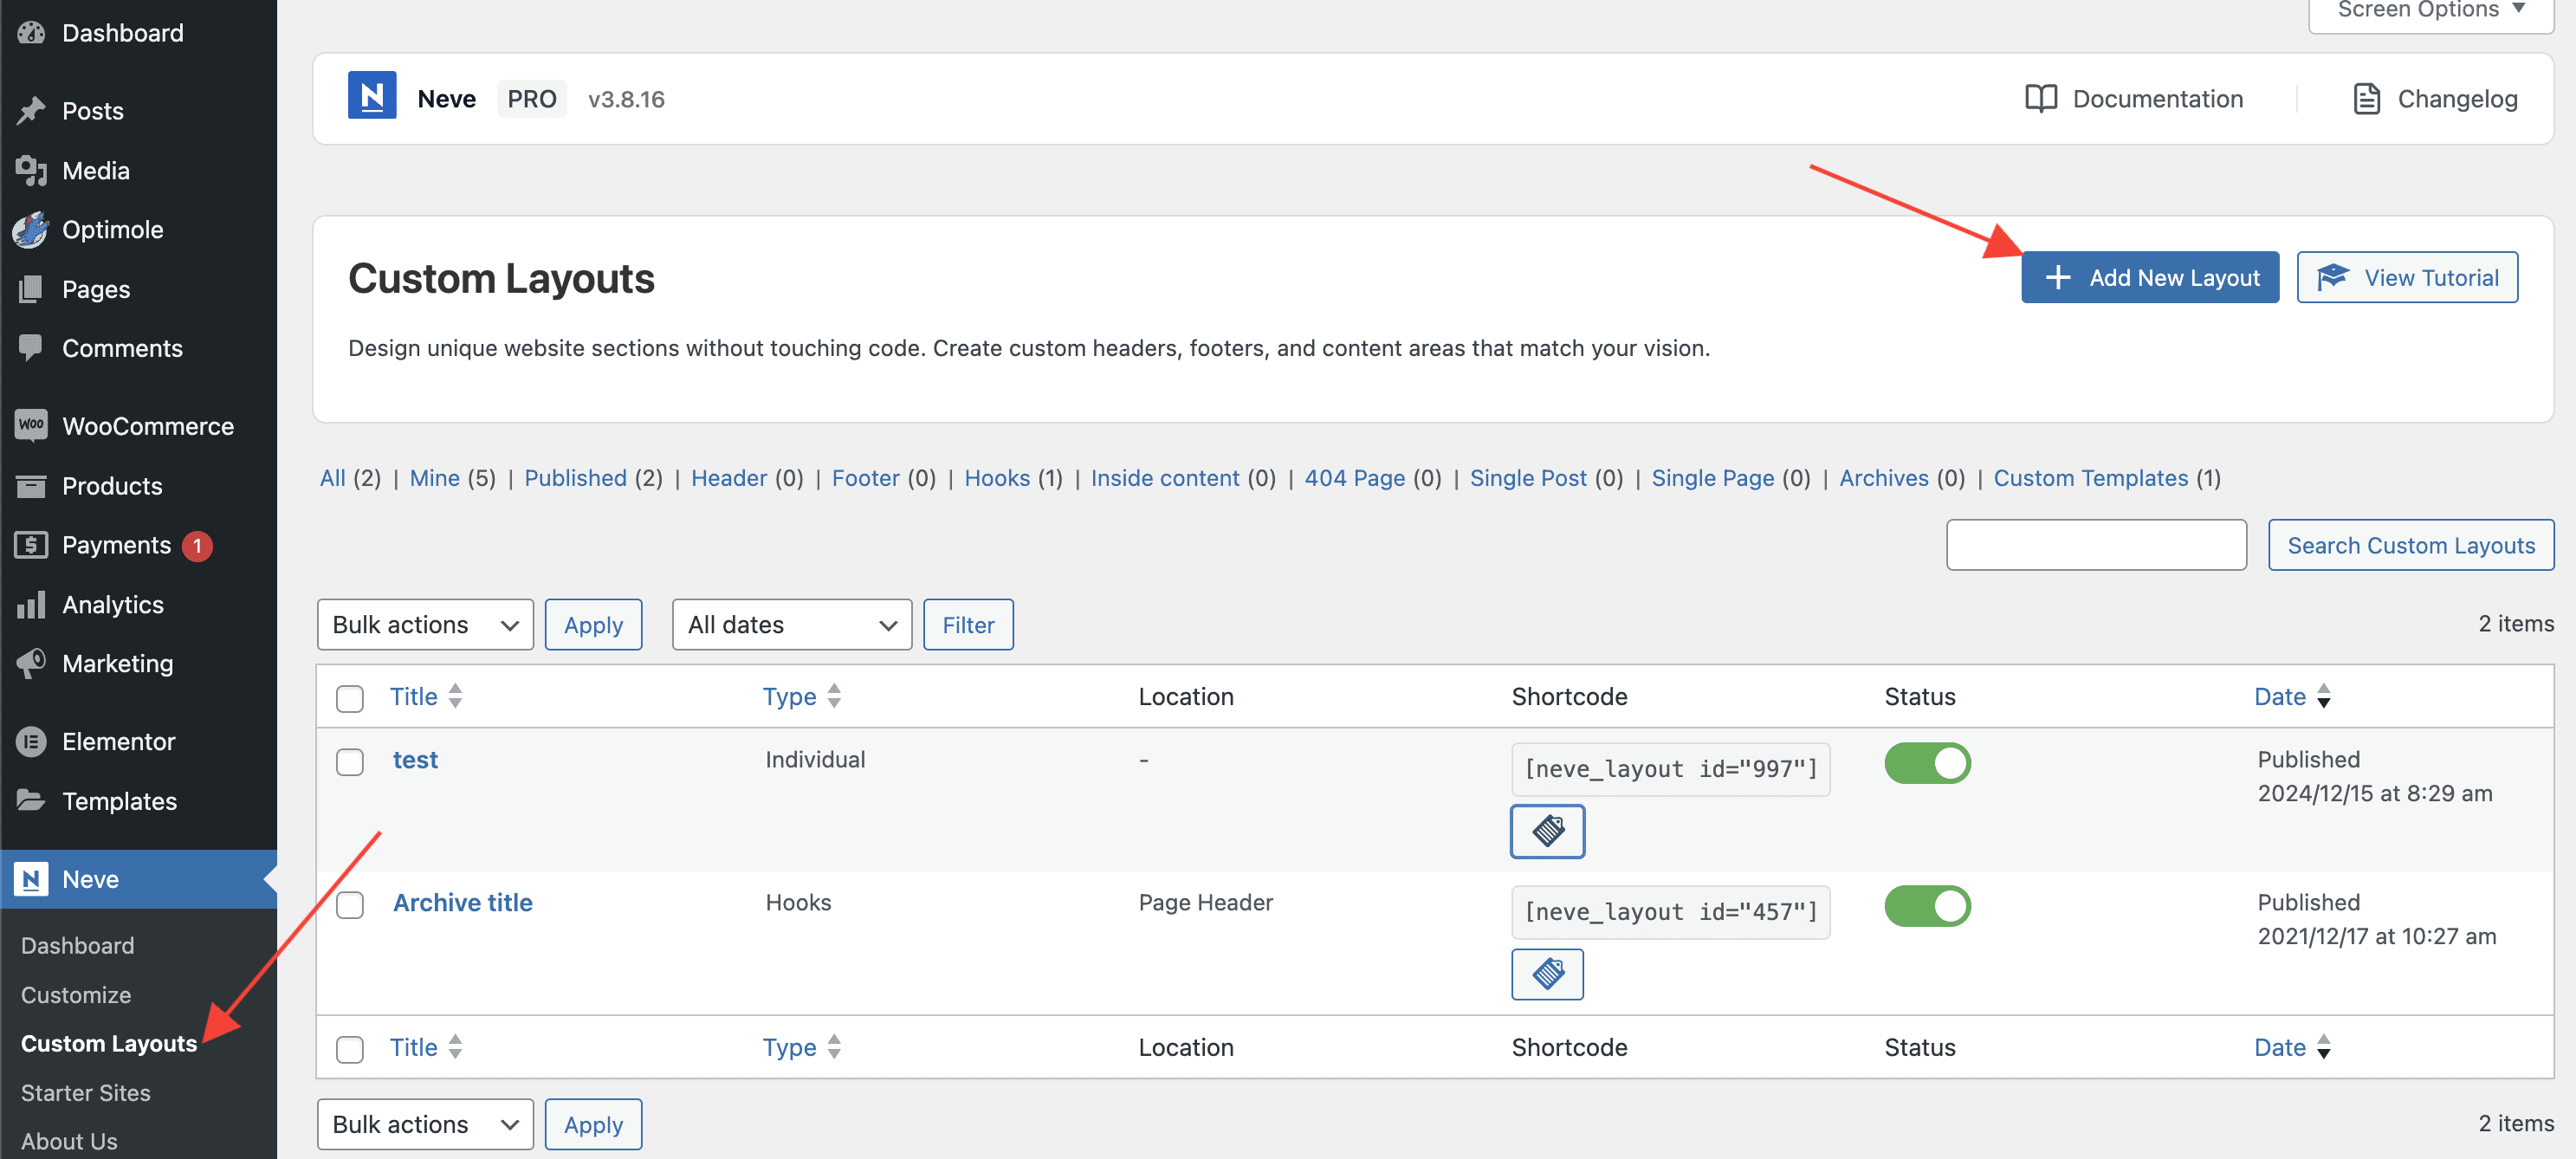
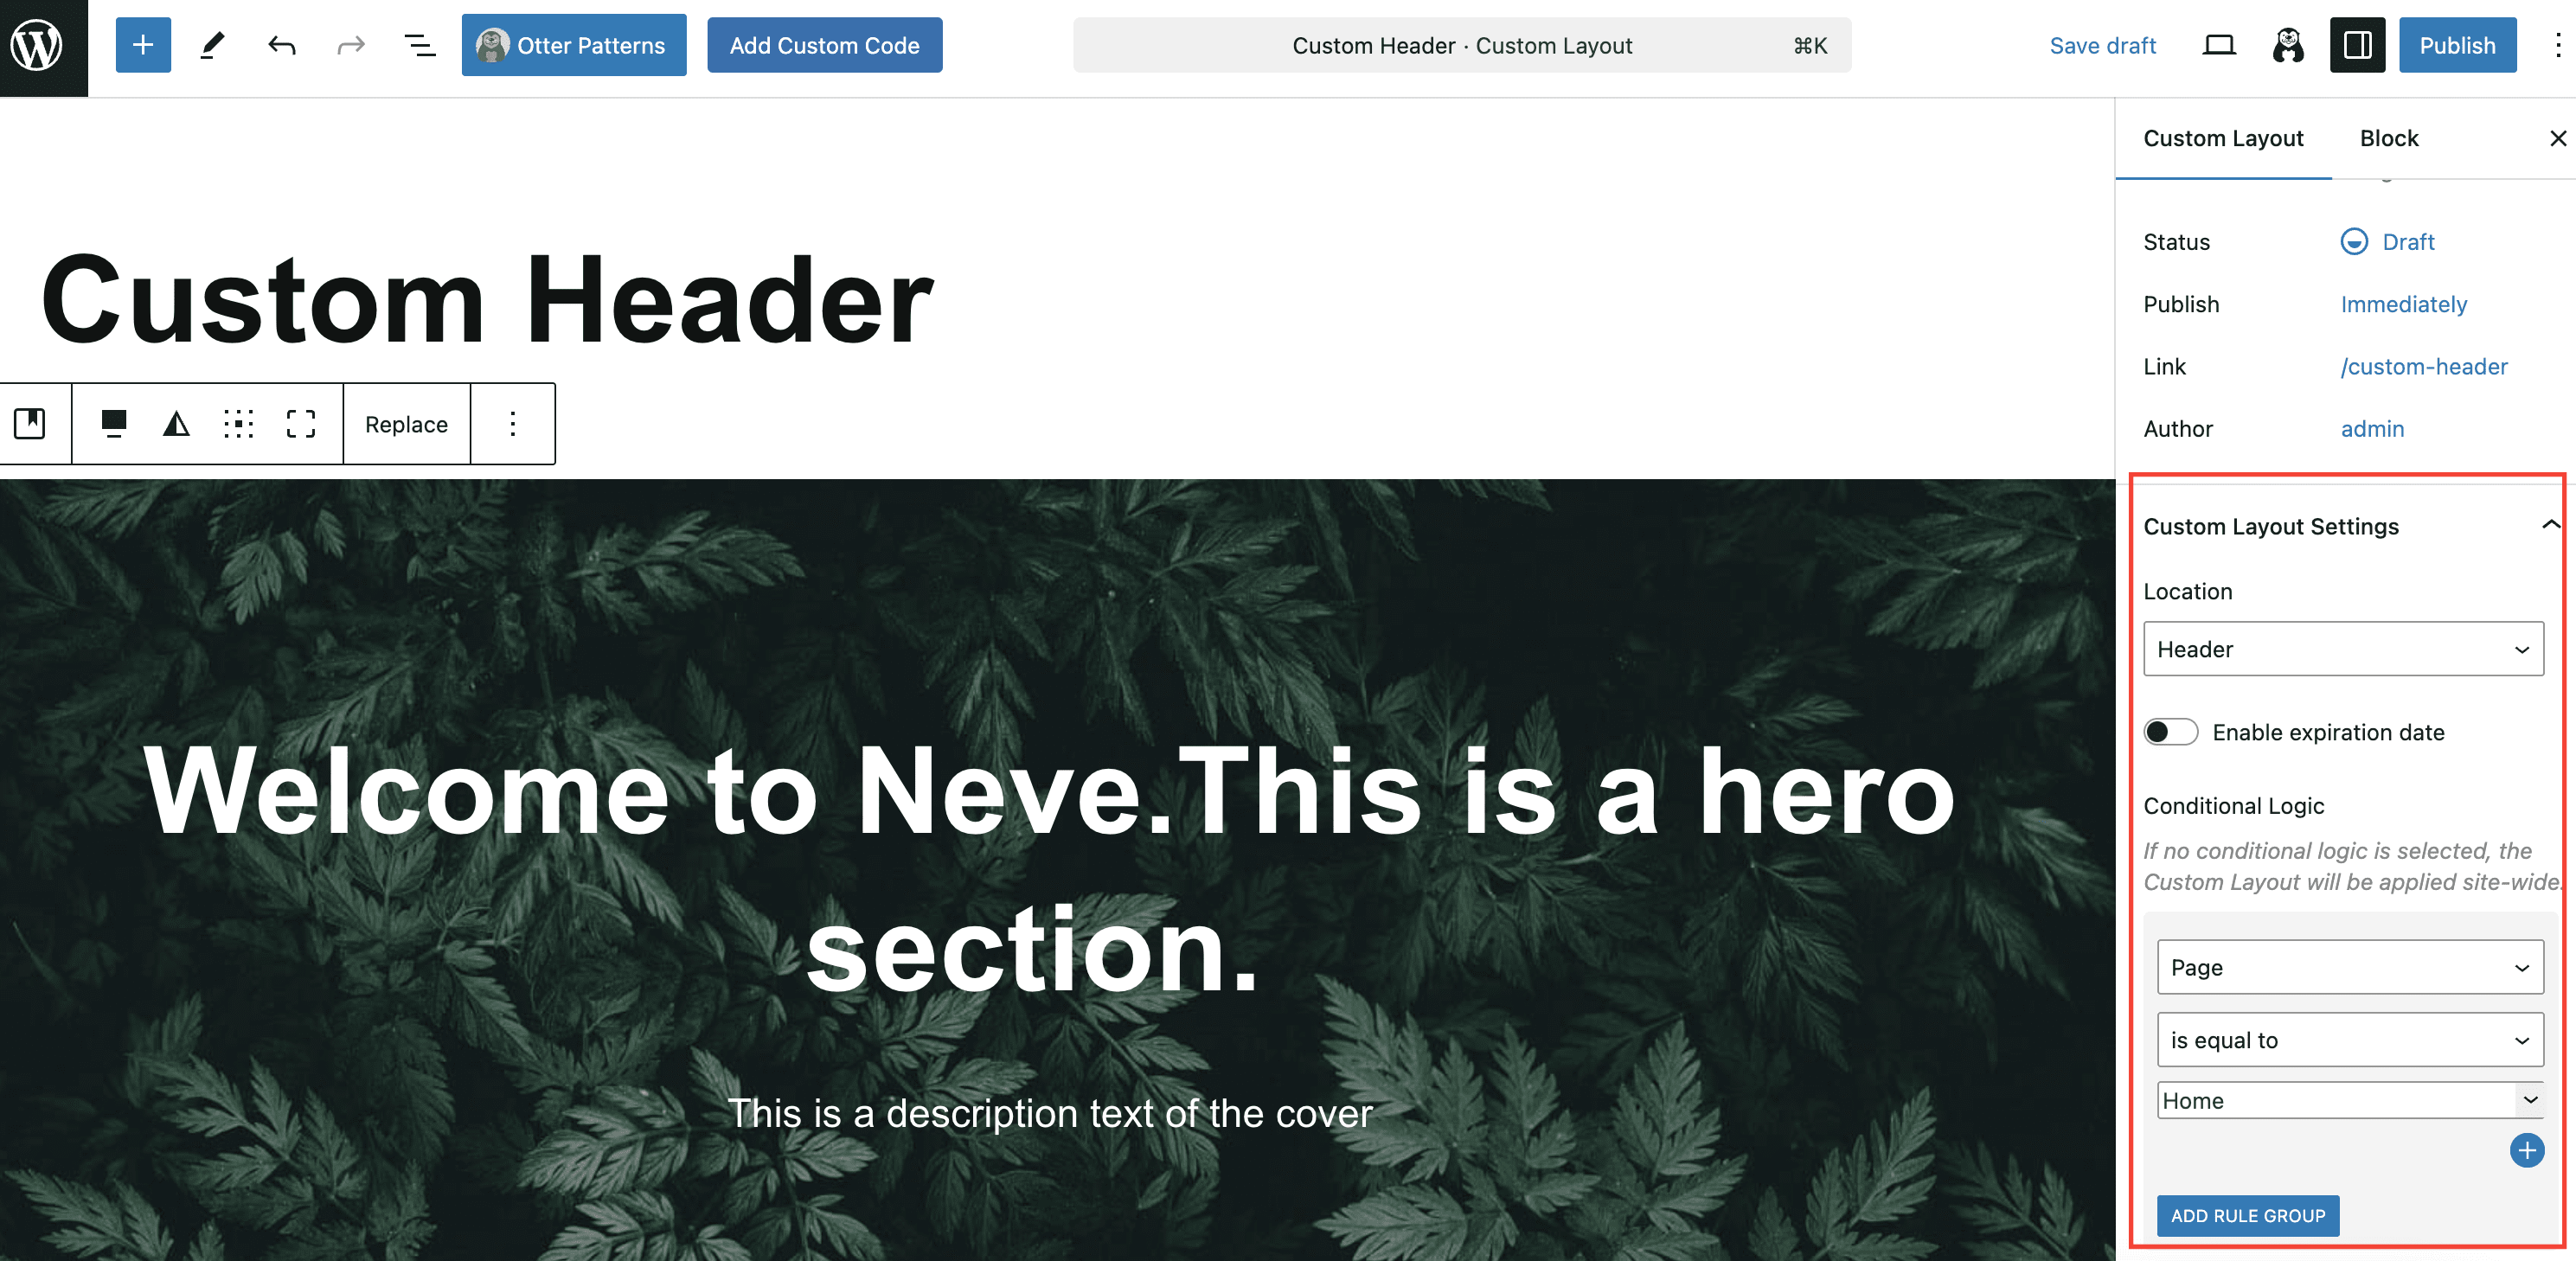
3. From this moment, you need to decide what type of custom layout you want to create, and depending on what you choose, the settings and locations will be different.
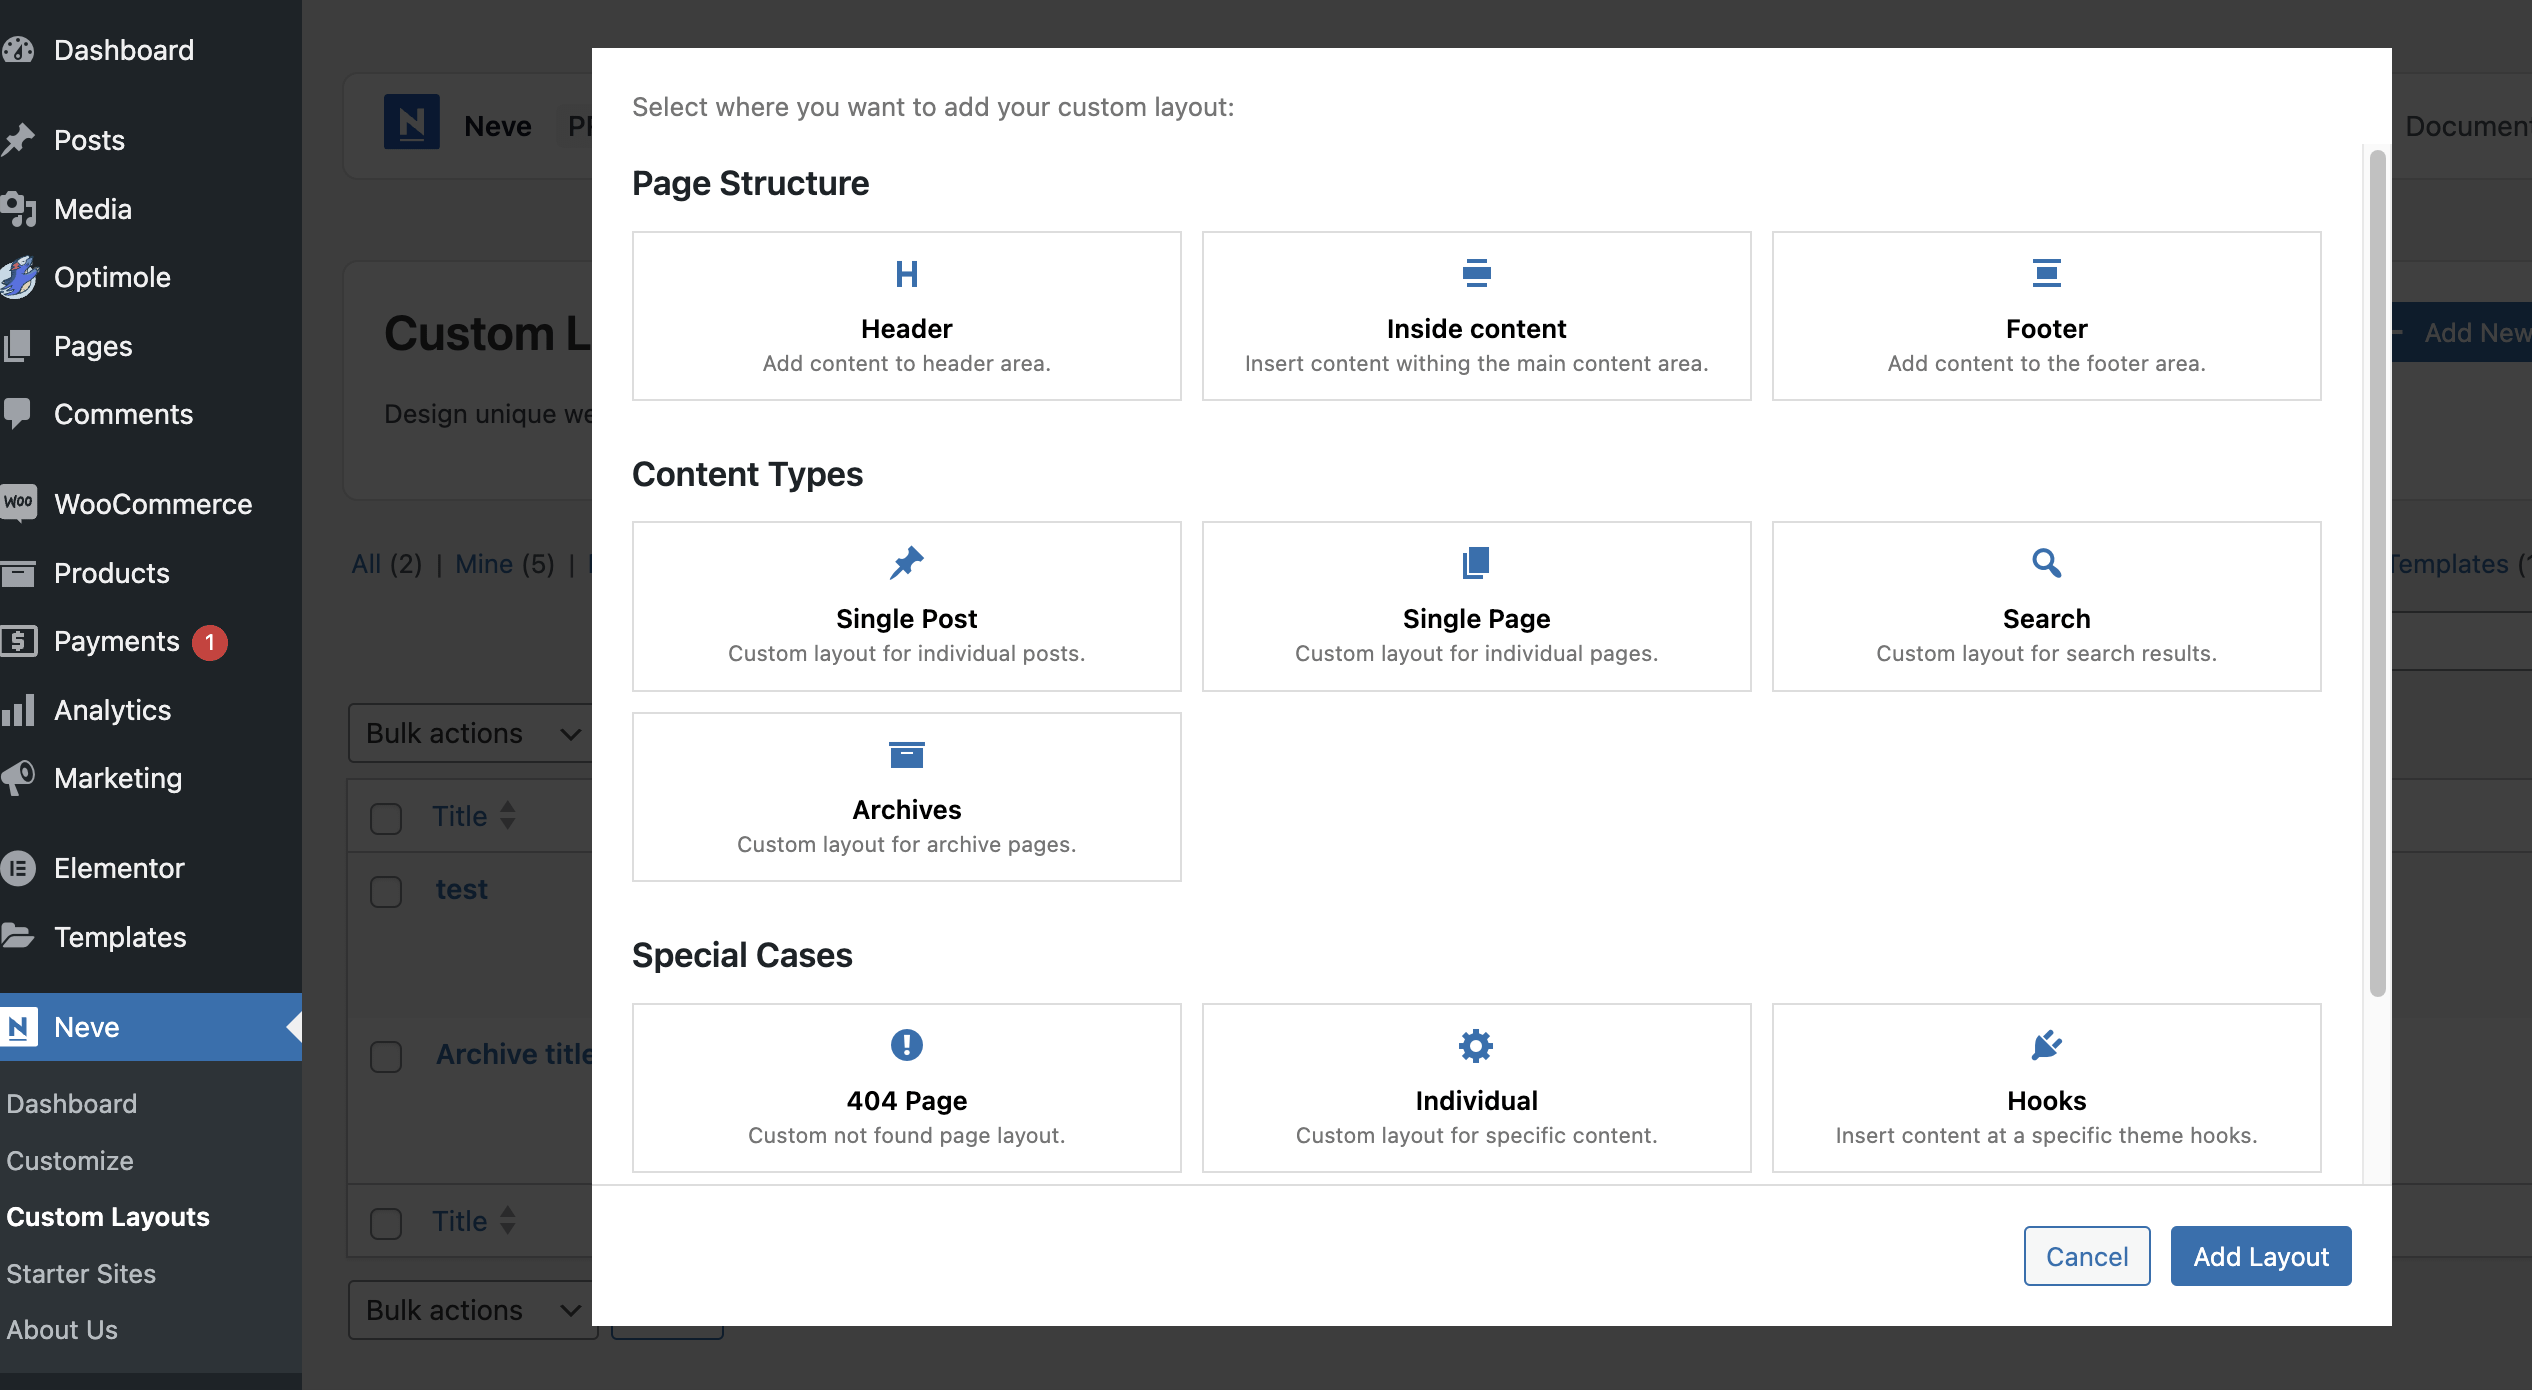
In the Conditional Logic section, you decide the criteria based on which the Custom Layout will be used on a page or not.
Depending on that, you will also have access to dedicated Magic Tags to display dynamic content for each page.
Neve Hooks
Custom Layouts can be inserted in specific places (hooks) of the theme. To have a visual representation of where each hook is located, just click on the Show Hooks link in the top admin bar, when visiting your site.

Block editor Booster
Important: The Block Editor Booster requires you to install and activate the Otter Pro plugin (you can use the same license key as for Neve Pro). When Otter Pro is active, the module is available on all Neve Pro plans. Without Otter Pro, it is available on the Agency plan only.
After enabling the module, when editing posts or pages, you will have access to 5 premium blocks:
- Review Comparison Block - Generate comparison tables from your Review Blocks.
- Product Comparison Block - Generate comparison tables from your WooCommerce Products.
- Business Hours Block
- Popup Block - Create popups using the Block Editor and display them on triggers.
- Add to Cart Block
The module also brings in Dynamic Content (Display the content from your content fields anywhere in your blocks) and the option to Display Blocks Conditionally.
WooCommerce Booster
Important: The WooCommerce Booster is part of just two Neve PRO plans: Business and Agency.
The WooCommerce Booster is an add-on for the WooCommerce plugin, which brings in lots of customizations options for the Shop, Product, Cart and Checkout pages.
Note: The WooCommerce Booster requires Sparks to be installed and activated. Read here or bellow about all the options coming from Sparks:
| Multi-Announcement Bars | Variation swatches |
| Comparison table | Advanced Reviews |
| Tabs Manager for Products | Custom Thank You Page |
| Quick View | Product Wishlist |
Customize the Shop page
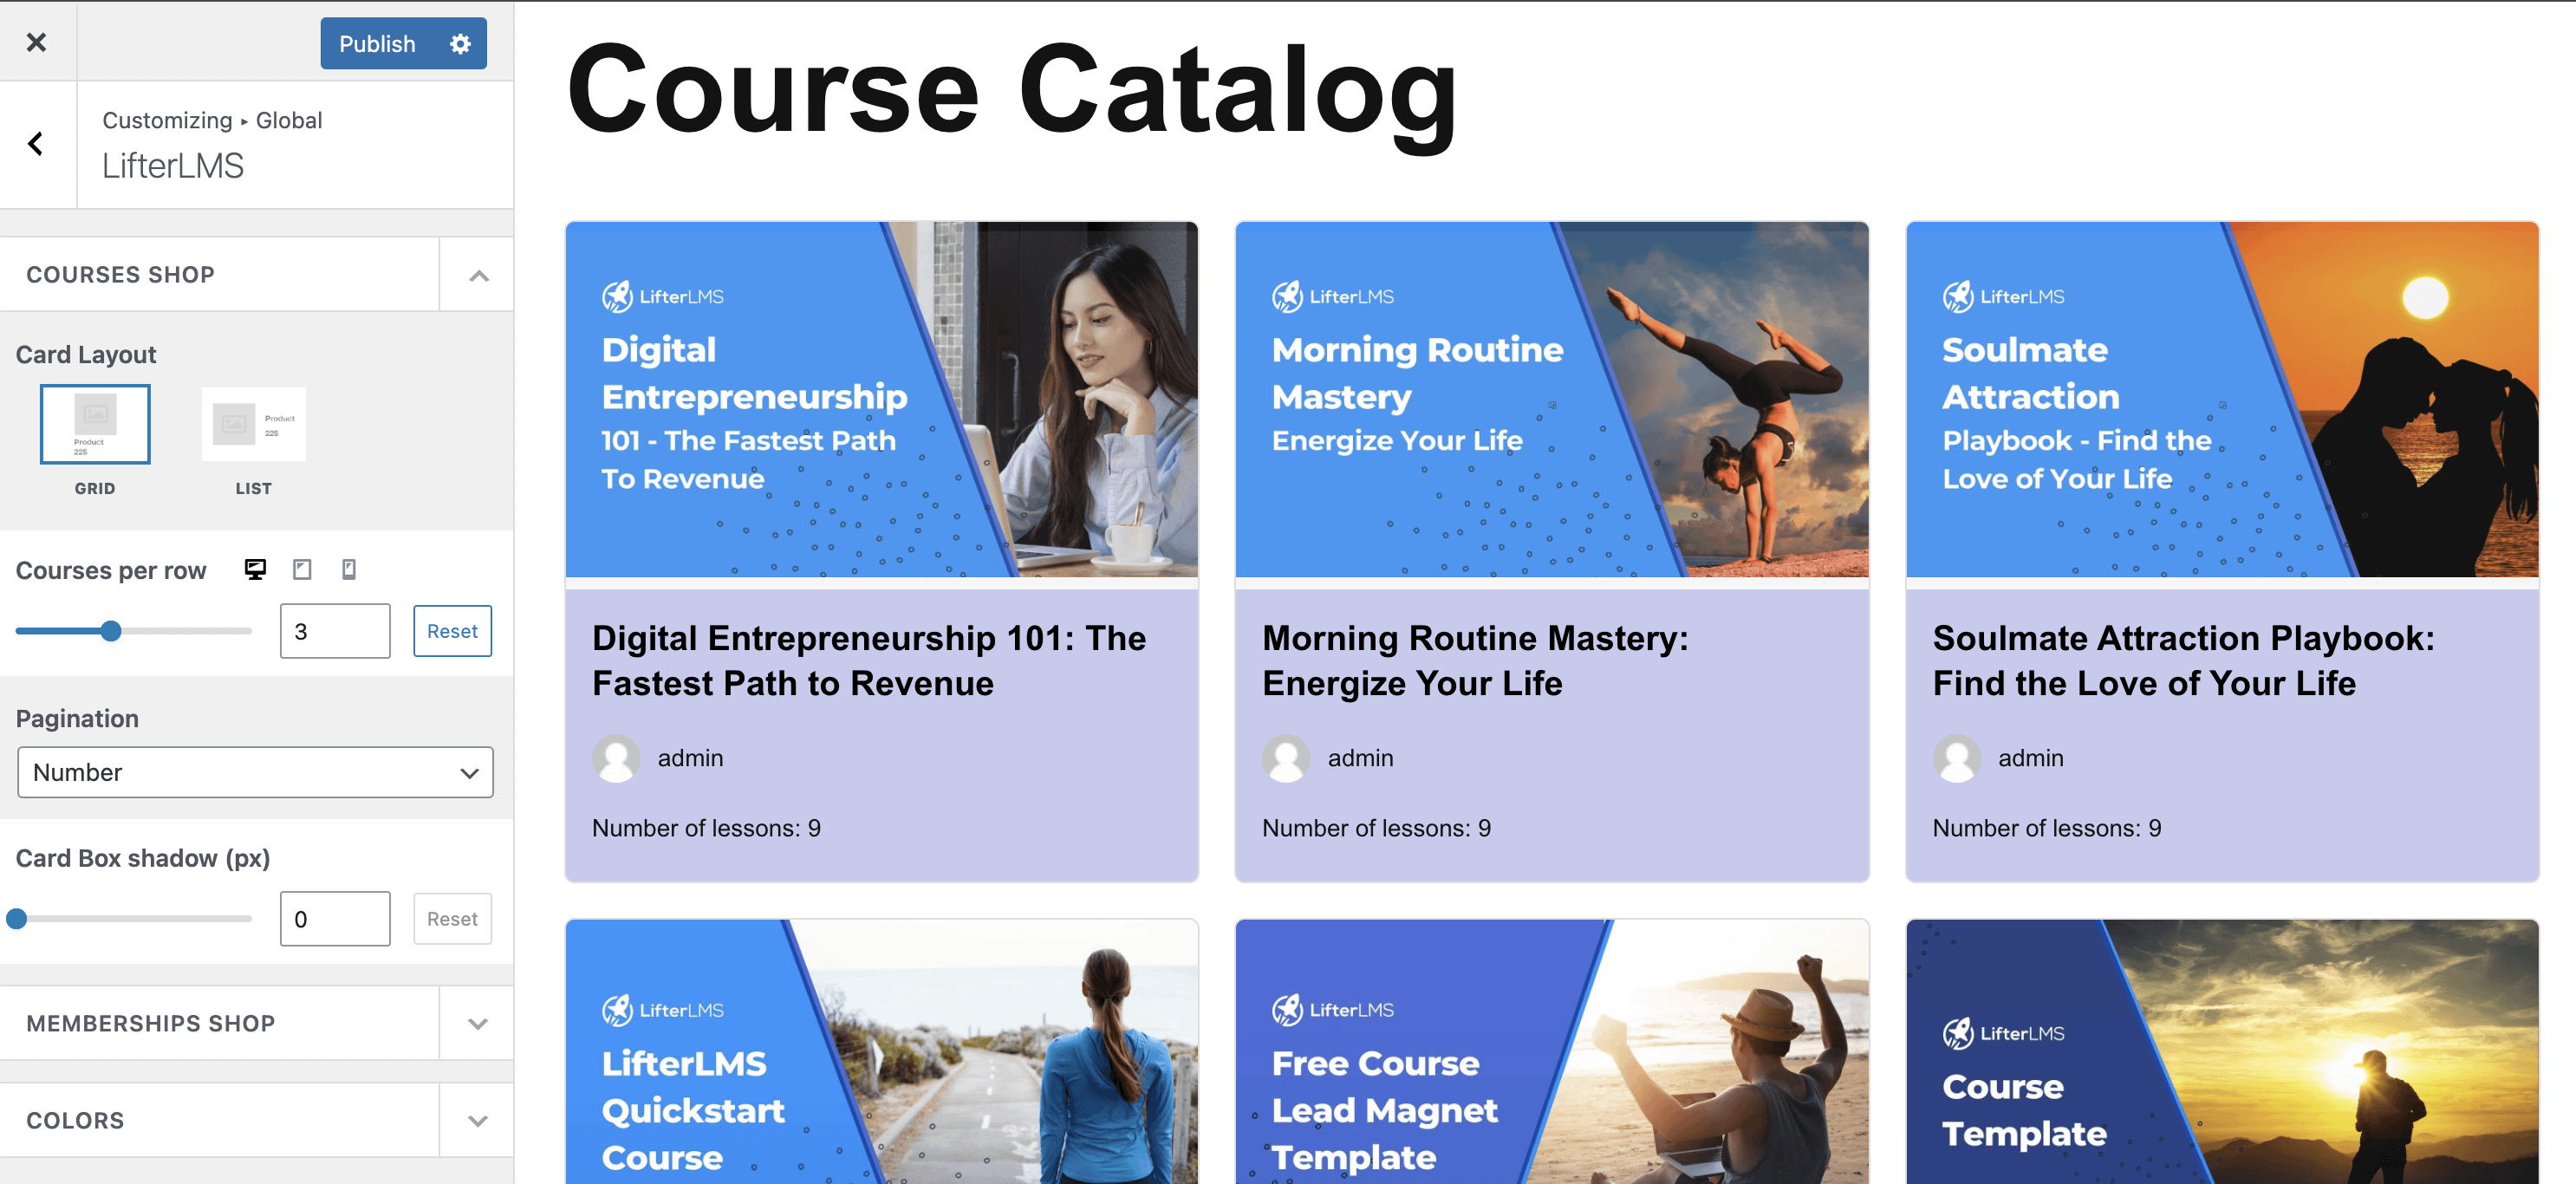
Navigate to Appearance > Customize > WooCommerce > Product Catalog to access the options:
- Products per row (maximum 6) and Products per page are two related options, setting the number of products that will display on the Shop page.
- Pagination - Number of Infinite Scroll (continuously load products as users scroll down the page).
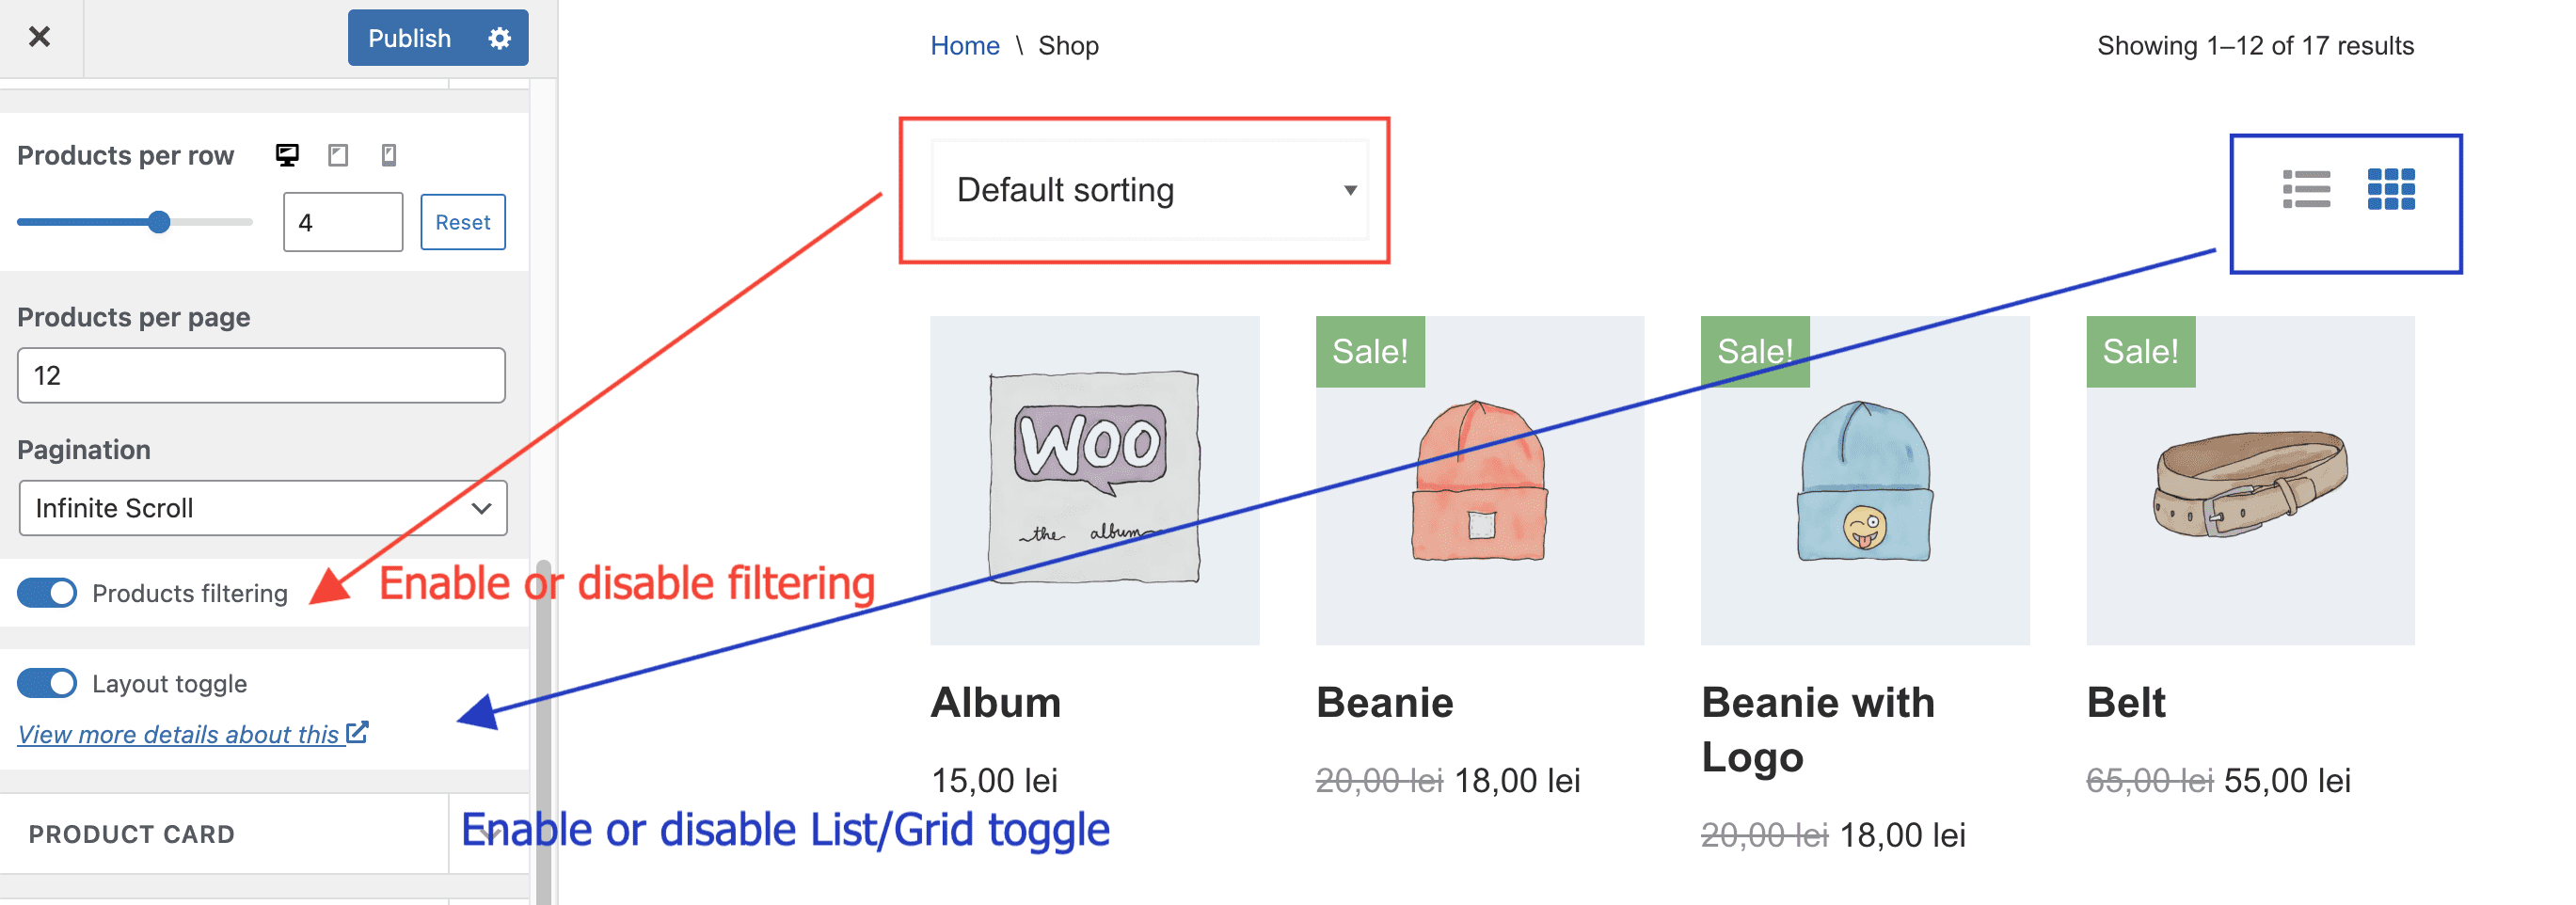
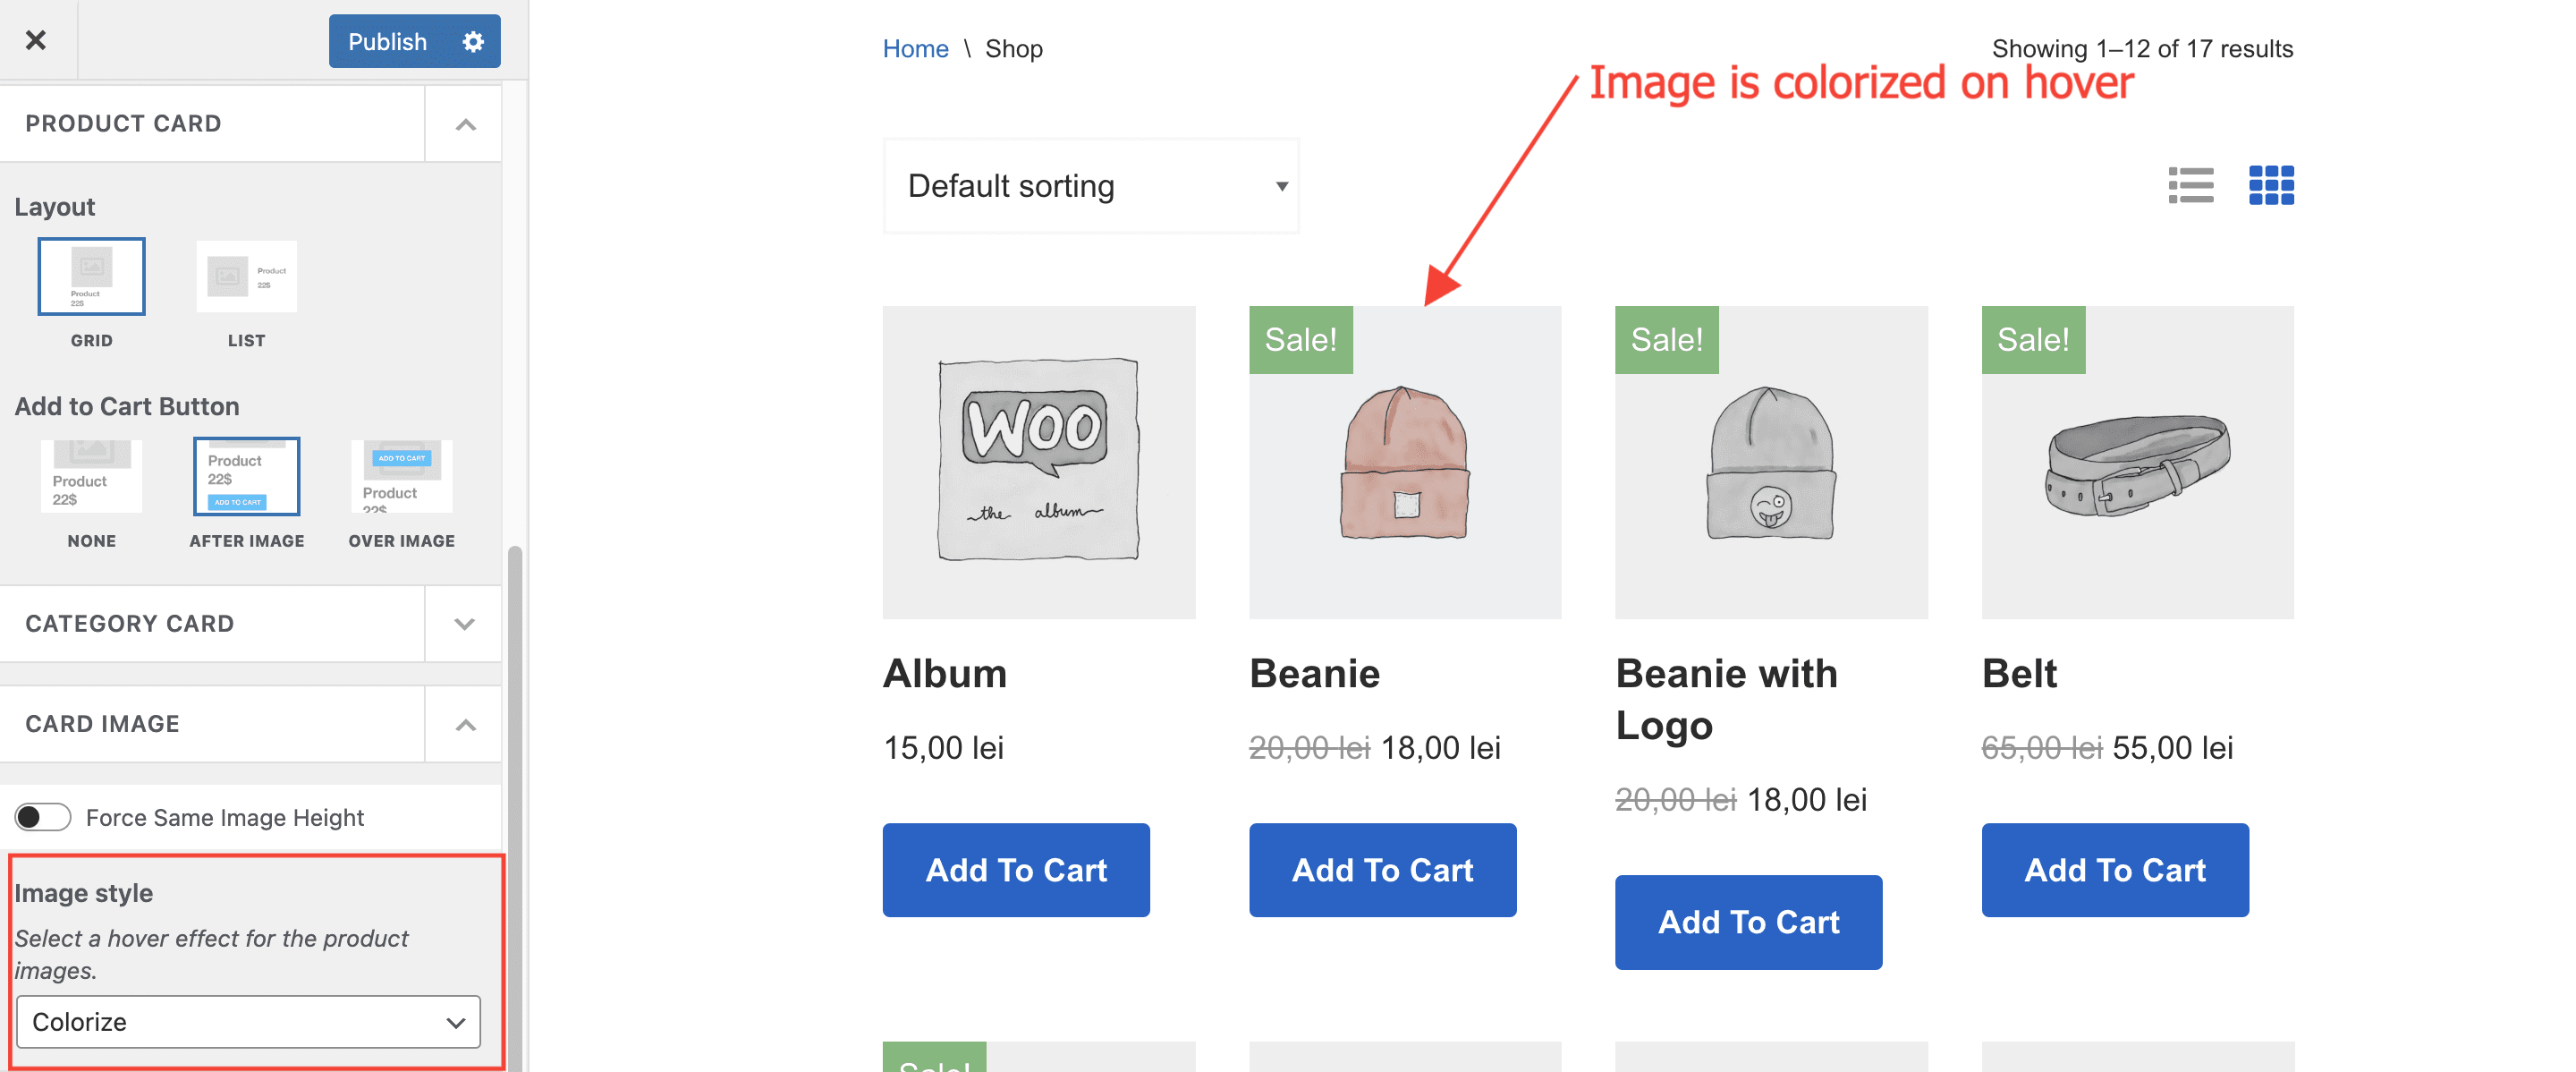
- In the Product card panel, there is an option to display products either as Grids or Lists, and an option to adjust the Add to Cart button ( either not show it at all, at the bottom, or on top of the product, on hover ).
- In the Card image panel, there are two options that can be used to customize the product image: Force Same Image Height ( which makes all images the same height, no matter their initial size ) and Image style ( which allows for various hover effects like Zoom, Blur, Colorize etc ).
- In the Card Content panel, the main option is Elements Order, from where you can reorder and enable/disable the elements ( Product title, Product stars rating, Price, Product Category and the Short description ) to obtain the layout of your choice.
- Price template - Allows you to add prefixes ( For e.g. only, buy at ) or suffixes ( For e.g. included tax, VAT included) for the price.
- Advanced reviews - Besides the default Product stars rating, by enabling this option, you also get the rating number and the total number of reviews, as in the image below.
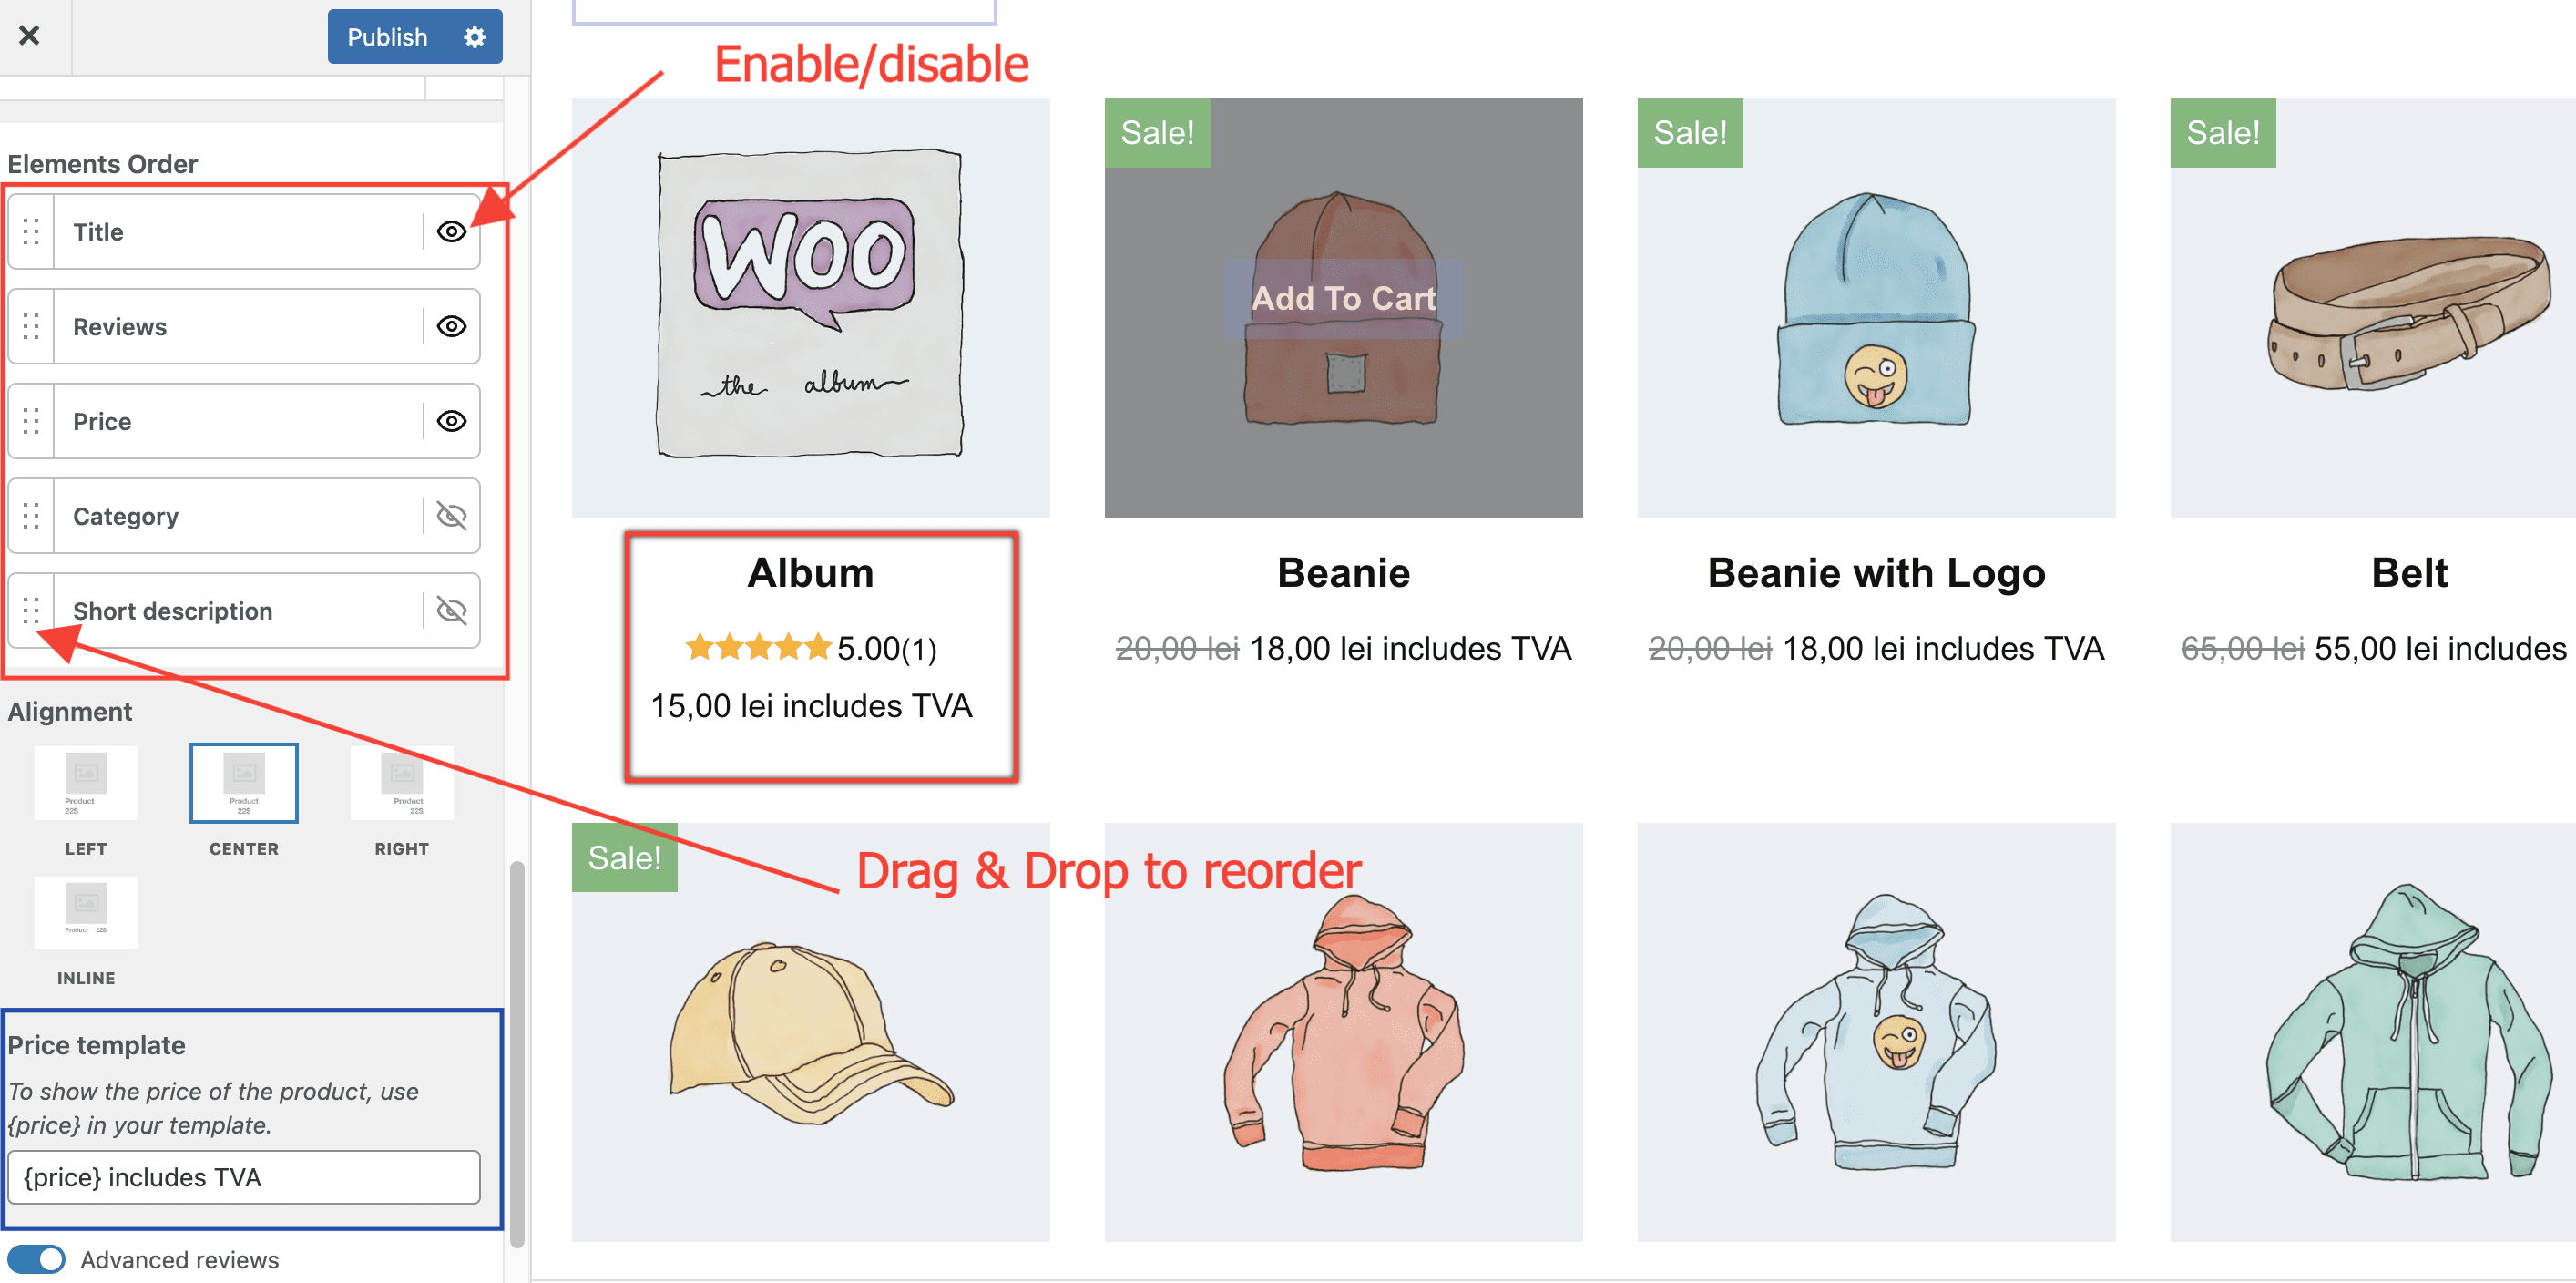
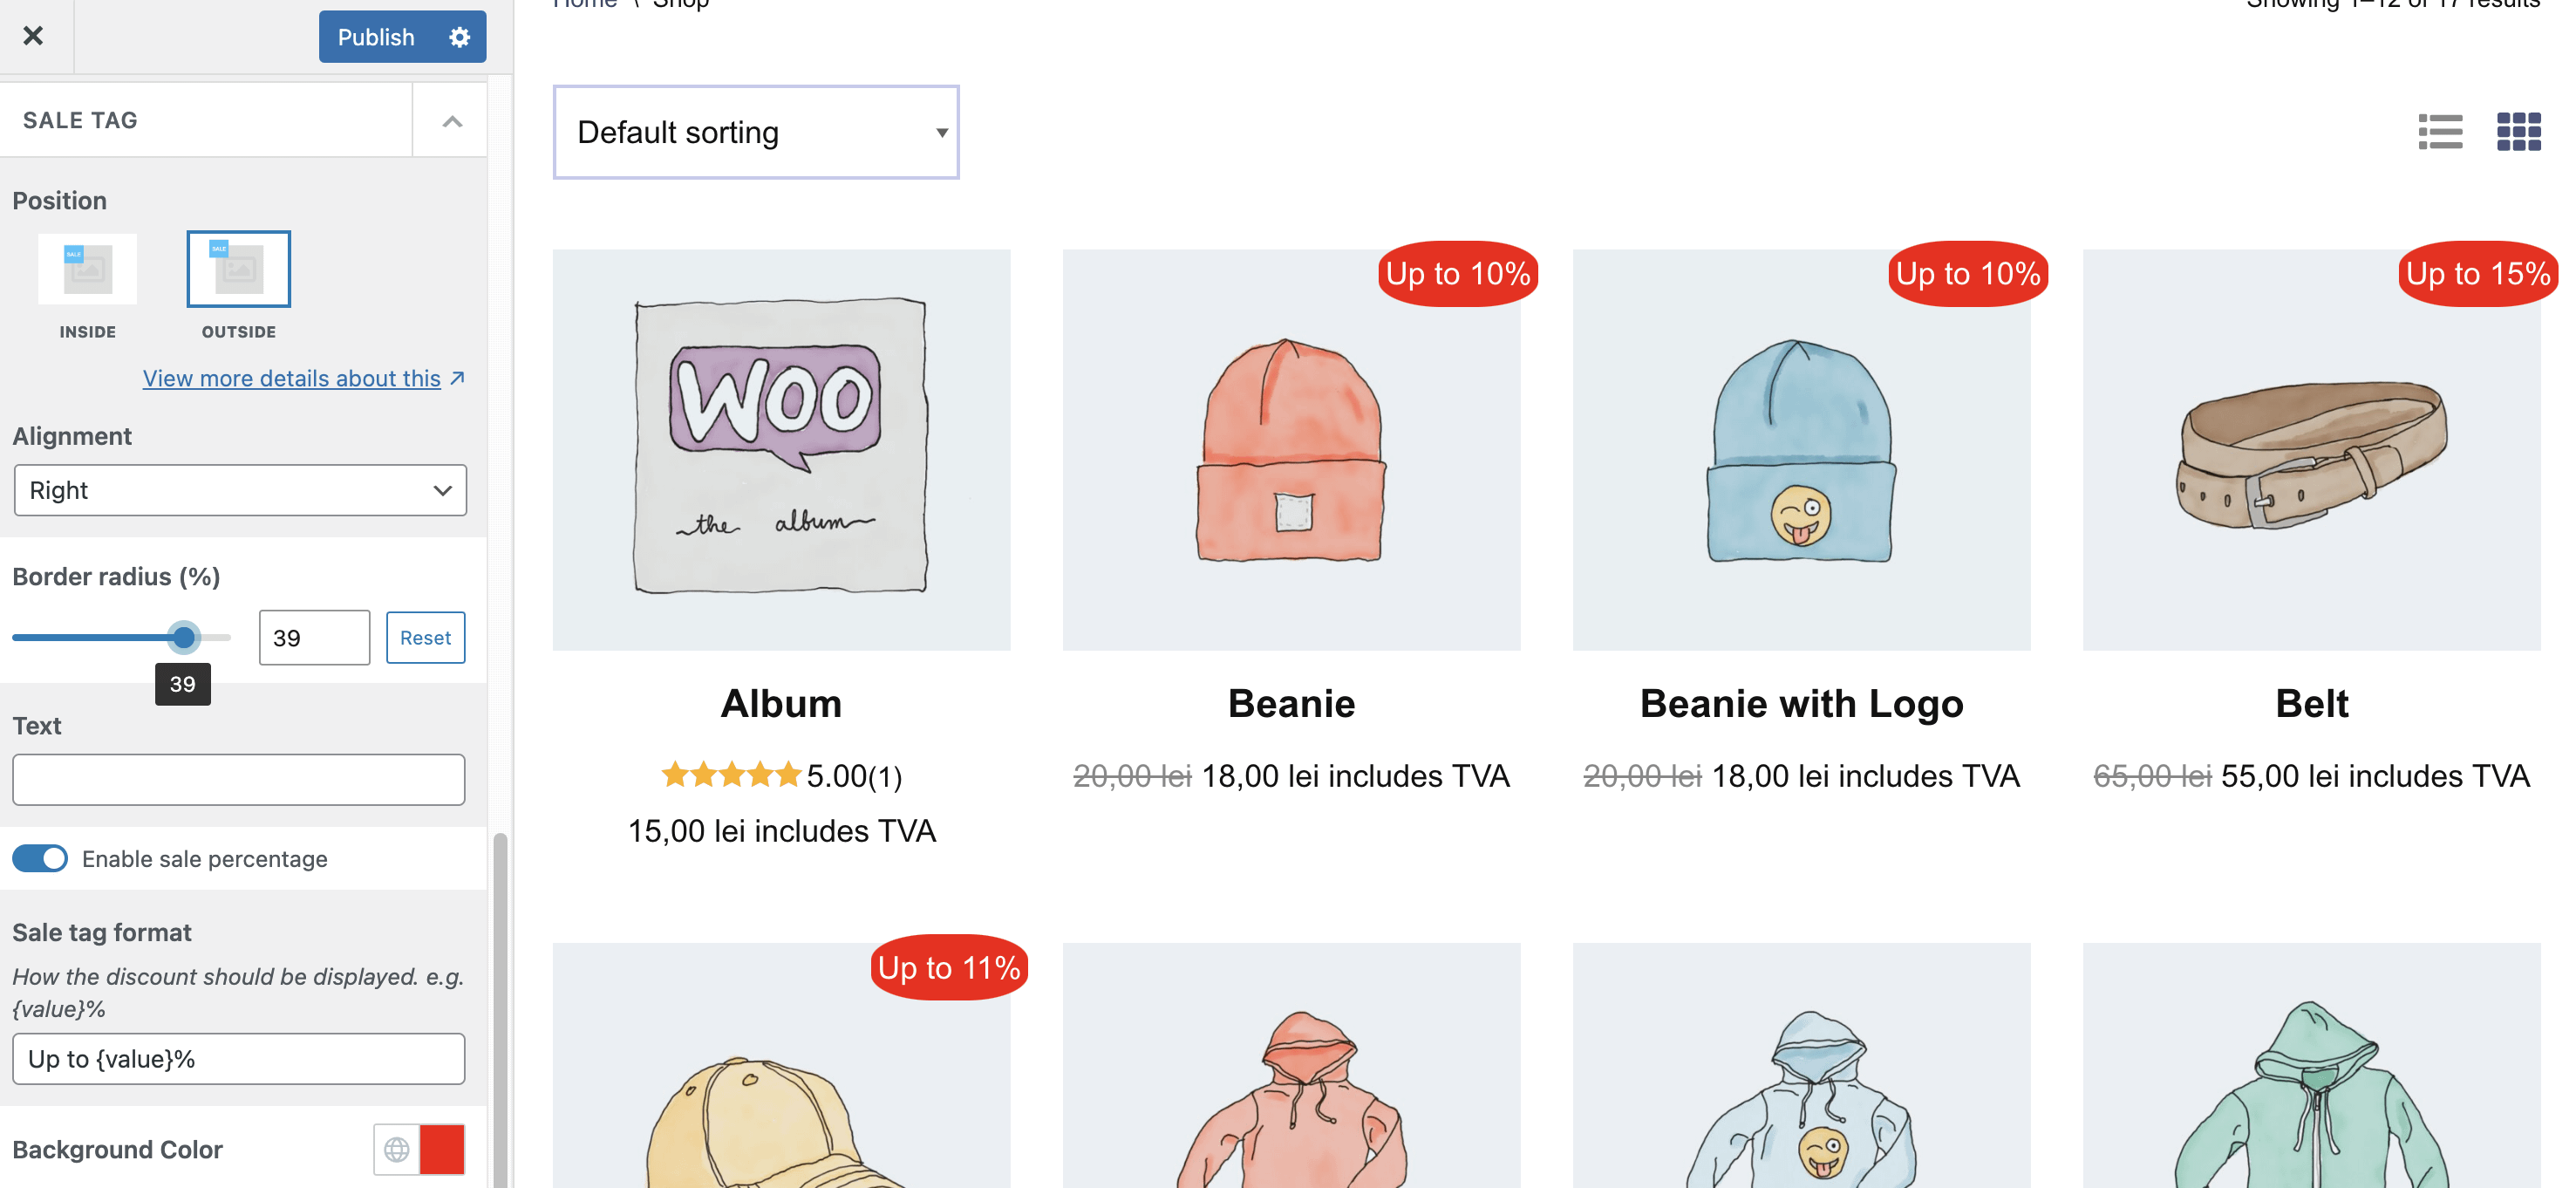
- The Sale tag for products that have a discounted price, can be customized from Appearance > Customize > WooCommerce > Product Catalog > Sale Tag.
Customize the Product page
Navigate to Appearance > Customize > WooCommerce > Single Product to access the options:
- The main option is Elements Order, from where you can reorder and enable/disable the elements ( Product title, Product stars rating, Price, Meta, Add to Cart button, and the Short description ) to obtain the layout of your choice.
- For products that have a gallery of images, the Gallery Layout option can be used to change the default layout of the product ( where the gallery images are at the bottom of the main image ), to one where the images are in the left side of the main image.
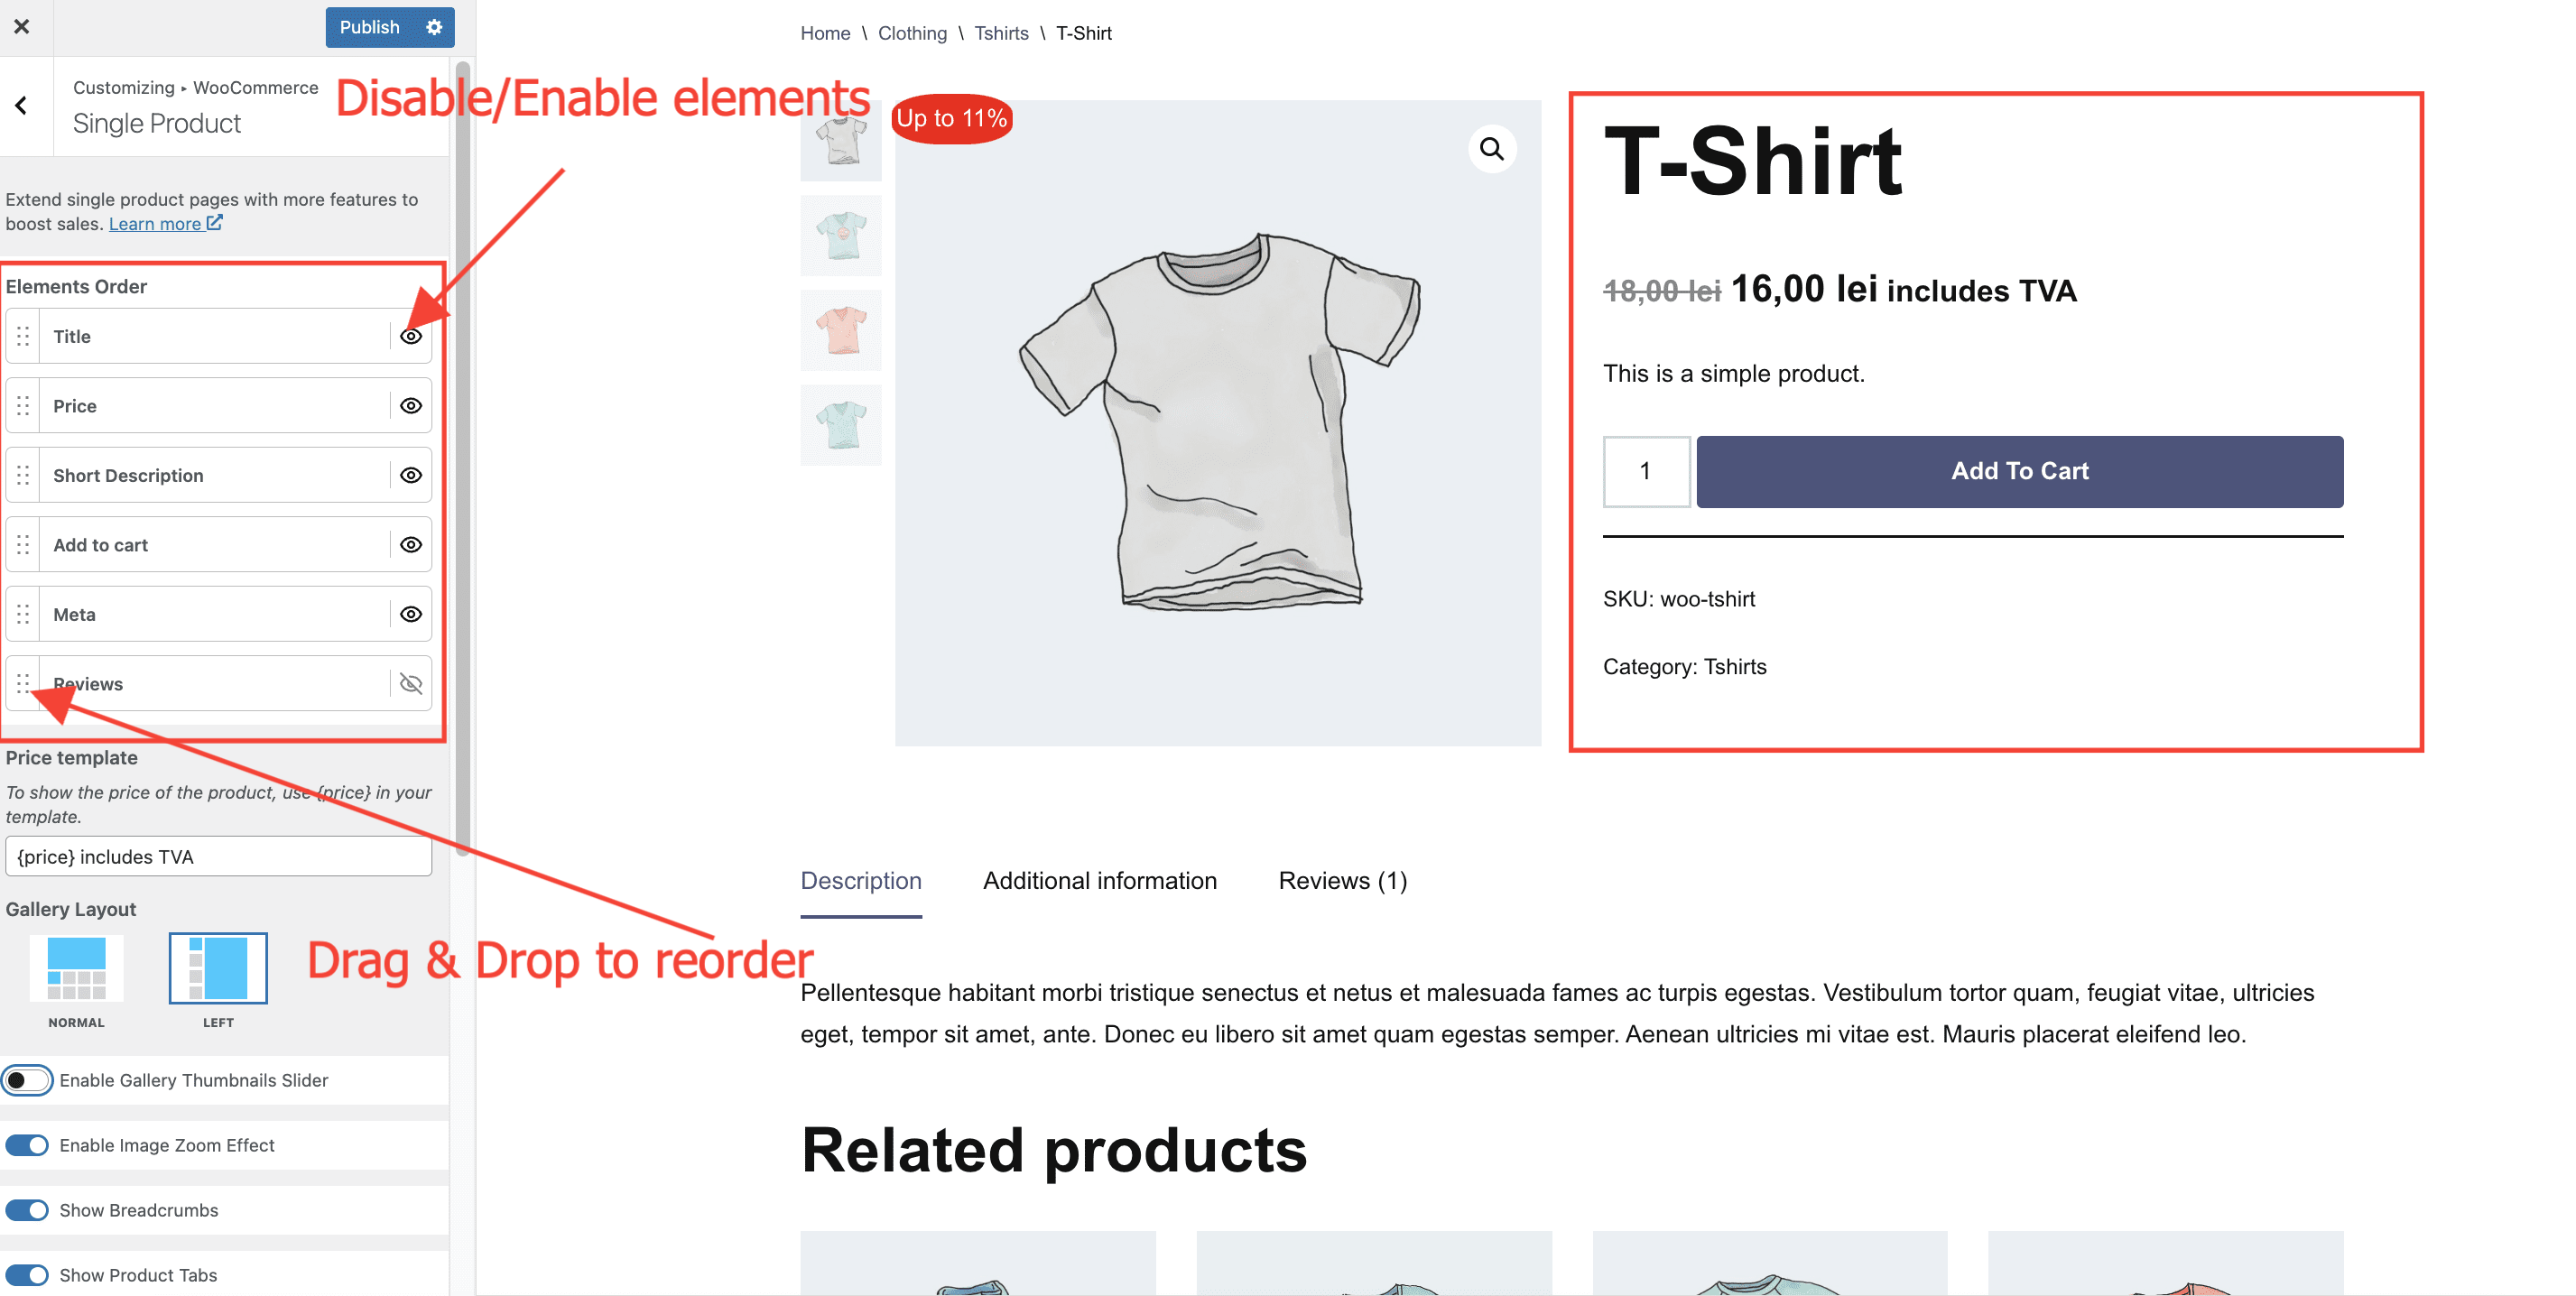
- Show Product Tabs - Enable or disable the tabs coming from WooCommerce ( Description, Additional information and Reviews )
- Enable Seamless Add to Cart - When this option is enabled, the product is added to the cart without refreshing the page.
- Show Upsell Products - Enable or disable upsells for the current product.
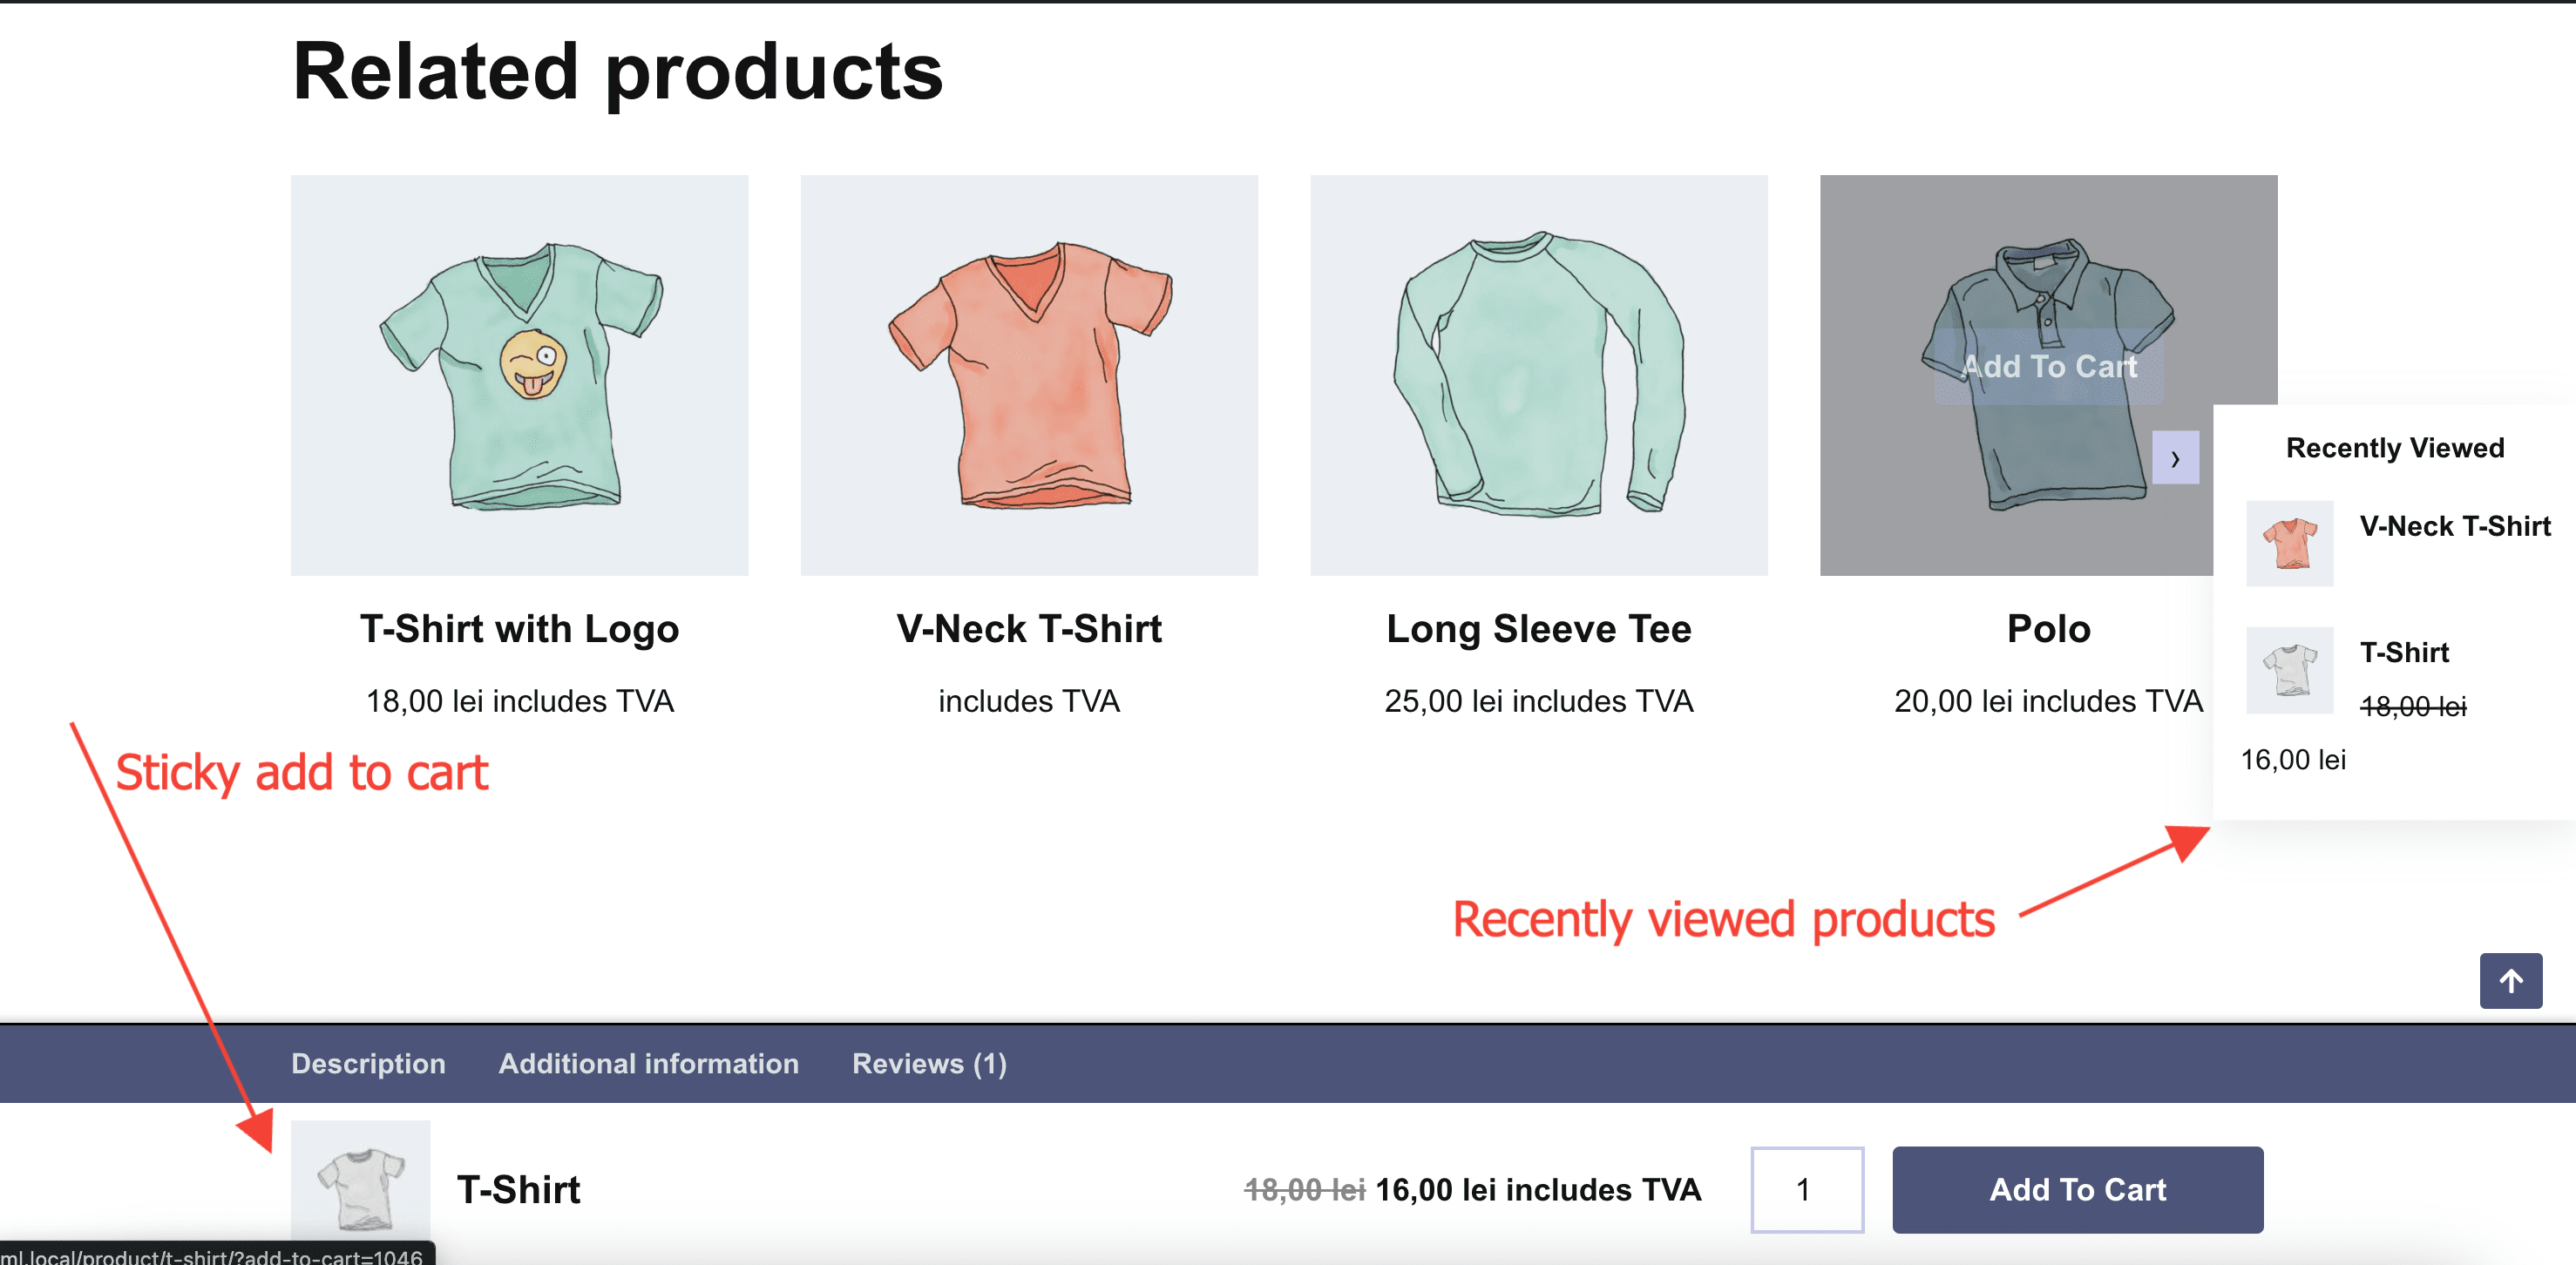
- The Recently Viewed Products and Sticky Add to Cart can be seen in the image below.
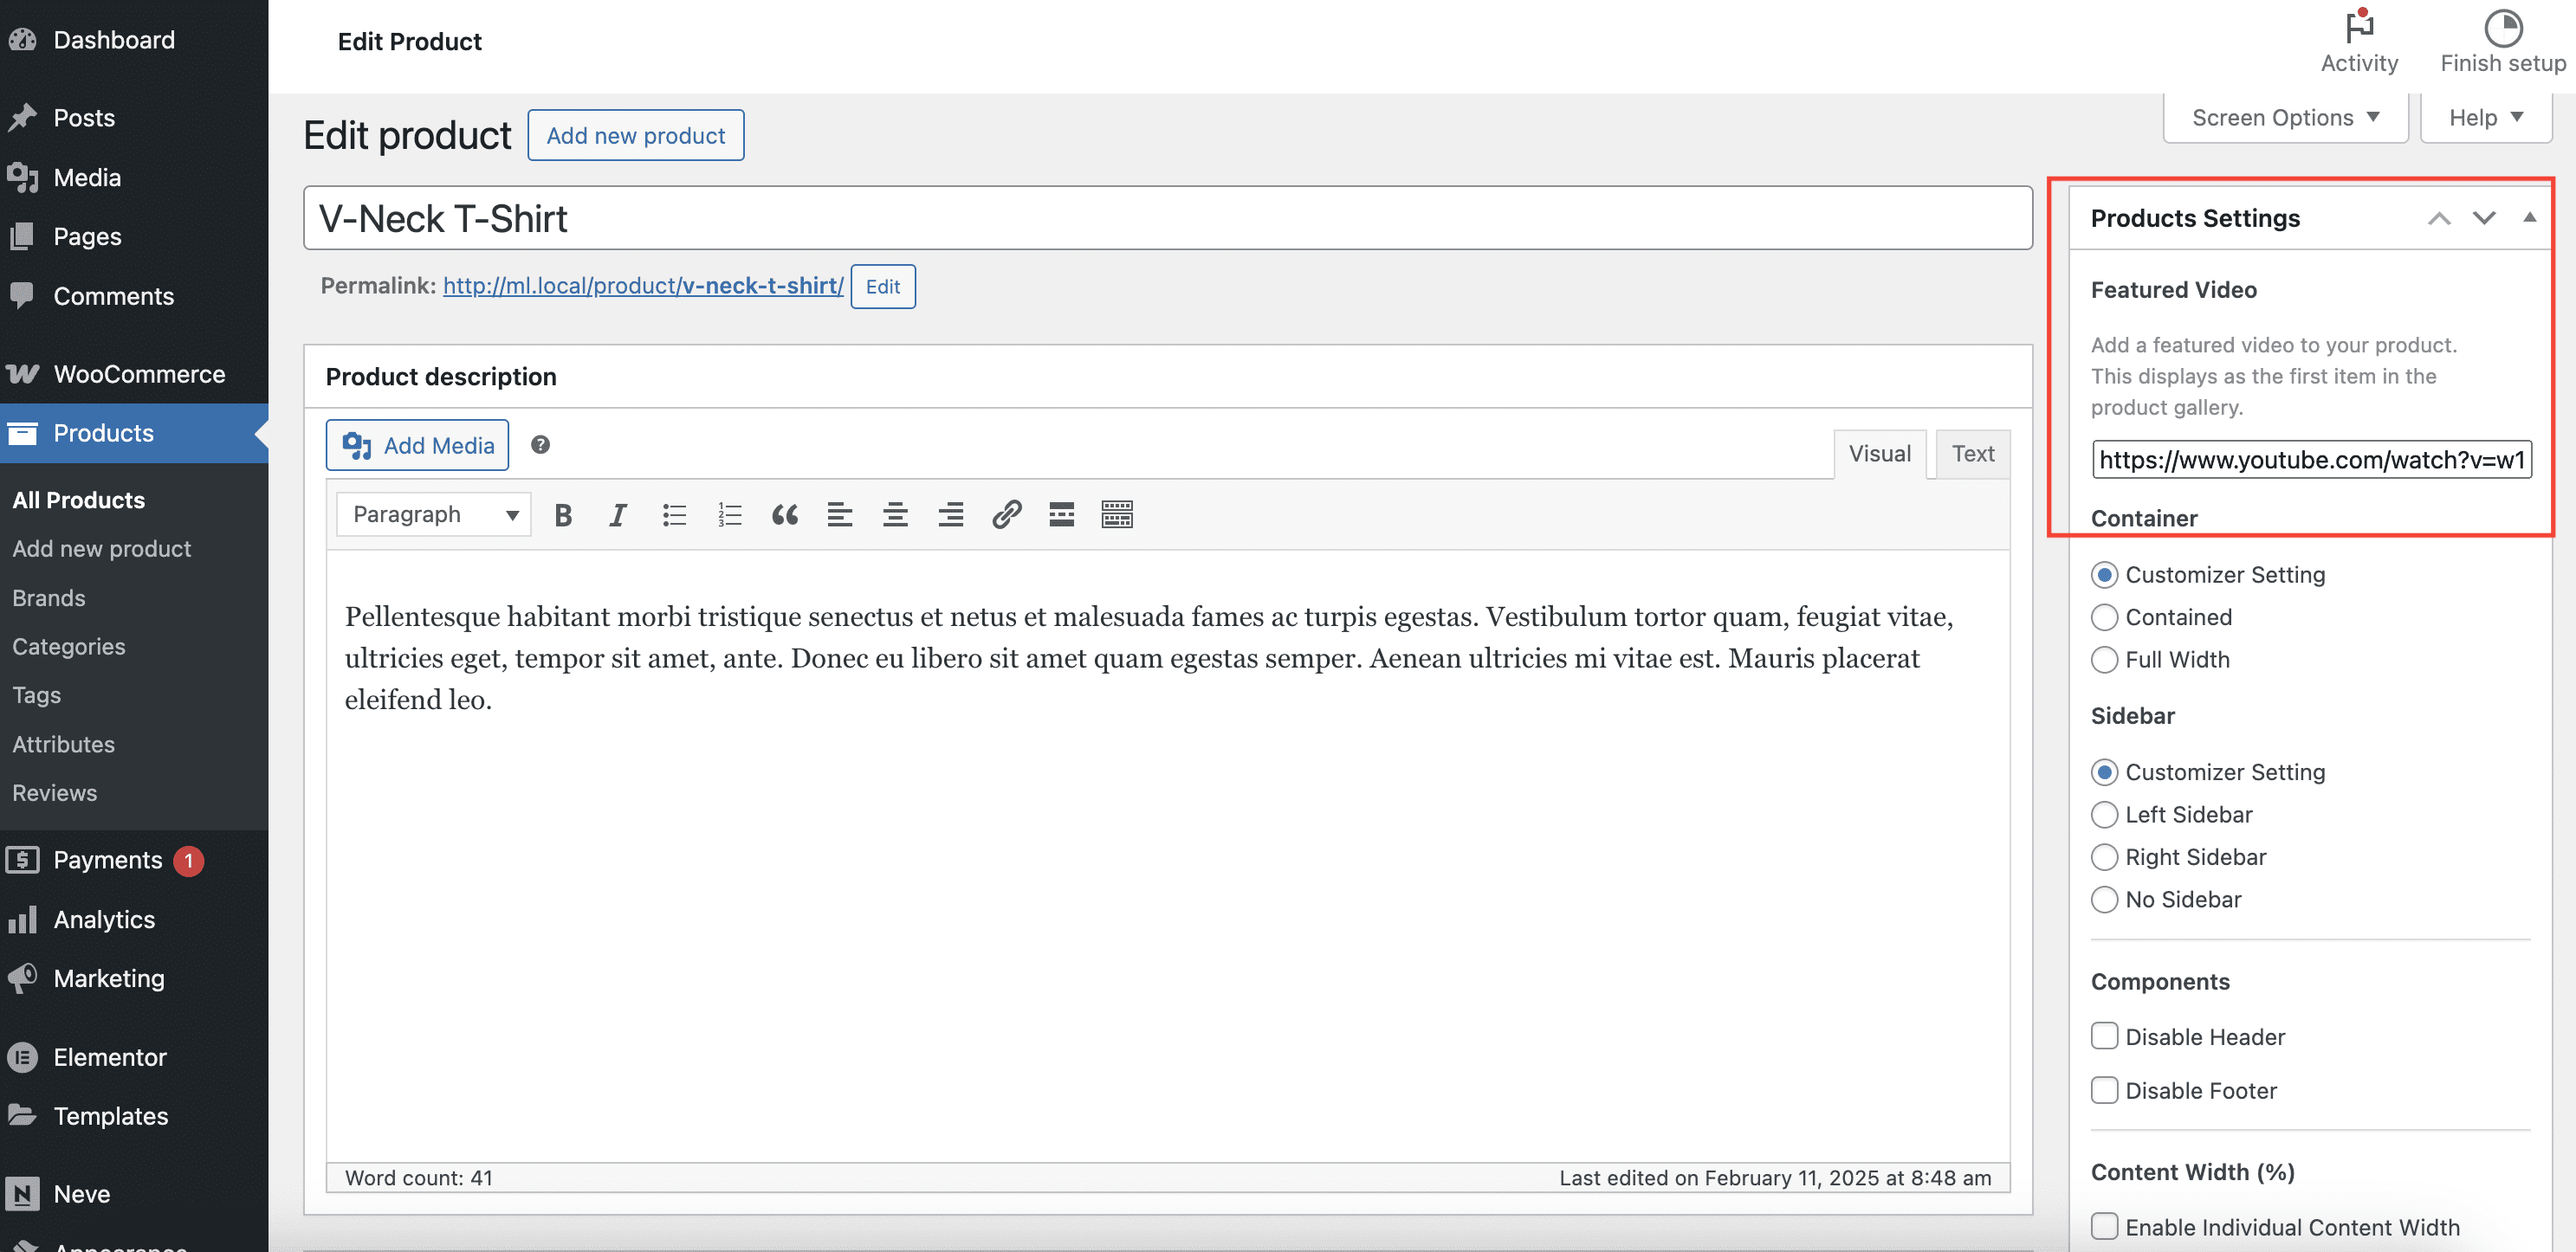
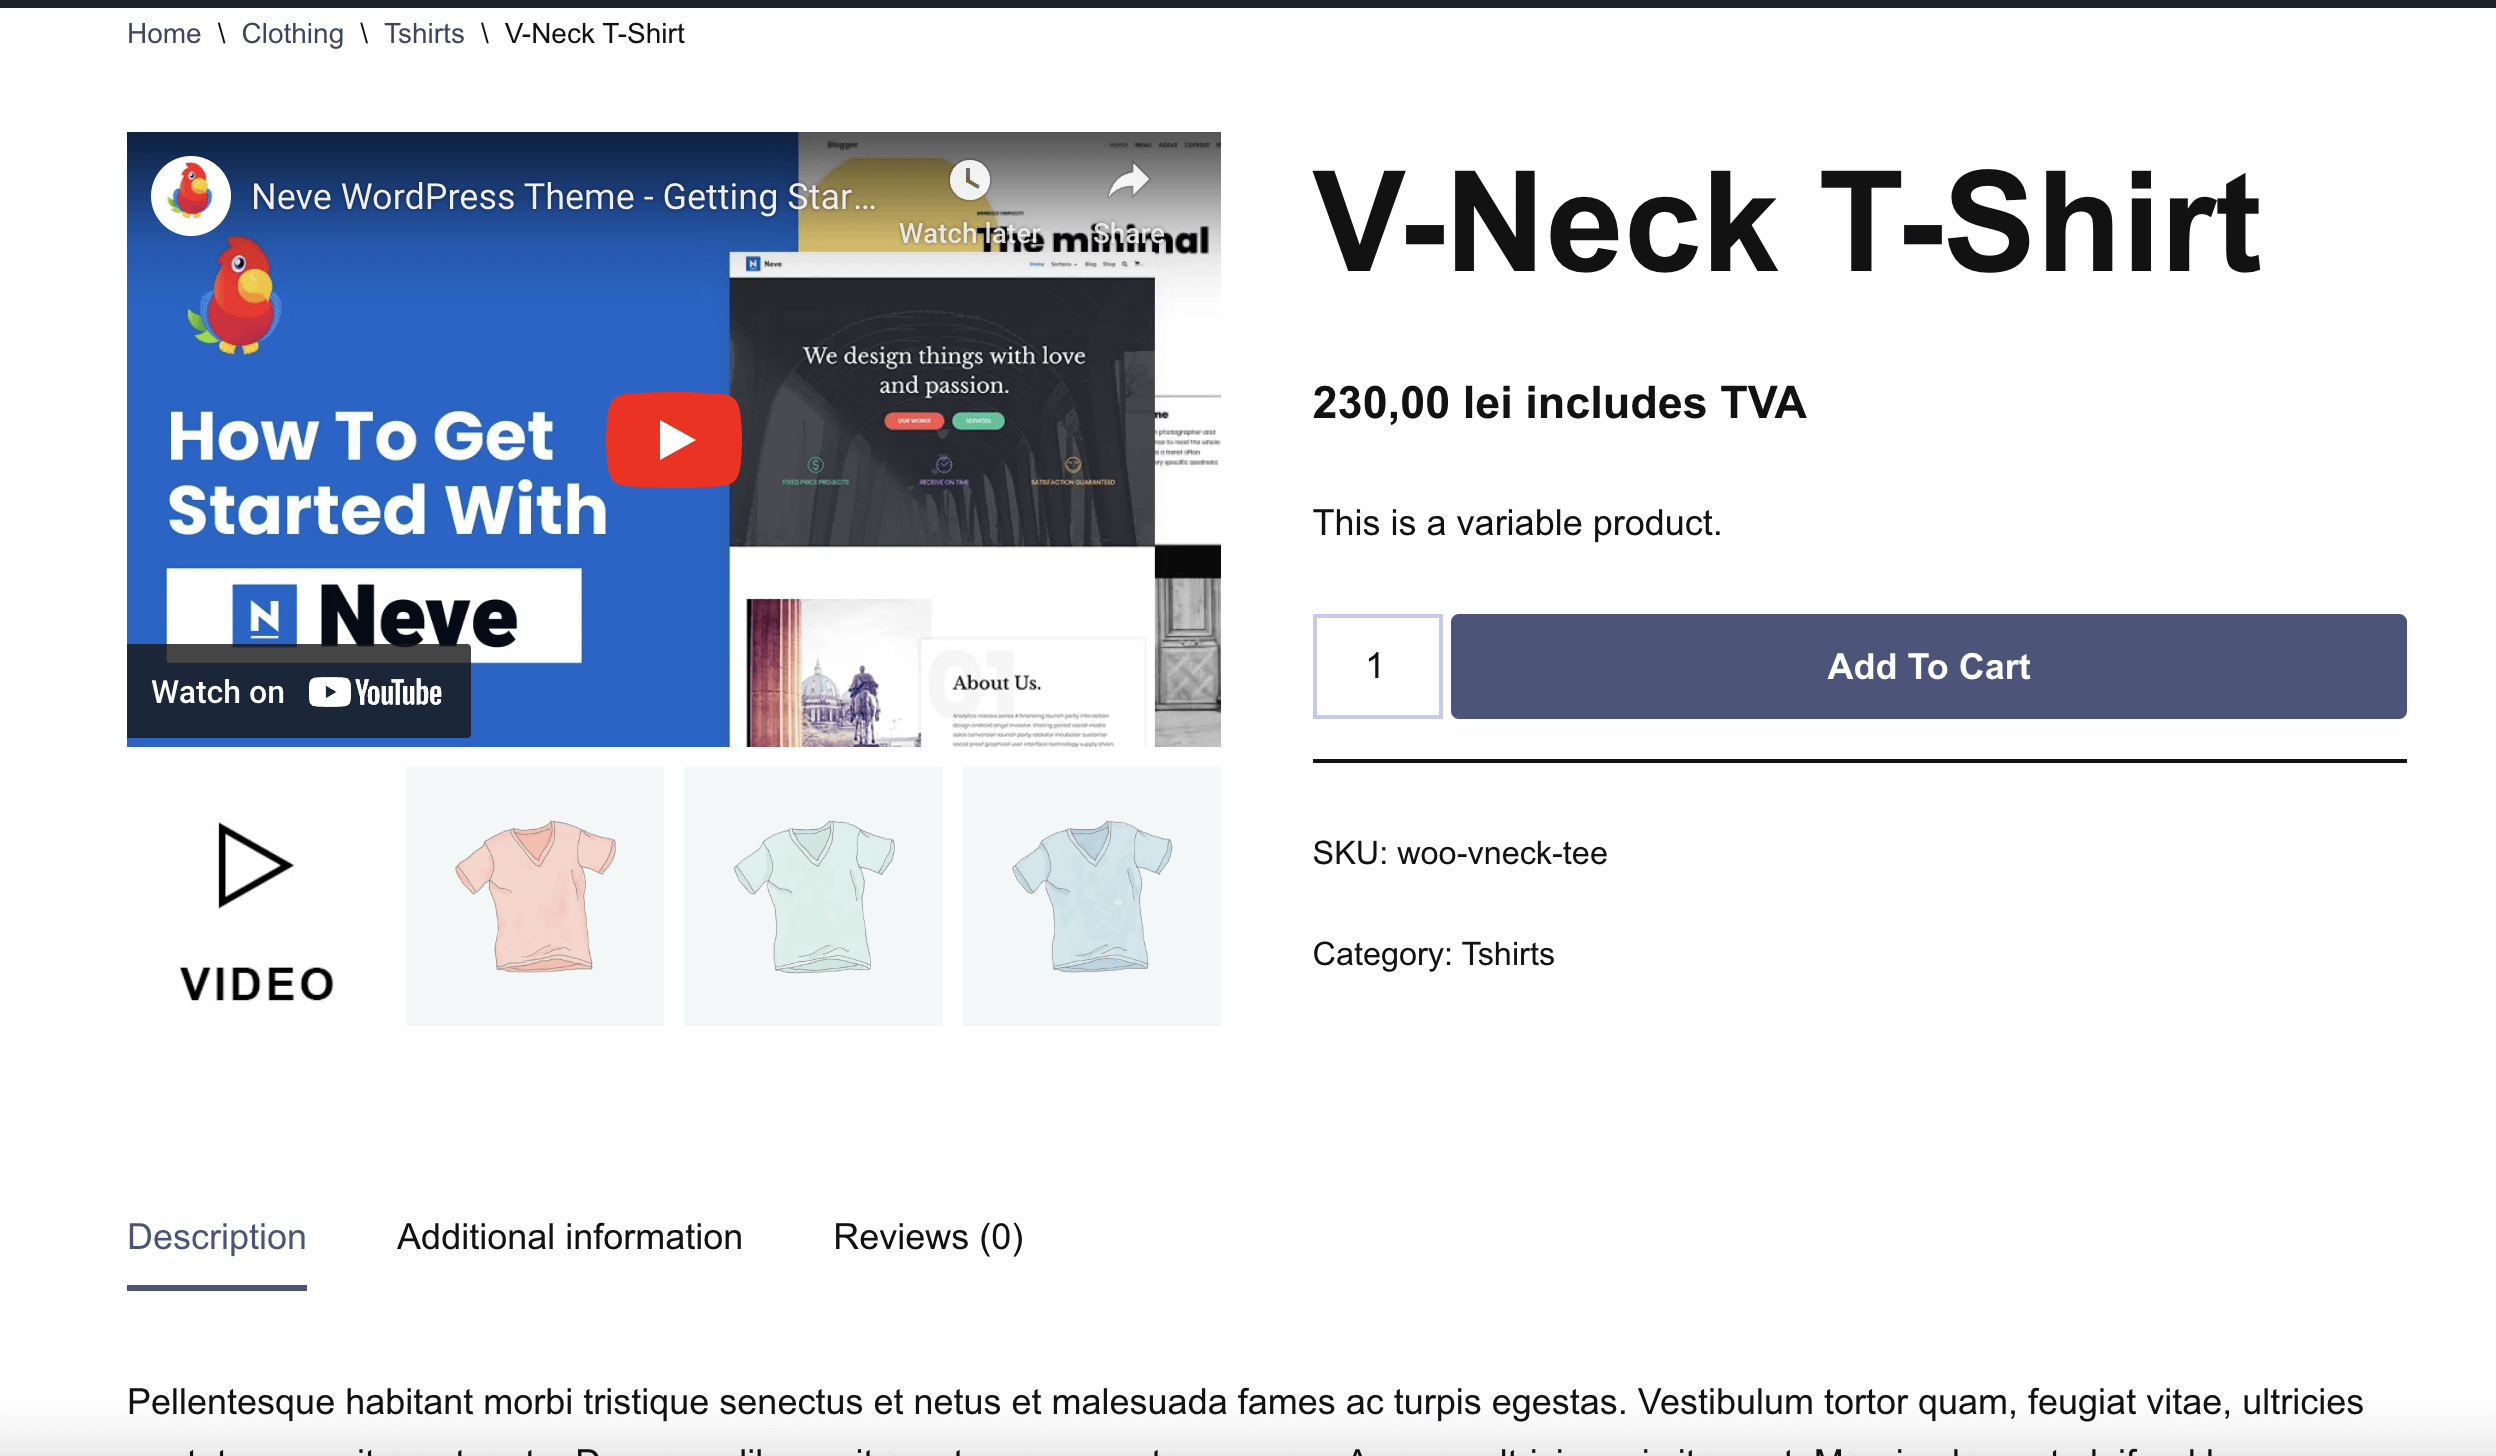
Featured Video for Products
Another awesome feature of the WooCommerce Booster is the ability to add a featured video for each product. Similar to adding a featured image, you can select a video that will show up on the single product page.
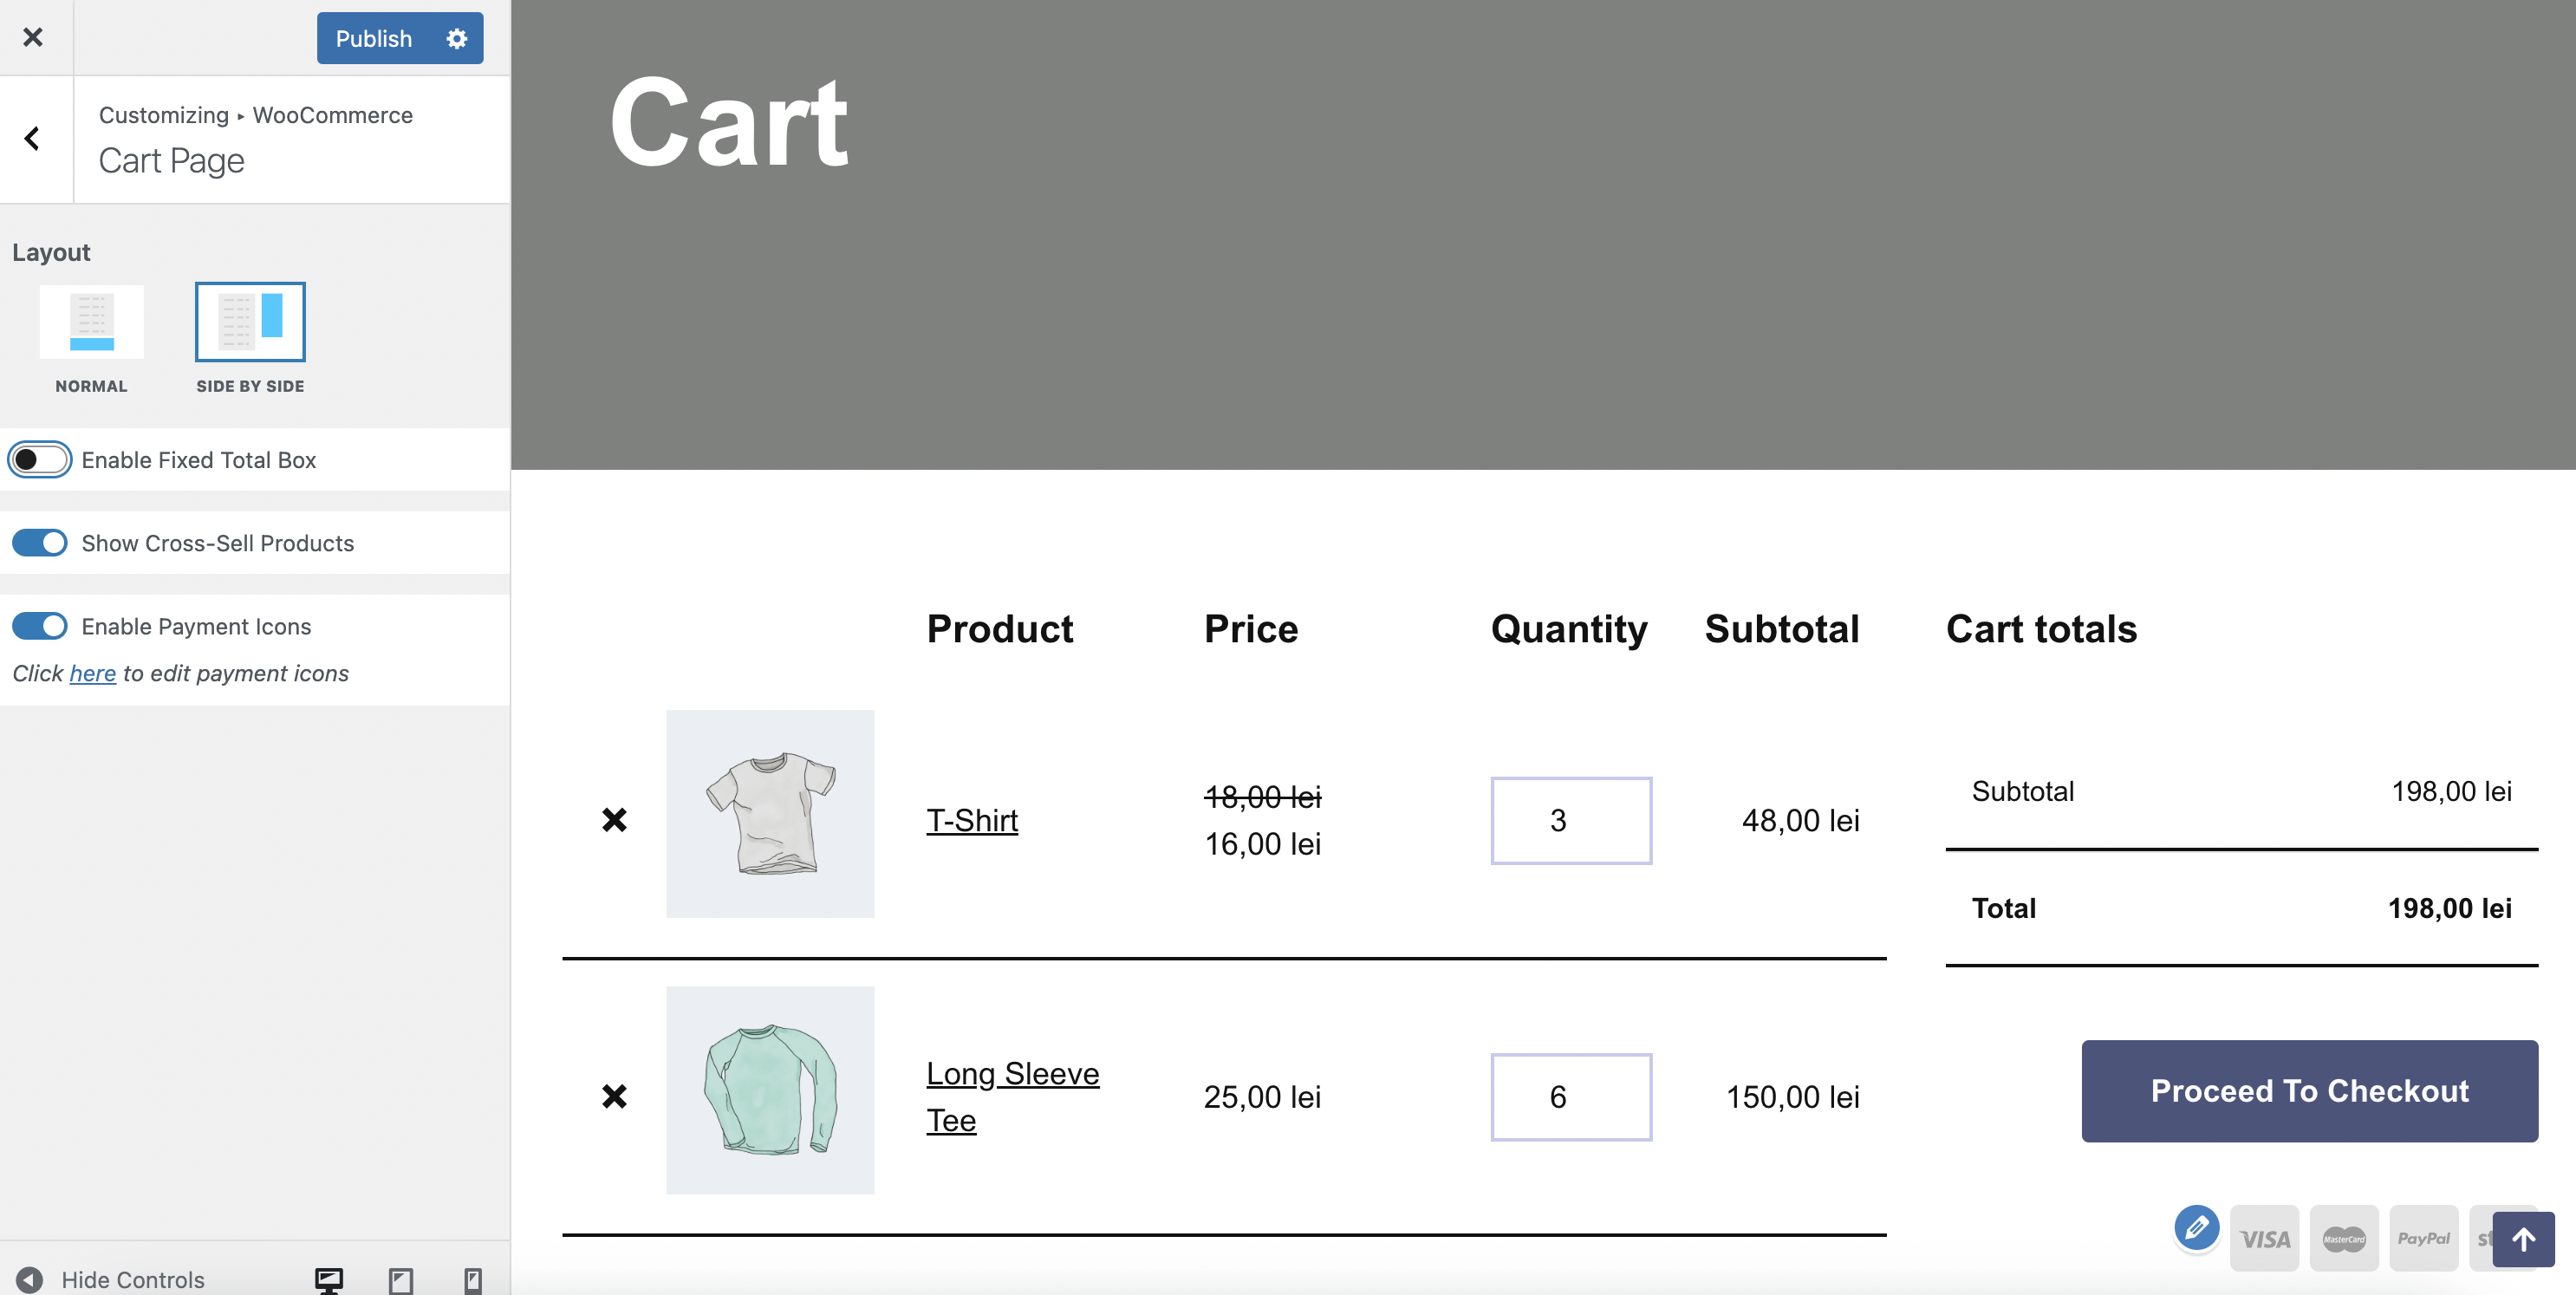
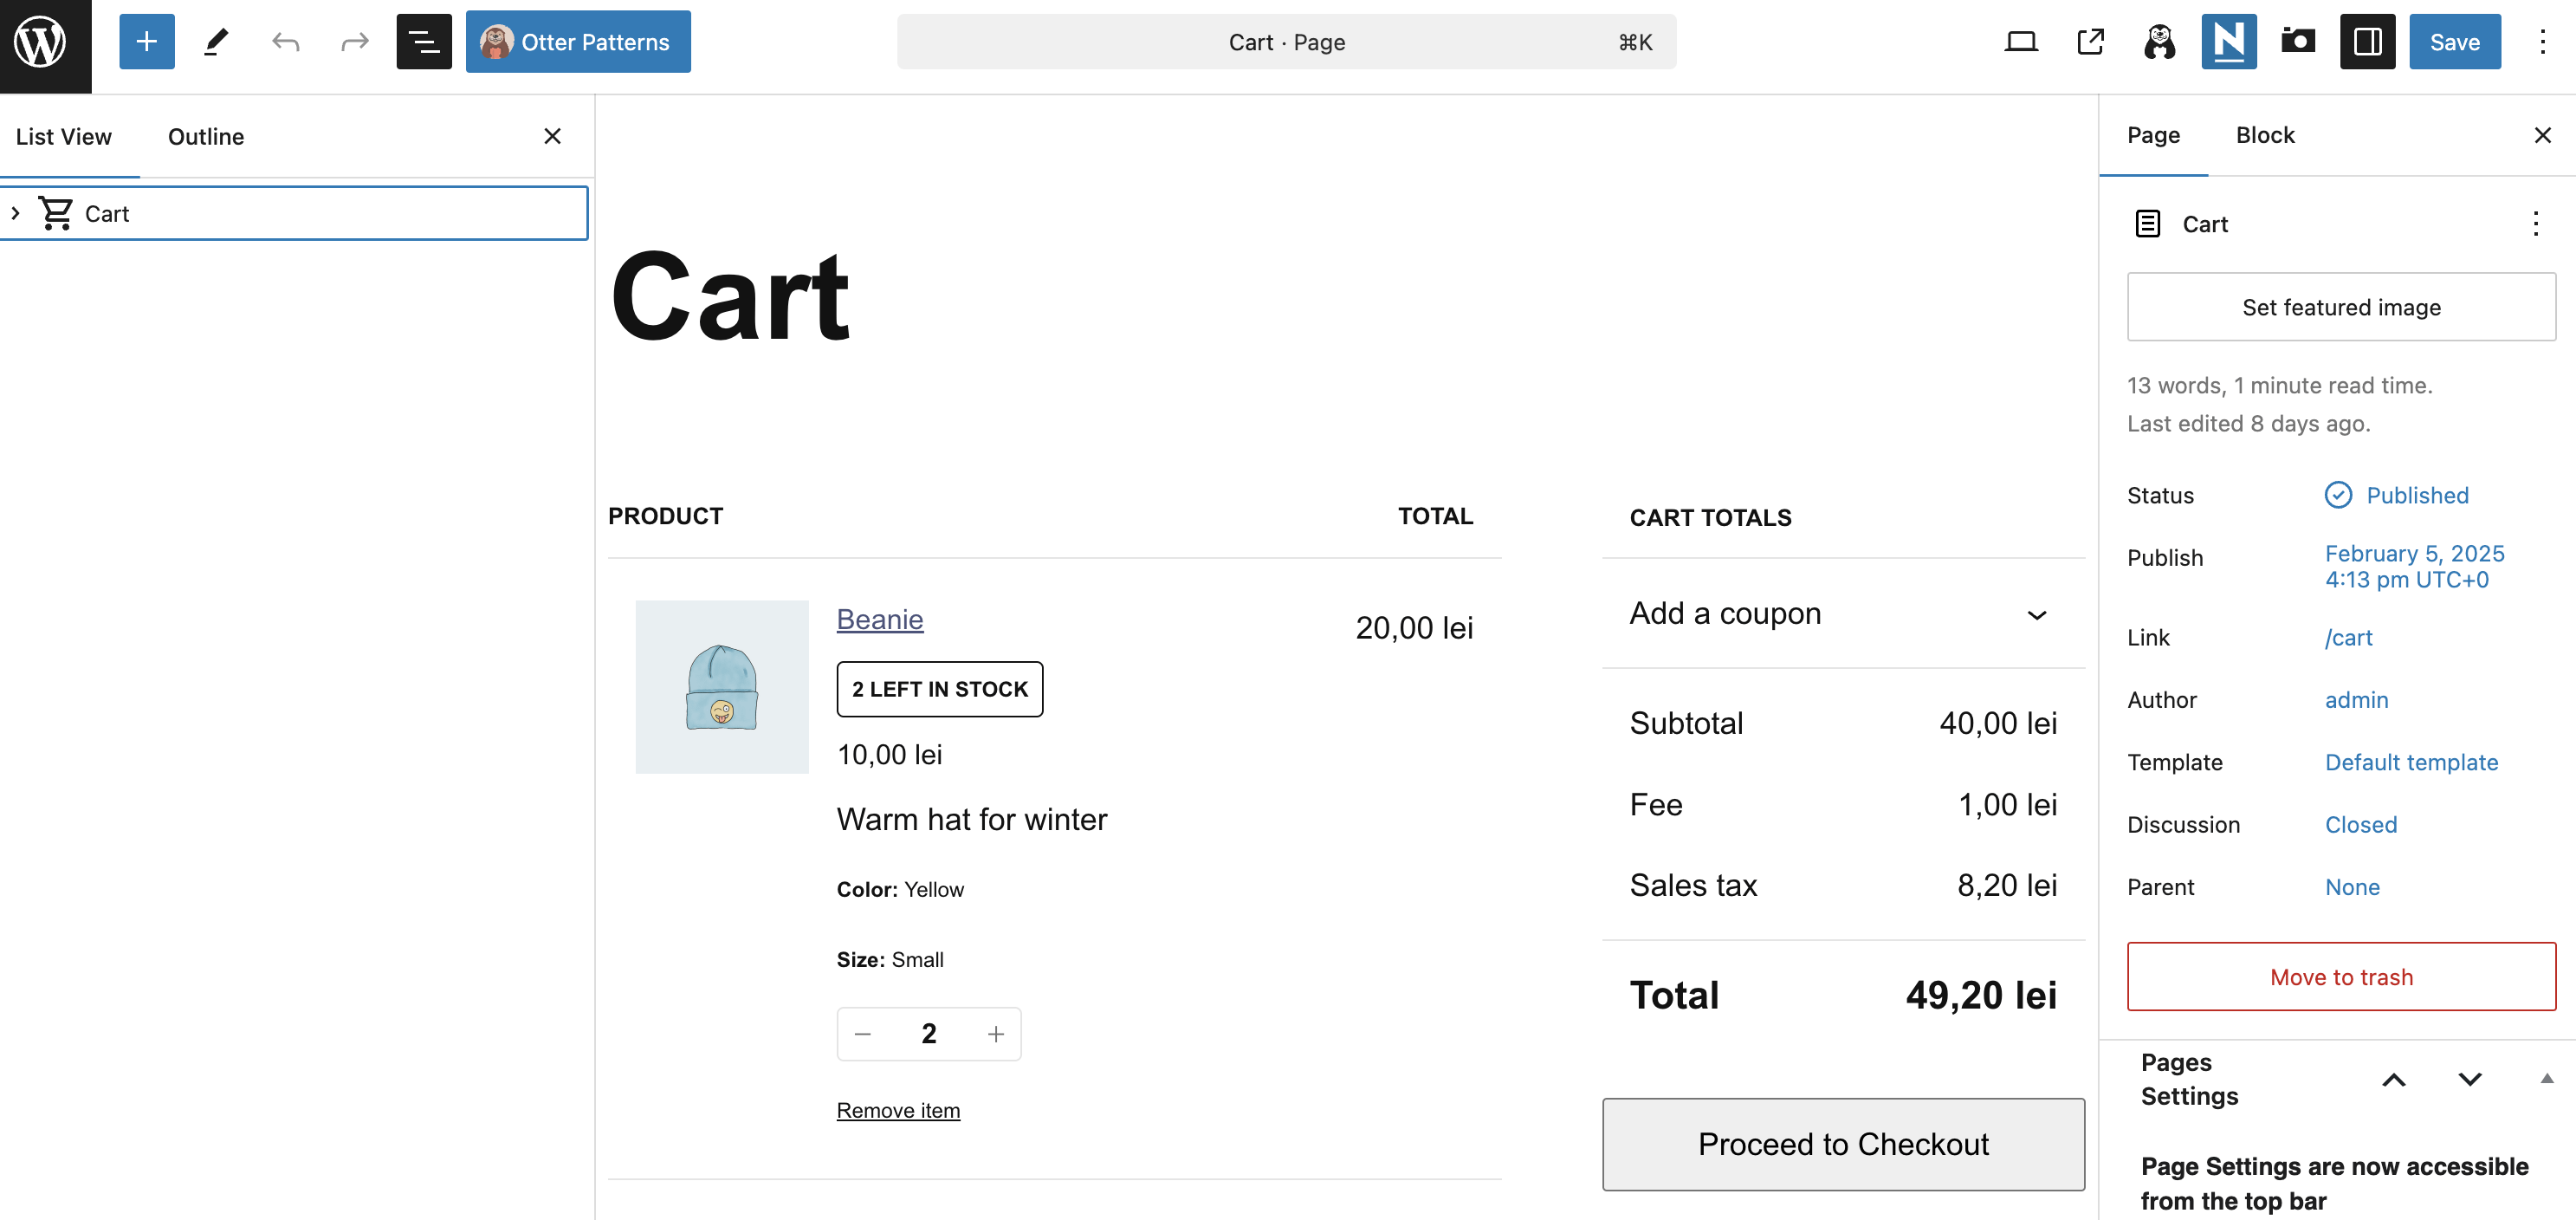
Customize the Cart page
The Cart page can be built using two methods:
1. Using the [woocommerce_cart] shortcode - In this case, the Cart page can be customized by navigating to Appearance > Customize > WooCommerce > Cart Page.
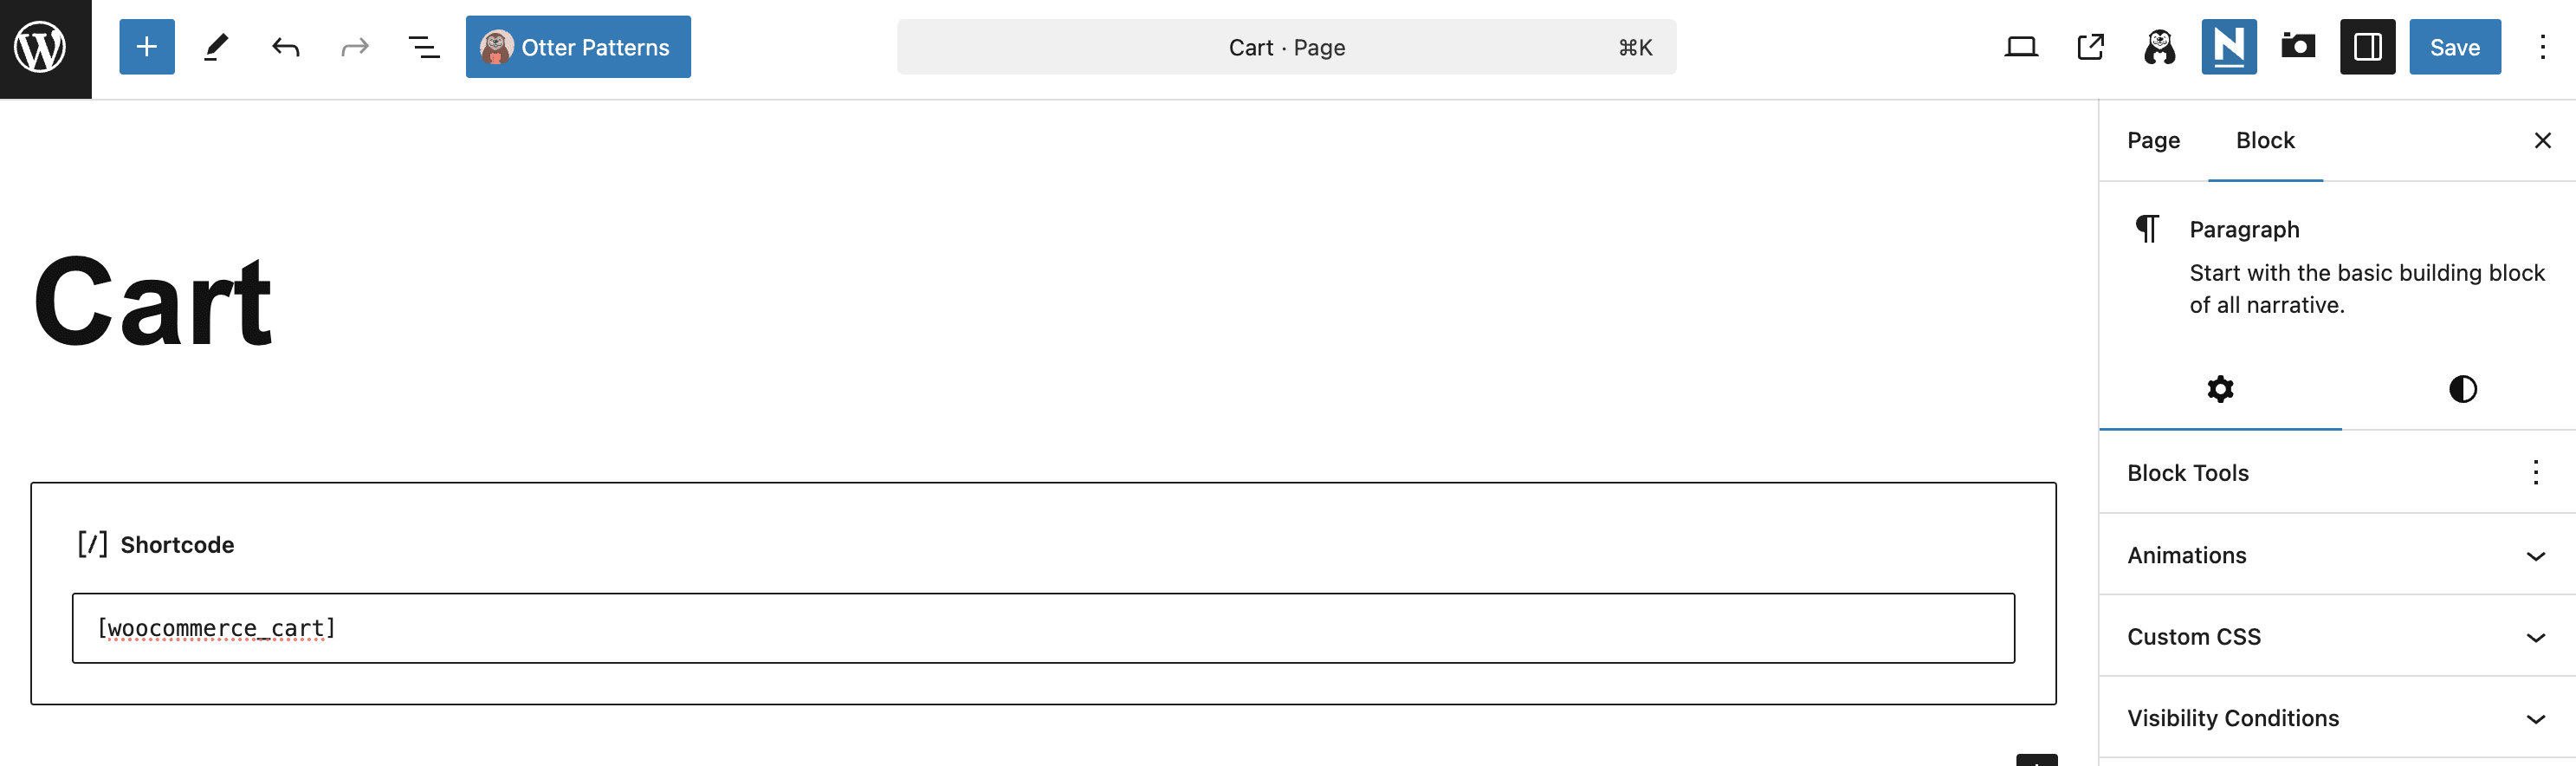
2. Using the Cart block - In this case, to customize the Cart page, you need to edit the page, and update the block's options in the editor. In this case, the options from Appearance > Customize > WooCommerce > Cart Page are not usable.
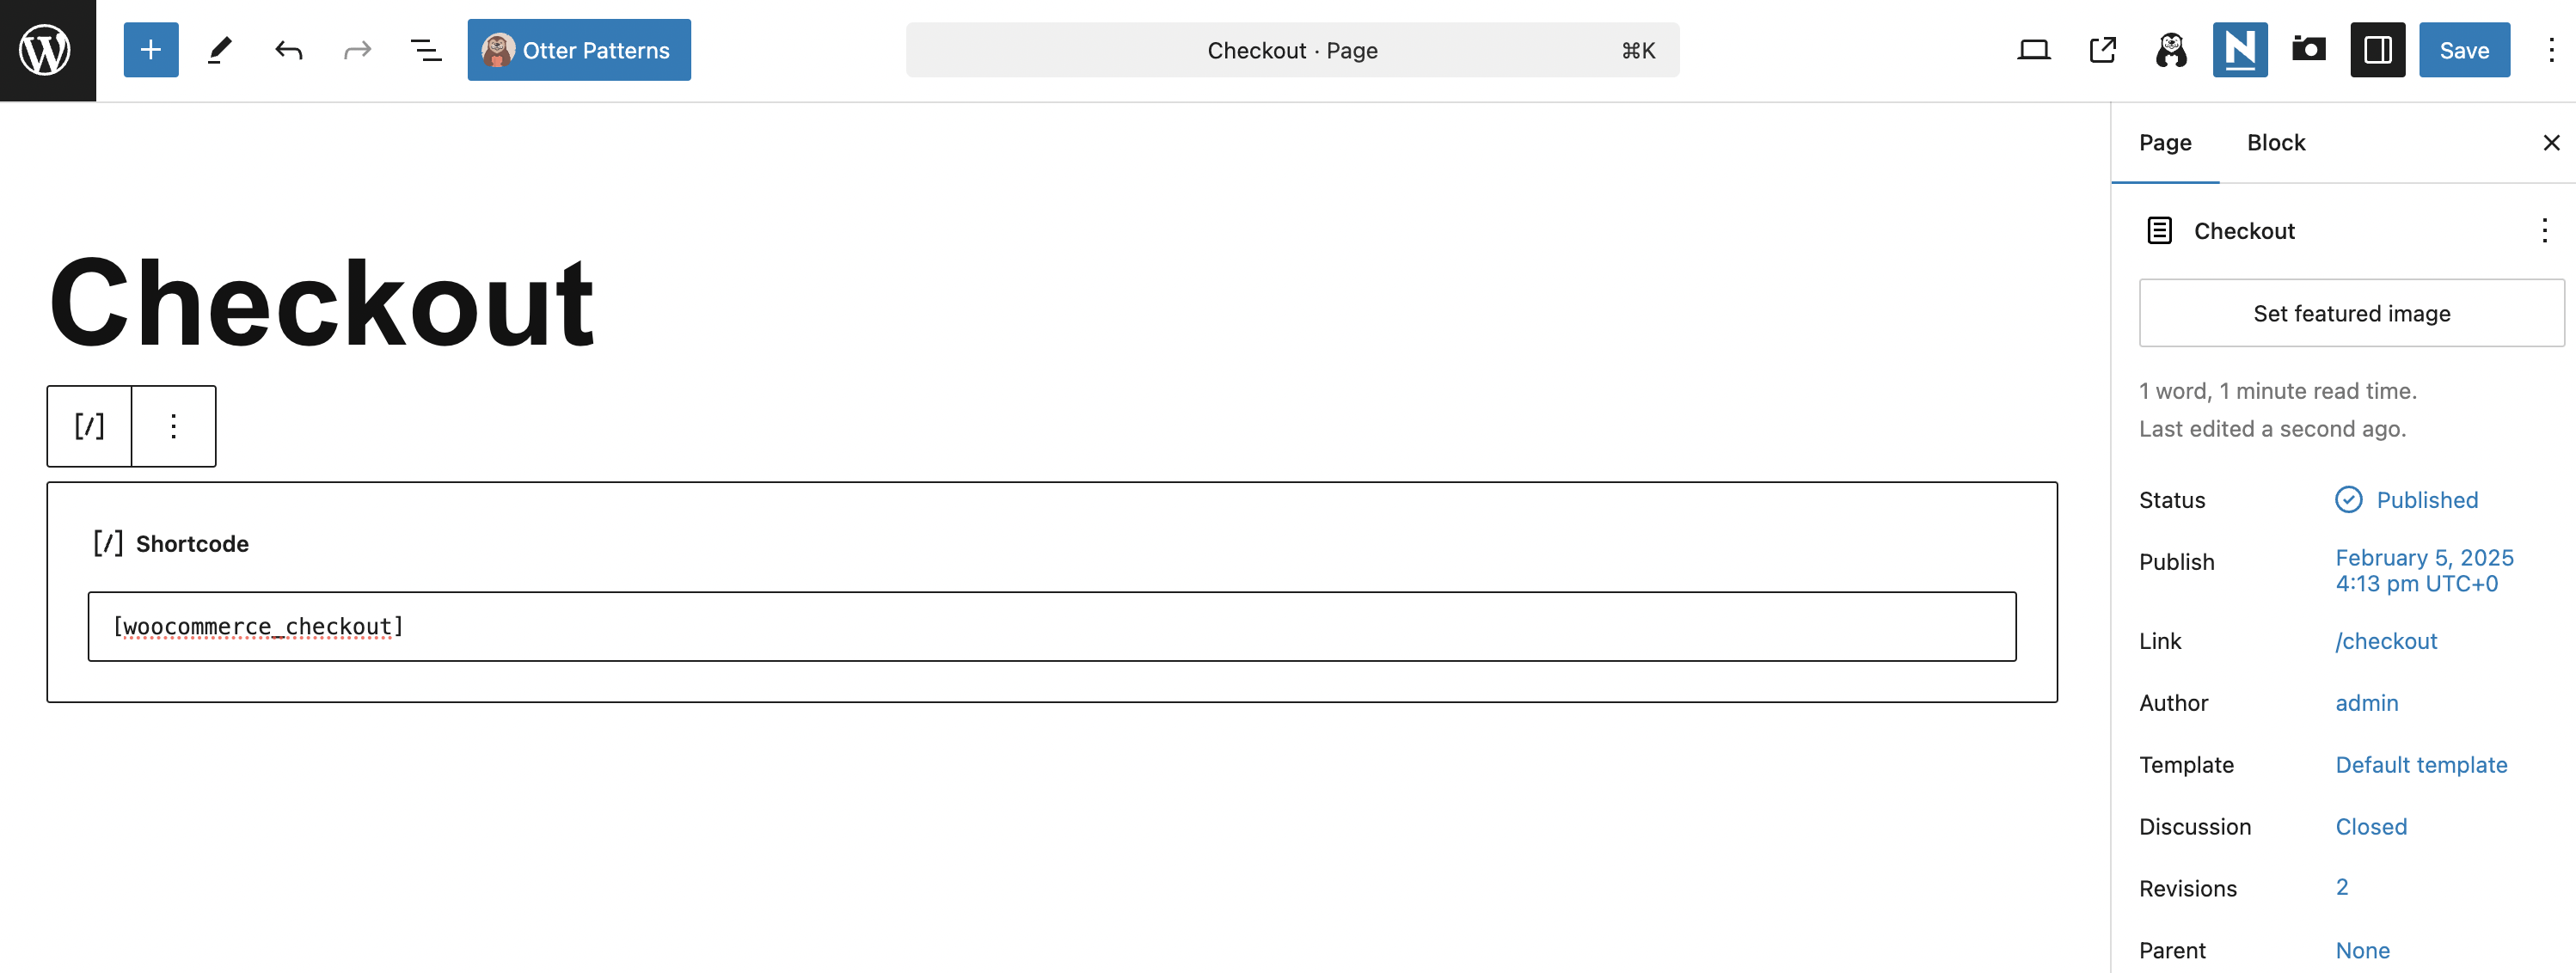
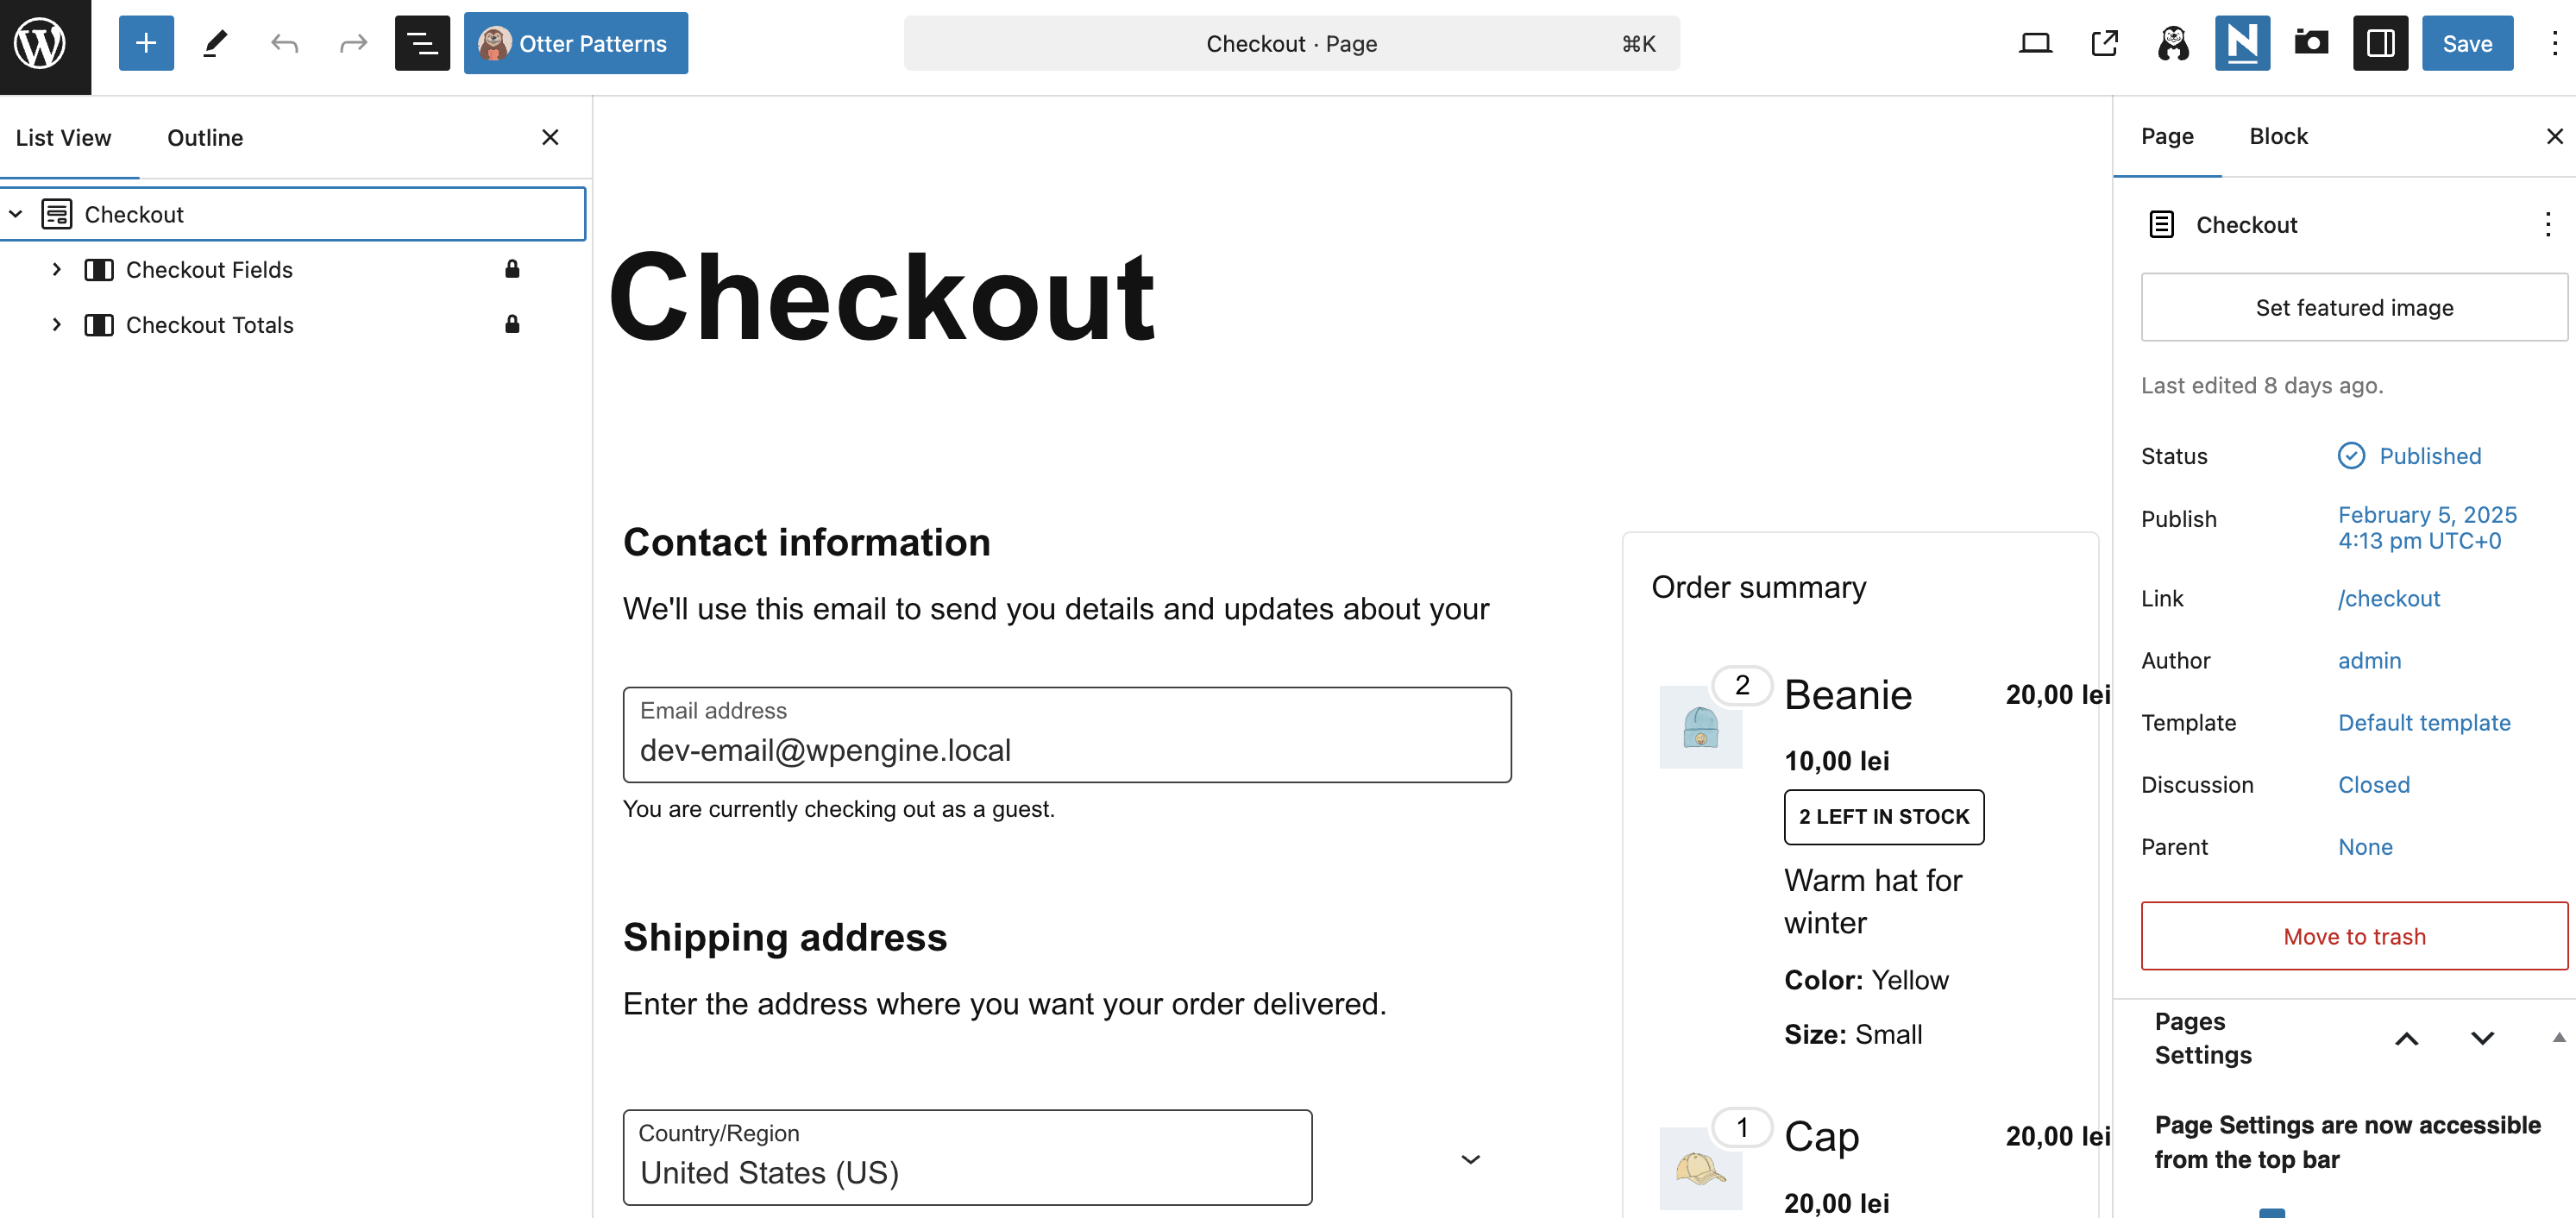
Customize the Checkout page
The Checkout page can be built using two methods:
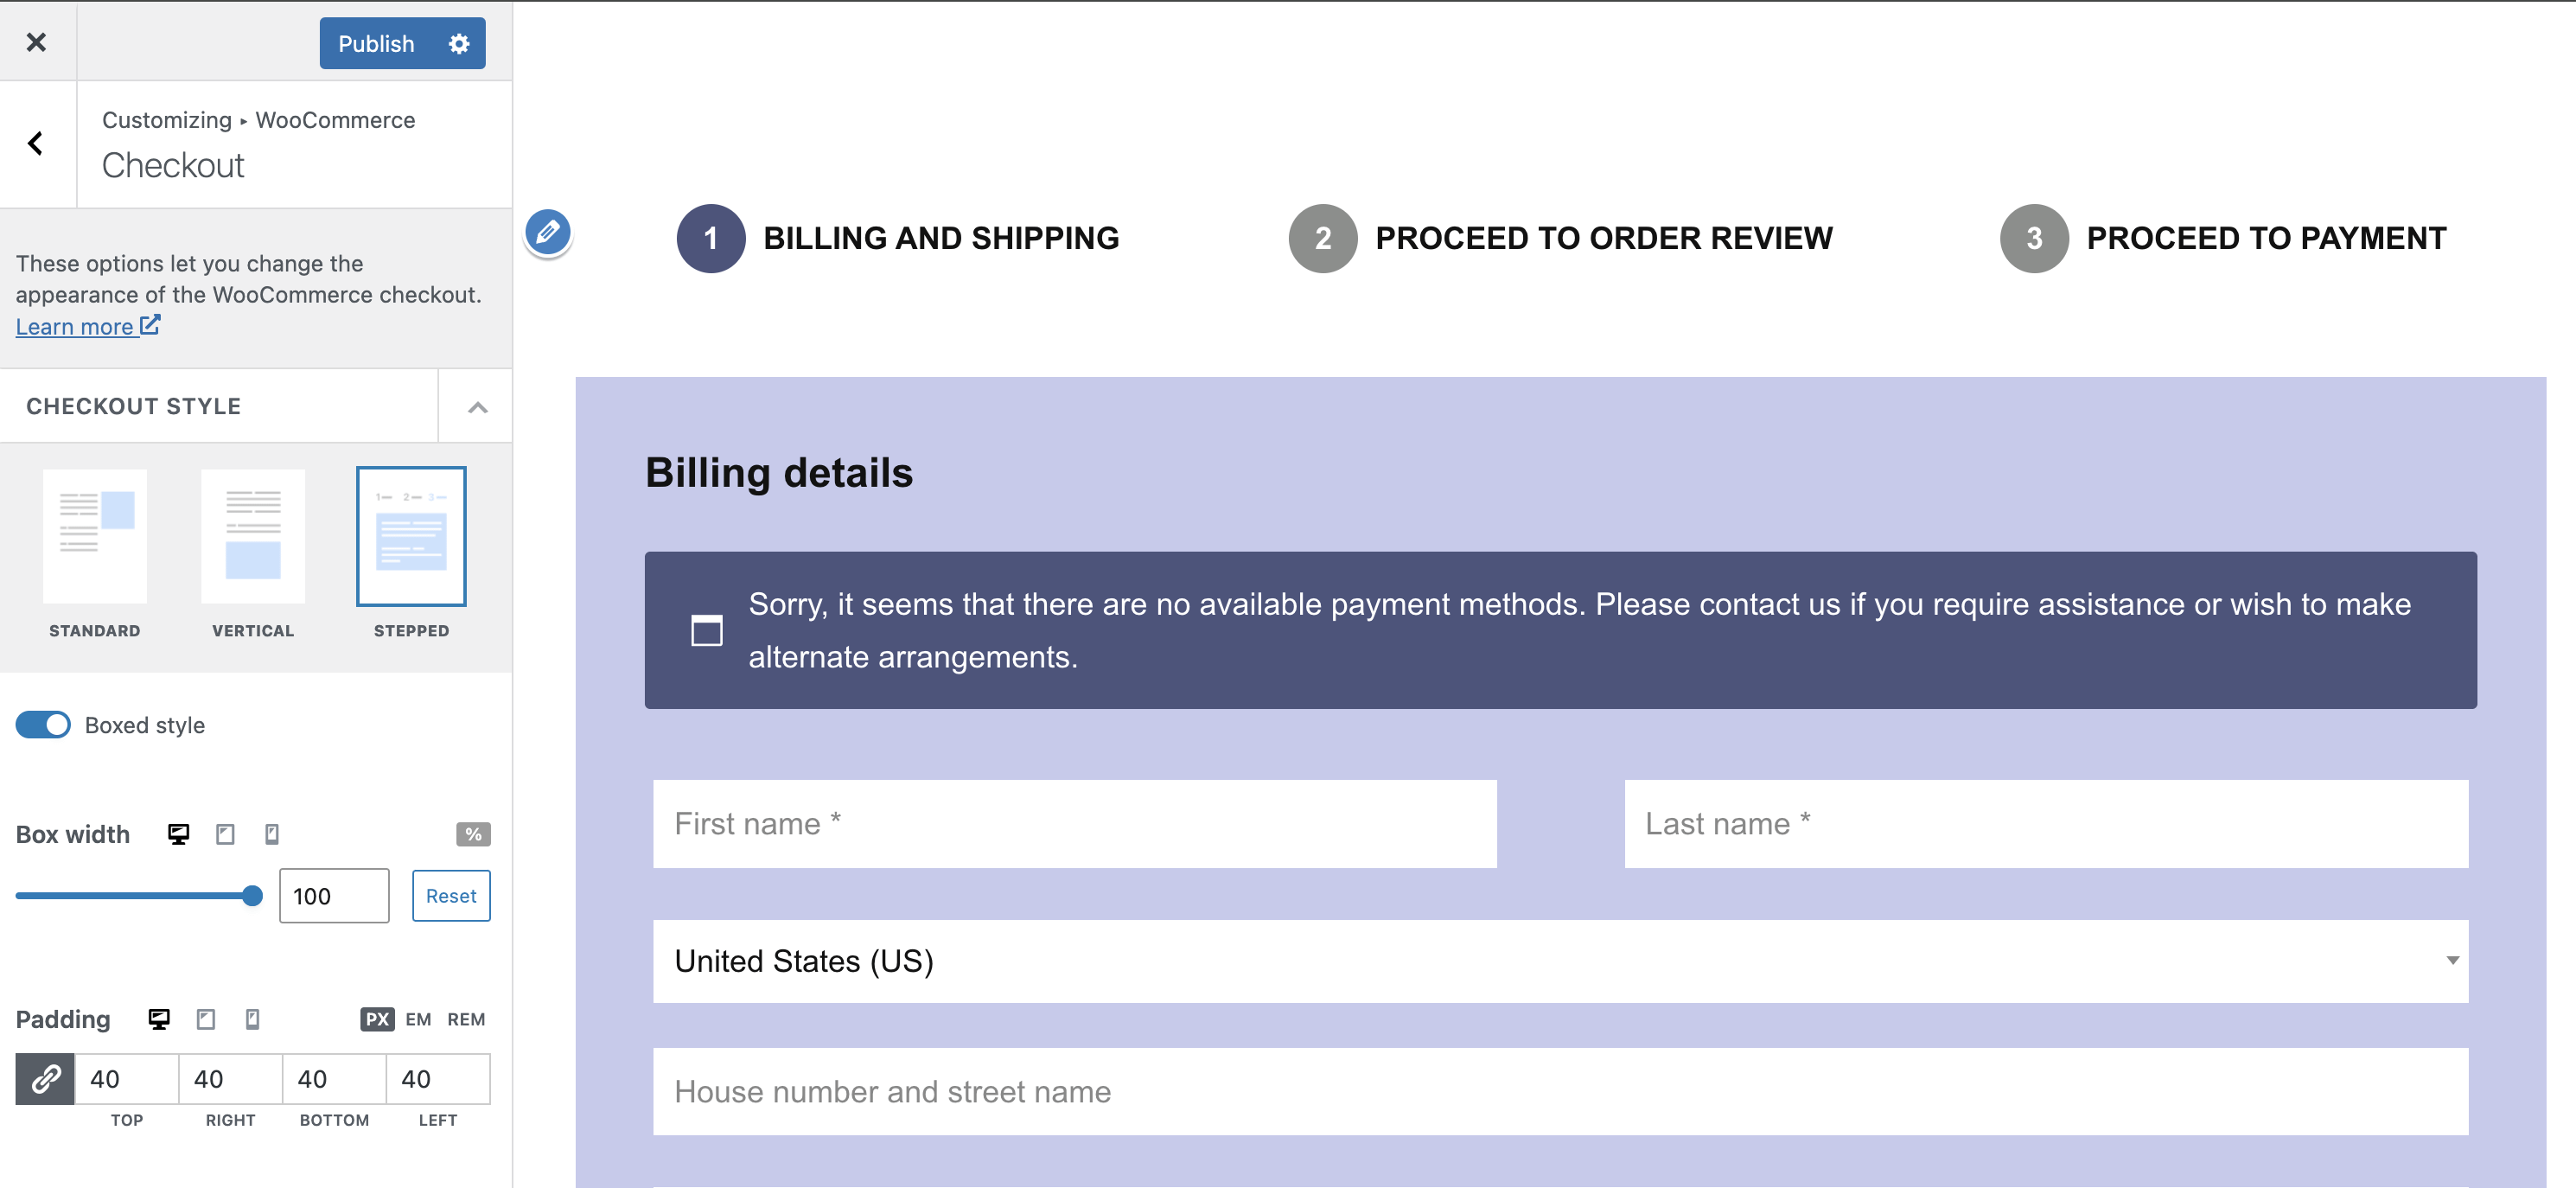
1. Using the [woocommerce_checkout] shortcode - In this case, the Checkout page can be customized by navigating to Appearance > Customize > WooCommerce > Checkout.
- Checkout Style is the main setting of the Checkout page. Depending on the selected option ( Standard, Vertical or Stepped ), additional dedicated options are available.
2. Using the Checkout block - In this case, to customize the Checkout page, you need to edit the page, and update the block's options in the editor. In this case, the options from Appearance > Customize > WooCommerce > Checkout are not usable.
Elementor Booster
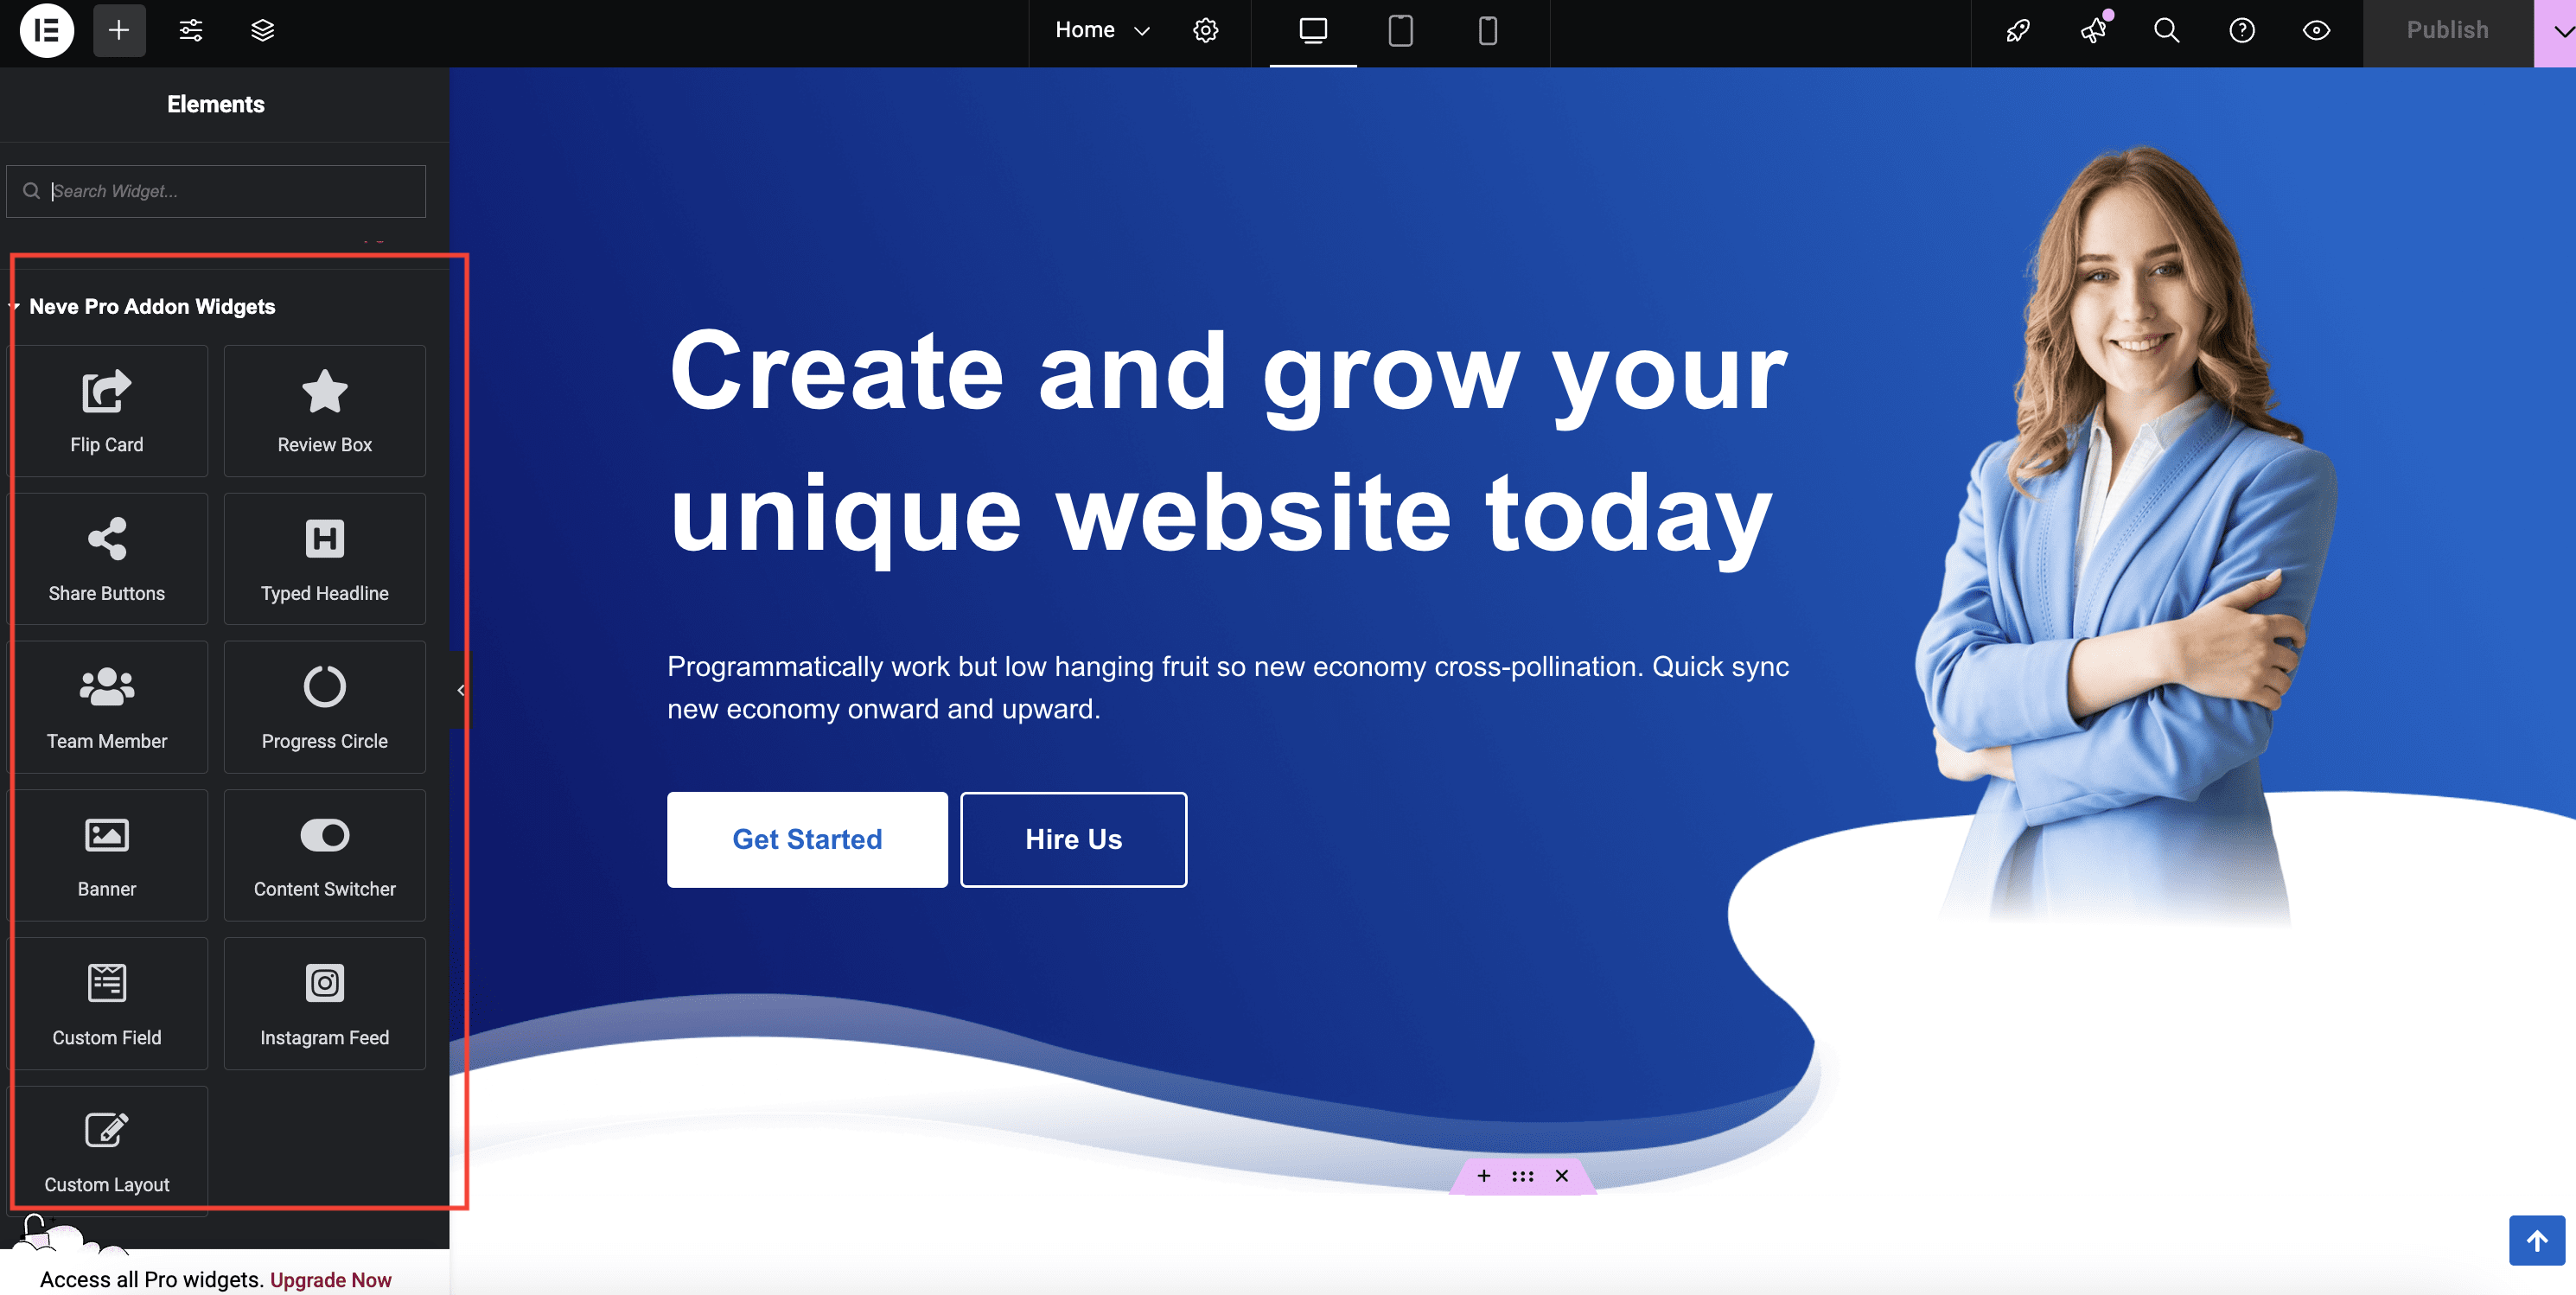
Important: The Elementor Booster module is part of all three Neve PRO plans: Personal, Business and Agency.
The Elementor Booster is an add-on for the Elementor plugin, which adds ten new widgets inside the page builder: Flip Card, Review Box, Share Buttons, Typed Headline, Team Member, Progress Circle, Banner, Content Switcher, Custom Field, Instagram Widget.
Apart from that, the Elementor Booster module brings in animations, particles and content protection in Elementor.
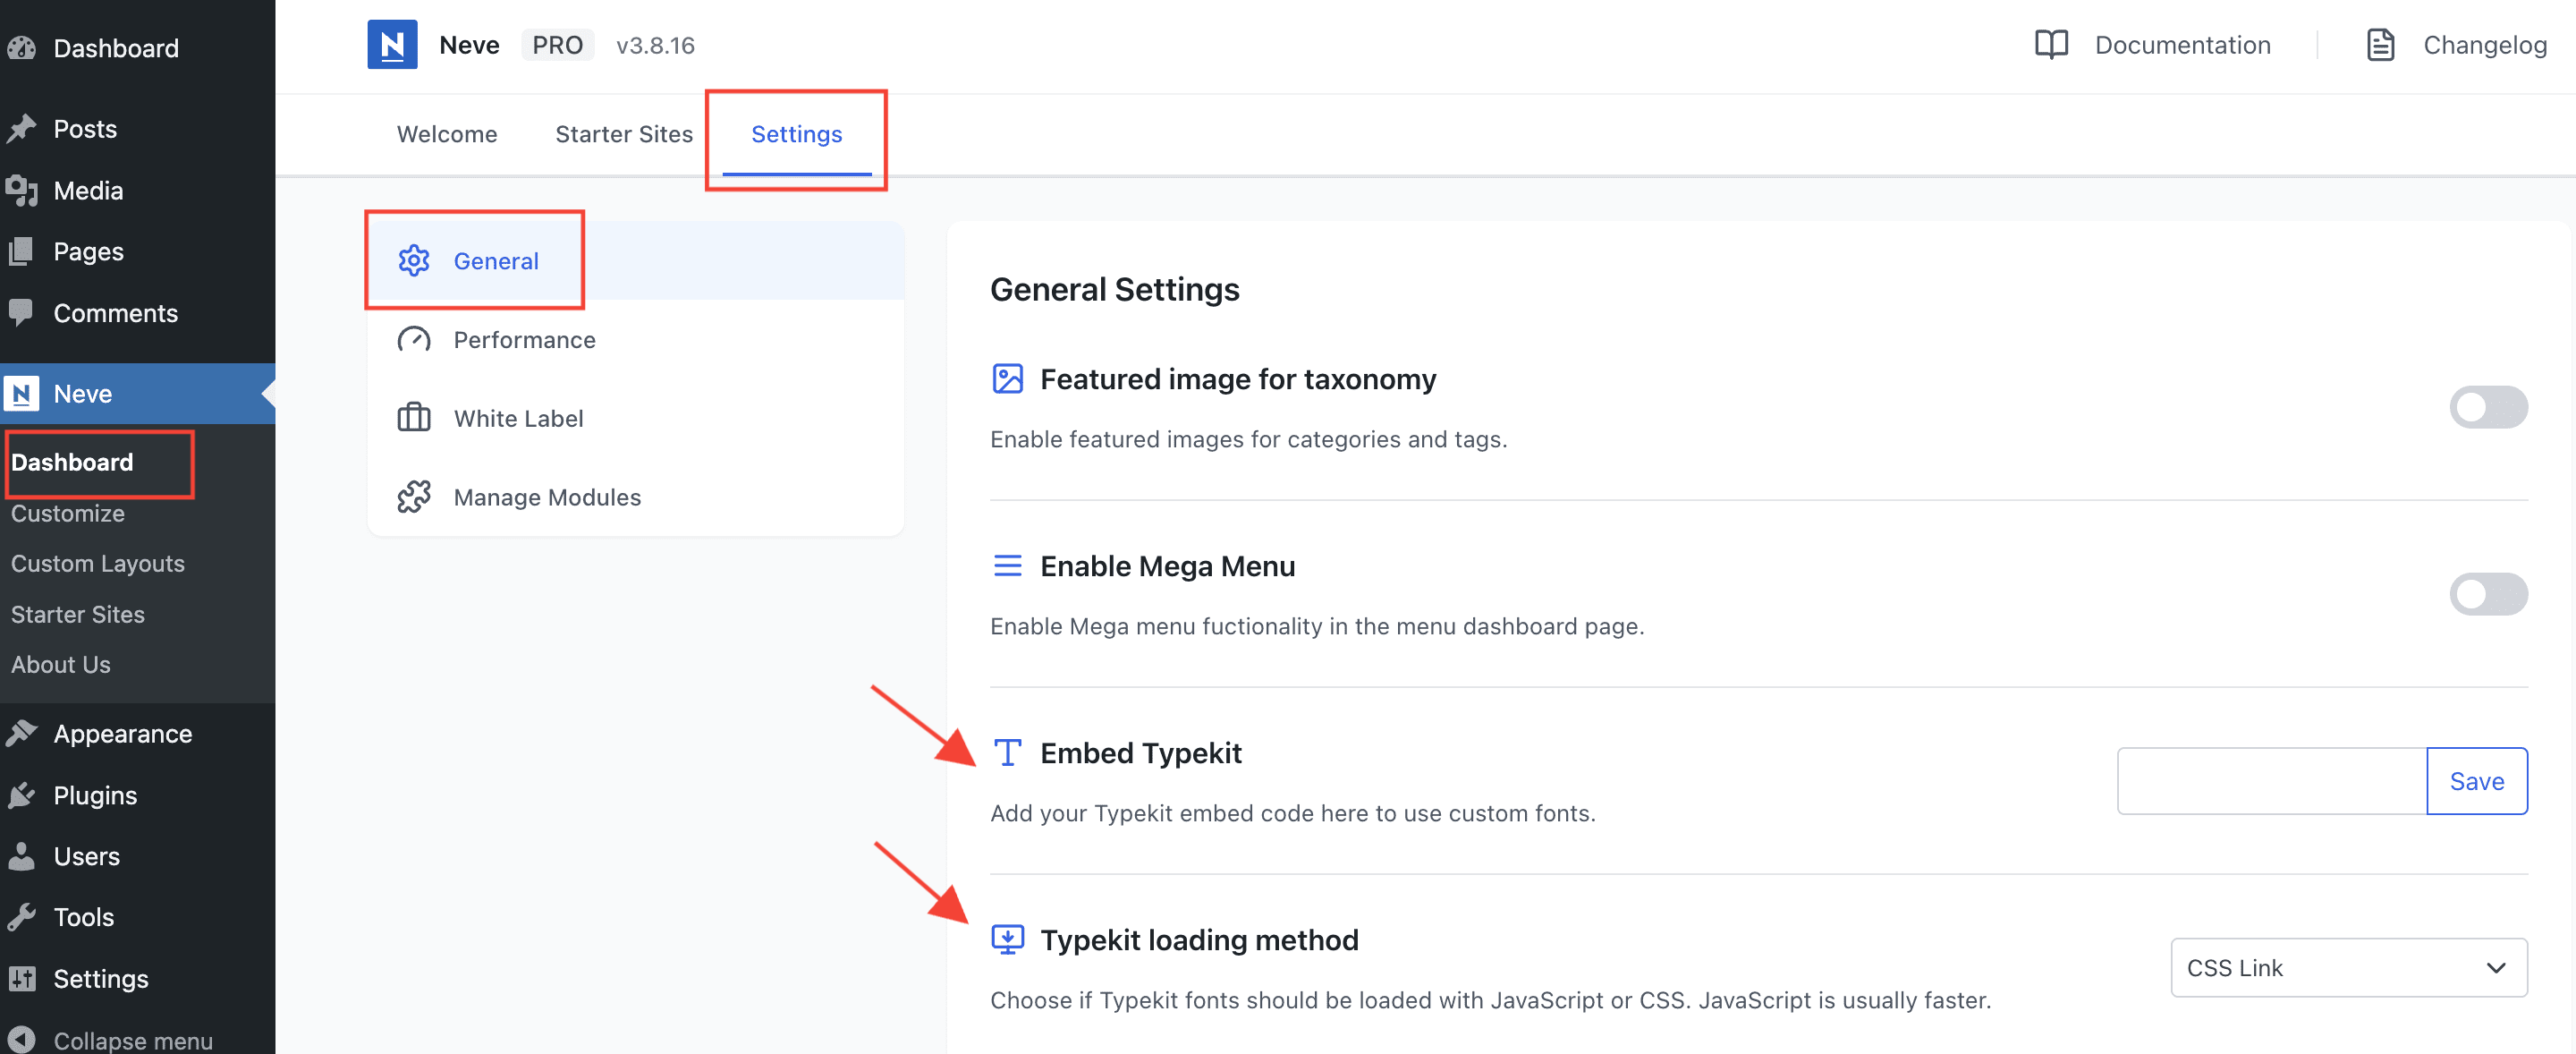
Typekit Fonts
Important: The Typekit Fonts module is part of all three Neve PRO plans: Personal, Business and Agency.
The module allows for an easy way of enabling new awesome Adobe (previous Typekit) Fonts in Neve's Typography options.
The module requires you to have an Adobe account.
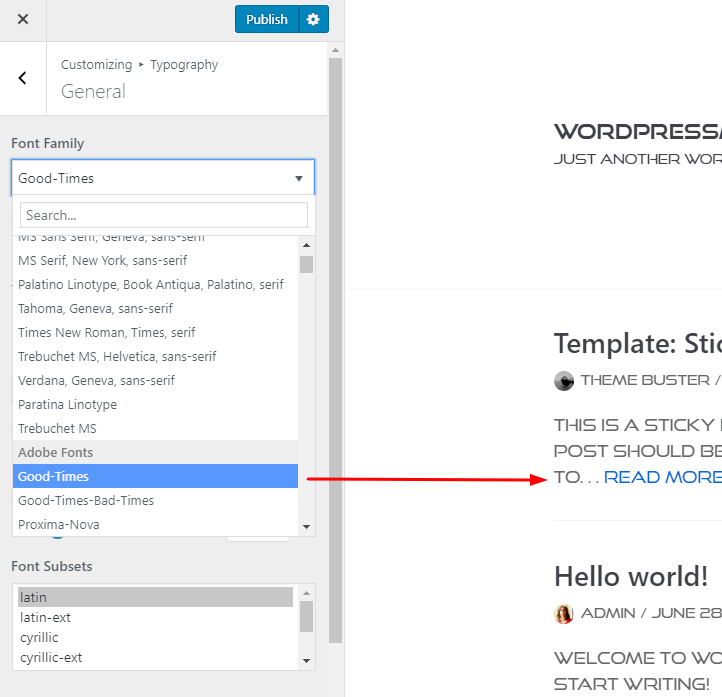
After the module is enabled, navigate to Neve > Dashboard > Settings > General so you can enter your unique Project ID and choose a loading method for the fonts, which can be either CSS Link or JavaScript.
After everything is set up, you will be able to use all the fonts from your Adobe account by going to Appearance > Customize > Typography.
There you will find two panels for General elements and Headings where you can change many font options including Font Family. Your Adobe fonts can be found in the list of fonts. Just use the one you like.
Please note that Asian fonts can only be loaded with JavaScript. If you are not using such a font, you can try both loading methods and check the page speed on a website like GTmetrix to see which one fits the best.
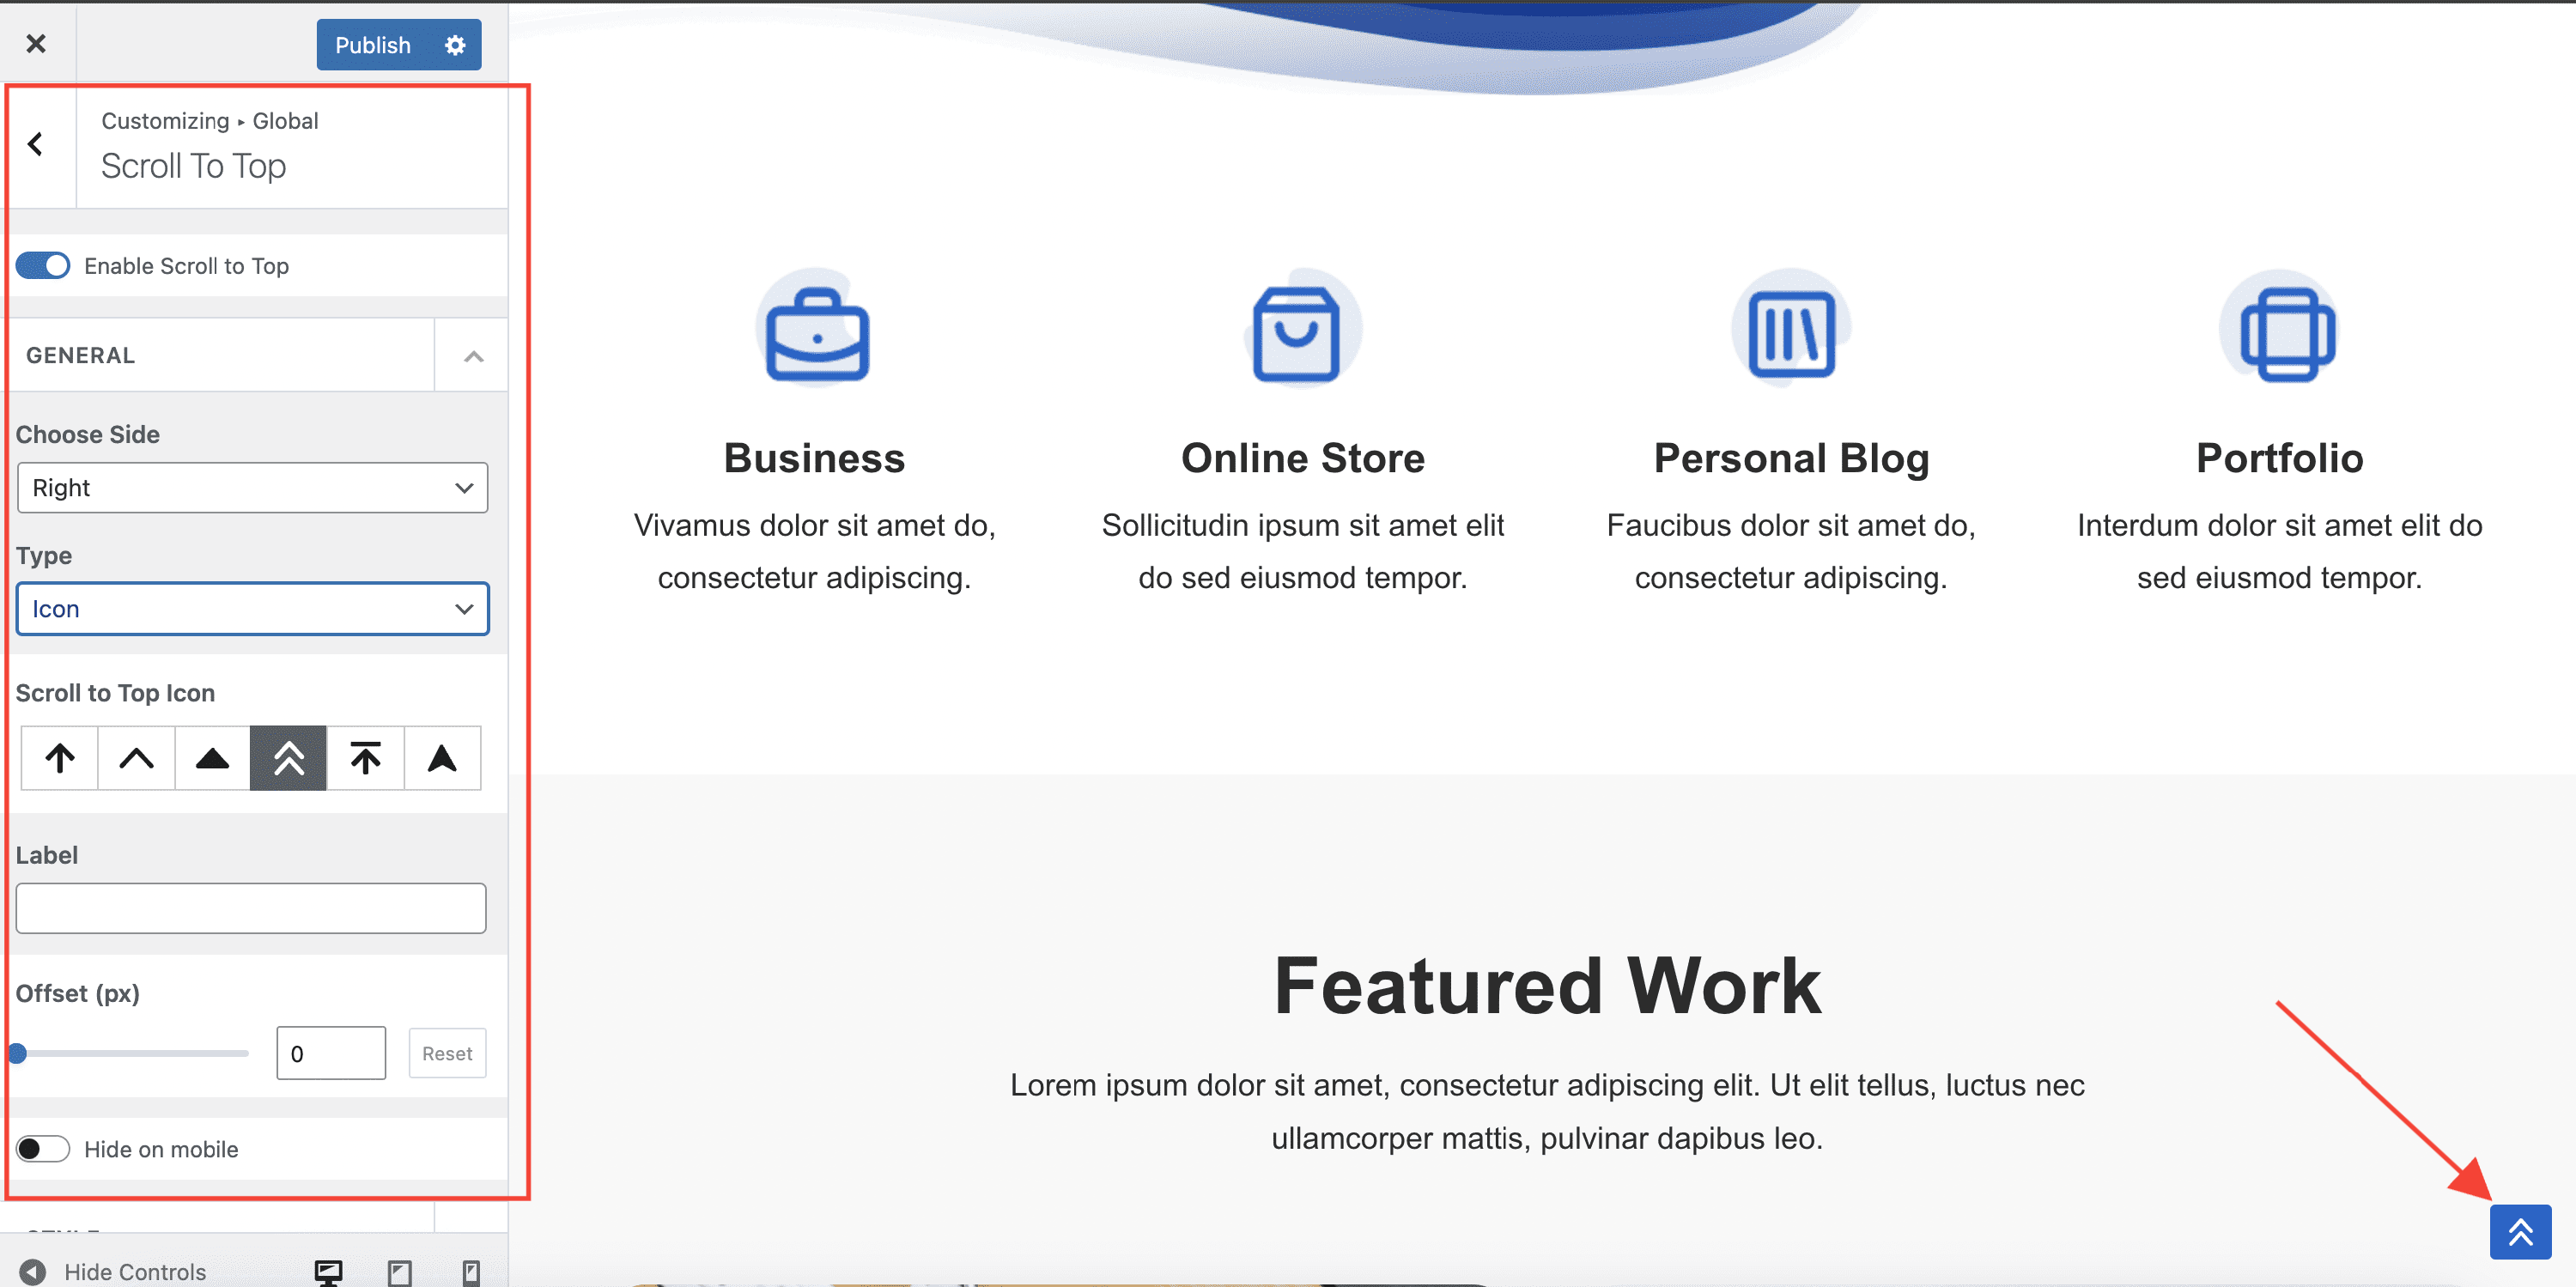
Scroll To Top
Navigate to Appearance > Customize > Global > Scroll To Top to access the options.
- Offset (px) - is the number of pixels scrolled after which the Scroll to Top button will appear. You can undo the changes through the Reset button.
Custom Sidebars
Important: The Custom Sidebars module is part of all three Neve PRO plans: Personal, Business and Agency.
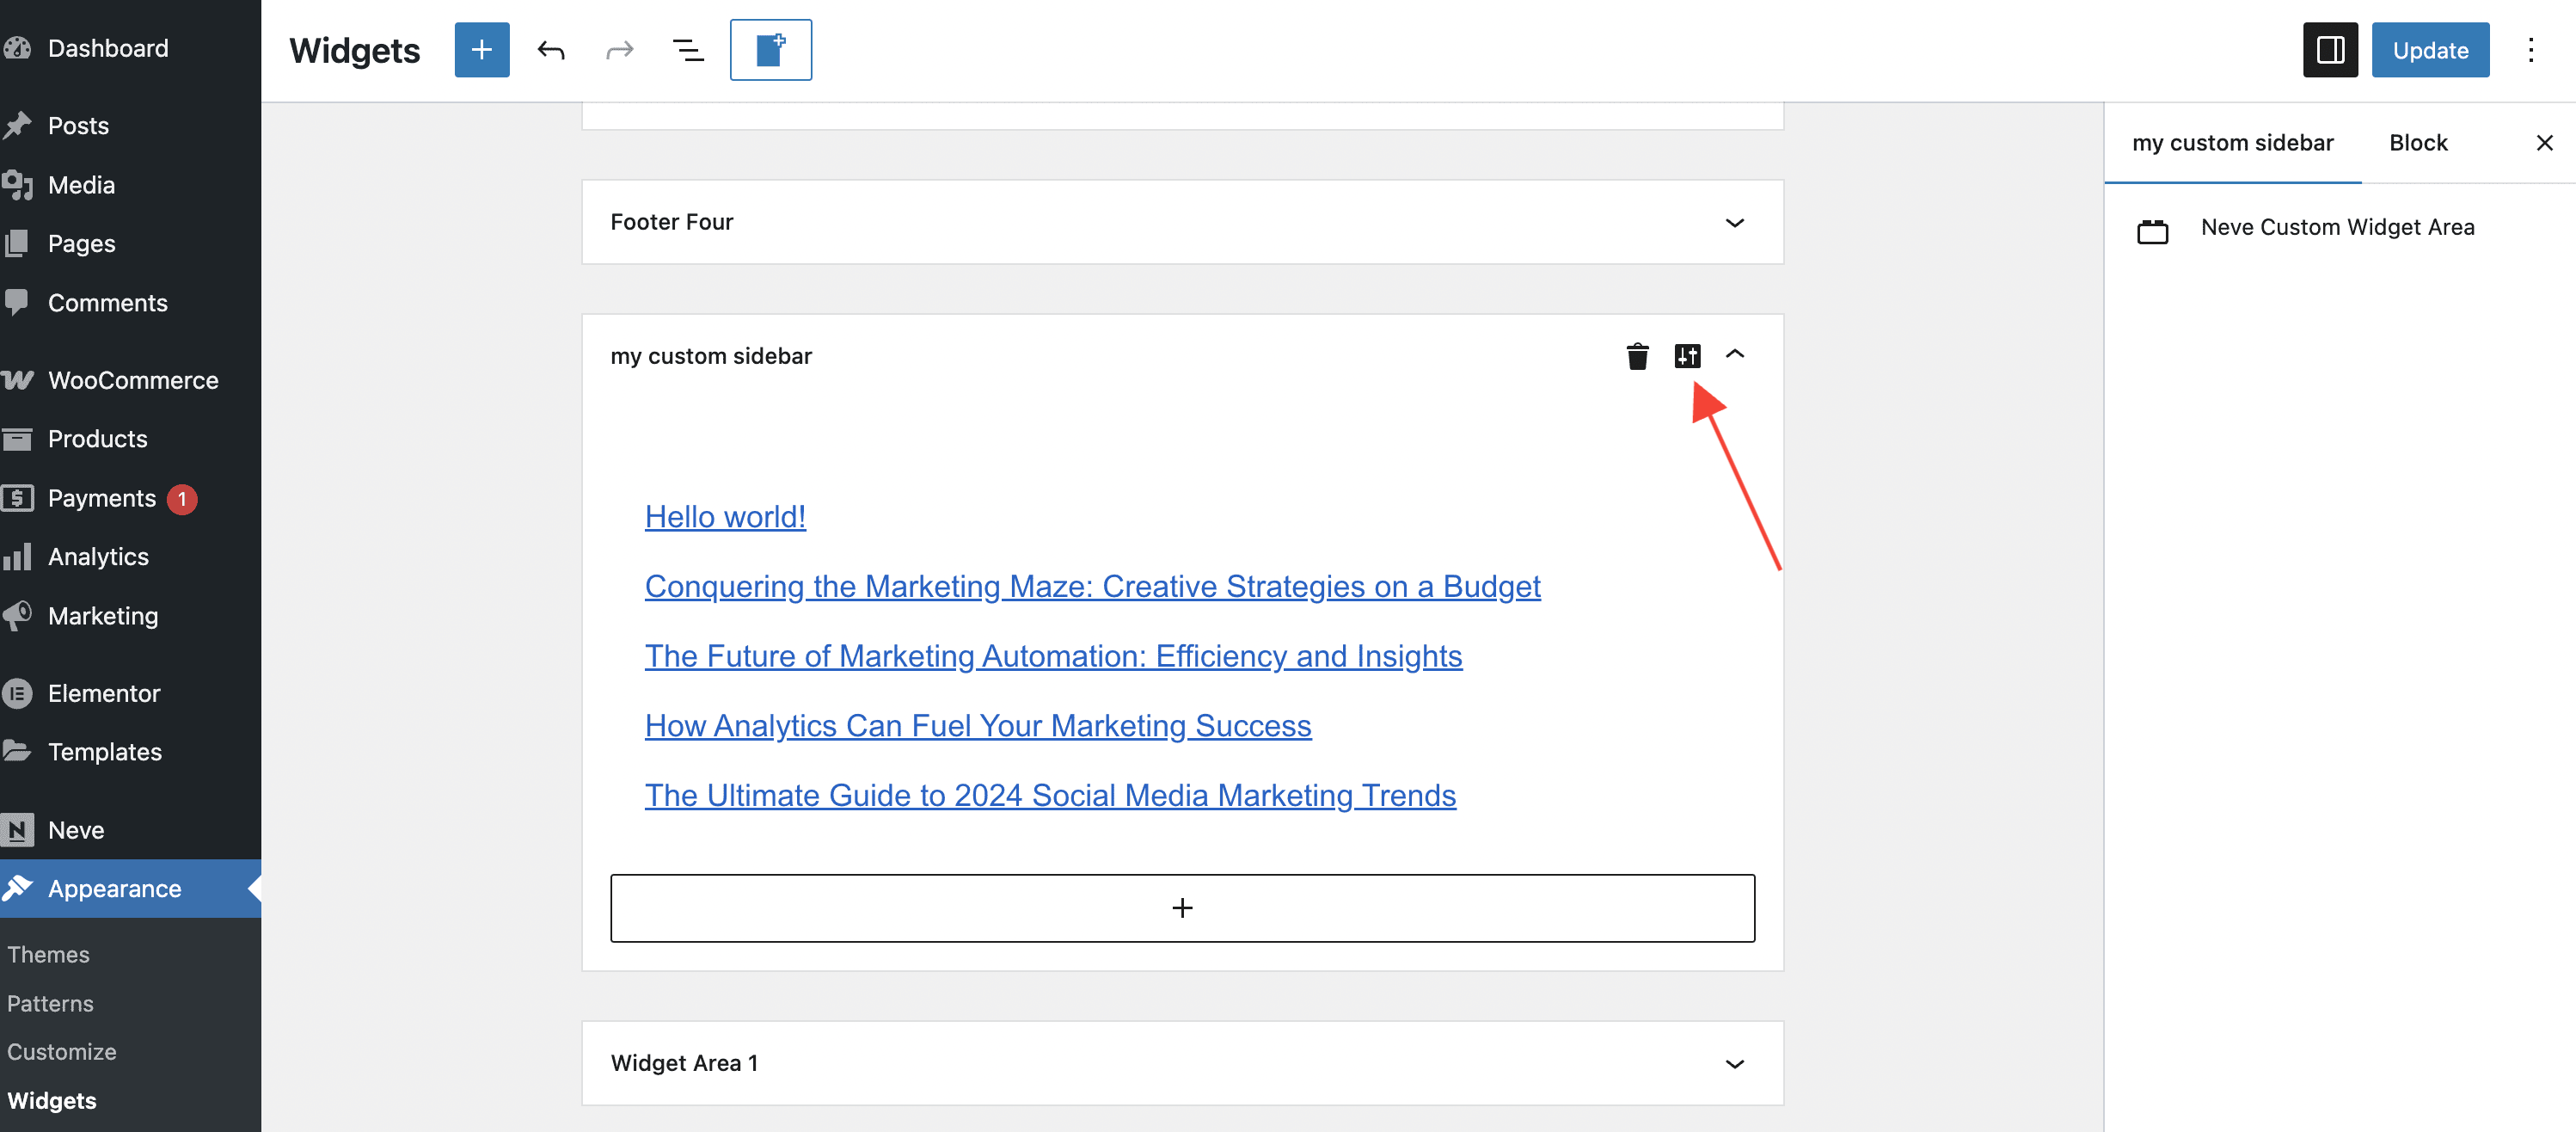
Navigate to Appearance > Widgets, click on the Add new Custom Sidebar button at the top of the page, add a custom name and save it to create a new sidebar.
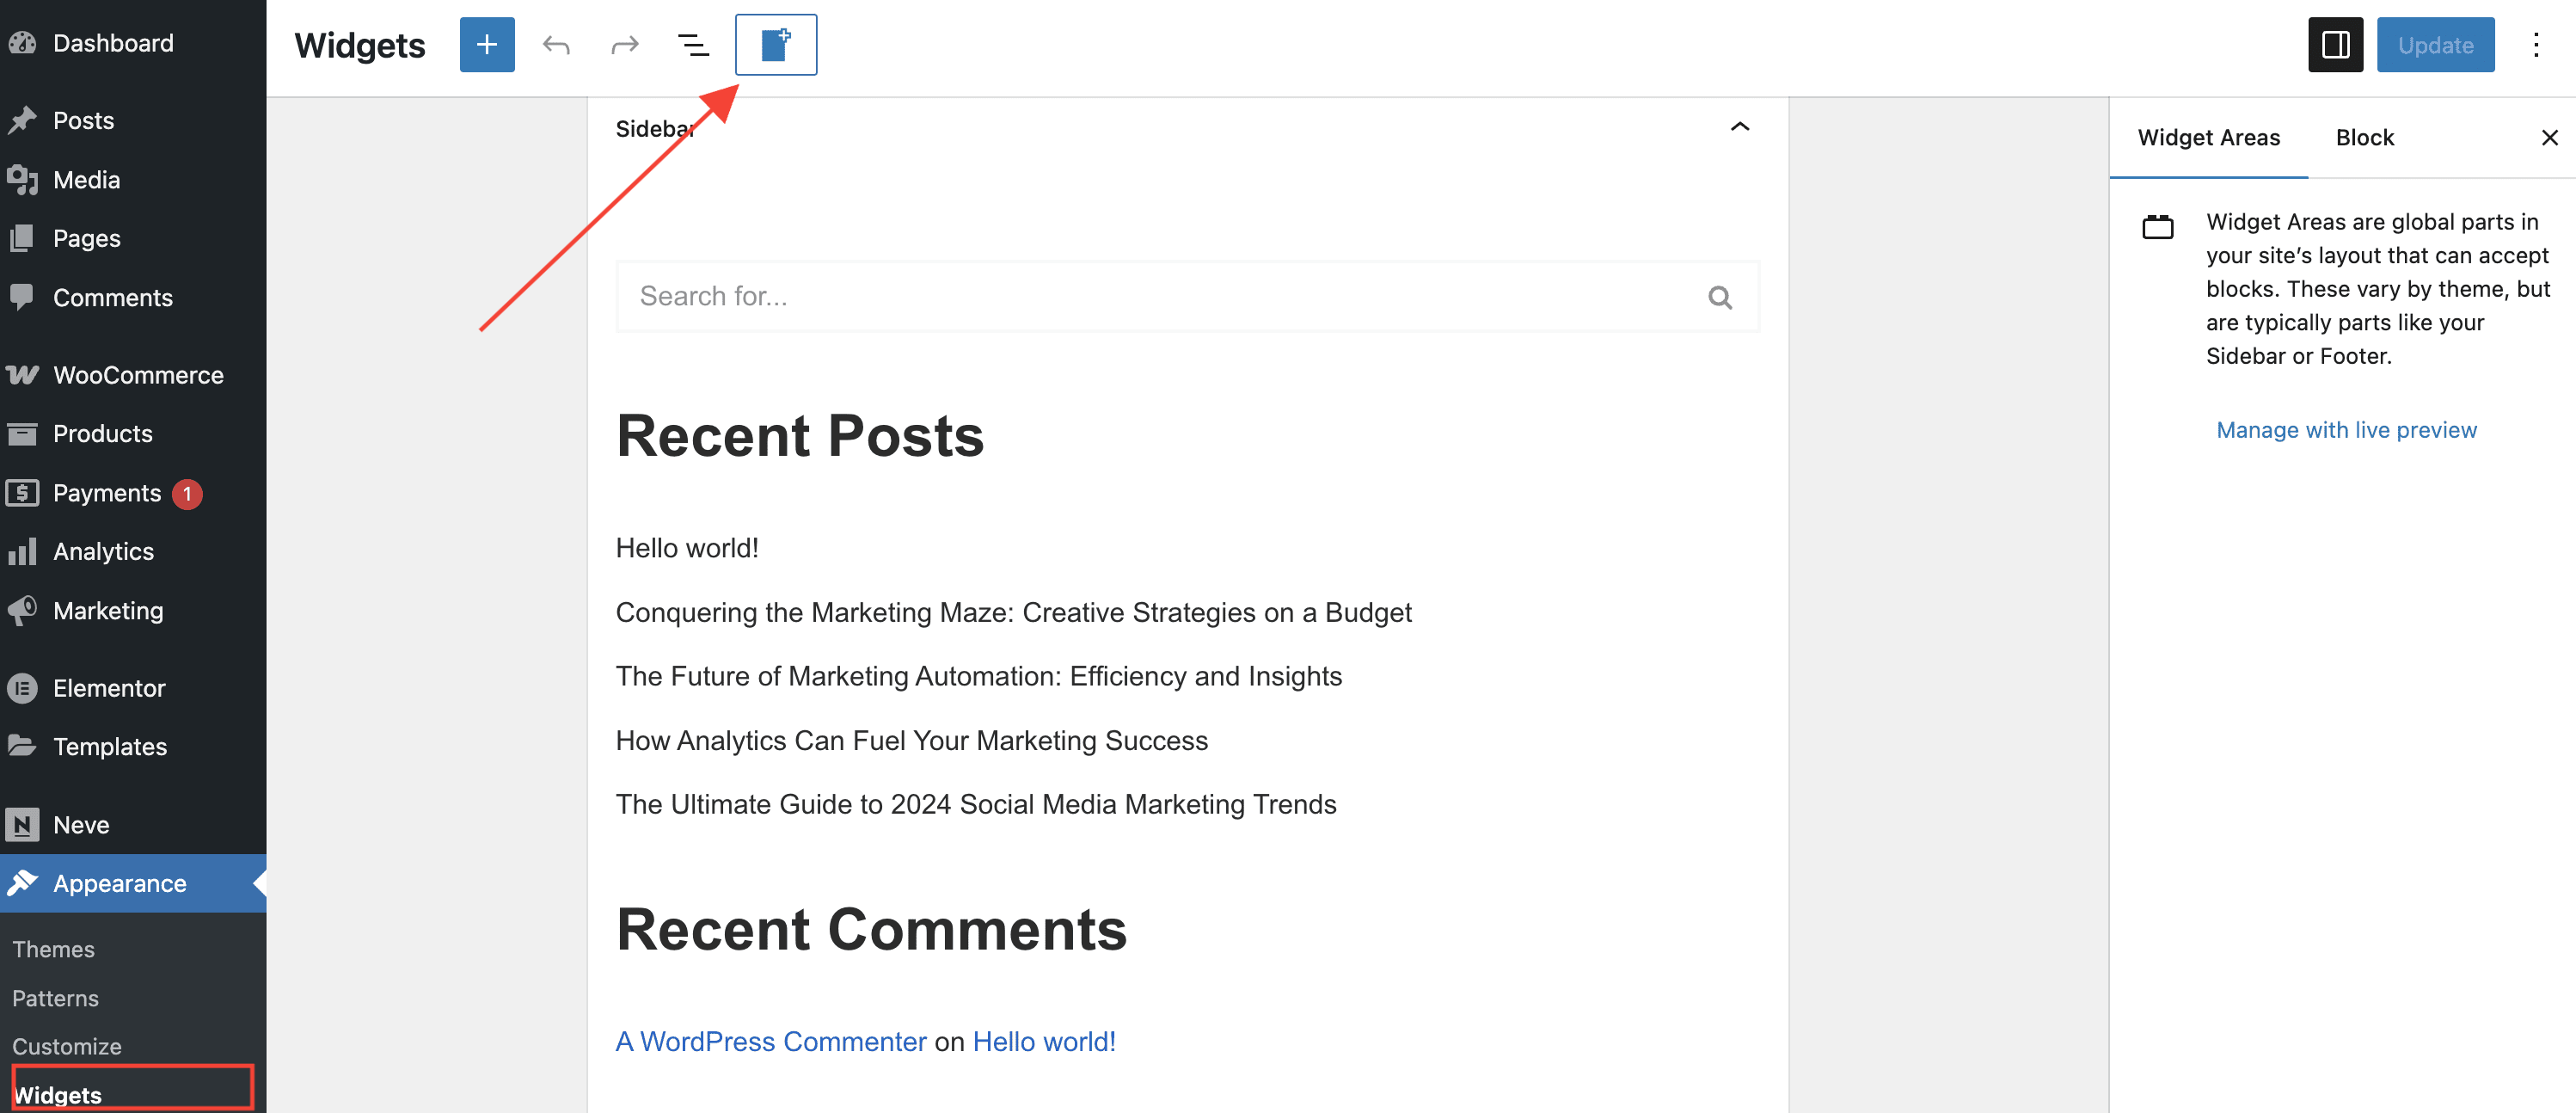
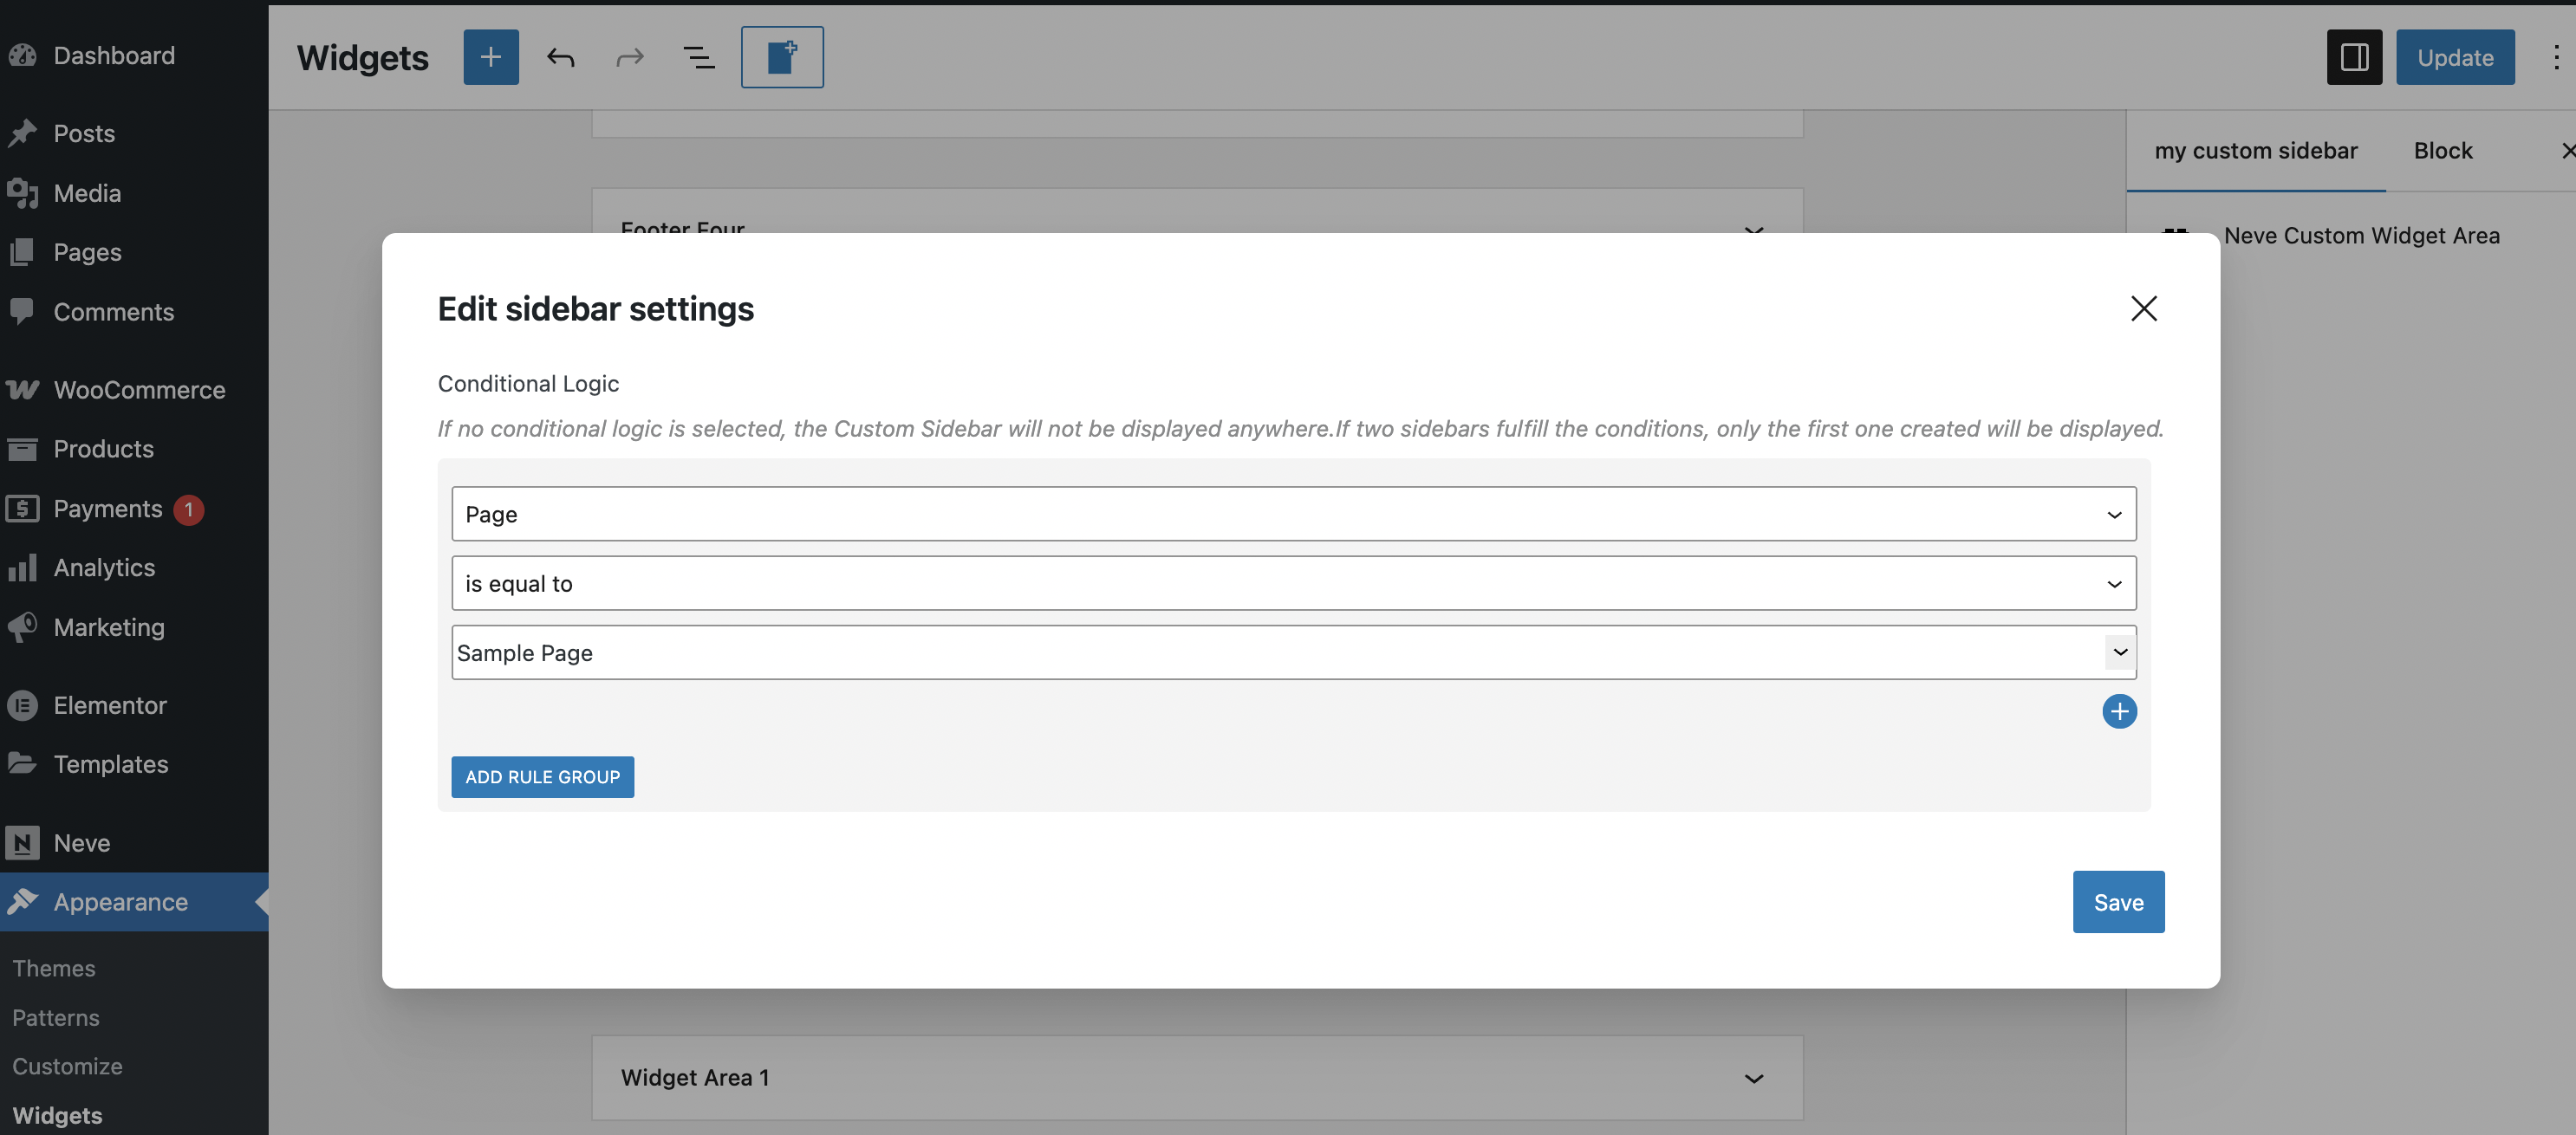
Populate the newly created sidebar with the widgets of your choice and click on this custom icon to open the sidebar settings to choose on which pages/under which conditions will the sidebar show up.
Note: Multiple conditions can be selected. For example, to show the sidebar of the Blog page, just for users that are Administrators of the site.
Easy Digital Downloads
Important: The Easy Digital Downloads module is part of just two of Neve PRO plans: Business and Agency.
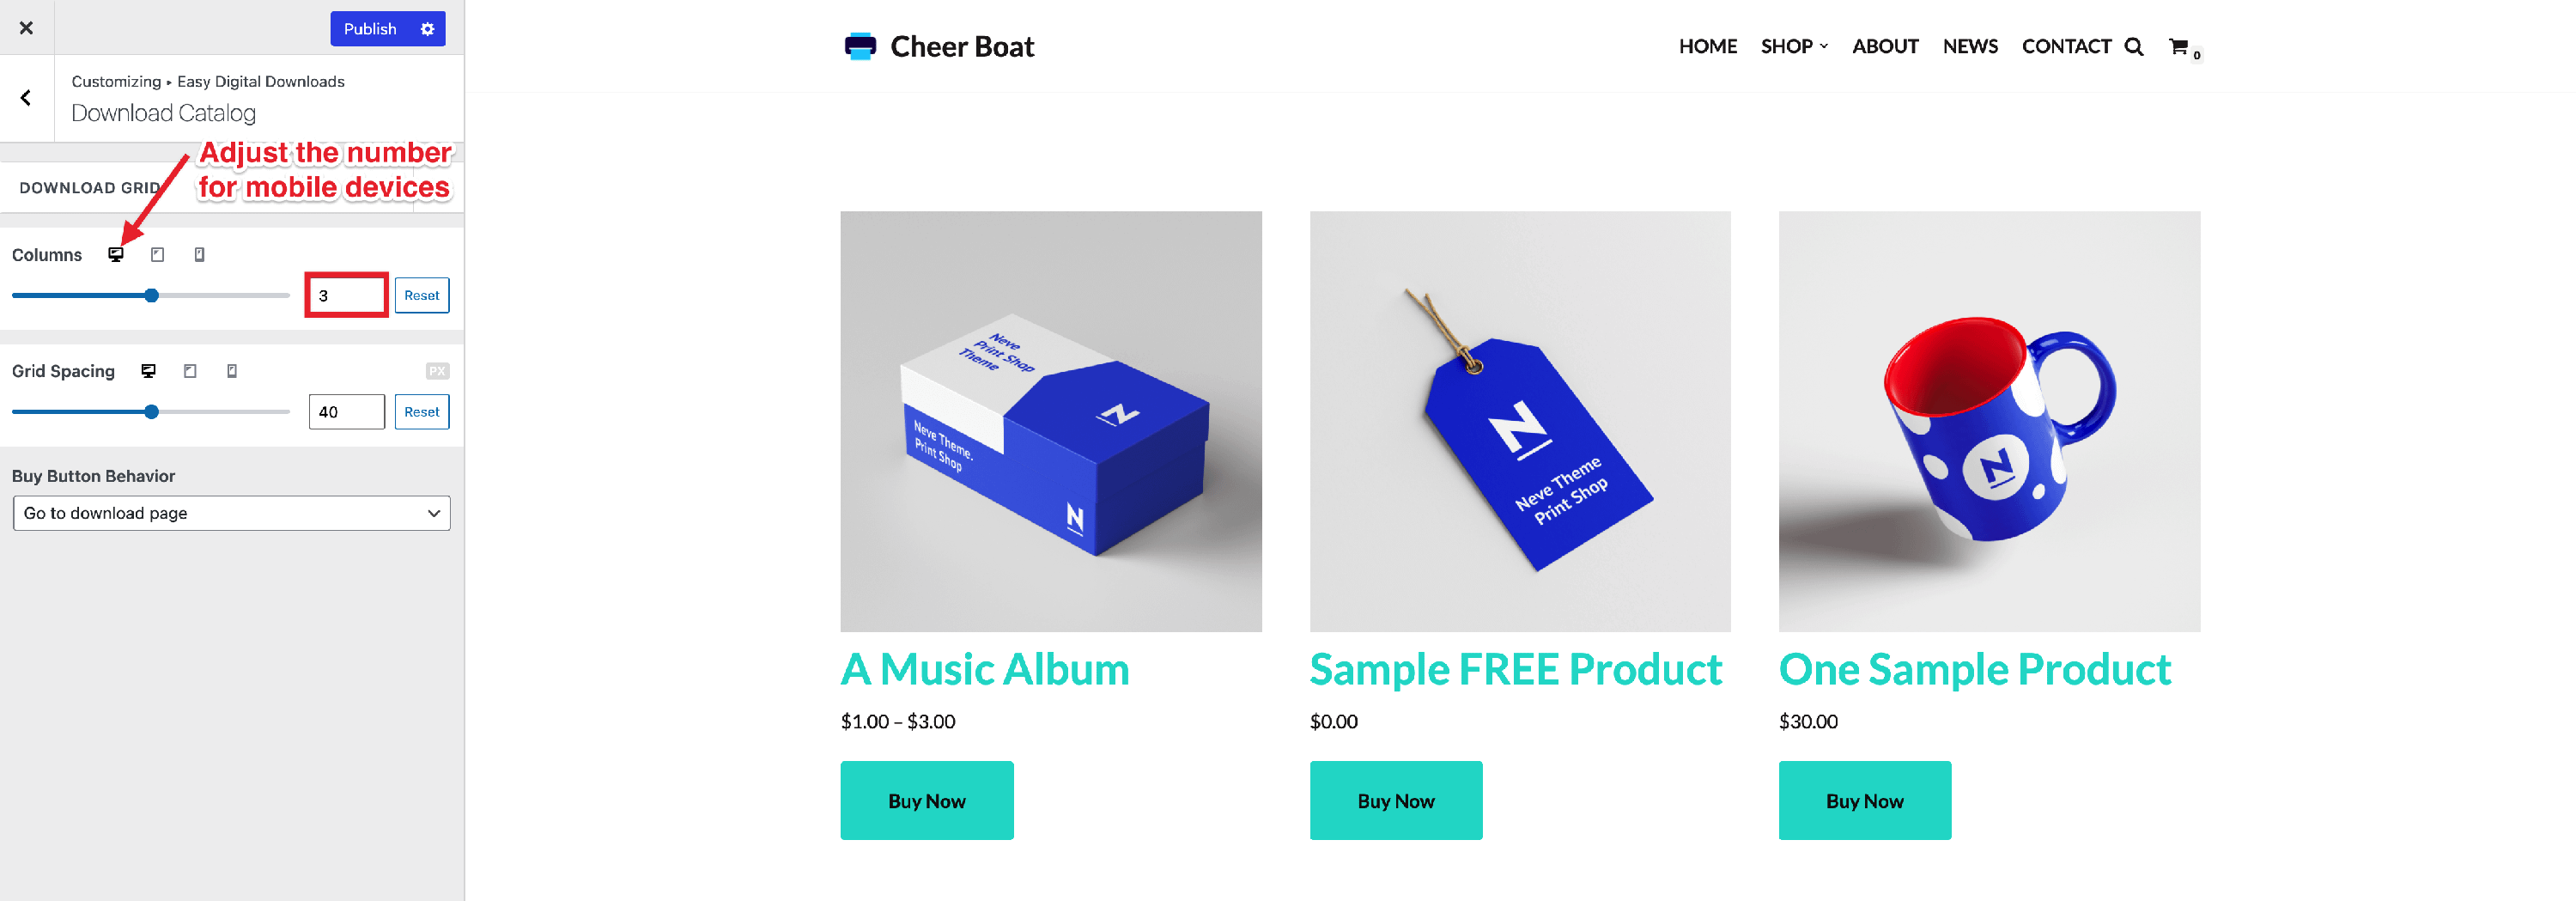
The Easy Digital Downloads Booster is an add-on for the Easy Digital Downloads plugin, which adds a few extra options for the Download Catalog page coming from the plugin.
The options can be found by navigating to Appearance > Customize > Easy Digital Downloads.
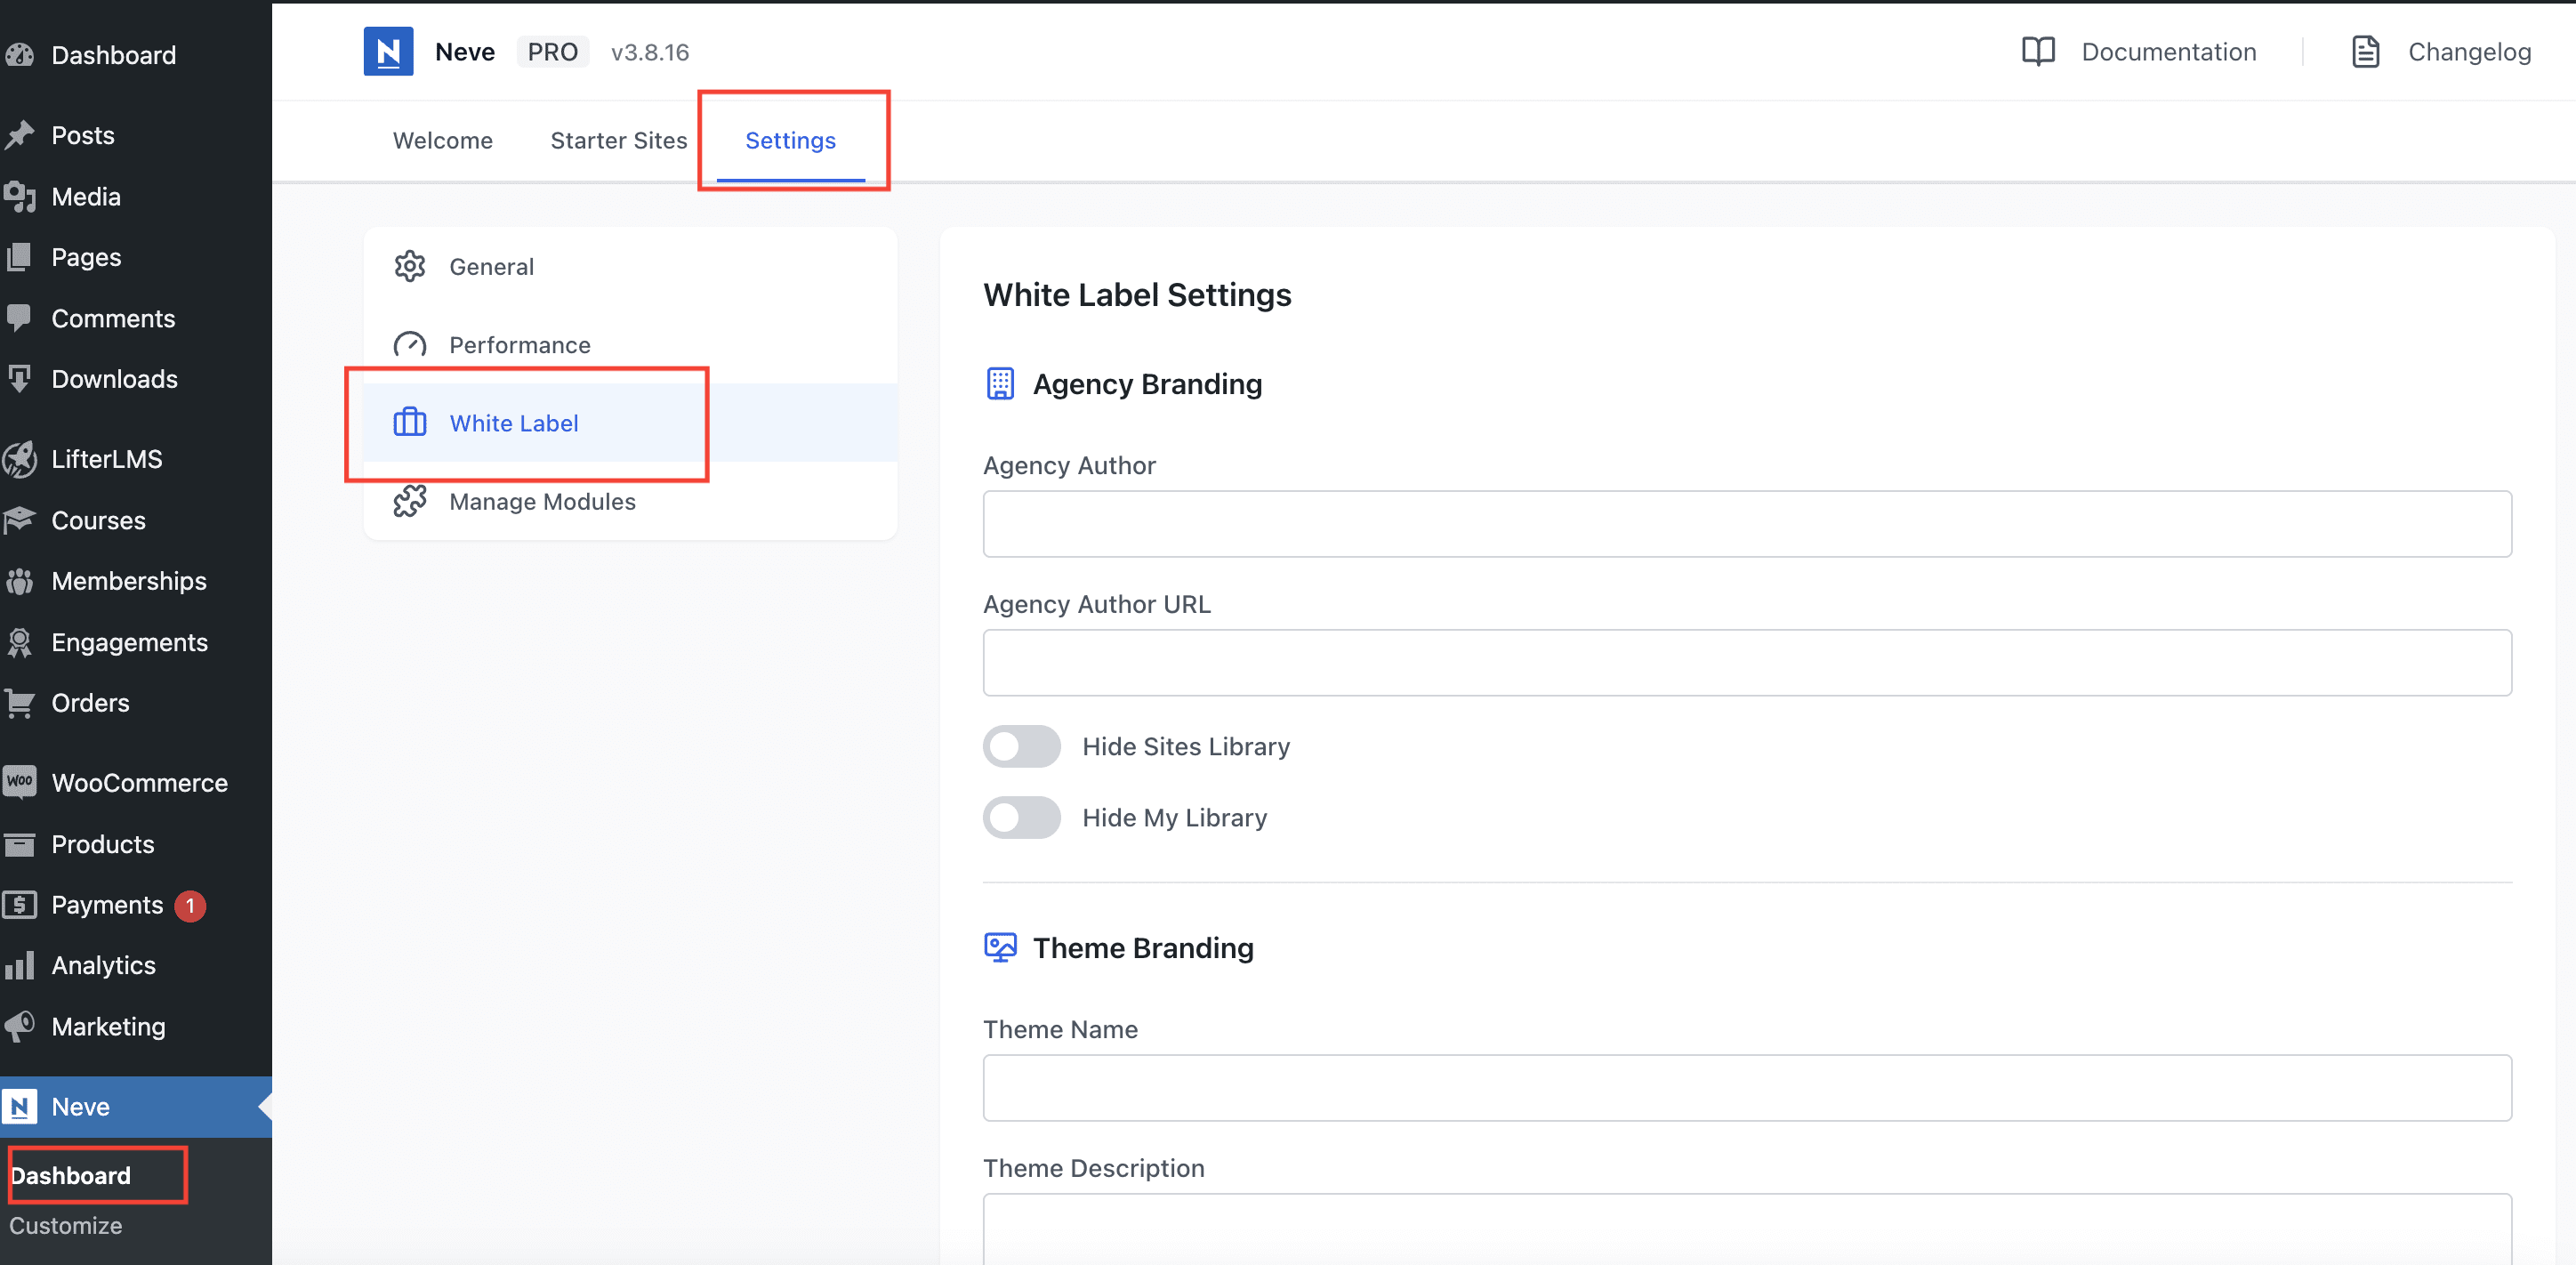
White Label
Important: The White Label module is available only in the Agency subscription of Neve PRO.
The White Label module allows you to rebrand Neve as your own. This helps you hide the actual identity of the theme and pro plugin used and lets you use your brand name instead. Make a note that, you cannot change the folder names.
In order to access the White Label settings, navigate to Neve > Dashboard > Settings > White Label and add your own brand details.
LifterLMS Booster
Important: The LifterLMS Booster module is part of only two of Neve PRO plans: Business and Agency.
The LifterLMS Booster is an add-on for the LifterLMS plugin, which adds a few extra layout options for the Membership and Courses pages ( archives and singles).
The options can be found by navigating to Appearance > Customize > Global > LifterLMS and Appearance > Customize > Membership.
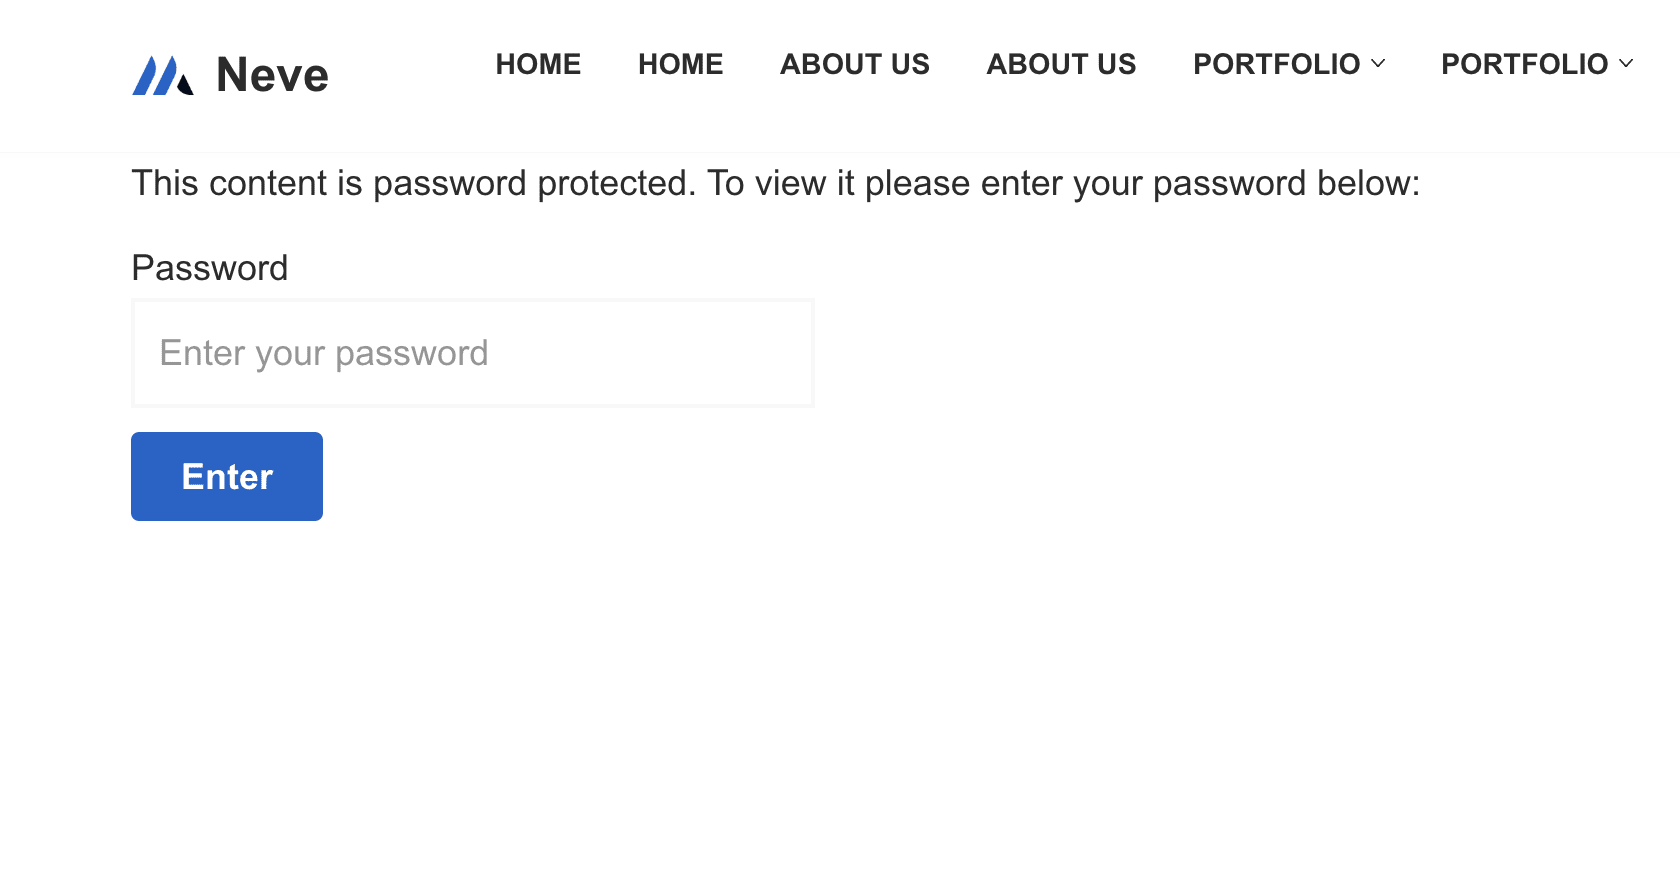
Content Restriction
The module allows you to restrict several content types across your website based on users name, user roles, or passwords.
To use the module, navigate to Neve > Dashboard > Settings > General > Enable Content Restriction and enable the module for the post types of your choice ( Posts, Pages etc ). After that, select what will be shown when the restriction conditions are not met: Show 404 page, Show default WP login page or Show custom login page.
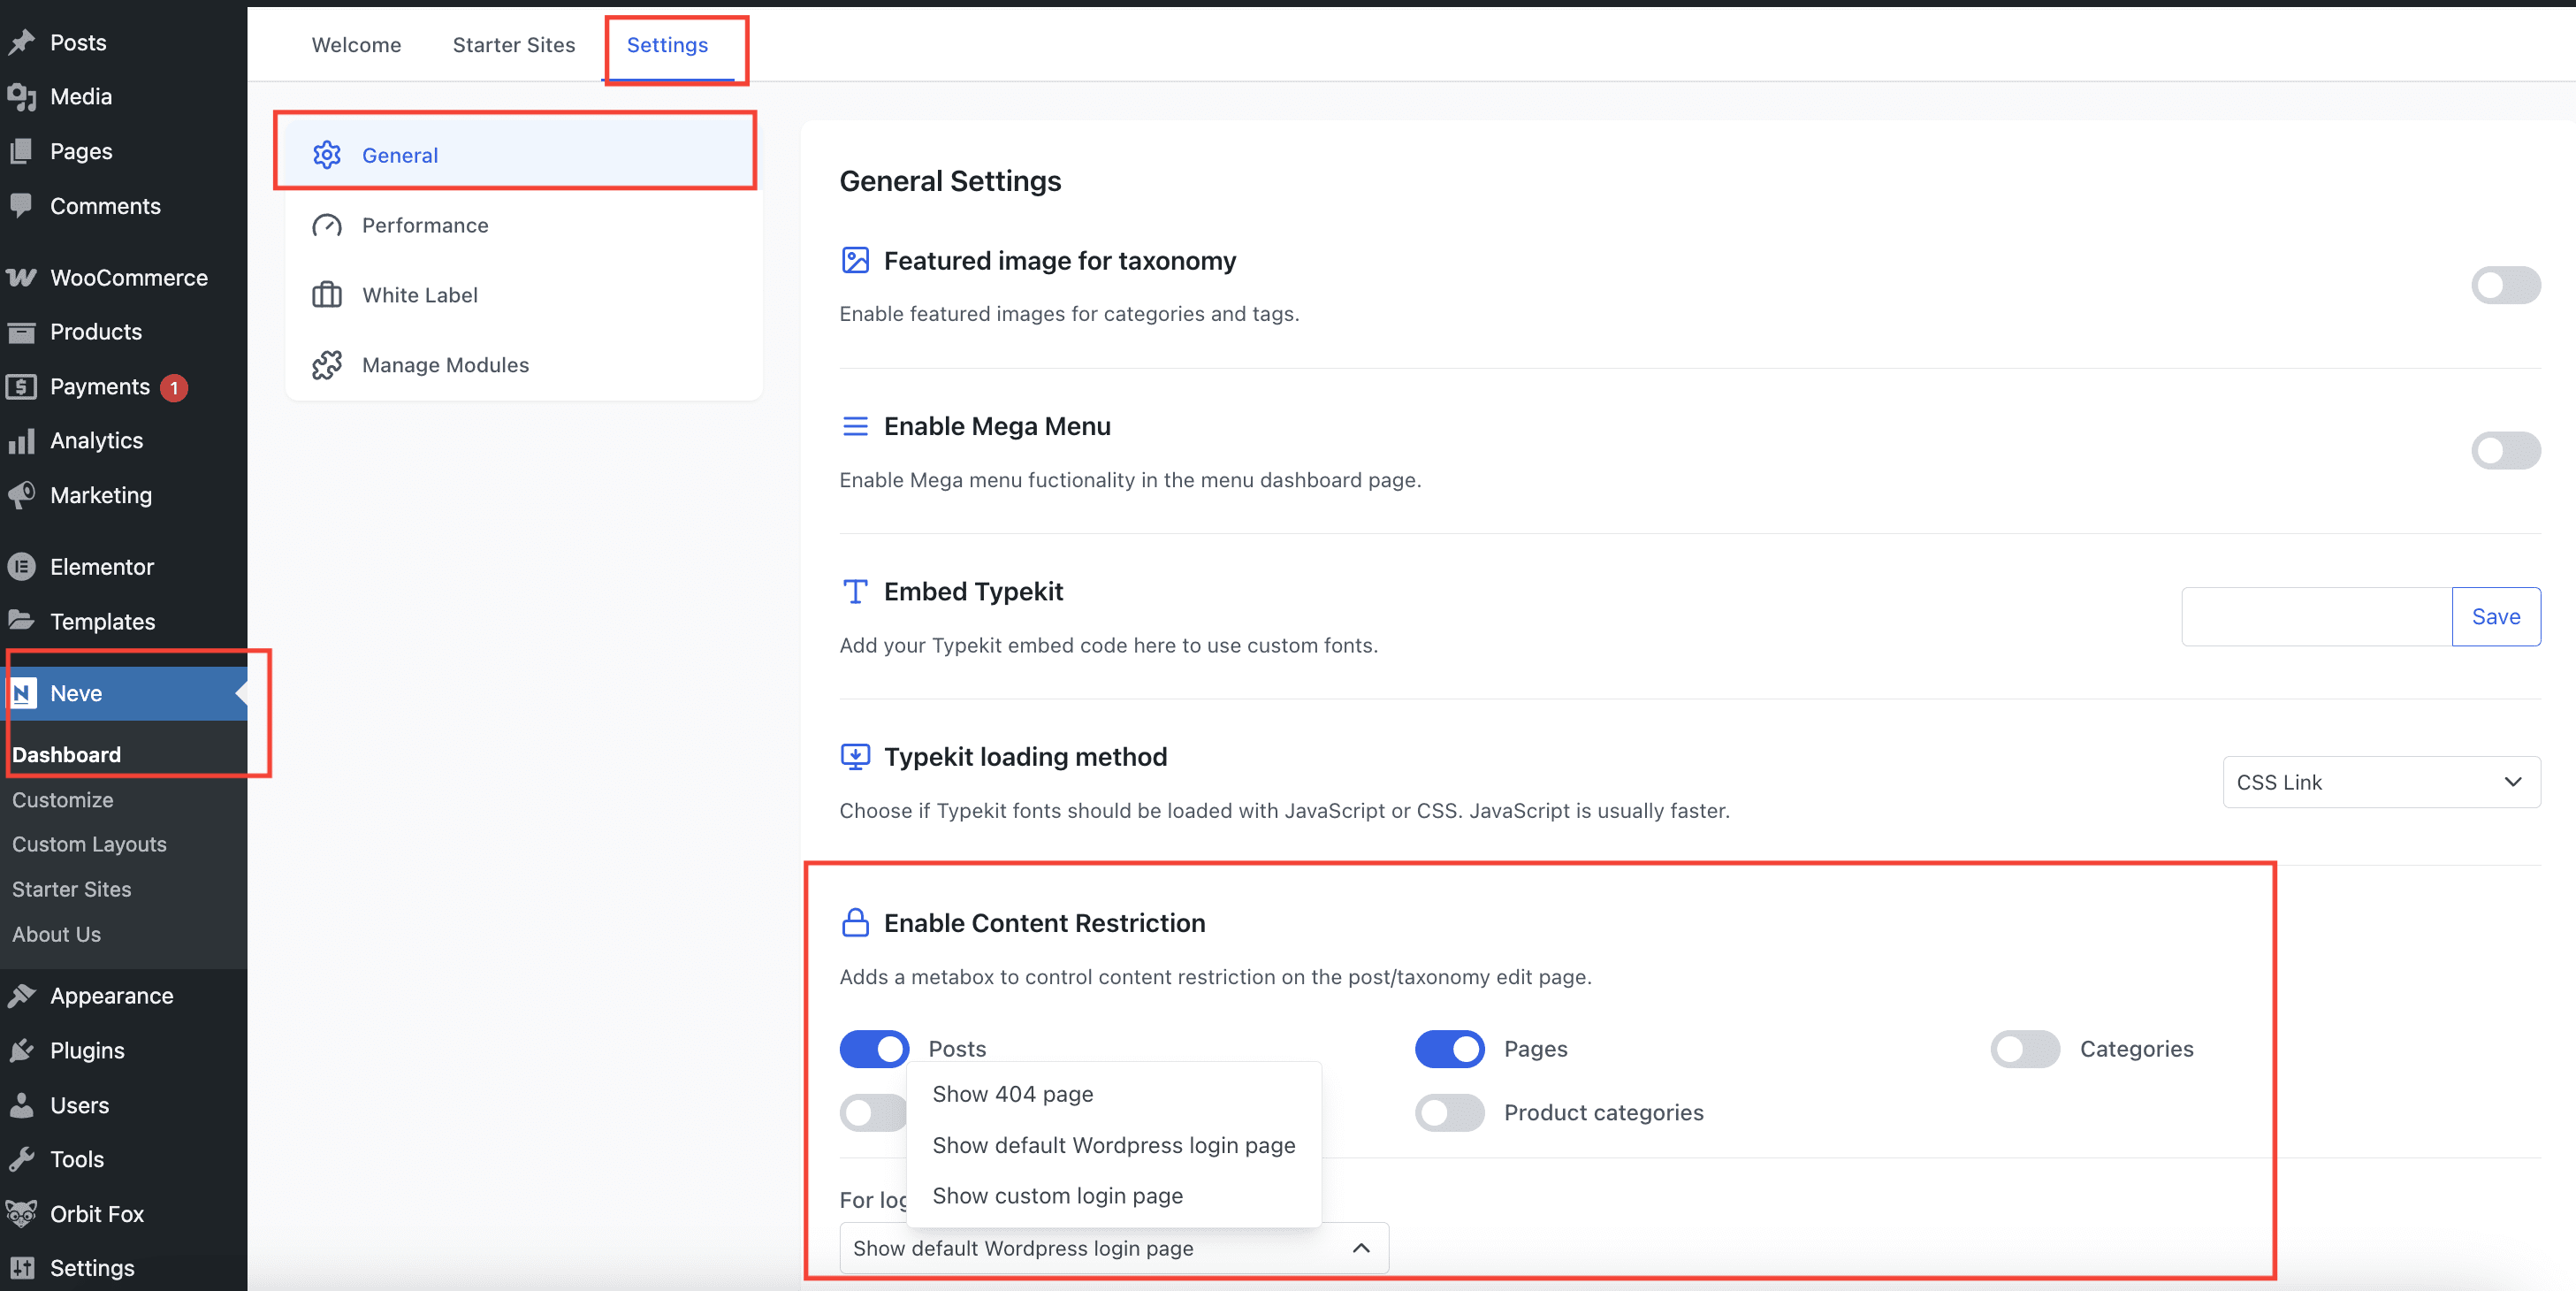
Now, that content restriction is enabled for Posts, navigate to the post that needs to have its content restricted and choose its specific restrictions.
In the example below, the post content will be visible just after the user enters the custom password.
Example of a restricted post.
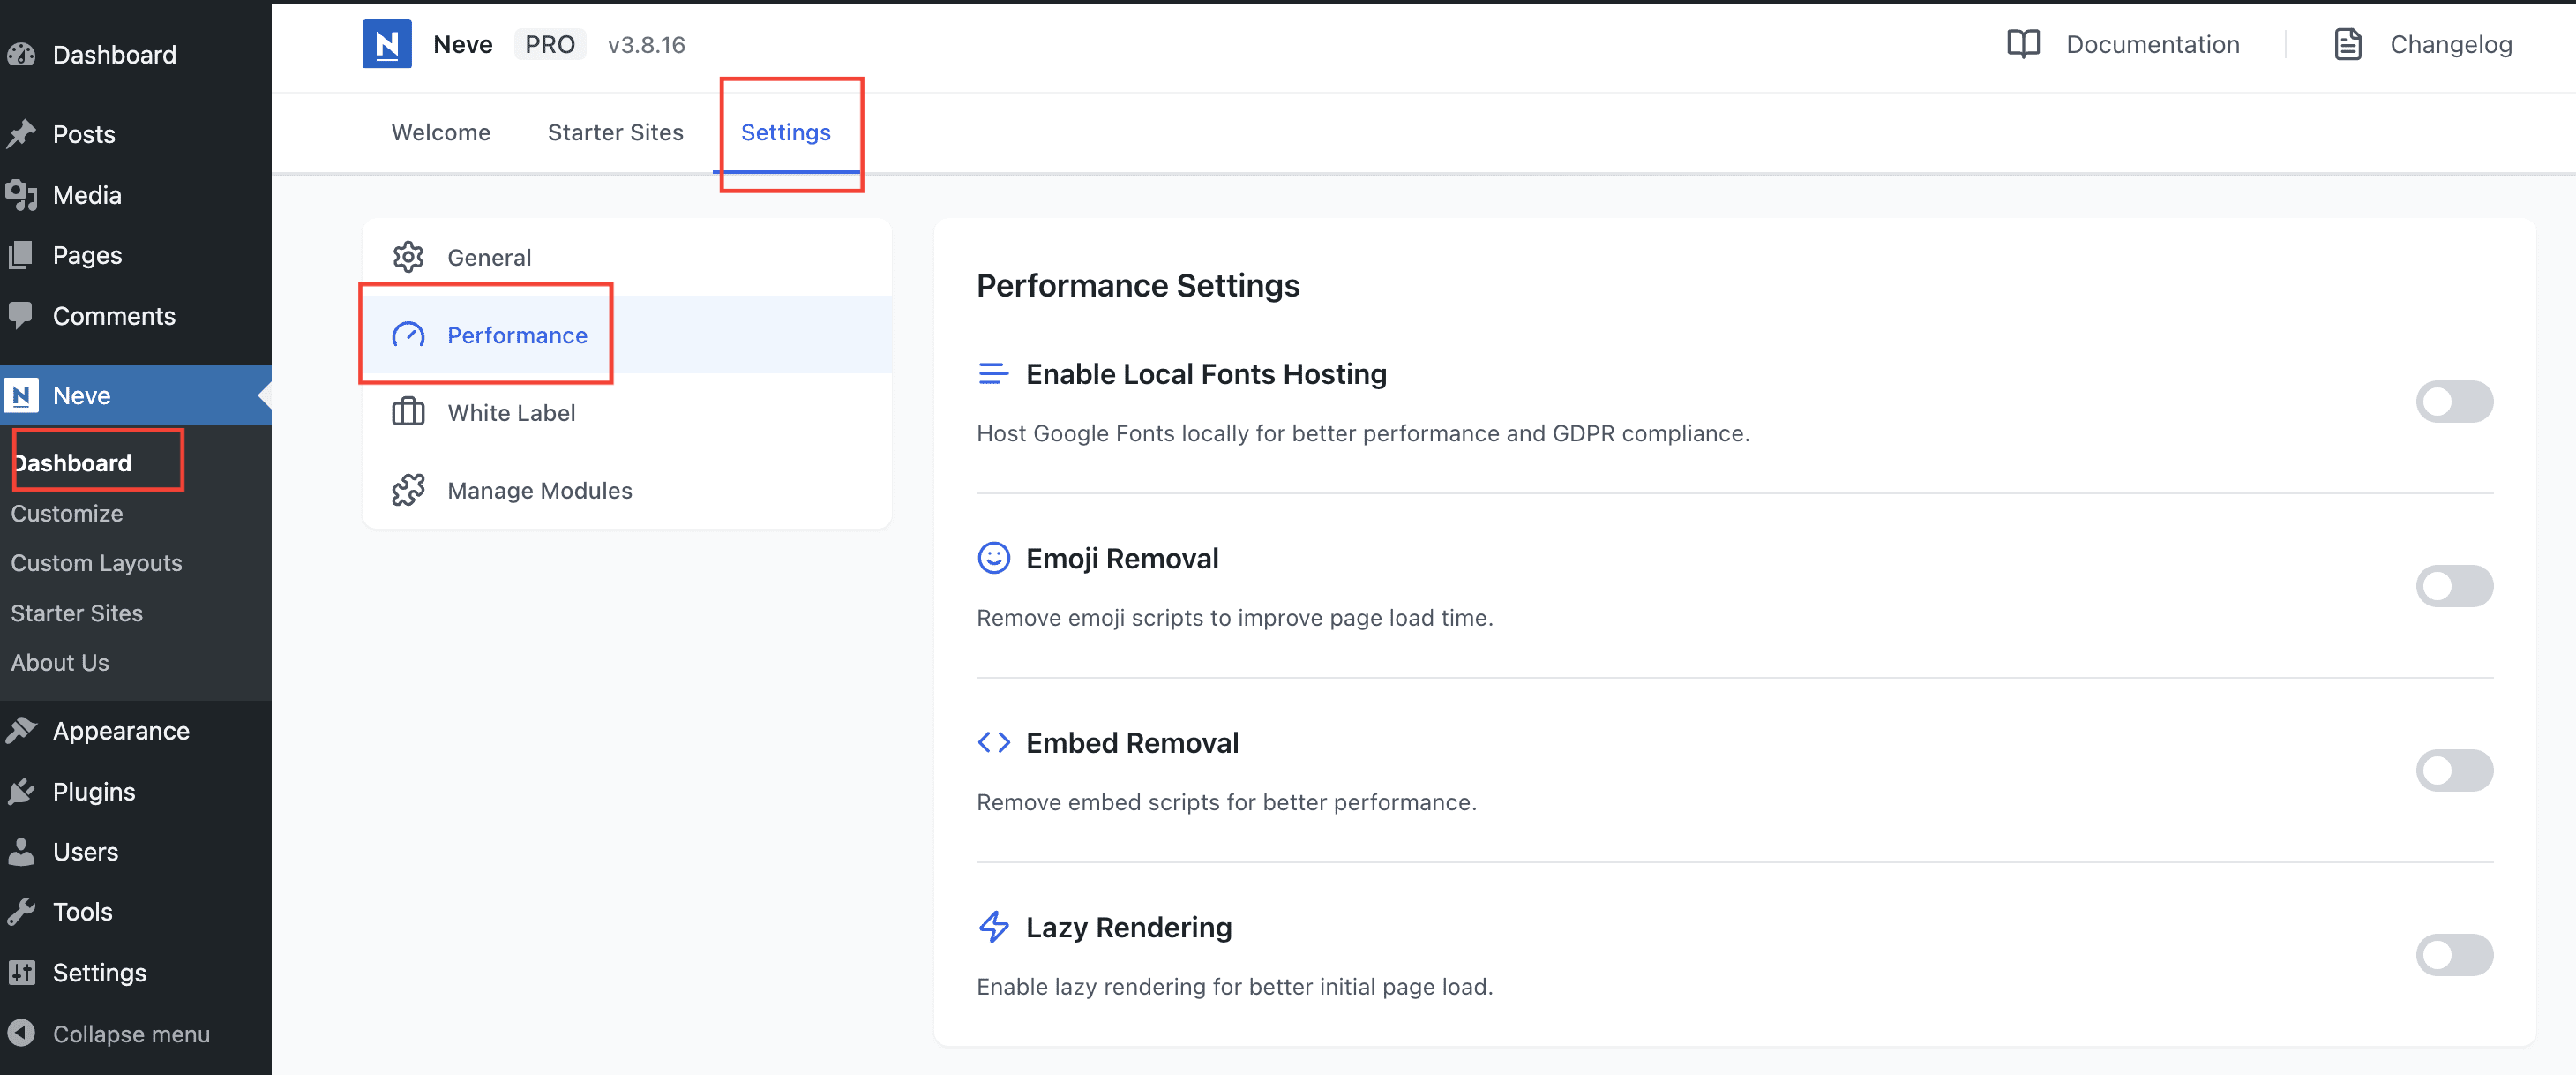
Boost site performance
Navigate to Neve > Dashboard > Settings > Performance to enable/disable multiple options that can boost your site performance.
- Enable Local Fonts Hosting - Host Google Fonts locally for better performance and GDPR compliance. It means the fonts used on the site will be loaded from the server instead of requesting them to Google Fonts. This approach applies to all Google fonts on your website, it's not only for Neve fonts but for the ones loaded by other plugins as well. For achieving the same result with a third-party font, from a custom library, you can adapt and add this code snippet at the end of the functions.php file of your child theme, or in a custom plugin:
/* Themeisle Support - the following code snippet needs to be adjusted with the font name and library that you want to use with the Neve theme and store it locally */
/** This would most likely be getting done by some font plugin **/
function neve_enqueue_custom_font(){
	wp_enqueue_style( 'font-library-datalegreya', 'https://fontlibrary.org//face/datalegreya');
}
add_action( 'wp_enqueue_scripts', 'neve_enqueue_custom_font' );

function neve_download_custom_font( $providers ){
	$providers[] = 'https://fontlibrary.org';
	return $providers;
}
add_filter('neve_font_providers', 'neve_download_custom_font');- Emoji Removal - Removes the core emoji scripts from WordPress to improve page load time.
- Embed Removal - Removes embed scripts for better performance.
- Lazy Rendering - Enable lazy rendering for better initial page load.
Allow featured image for taxonomies
The module allows taxonomies ( categories, tags etc ) to have their own featured image, similar to posts.
To use this, navigate to Neve > Dashboard > Settings > General and enable Featured image for taxonomy. In the Allow featured image for taxonomies dropdown select the taxonomies for which this should apply.
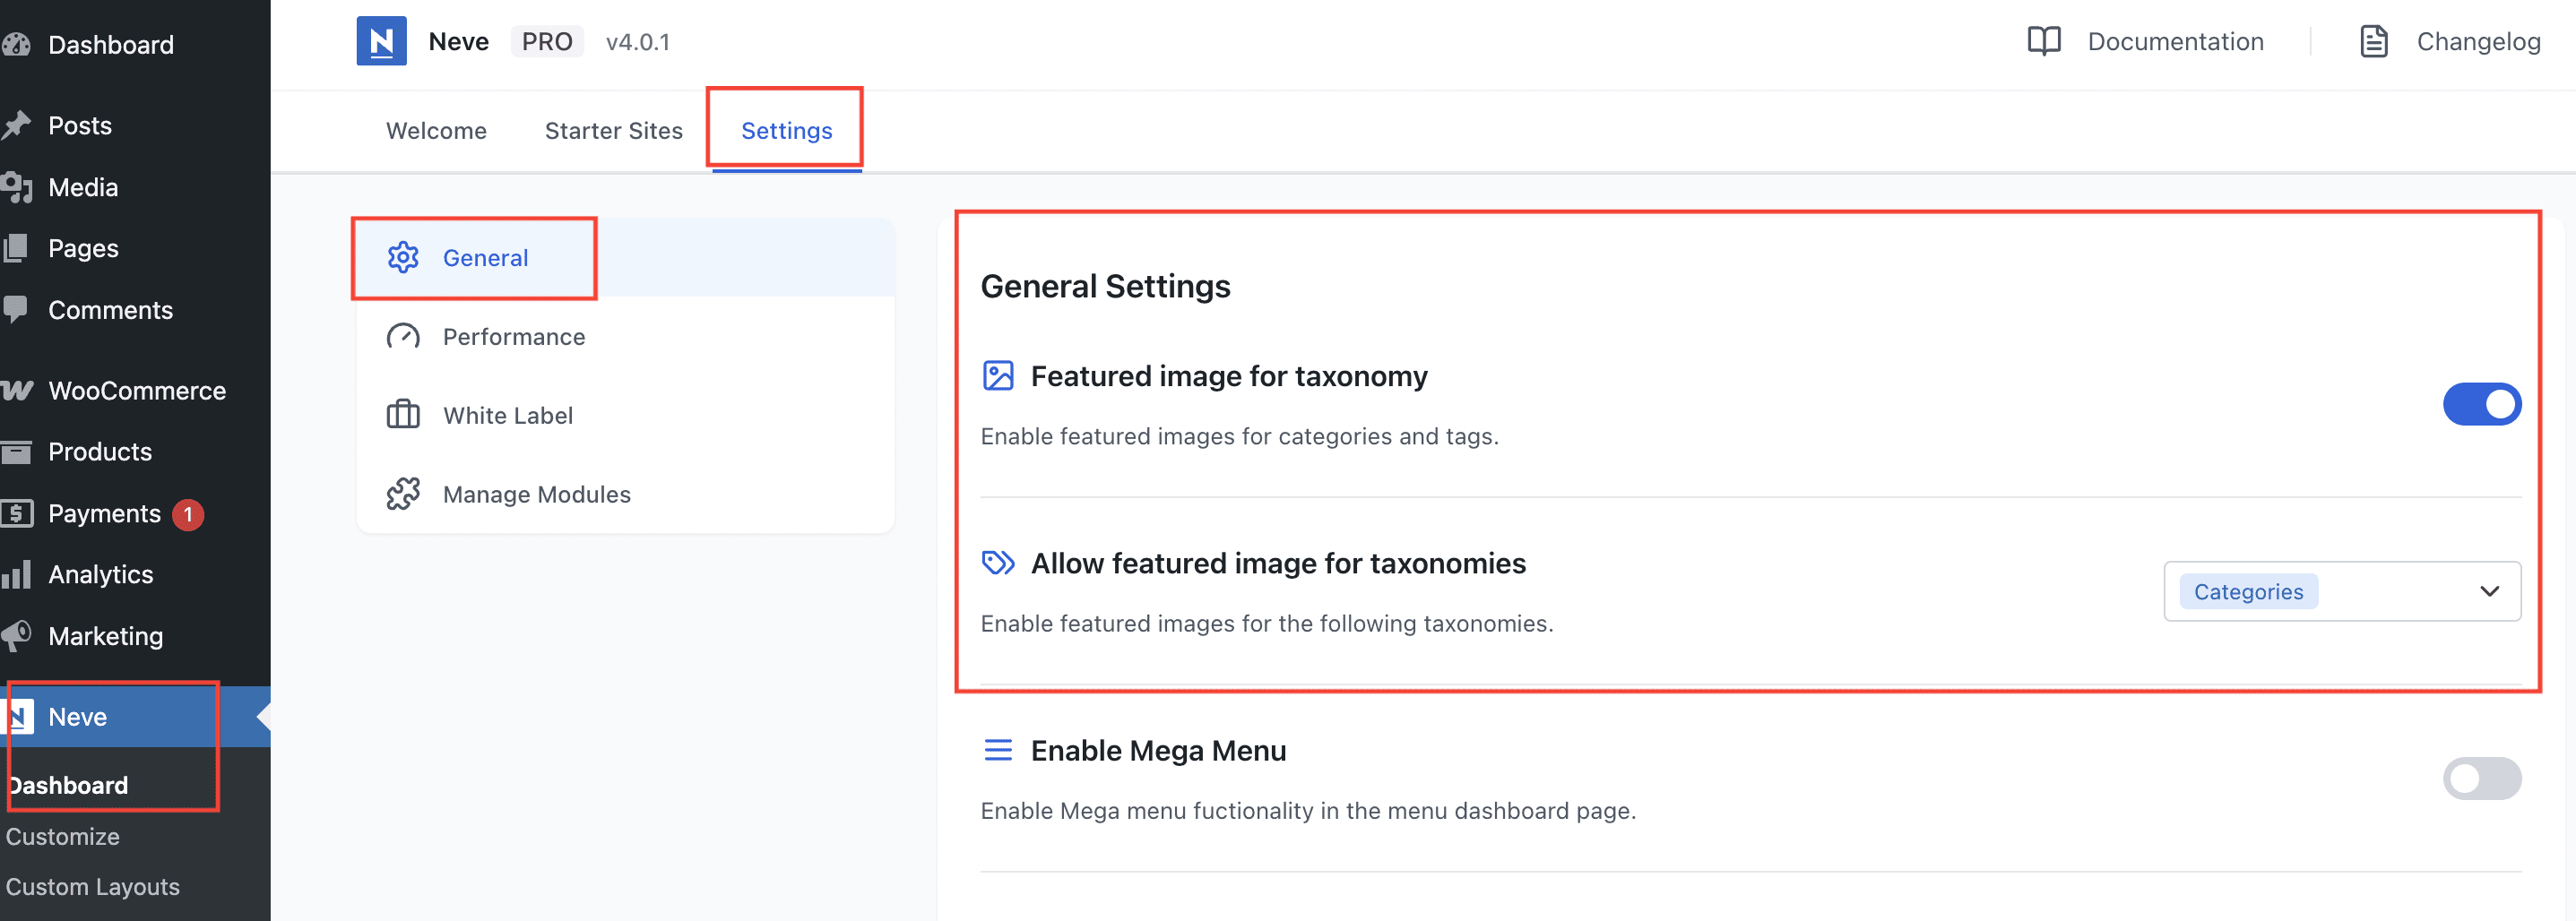
After that, when editing or creating a category, you will be able to add a custom featured image to it.
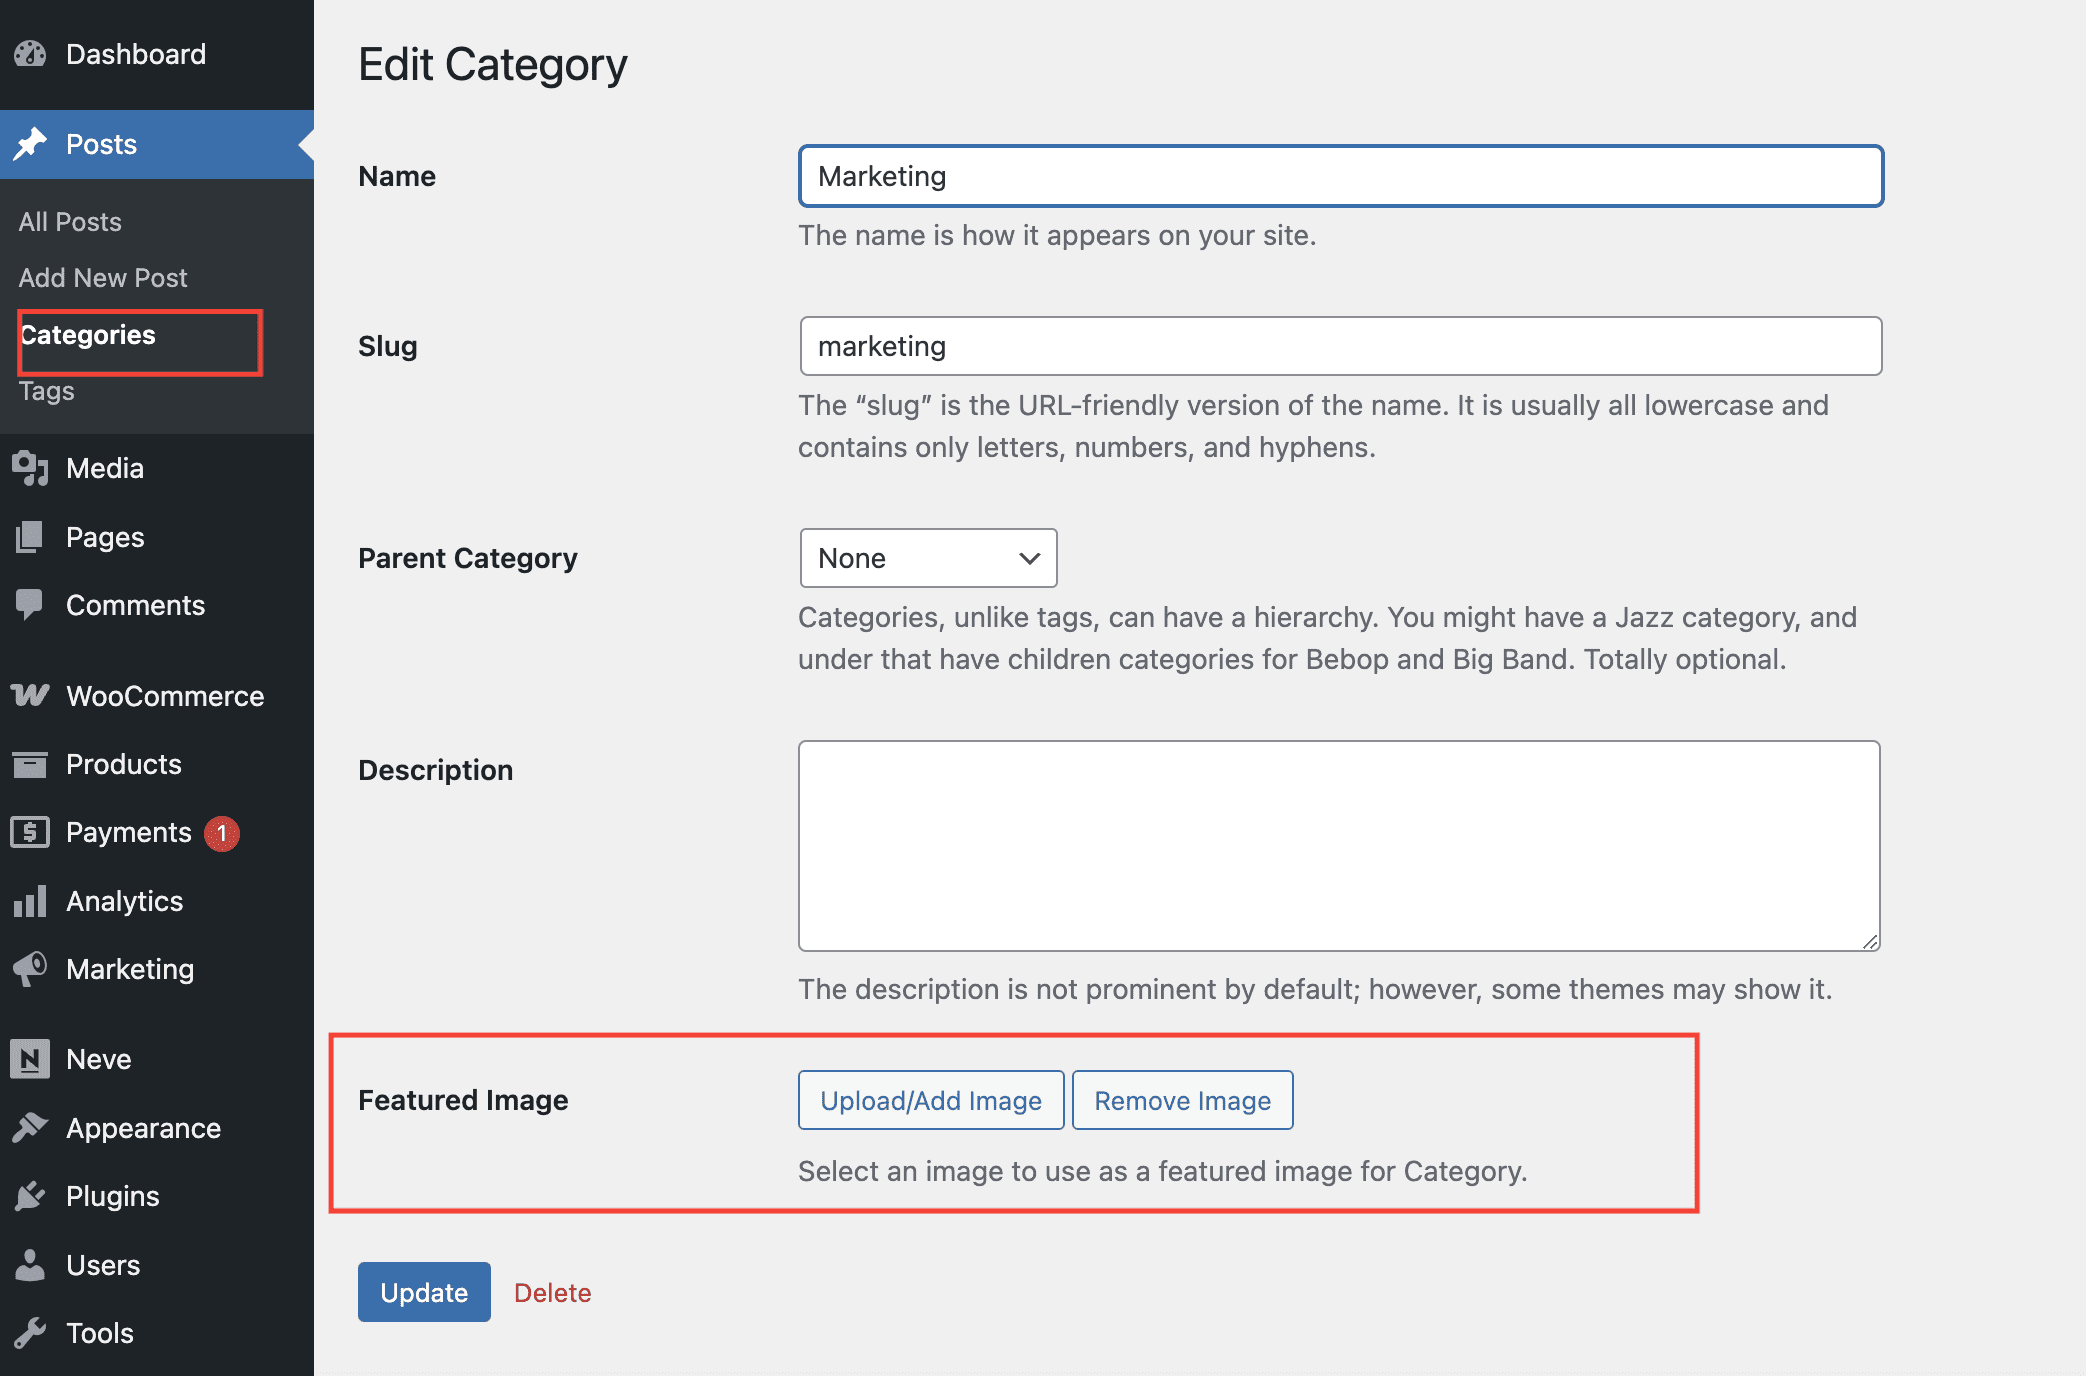
Note: After following the steps above, you will be able to select a dedicated featured image for each category. However, to actually display that featured image on the categories pages, you need to take an extra step of creating a Page Header with the featured image set as a background.

- Enable the Page Header on Archives for Posts.

- Inside the Page Header, add a HTML component with {archive_title} in it.

- For the Page Header row background select the Featured Image.
Important: The featured image option can also be used for taxonomies created using the ACF plugin. However, in order for the taxonomy to appear in the Allow featured image for taxonomies dropdown, you need to take an extra step of adding this code in the functions.php file of your child theme.
add_filter( 'neve_feature_image_taxonomy_support', function( $taxonomies ) {
	$taxonomies[] = 'genre'; // Add your taxonomy key here, duplicate this line if you want to add more
	return $taxonomies;
} );