
Hyve Documentation
Hyve is an AI-powered WordPress chatbot that uses your site's content as a knowledge base to answer visitor questions in real time.
In this article
Getting Started
Hyve is an AI-powered chatbot that transforms your WordPress content into engaging conversations. It uses the content from your WordPress site as a knowledge base to intelligently respond to user inquiries, providing accurate and context-aware answers directly from your existing materials.
Hyve needs an AI connection before it can answer anything. You can choose between two modes:
- Hyve Connect is the hosted option. Hyve handles the AI for you, so you do not need an OpenAI account or API key. It includes a free allowance, and an active Hyve license raises the limits.
- Self-hosted uses your own OpenAI API key. Chat requests and content processing are billed to your OpenAI account.
You pick the mode in Hyve > Settings > AI. Only one mode can be active at a time.
📝 Note: Hyve Connect is available in Hyve Lite 2.0 and later. If you do not see it in Hyve > Settings, update the plugin.
⚠️ Important: If you use your own OpenAI API key and see a "Too many requests" error, the account has no credit on it. Hyve needs an OpenAI API key with available credit to work in self-hosted mode.
Install and Set Up
Download the plugin
- The free version of the plugin, Hyve Lite, is available on WordPress.org or directly in the Dashboard of your website at Plugins > Add new and search for Hyve.
- The premium version, Hyve, is available in your customer account on store.themeisle.com.
If you paid for the plugin, Hyve Lite isn't required for it to work; you can only use Hyve.
Install the plugin
In your website's Dashboard, navigate to Plugins, Add New, and upload the plugin zip file you just downloaded, either hyve-lite.zip or hyve.zip .
Connect the AI
Once installed and activated, the first step is to connect Hyve to an AI service. The Dashboard shows a setup checklist that walks you through the remaining steps.
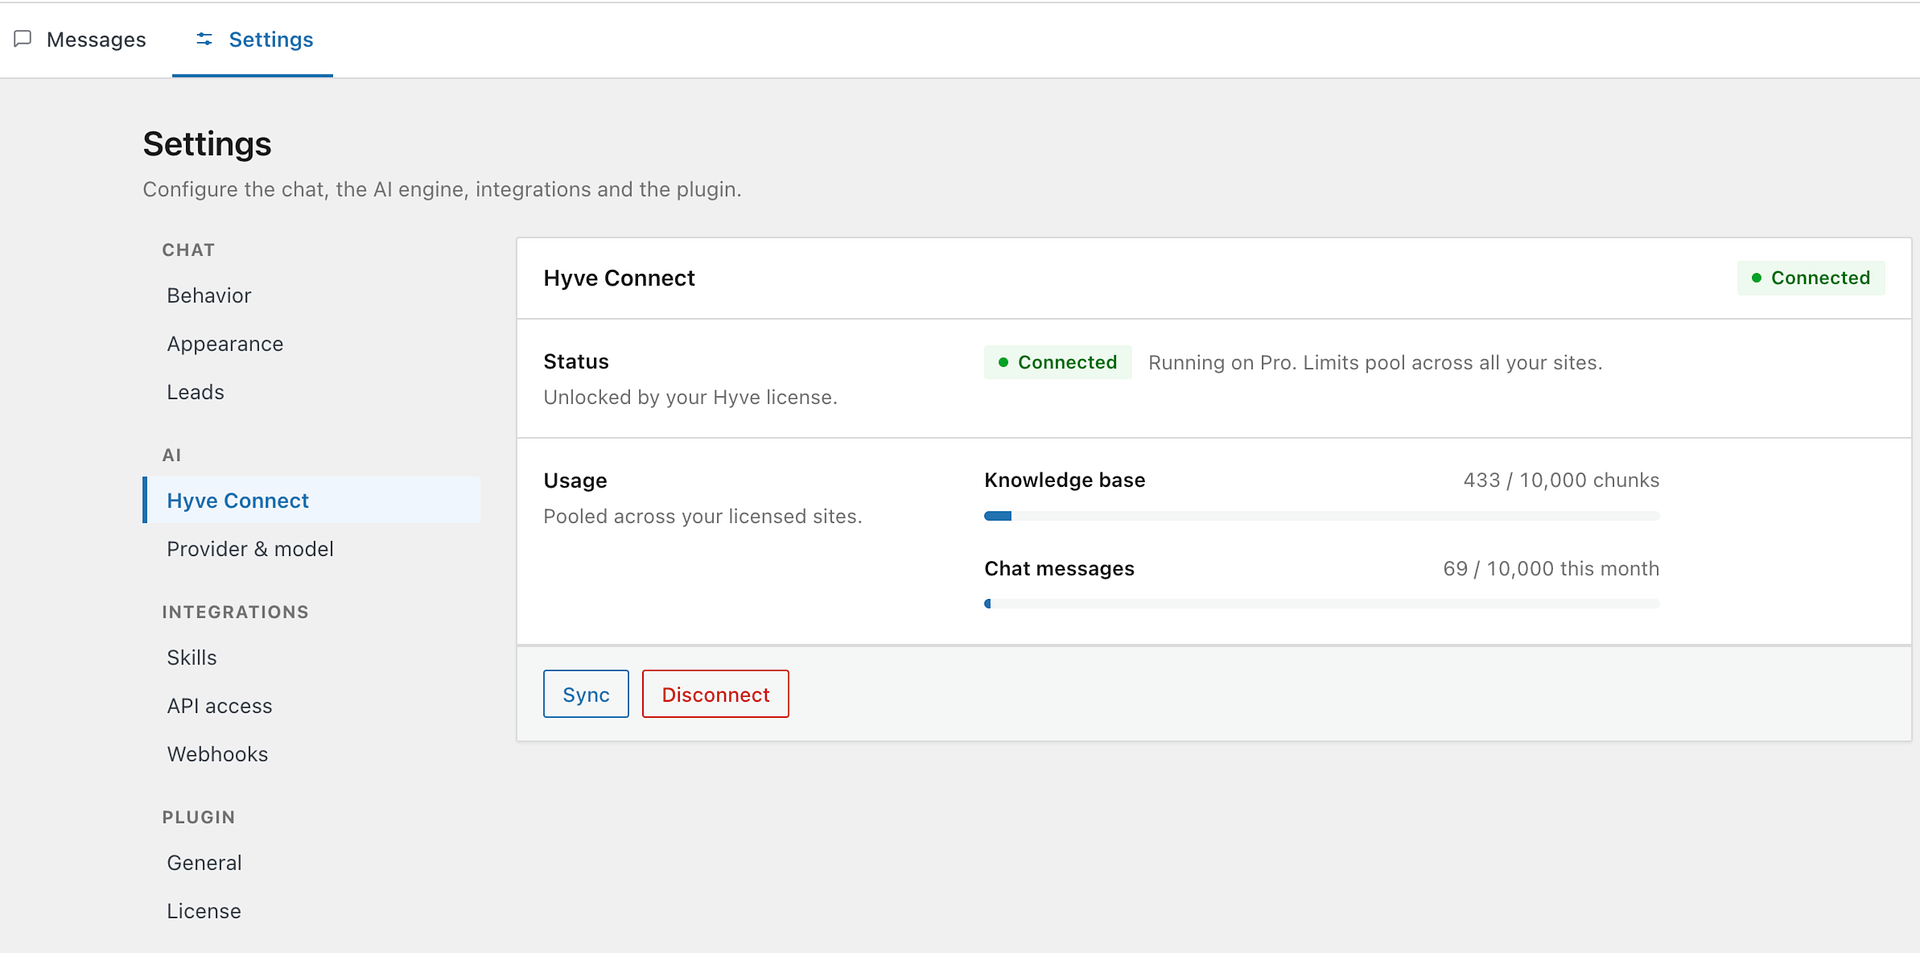
To use the hosted option, go to Hyve > Settings > AI > Hyve Connect and turn it on. No API key is needed.
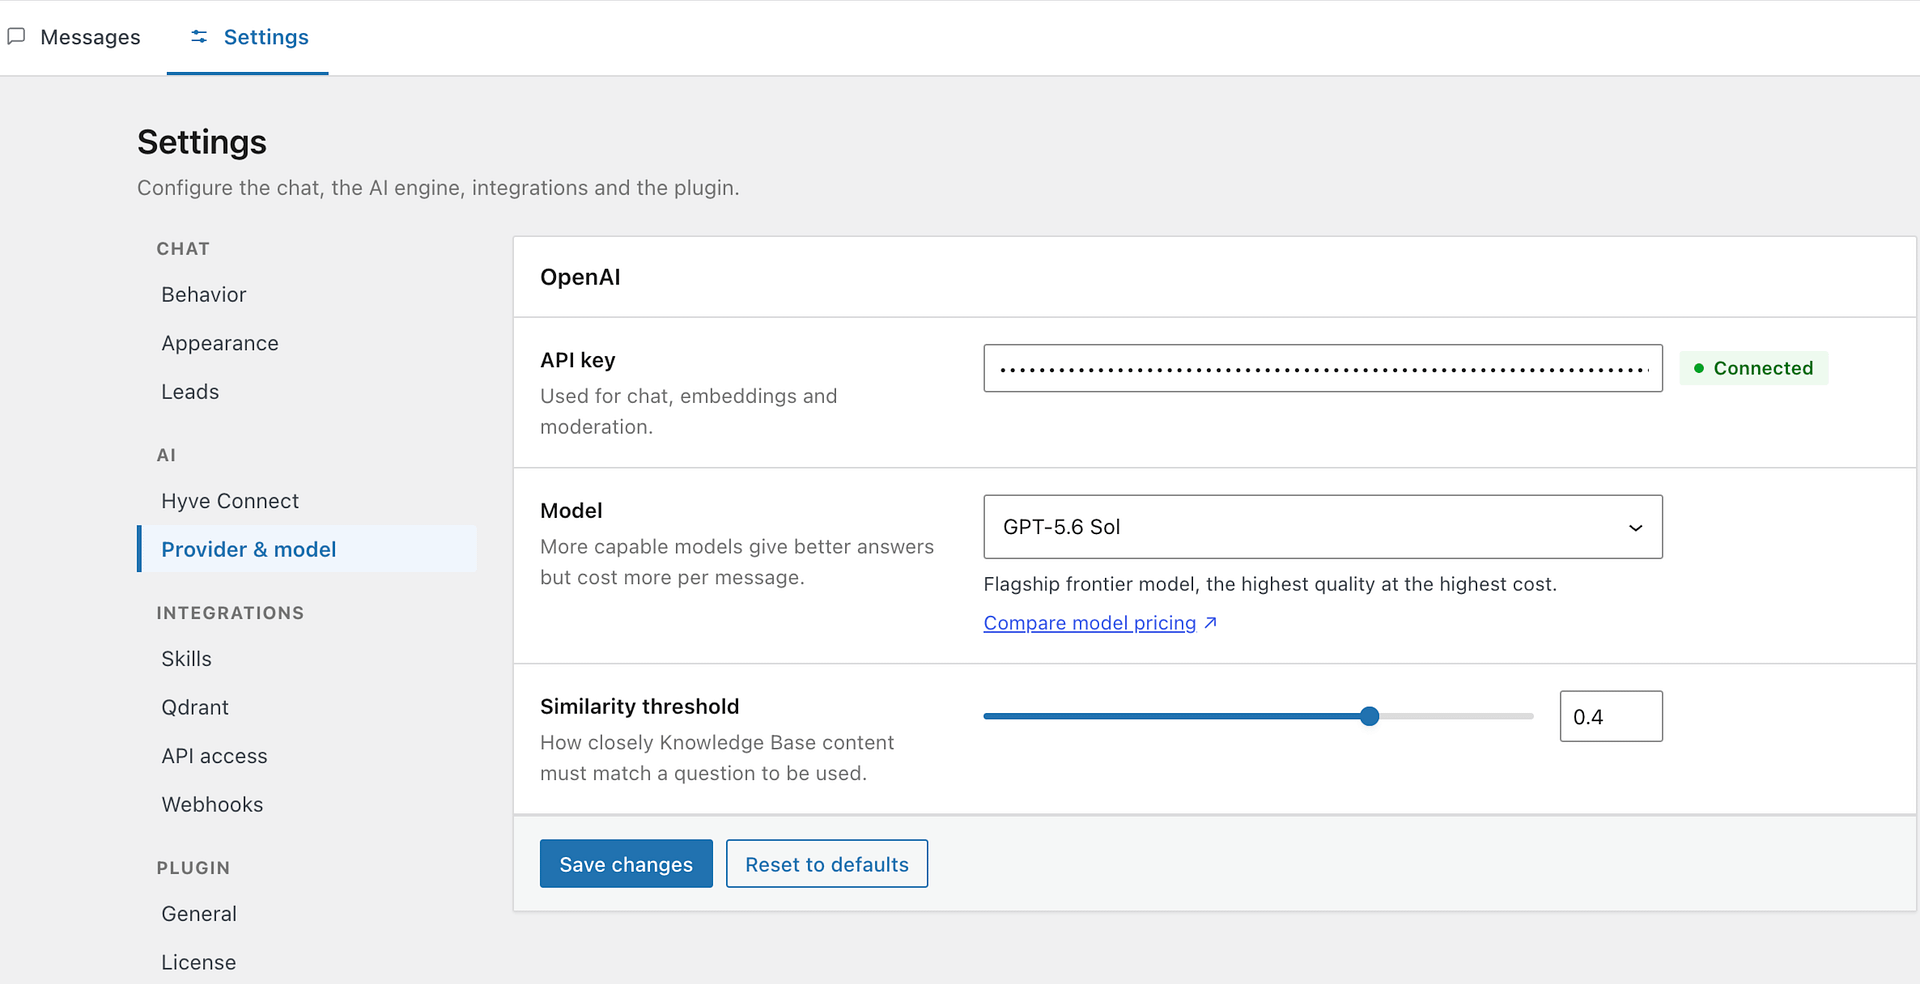
To use your own OpenAI account instead, go to Hyve > Settings > AI > Provider & model and paste your API key.
📝 Note: You can generate a new OpenAI API key or copy an existing one on this page.
Activate the license key
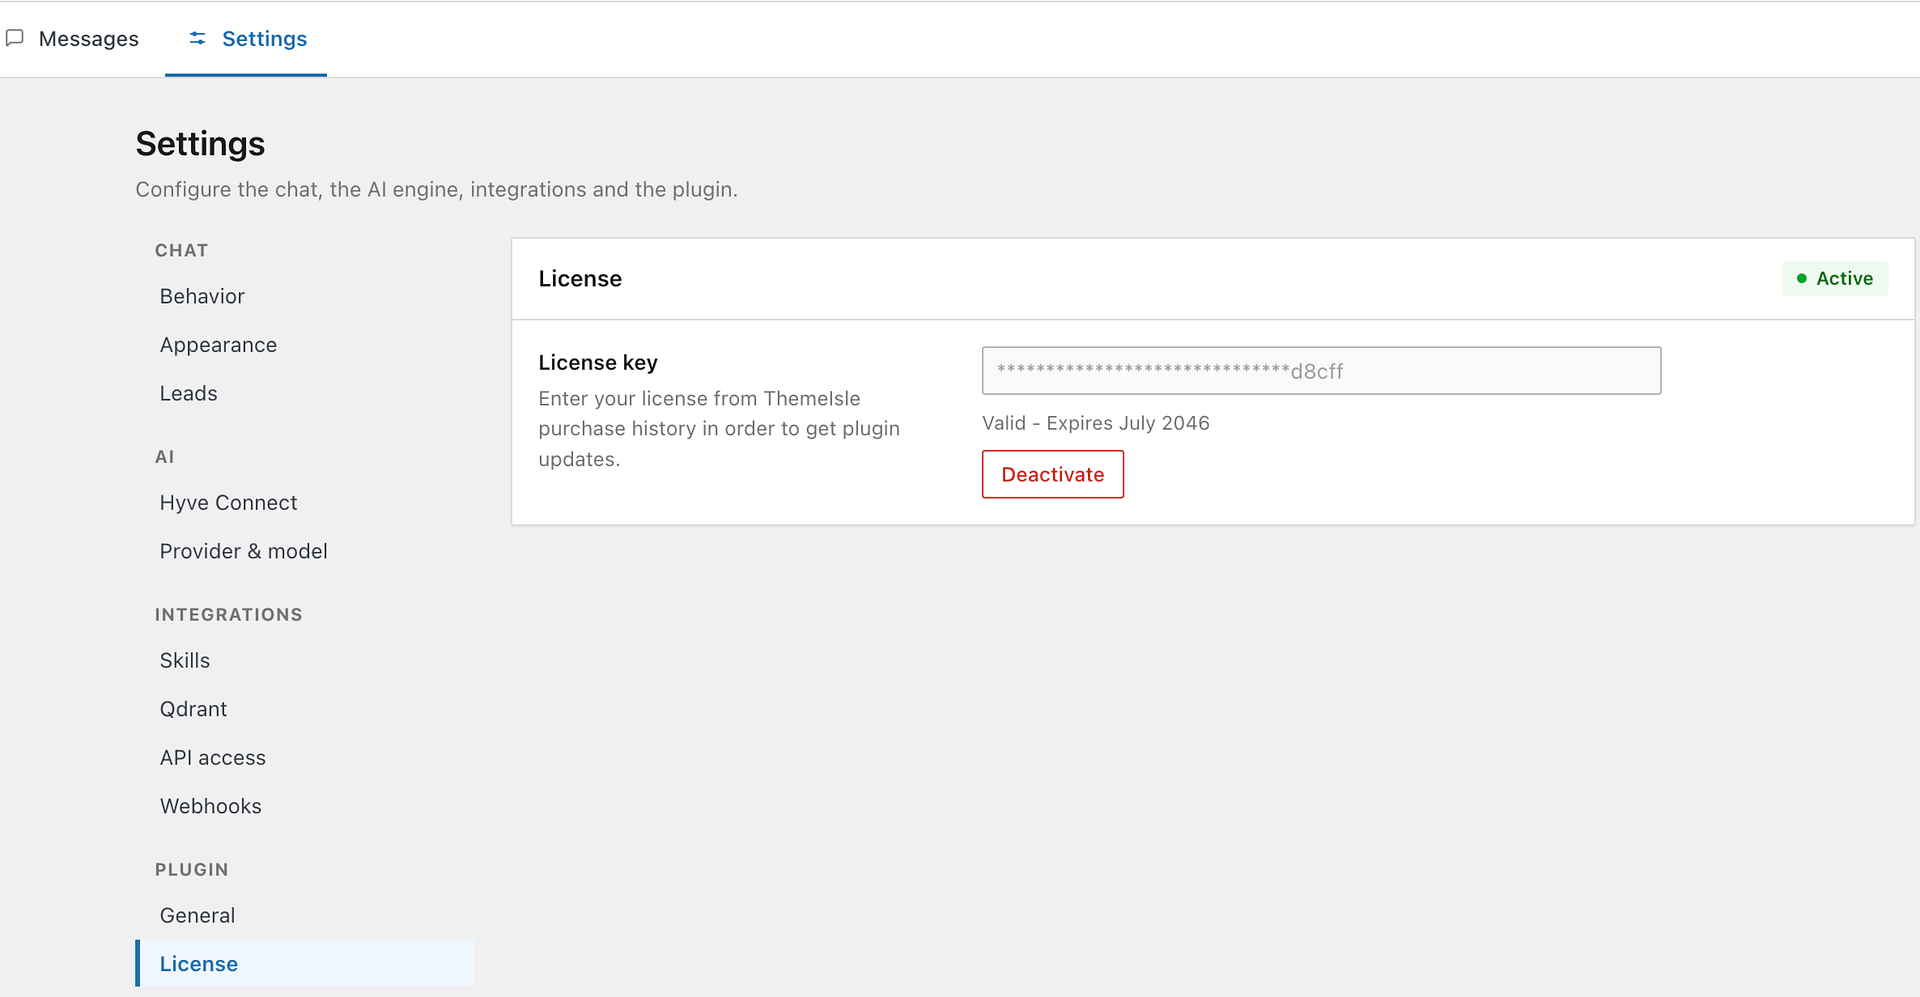
To enable the premium features, copy your license key from your account at store.themeisle.com and activate it in Hyve > Settings > Plugin > License. An active license also raises your Hyve Connect limits.
The Hyve Dashboard
Hyve > Dashboard is the overview screen for your chatbot. What it shows depends on how far along your setup is.
Before setup is complete
Until an AI service is connected — either Hyve Connect or your own OpenAI API key — and at least one source is added to the Knowledge Base, the Dashboard shows a setup checklist with the steps that are still missing and a button that takes you to each one. The checklist stays in place until the required steps are done, then makes way for the statistics below.
Once the chat is live
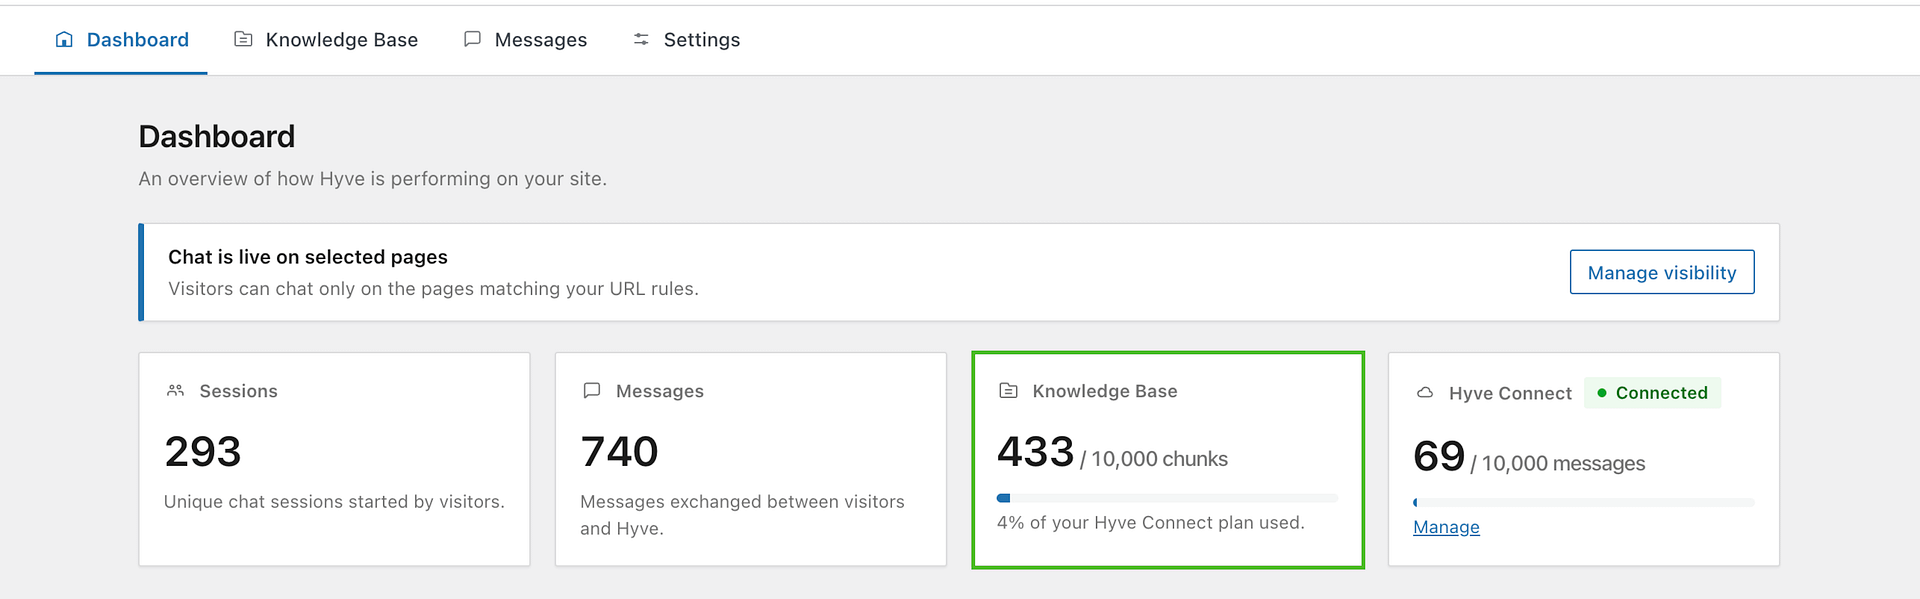
With setup complete, the Dashboard shows:
- Sessions and Messages - the number of chat sessions your visitors started and the messages exchanged with Hyve.
- Knowledge Base - how much of your storage limit is in use, together with the share of the limit you have reached.
- Usage - a chart of sessions and messages over time, which you can switch between the last 7, 14, 30, and 90 days.
- The current chat visibility, describing where visitors can reach the chat, with a button that opens the visibility settings.
- Recent conversations - the latest chats, with a link to the full history on Hyve > Messages.
- Get started - shortcuts to growing the Knowledge Base, personalizing the chat, and the documentation.
📝 Note: Service errors are one of the things the Dashboard surfaces, not its main purpose. See Troubleshooting for what those notices look like and how to clear them.
Adding Content to the Knowledge Base
The chat won't work if the Knowledge Base is empty.
To add content to the Knowledge Base, navigate to Hyve > Knowledge Base > All sources and choose an option to add sources.
- WordPress (available with Hyve Lite)
- Custom Data (pro)
- Website URL (pro)
- Sitemap (pro)
- Documents (pro)
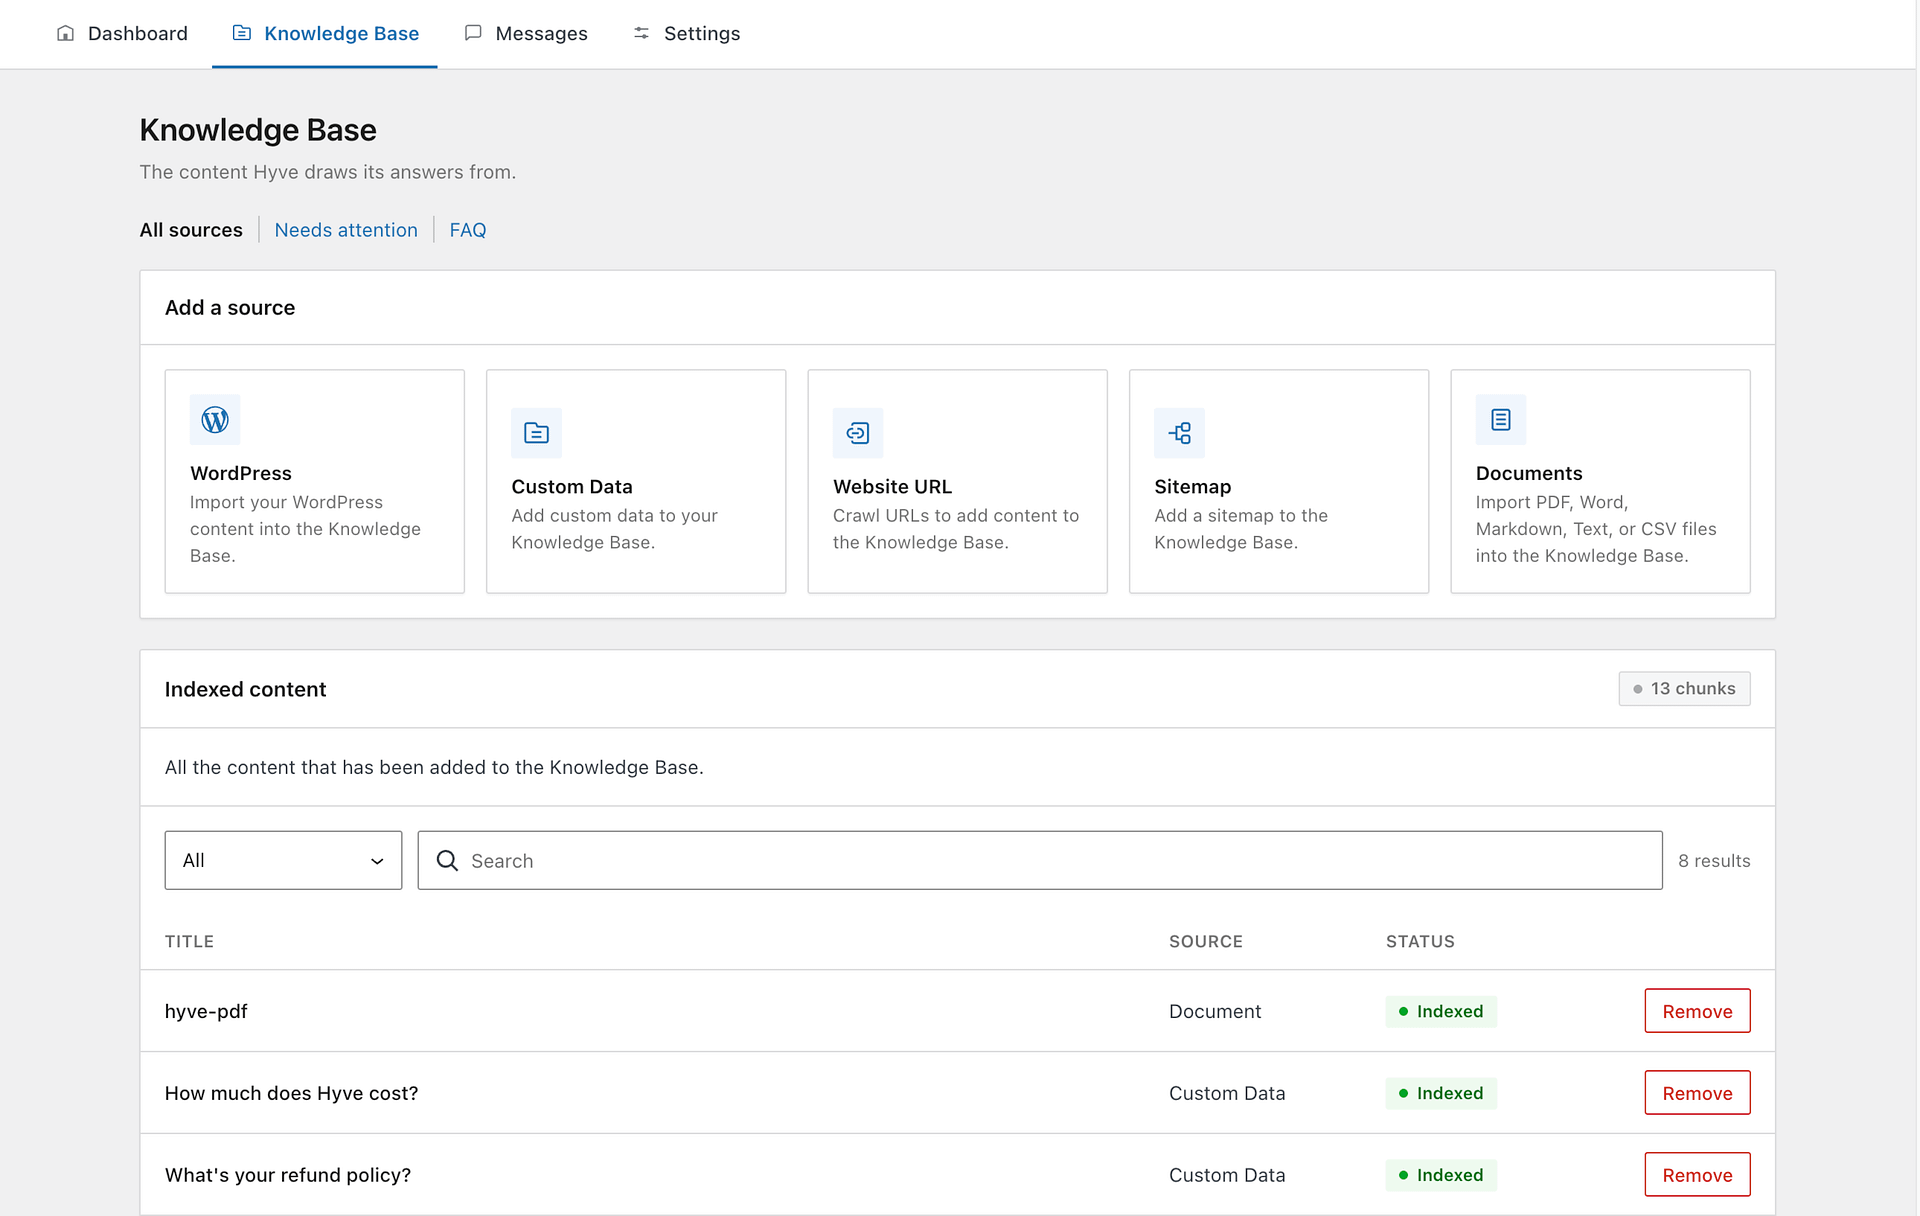
To check if a source was successfully added, navigate to Hyve > Knowledge Base and look for it in the list of added sources. The Knowledge Base card on Hyve > Dashboard tells you how much of your storage limit is in use, but it counts content chunks rather than individual sources, so use it to watch your remaining space rather than to confirm a single item.
By default, the Knowledge Base is limited to a maximum of 500 chunks. To extend this limit without an additional cost, see our dedicated article: Integrate Hyve with Qdrant.
If a post that you have added to your Knowledge Base has been updated since, you will see it in the Needs attention tab. From there, you update the data in your knowledge base. This might seem like an extra step, but we do this to avoid anything that does not pass Moderation and goes to your Knowledge Base.
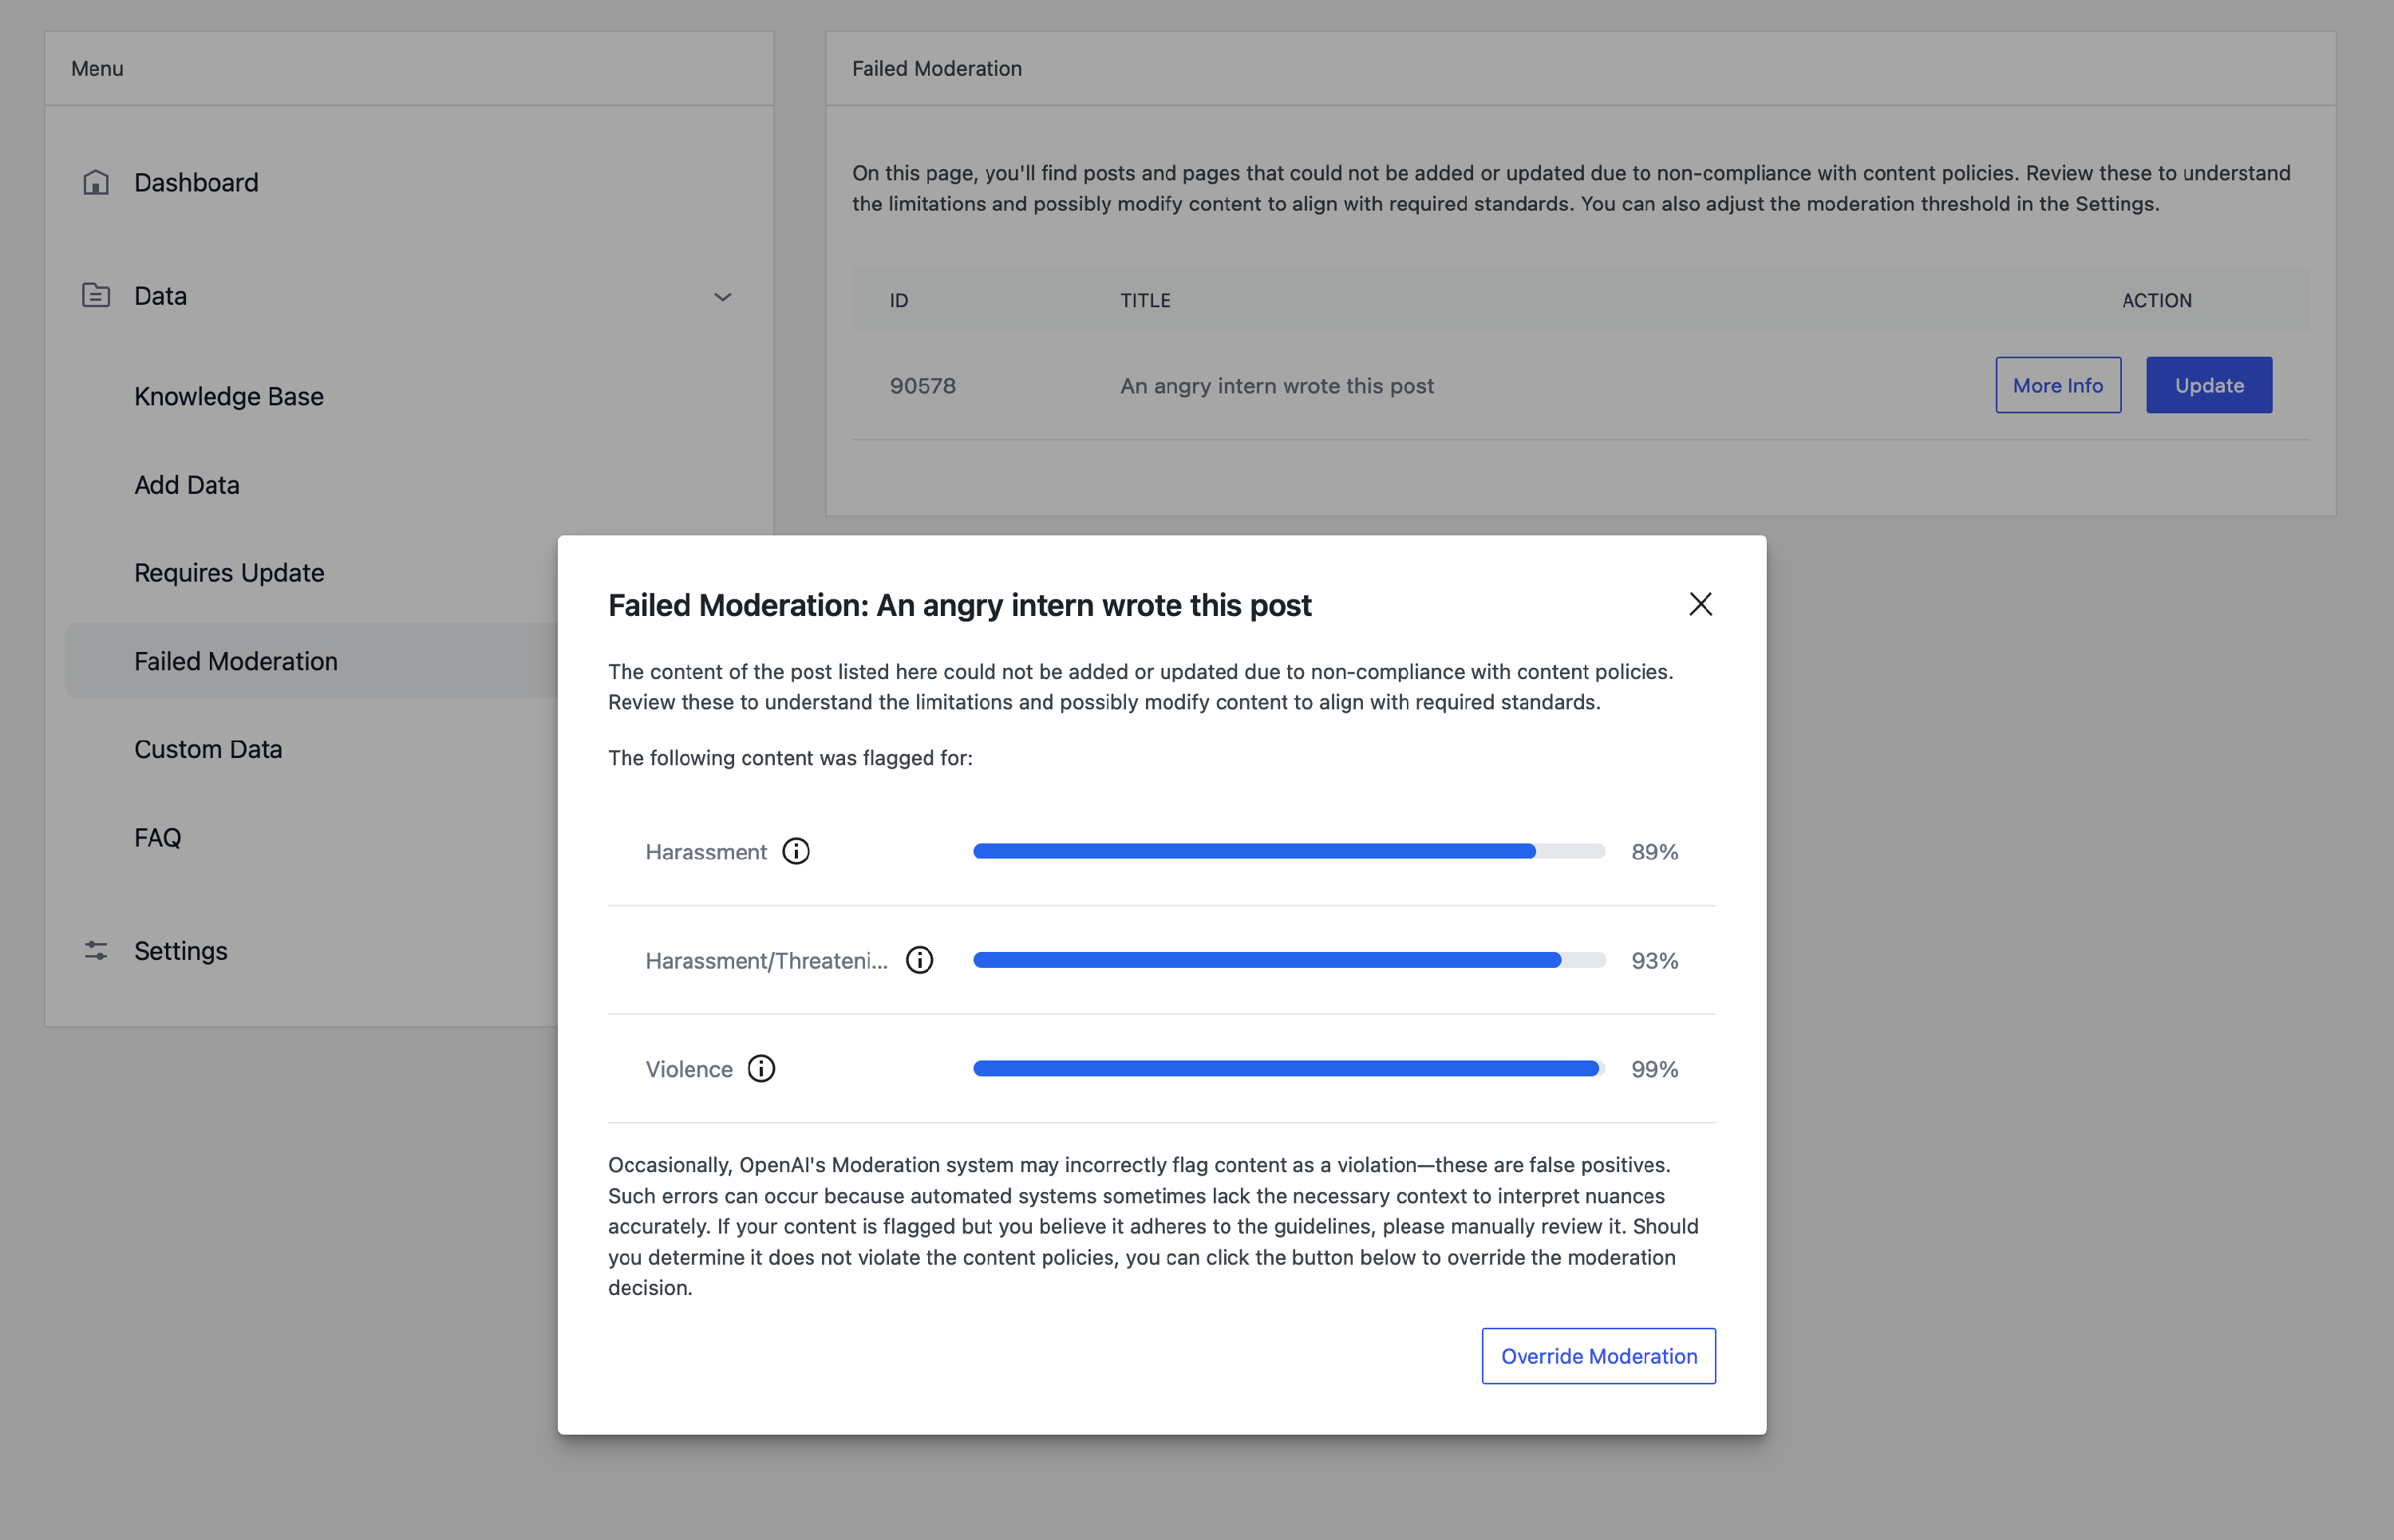
Sometimes, when you try to add a post to your Knowledge Base, you might see a Failed Moderation dialog. This might happen if your content fails to pass OpenAI's Moderation checks. In the dialog, you can see what exactly is causing your content to fail, and you can review and edit it accordingly. After a review, if you find your content does not fall under any given categories, you can override the moderation to proceed with your content. OpenAI can often falsely flag content for violations, sometimes due to lack of context.
Private and password-protected WordPress content
The WordPress source list also includes private and password-protected posts, and each entry is labelled with its visibility so you can tell them apart from public content.
❗ Danger: Anything you add to the Knowledge Base can be used to answer any visitor, even if the original post is private or password-protected. Adding restricted content makes it readable to people who could not open the post itself. Only add it when you are comfortable with the chat repeating it.
Answers built from private or password-protected posts do not get a source link underneath them, because the page behind the link is not publicly reachable. Answers built from public posts do.
Documents (pro)
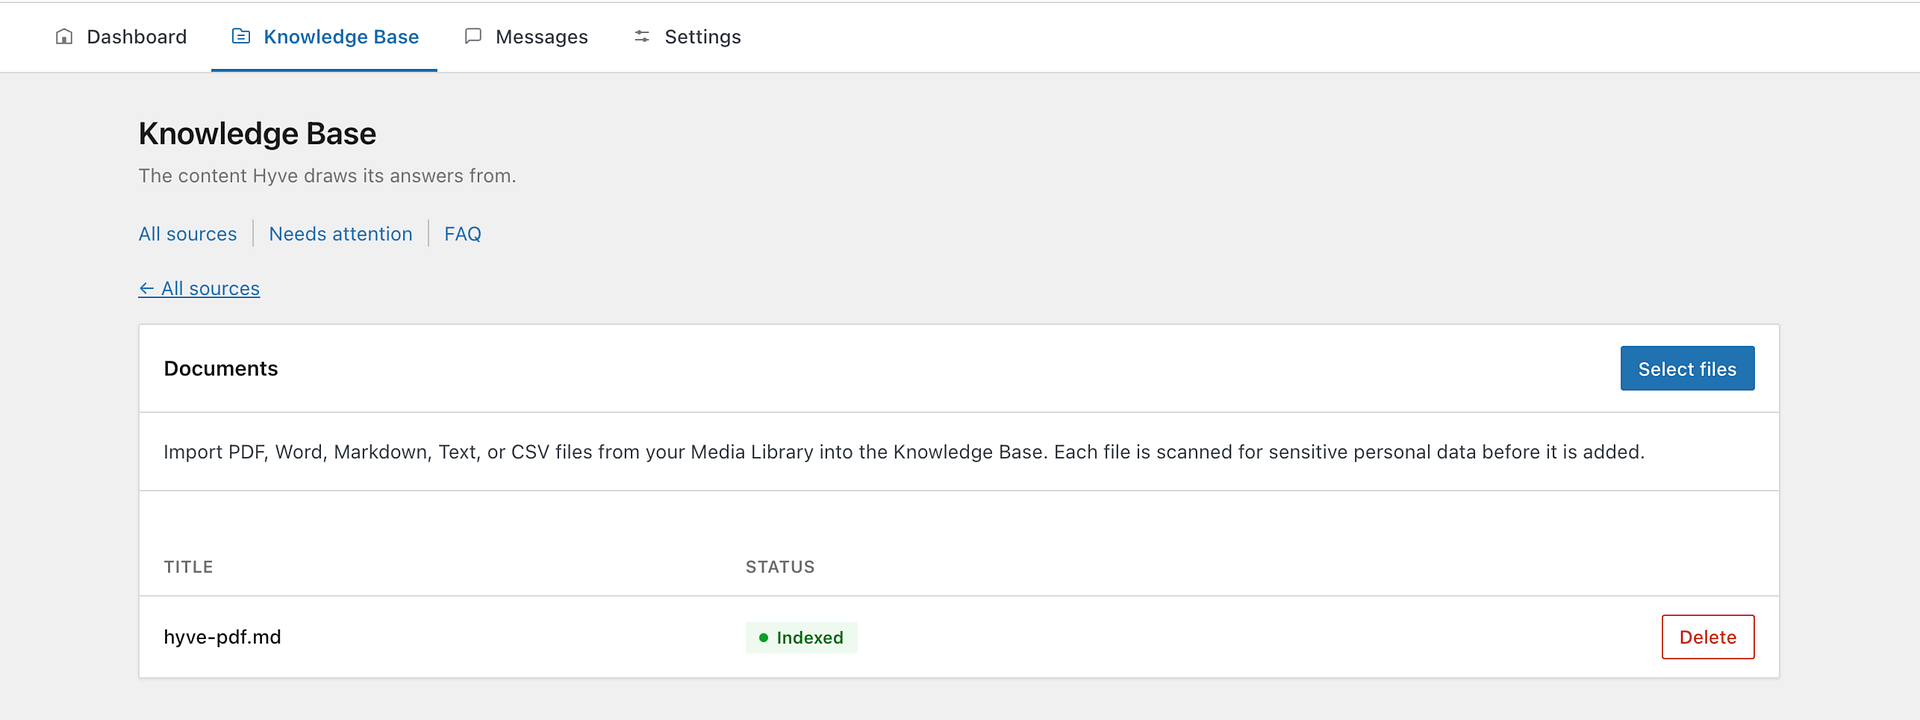
From the Documents source, you can add files instead of pointing Hyve at existing pages. Click Select files to pick them from your Media Library, one or several at a time. The supported file types are PDF, DOCX, TXT, Markdown, and CSV.
Scanned or image-only PDFs cannot be read, because Hyve extracts the text from the file rather than reading images.
Before a document is added, Hyve checks it for sensitive personal data. If it finds any, or if the check could not be completed, you are asked to confirm the import. Review the file at that point and continue only if you are sure the content is safe to store.
To take a document out of the Knowledge Base, use Delete on its row. Hyve stops using it in answers, and the file itself stays in your Media Library.
Custom Data & FAQ
From the Custom Data tab, you can also add Custom Data to your Hyve's Knowledge Base, in addition to post types. Custom Data lets you privately feed specific data directly into your chatbot without displaying this information on your public website. This can be good for content that does not make much sense to be publicly visible on your posts or even answer some of the specific questions that your users might have.
💡 Tip: Q&A entries can be matched from the title alone, so a Custom Data entry titled with the question is found even when the answer body does not repeat it. Keeping the answer descriptive still helps, because more wording variants give the chatbot more to match against.
For example:
- Custom Data Title: Do you offer support?
- Custom Data Content: Yes, you can contact us on store.themeisle.com/contact
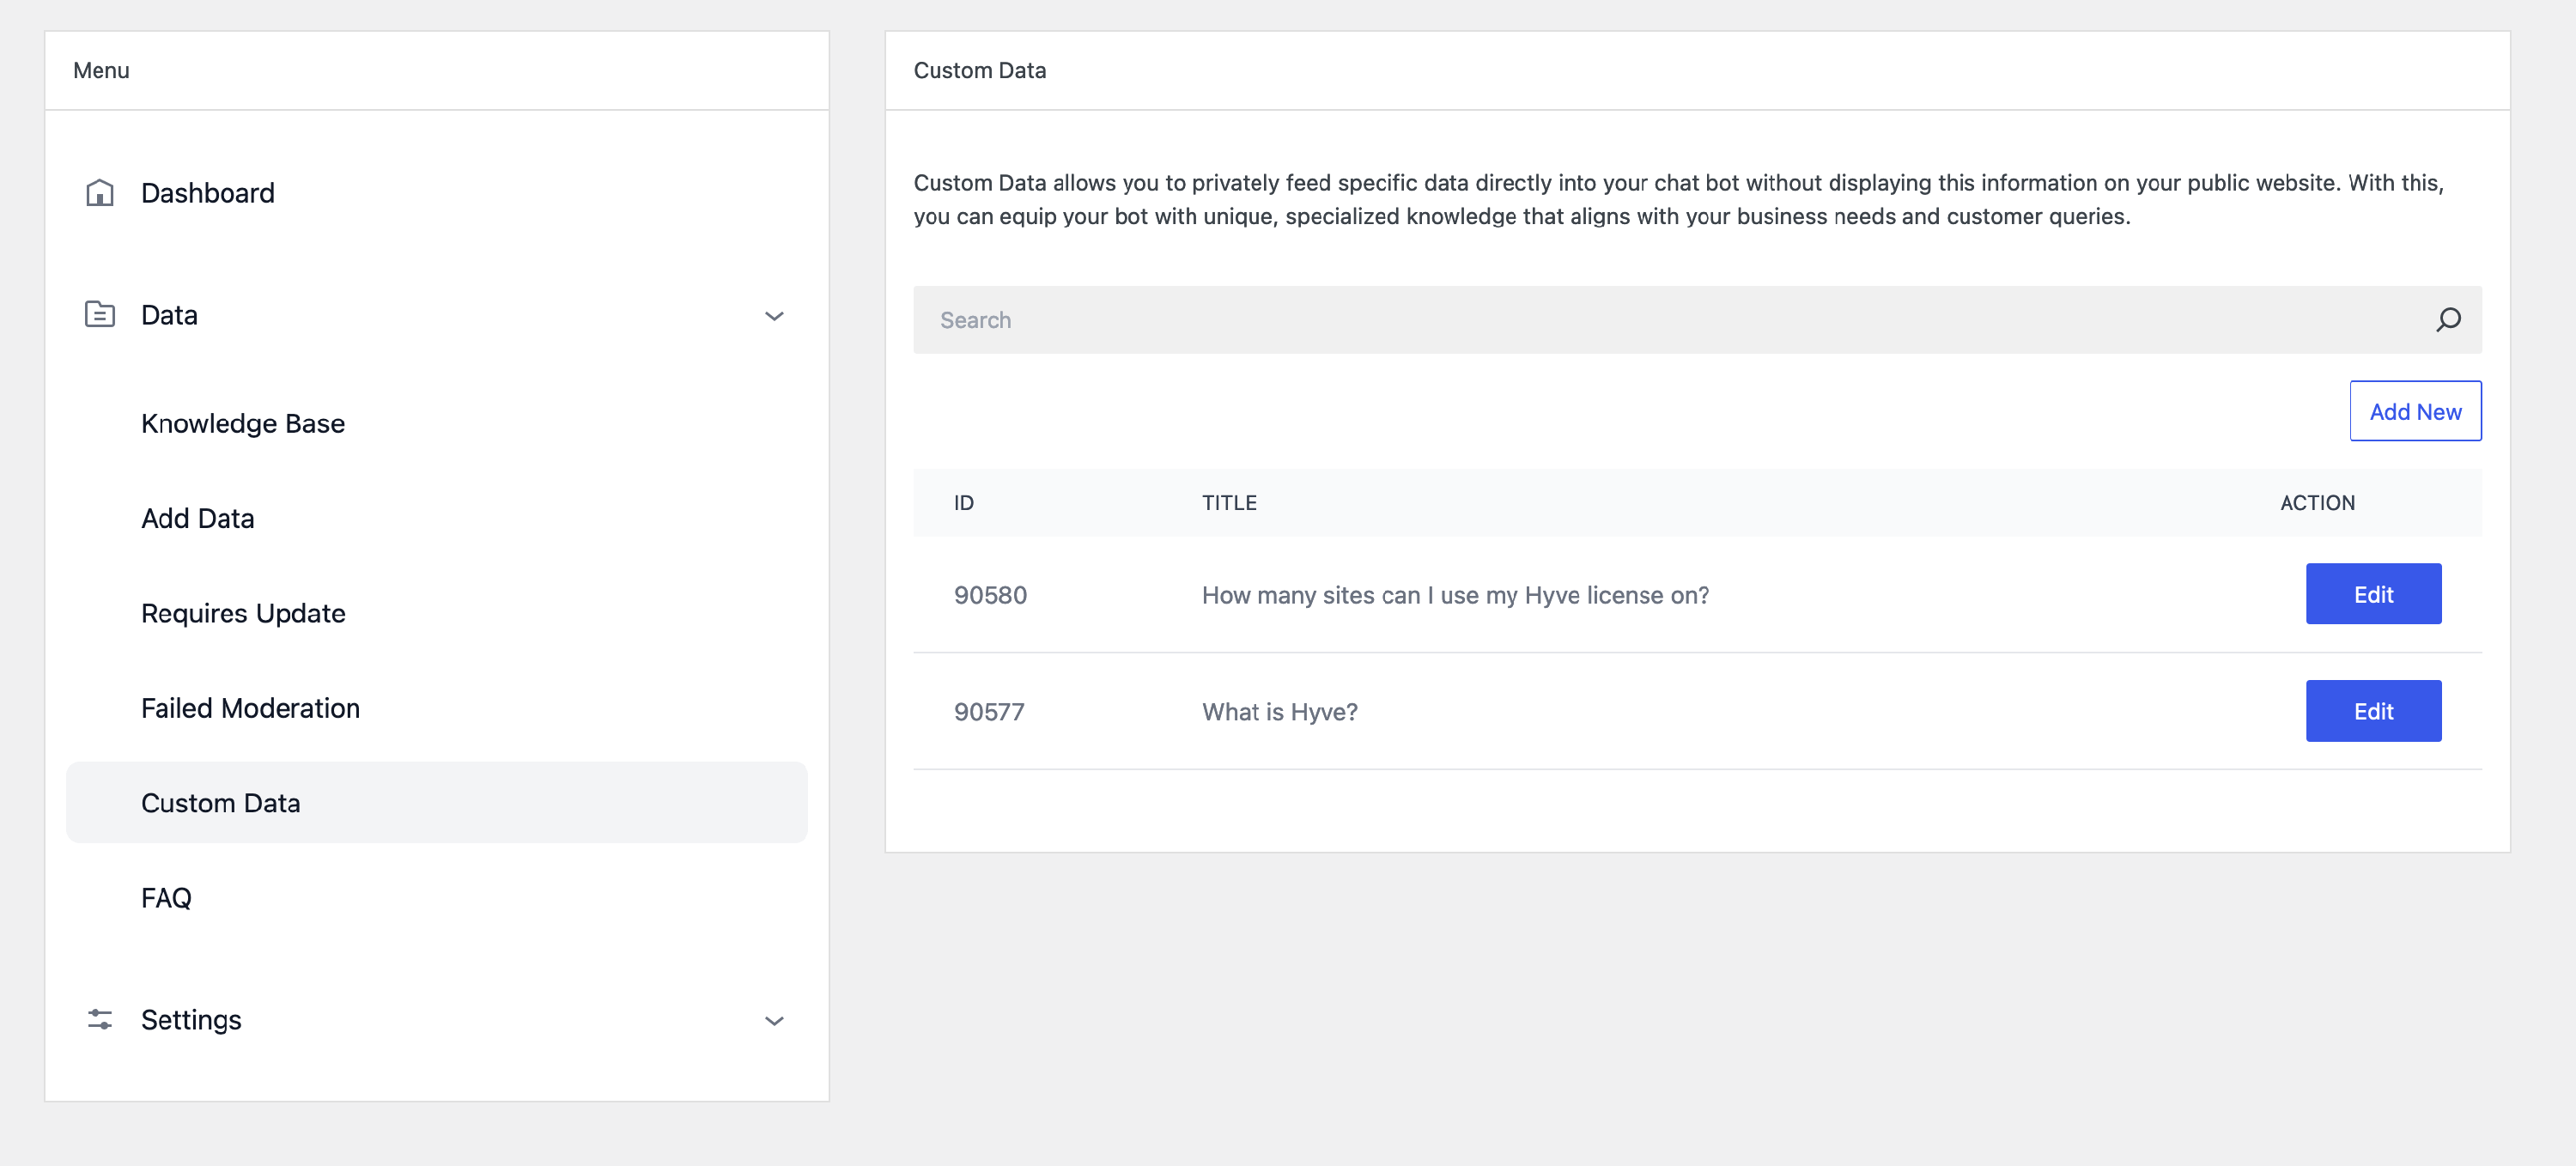
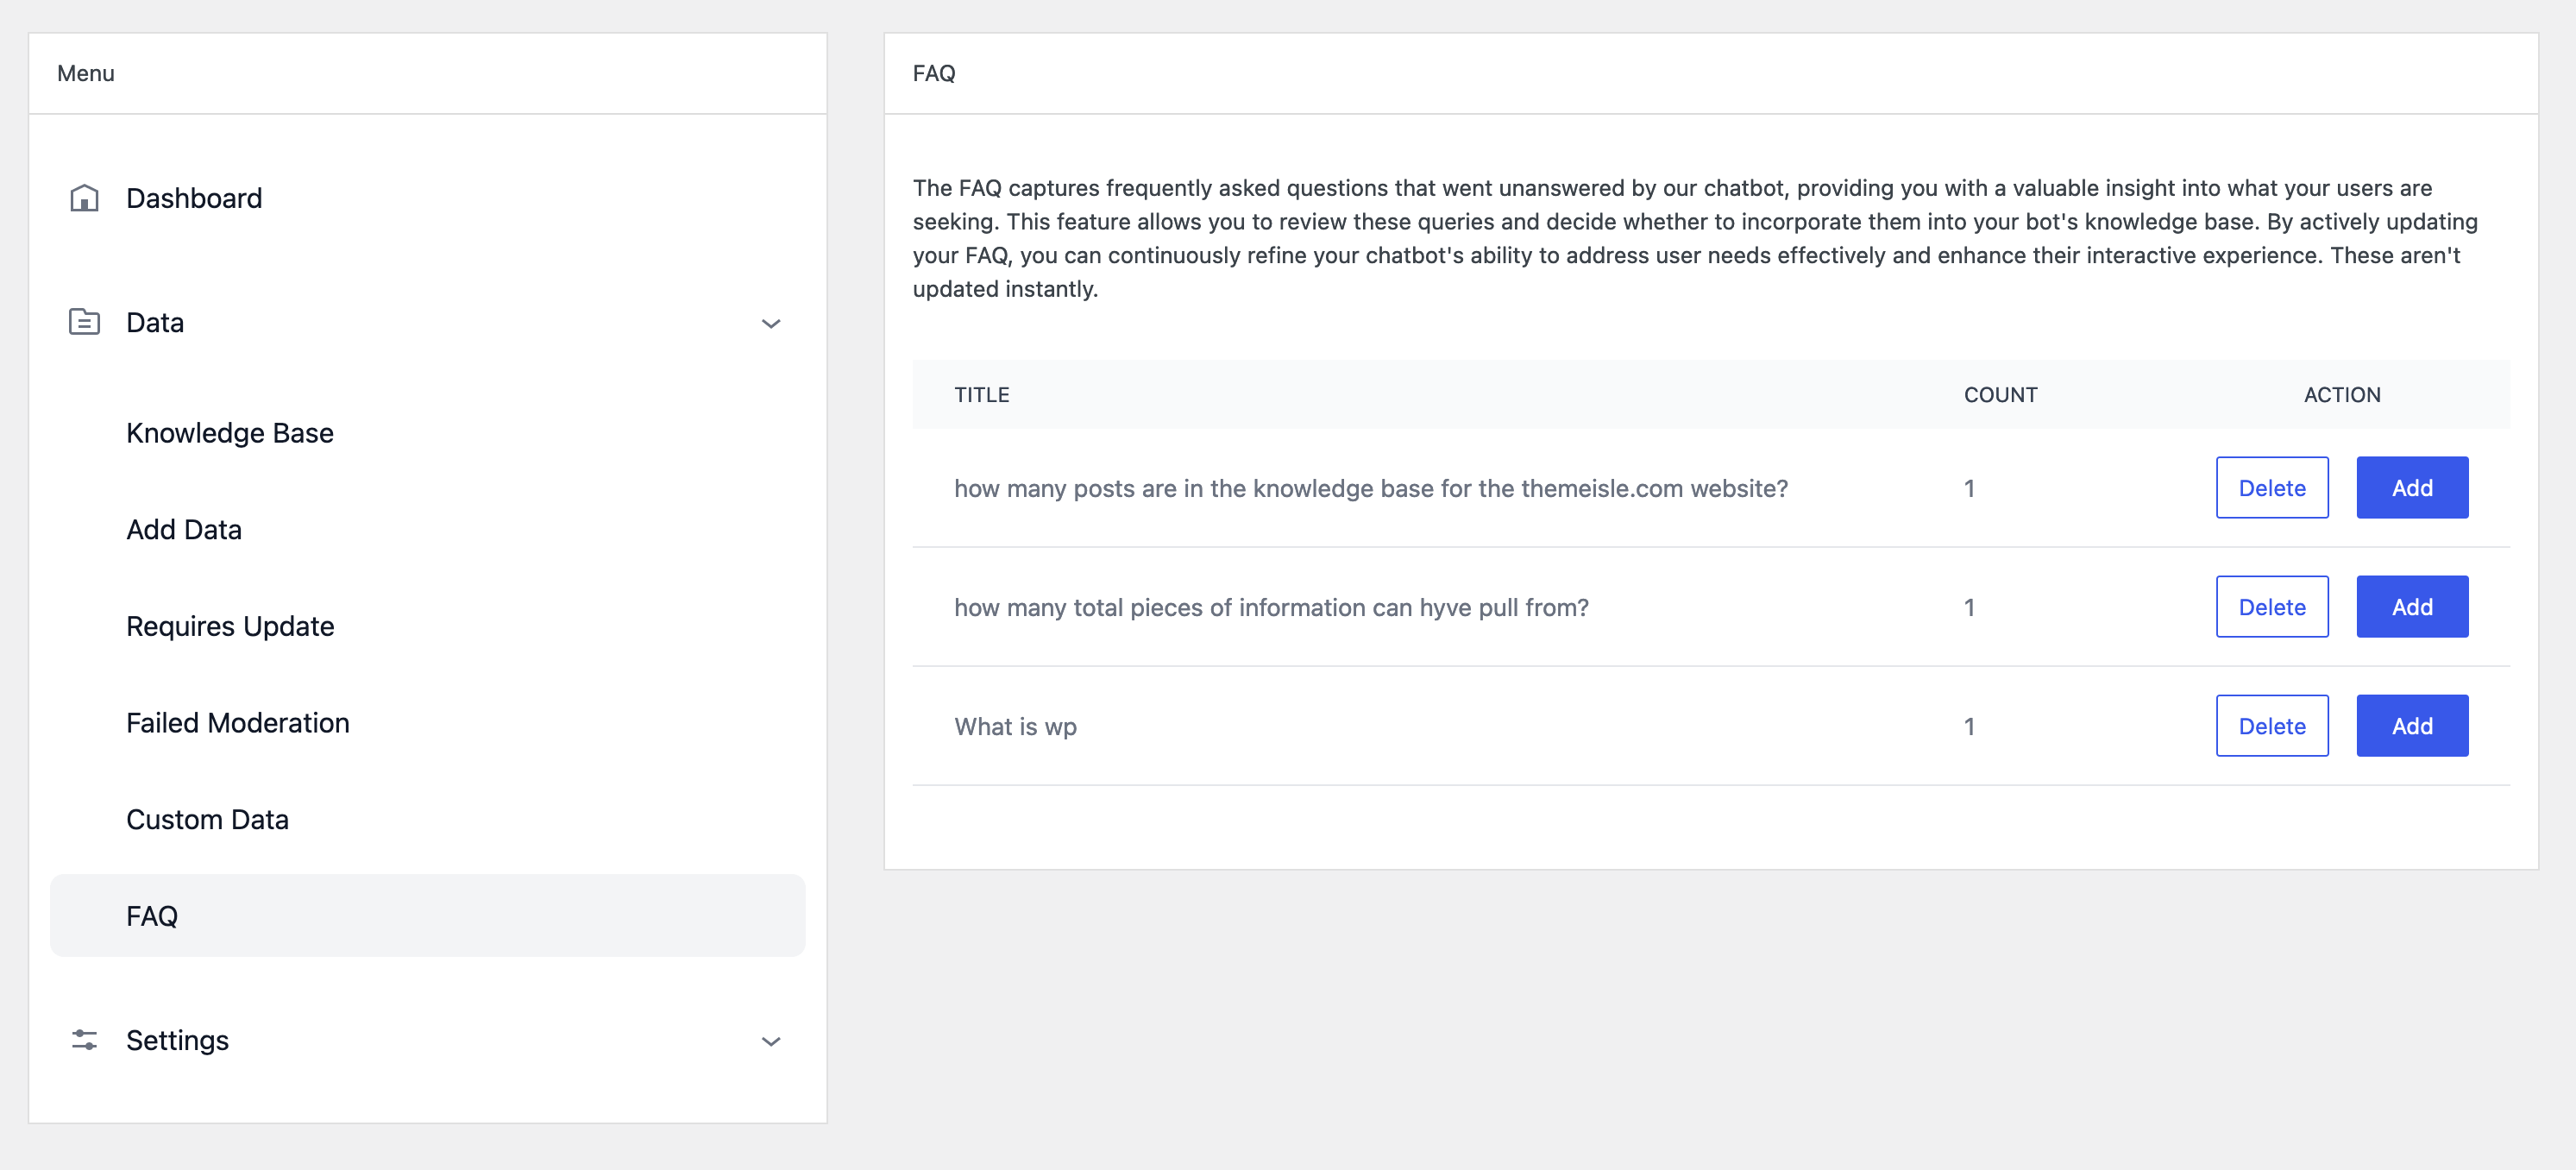
With the FAQ, you can find out some of the questions your users asked on your website that went unanswered. The FAQ page updates a couple of times daily to show you the questions and their count. You can use this information to update your post to answer those particular questions or add them as part of your Custom Data. This feedback loop can help you train your Chatbot to answer most of your user's queries.
Enable the chat
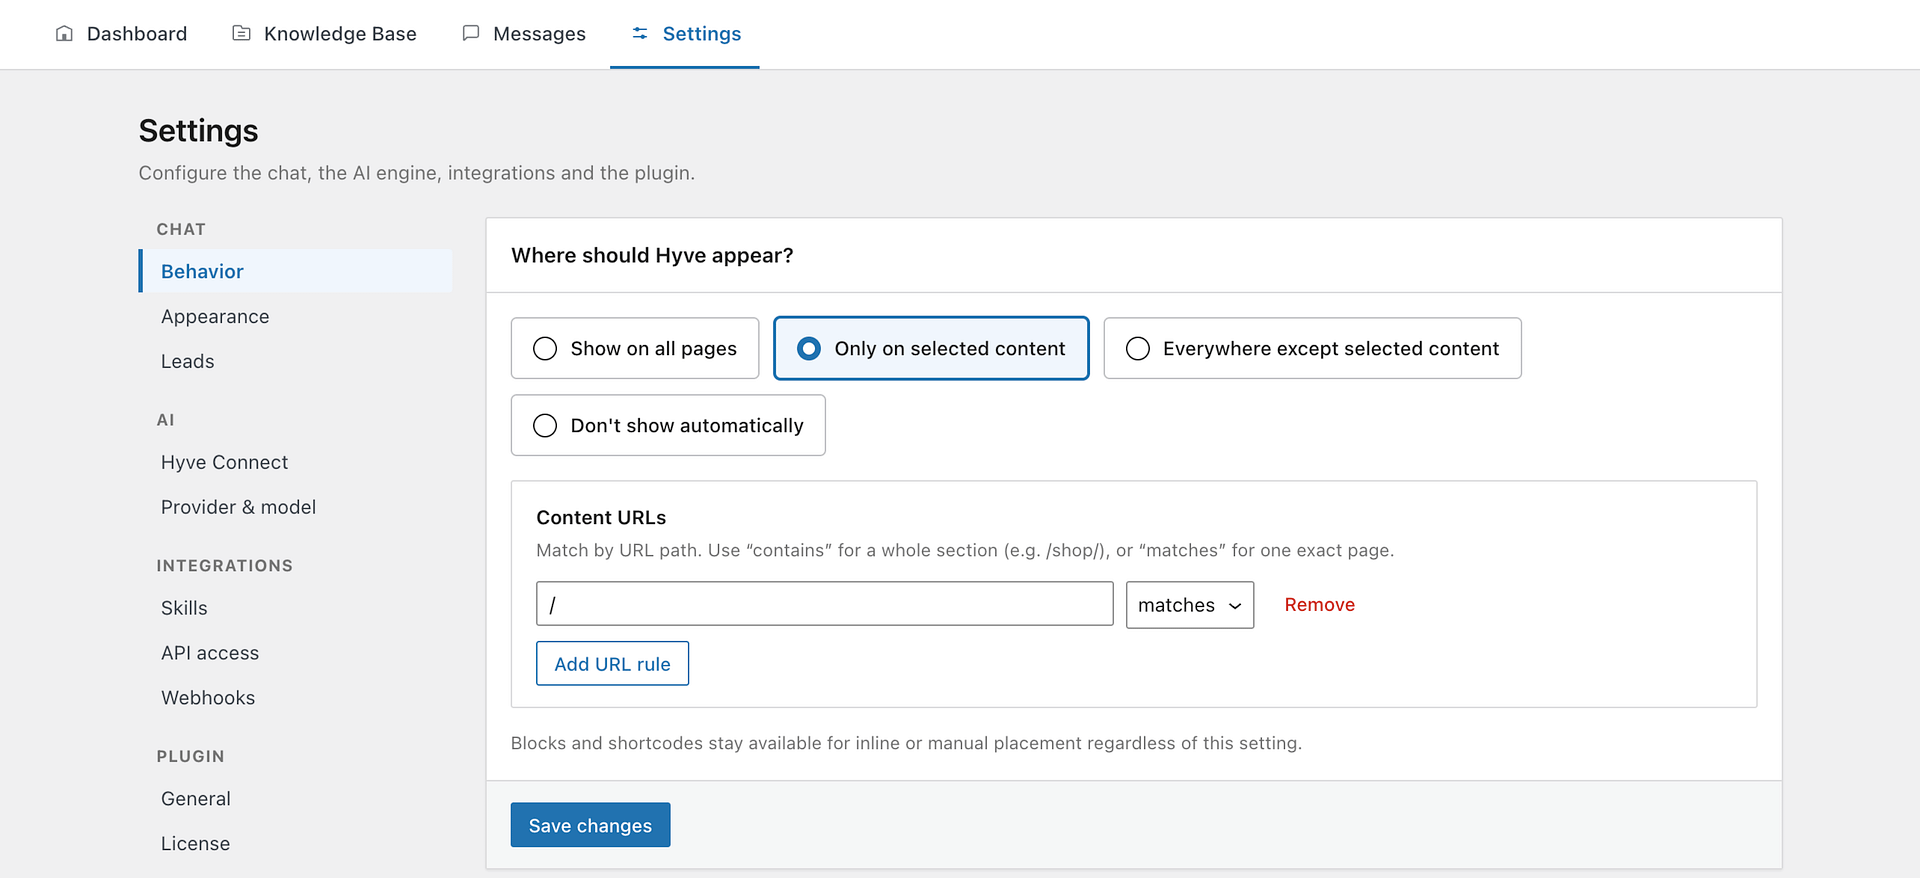
Once your Knowledge Base has content, choose where the chat should appear. The display mode is set in Hyve > Settings > Chat > Behavior.
Choose where the chat appears
There are four display modes:
- Show on all pages displays the floating chat bubble everywhere on the site.
- Only on selected content displays it only on the pages that match the rules you add.
- Everywhere except selected content displays it everywhere apart from the pages that match the rules you add.
- Don't show automatically never places the chat on its own. Use this when you only want the chat where you add a block or shortcode.
For the two selective modes, you build a Content URLs list. Each rule takes a path and an operator:
- contains matches any address that includes the path, so
/shopalso matches/shop/product-name. - matches applies to one exact address only.
The chat is displayed as soon as any rule in the list matches the page a visitor is on.
Place the chat with a block or shortcode
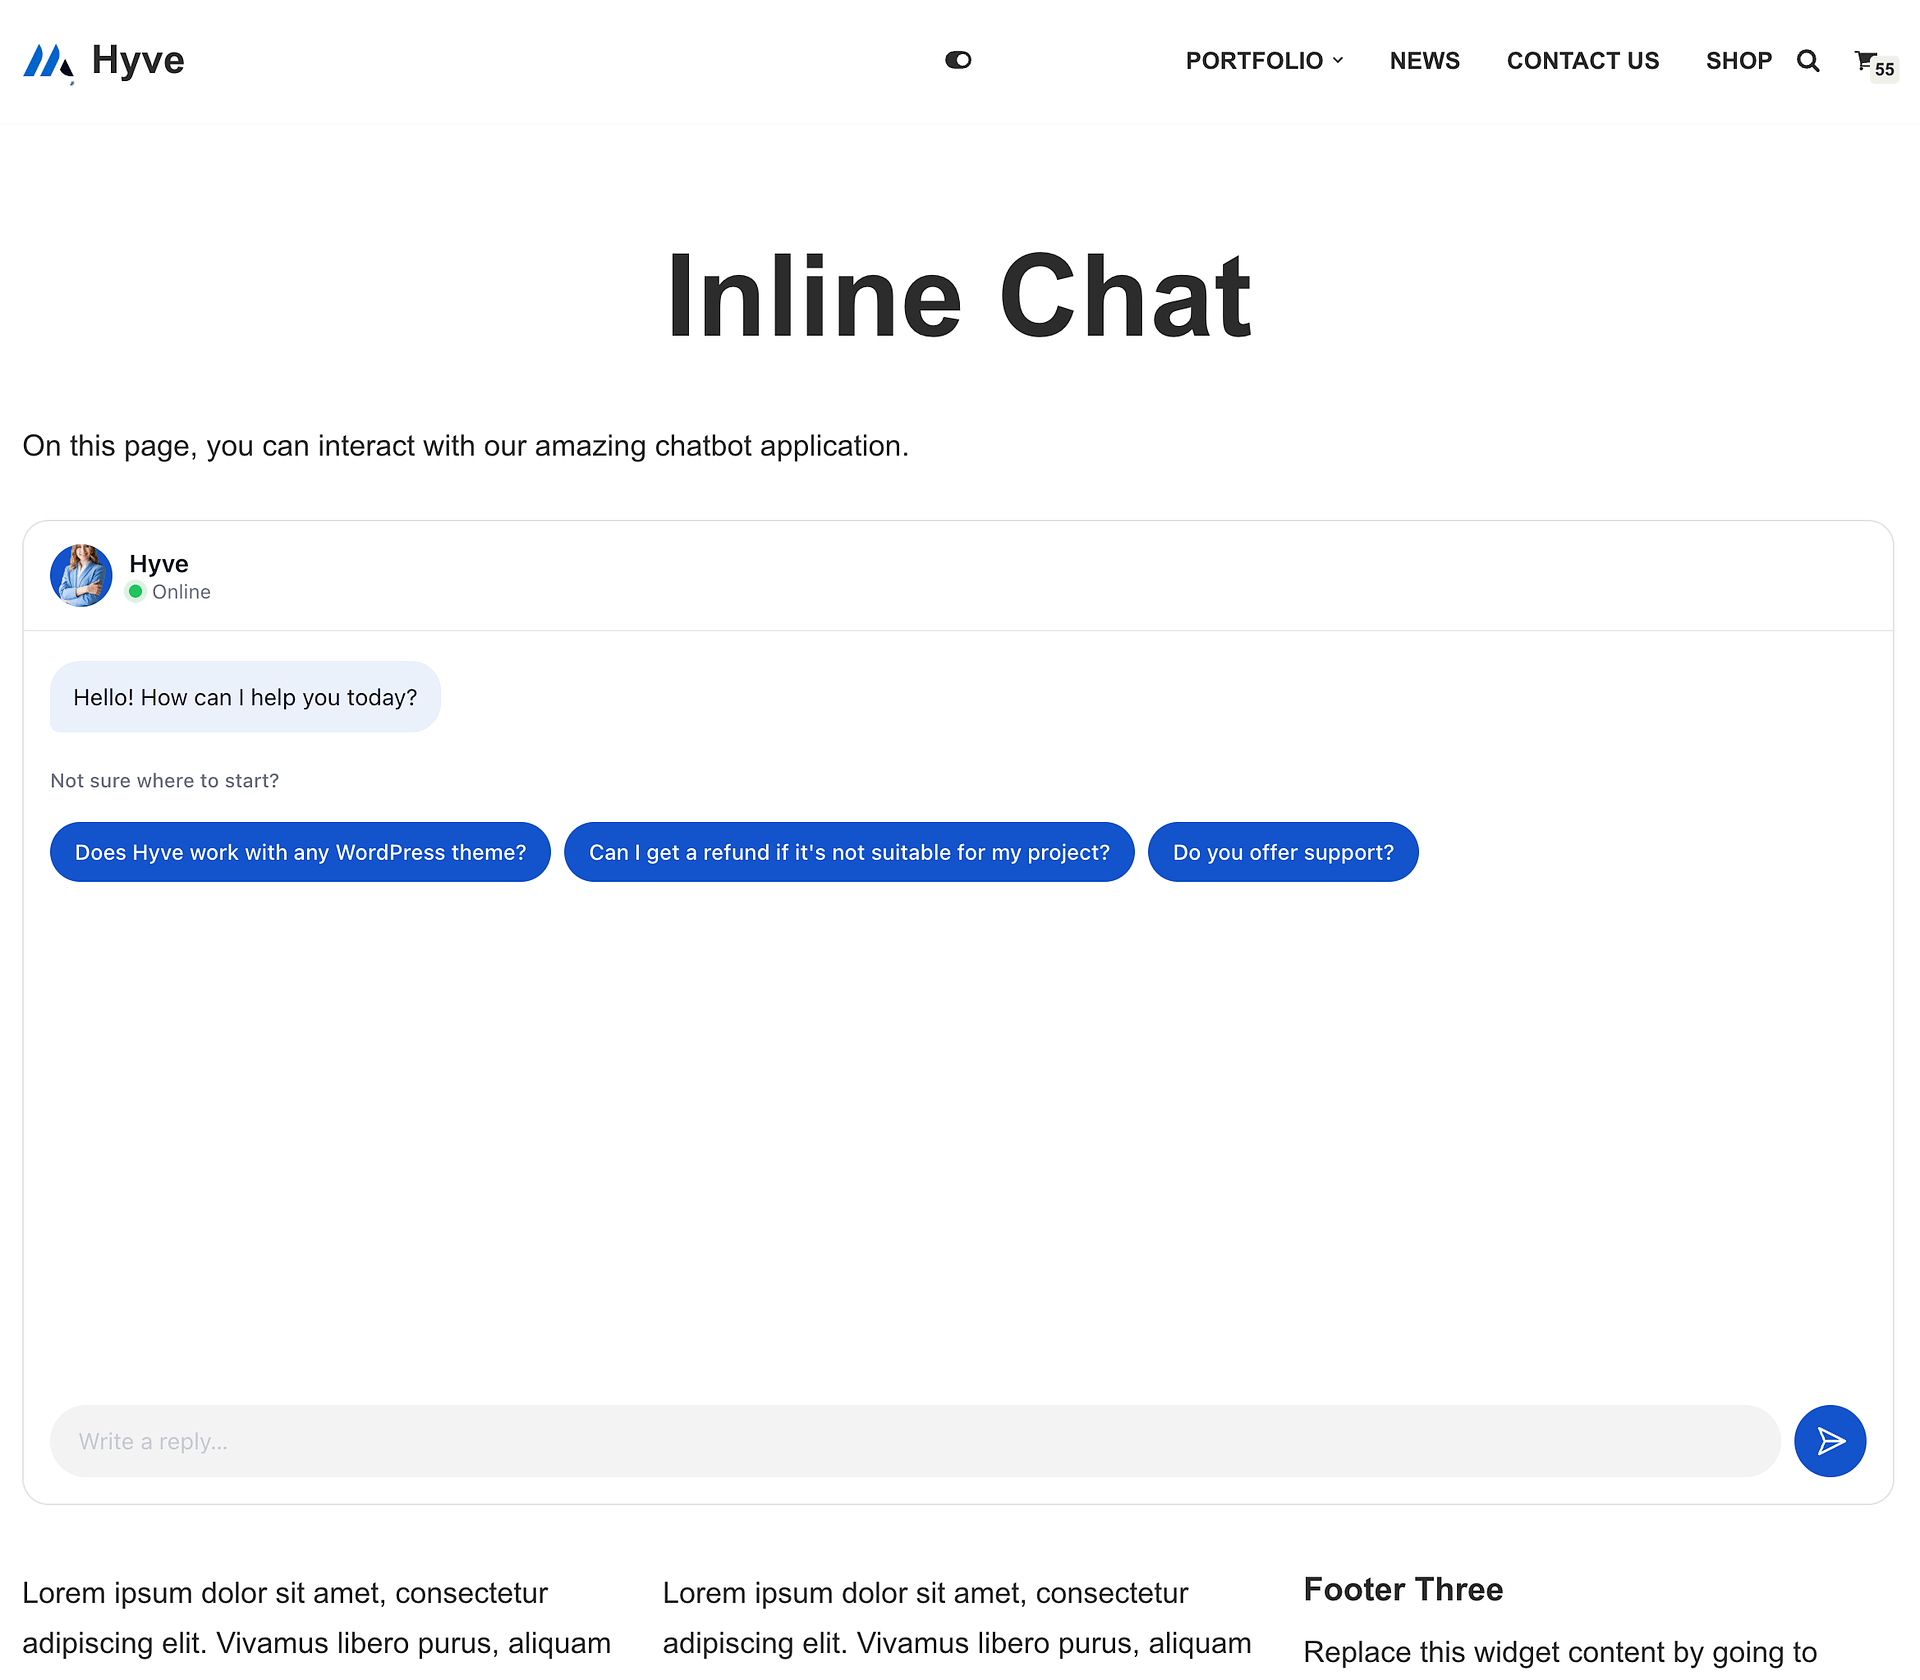
You can also place the chat on a specific page with the dedicated Gutenberg blocks:
- Hyve Chat - Inline
- Hyve Chat - Chat Bubble
Or with a shortcode. For the inline chat:
[hyve]For the bubble chat:
[hyve floating="true"]📝 Note: An inline block or shortcode always wins over the display mode. On a page that has one, the chat renders in that spot instead of as a floating bubble, even when the display mode is set to all pages. A floating block is redundant on those pages, because the bubble already appears there.
Keep in mind that you can only display the chat once on a page.
Page awareness
With Hyve Pro, the chatbot can take the page a visitor is chatting from into account when it answers. This is what lets questions like "how much does this cost?" resolve to the page the visitor is looking at, instead of being answered from the Knowledge Base at large.
Turn it on in Hyve > Settings > Chat > Behavior, in the Conversation card, with the Page awareness toggle. It is enabled by default once your license is active.
📝 Note: Page awareness is part of Hyve Pro. Without an active license it stays off whatever the toggle shows, and the chat answers from the Knowledge Base alone.
How Hyve reads the page depends on whether that page is already in your Knowledge Base:
- Pages in the Knowledge Base are answered from the content Hyve already stored for them, so nothing extra is fetched.
- Pages that are not in the Knowledge Base are read from the published page itself. Because Hyve reads the page the way a visitor sees it, content produced by page builders and product templates is picked up even when it never appears in the post content.
Limits of Page awareness
- Only pages on your own site are used. A URL pointing anywhere else is ignored.
- Private and password-protected posts are skipped, even when the visitor can open them.
- Only the beginning of a long page is read, so keep the details visitors ask about near the top.
⚠️ Important: Content read from a page that is not in the Knowledge Base is cached for about a day, and it refreshes when you edit the post. If you correct something on such a page — a price, for example — and the chat still quotes the old wording, allow for that delay before assuming the setting is broken.
Read and Manage Messages
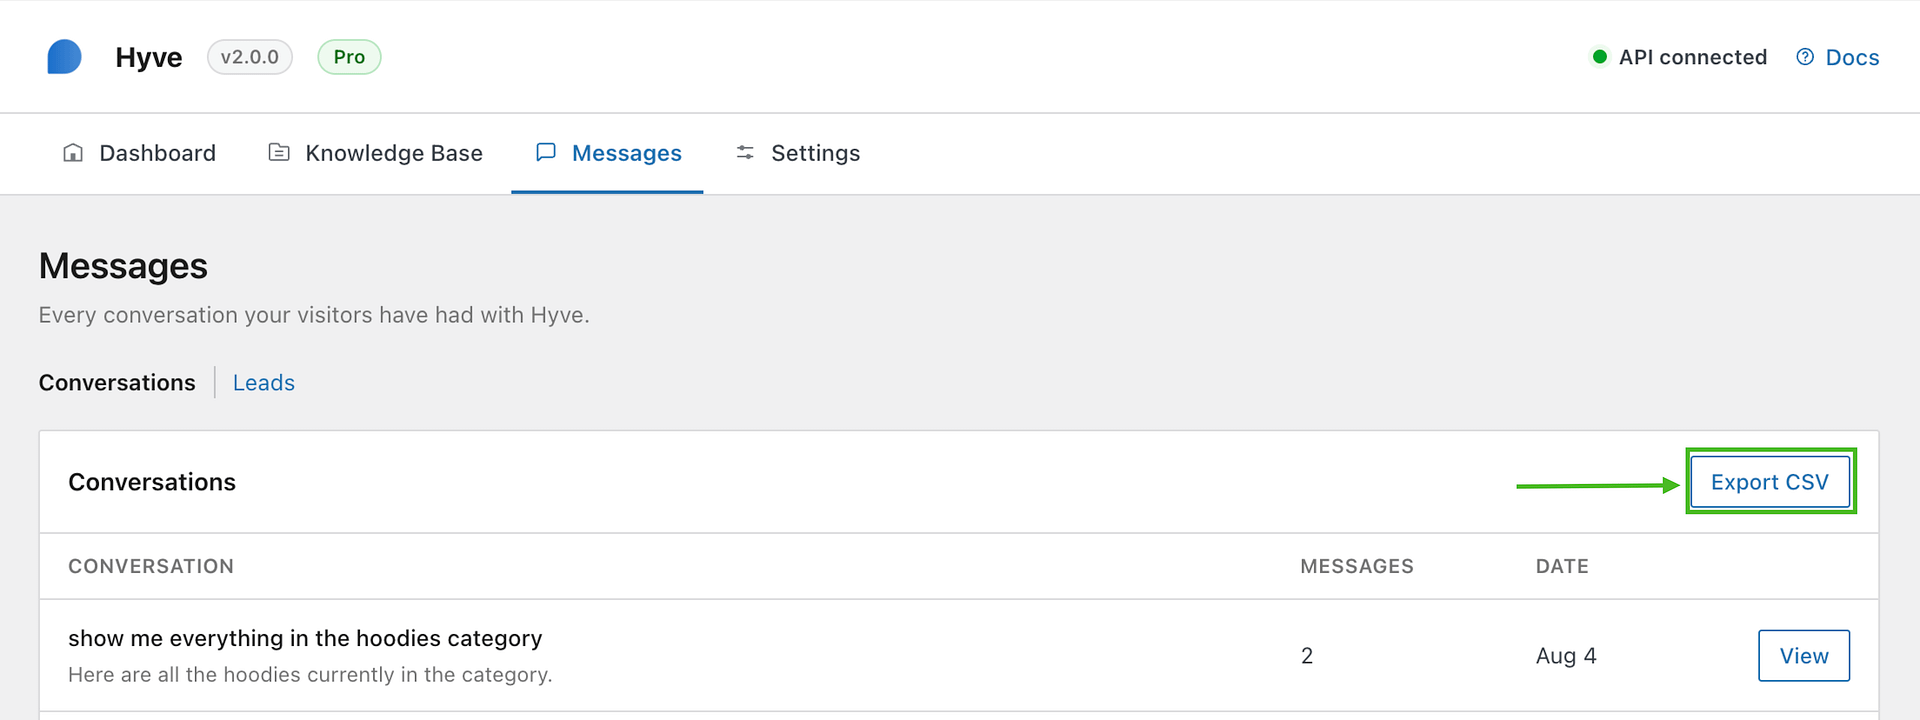
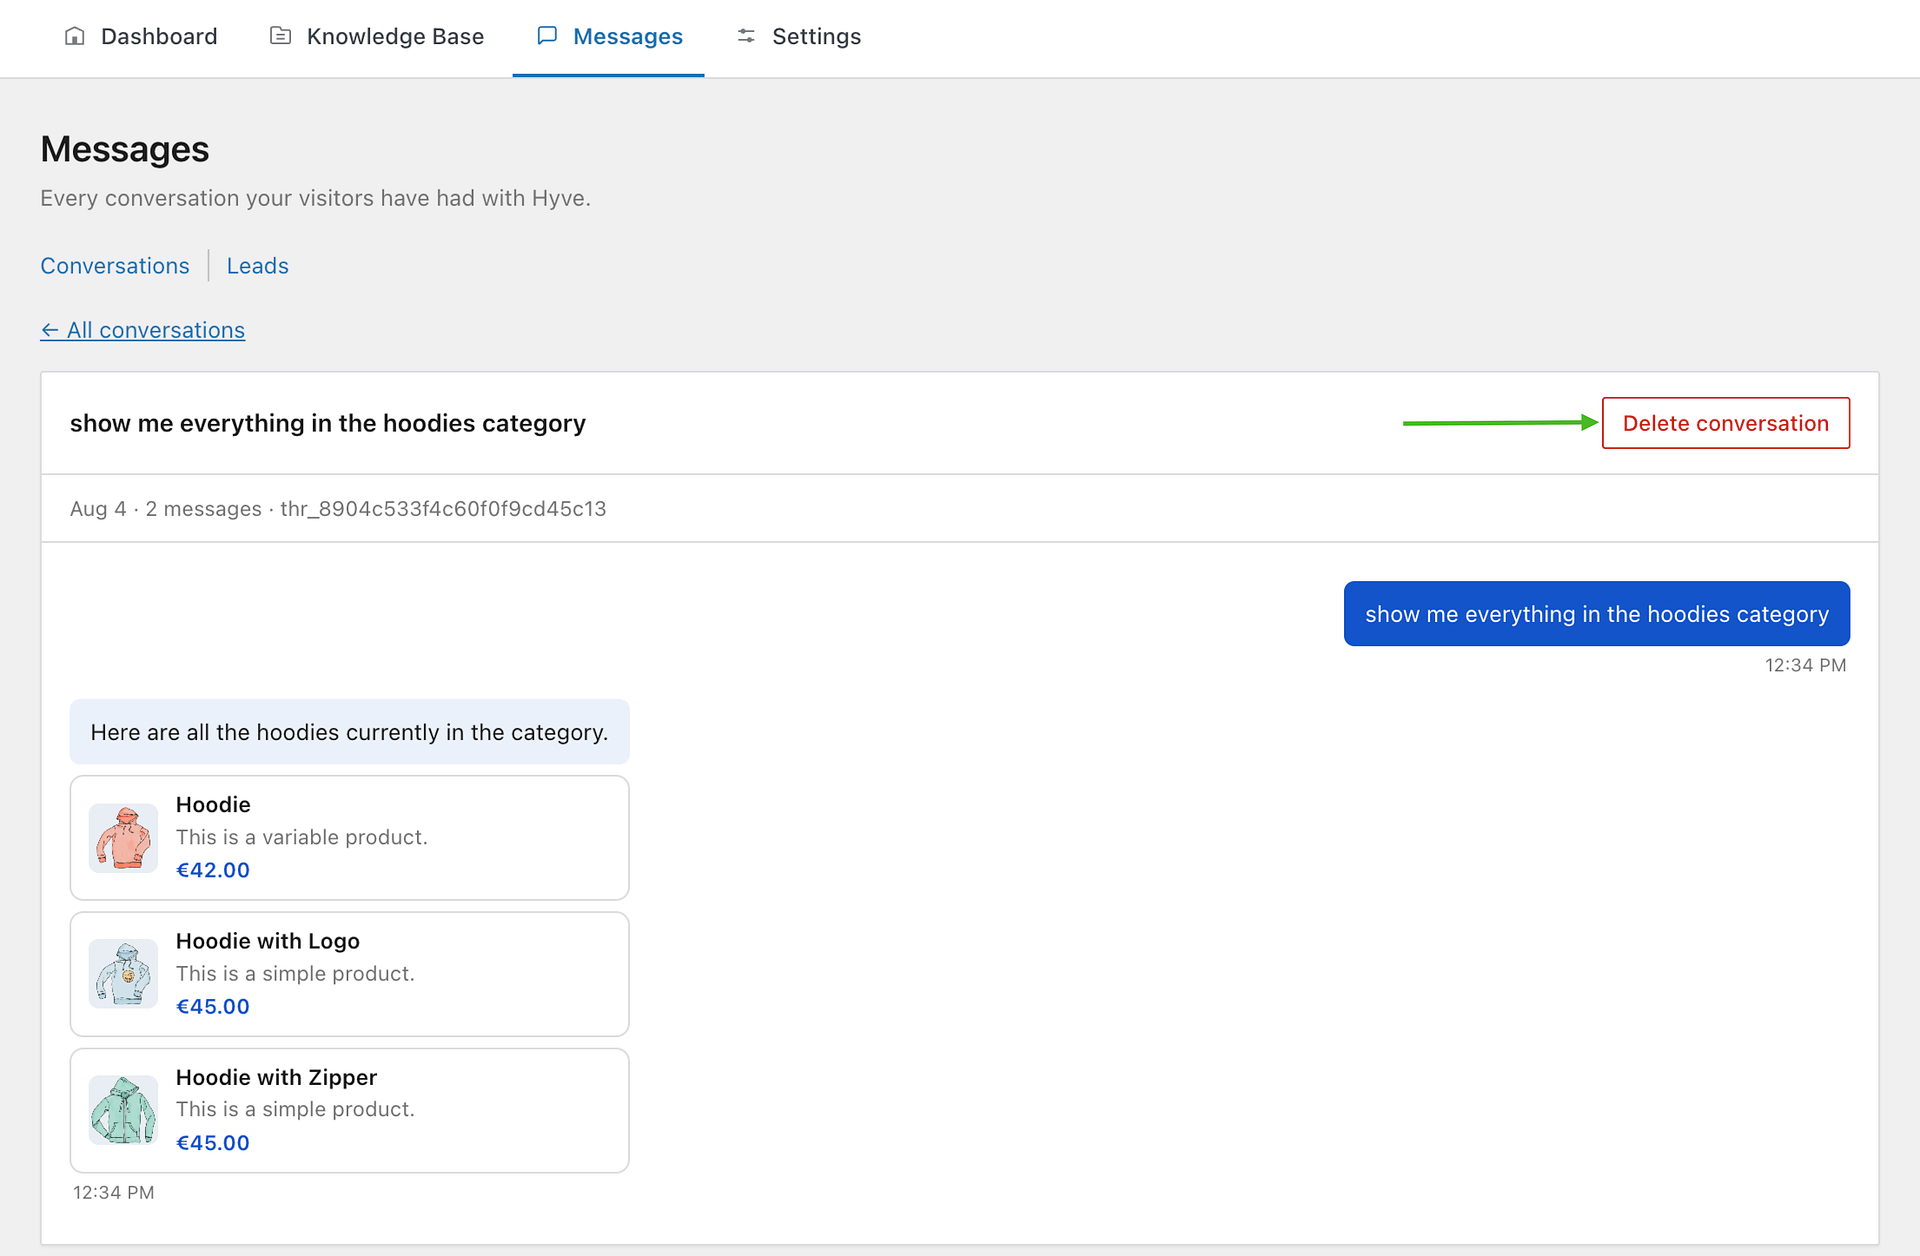
Messages sent by your site visitors in the Hyve chat are kept on the Hyve > Messages > Conversations page. From here, you can also delete threads and, with the premium version, export them.
Inspect a conversation and its trace
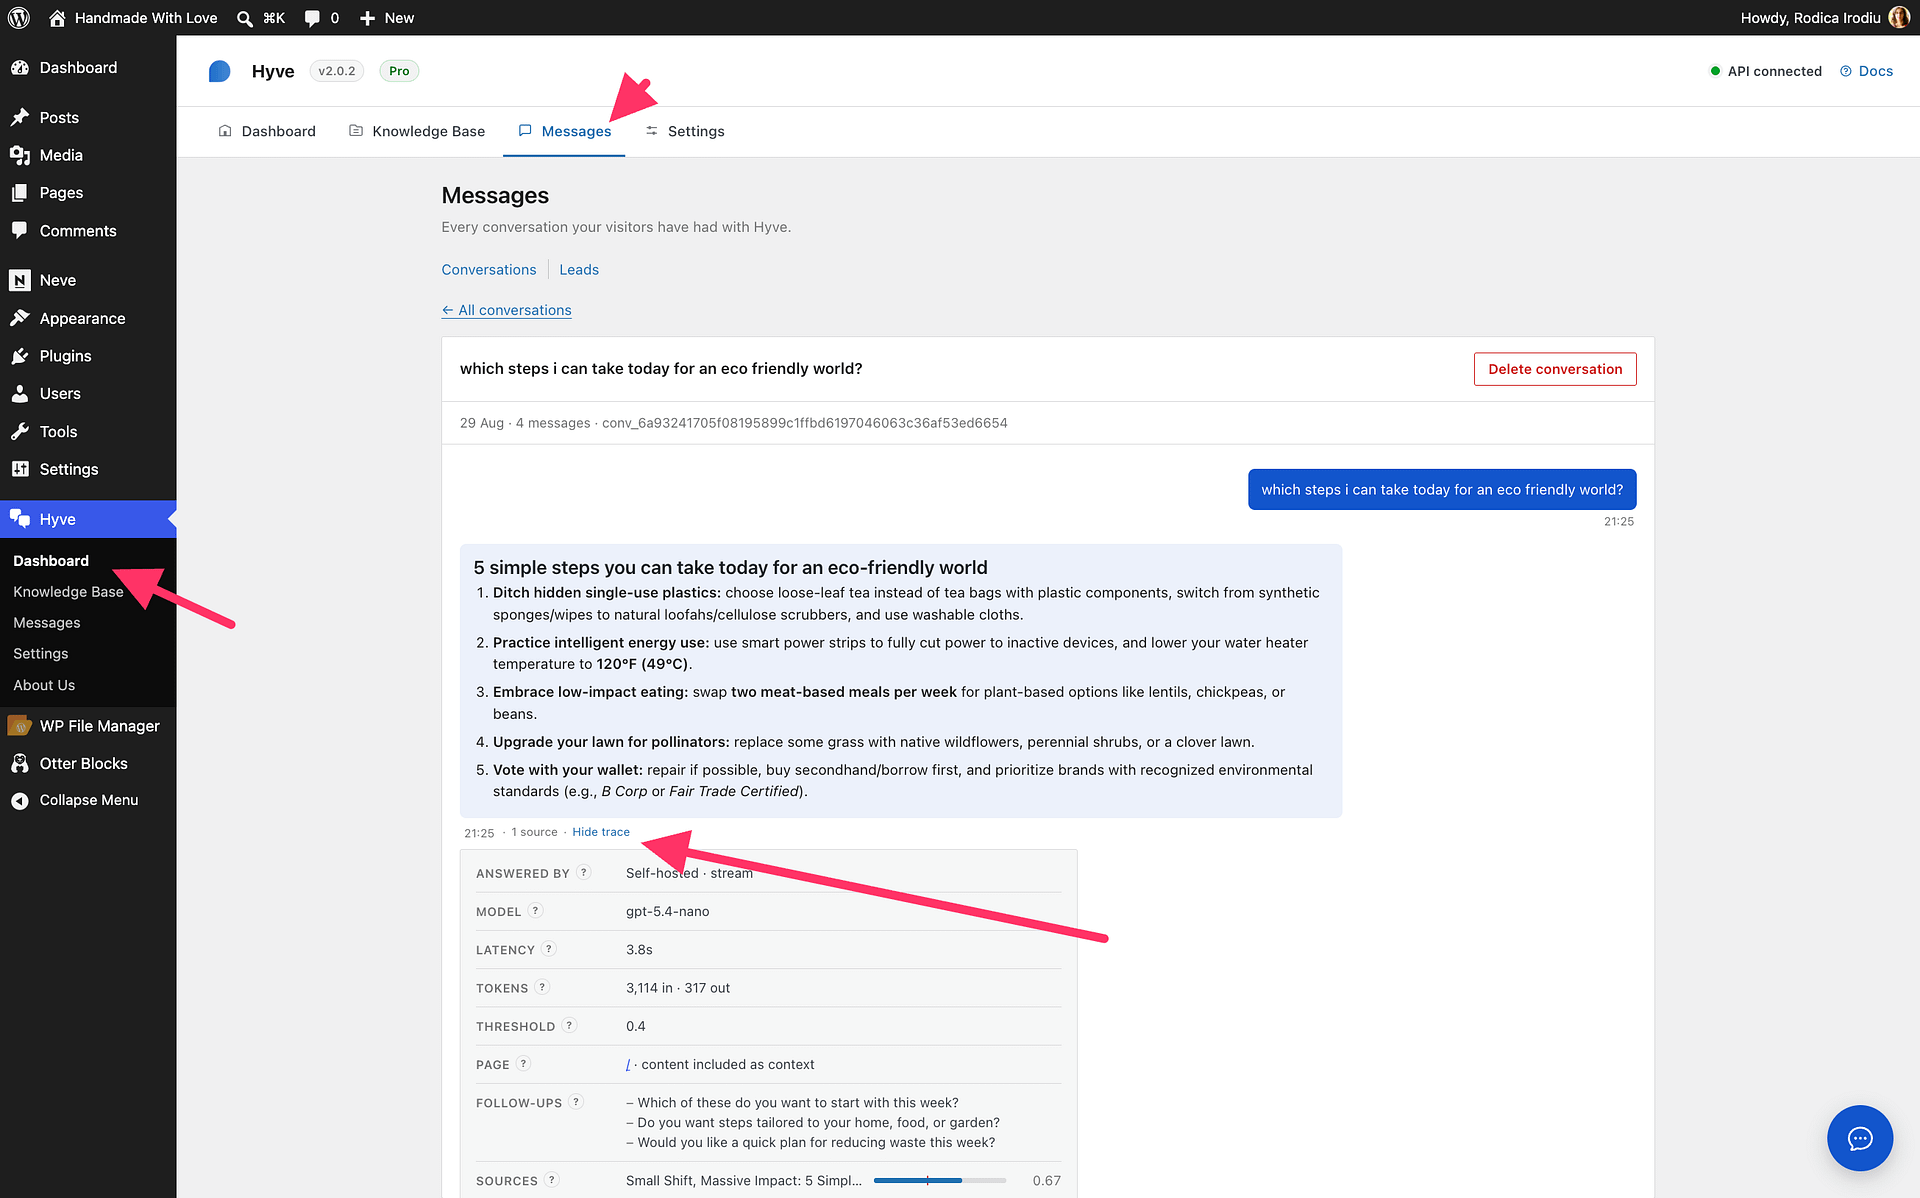
Open Hyve > Messages > Conversations, then select a conversation to open the full thread. Under a bot reply, select Show trace to expand the diagnostic details for that reply.
The conversation summary shows whether the reply was answered or marked Not answered, as well as the number of Knowledge Base sources included in the reply. Not answered means Hyve returned the configured fallback instead of an answer grounded in the available context. A source is a piece of content retrieved from your Knowledge Base for that reply. Sources shown dimmed matched the search but were excluded from the context sent to the model.
The expanded trace can show:
- AI mode and model used to create the reply.
- Response time and Token usage for the request.
- The Similarity threshold used to decide which Knowledge Base results matched the question.
- Skills and skill calls used for the reply when the relevant Hyve Pro skills are enabled.
- Page context and Follow-ups when those details were available.
- The Sources sent to the model, the Model reply, and the Retrieval query used to find them.
Available fields vary by reply. Self-hosted and Hyve Connect responses can expose different provider and usage details, and Hyve Pro traces can include skill details only when a skill was available and used.
The thread can also include event dividers instead of bot replies. These mark moderation failures, rate limits, or chat errors so you can distinguish a system event from a visitor or bot message.
With the premium version, in-chat lead and contact forms collect submissions on the Hyve > Messages > Leads page.
Administrators can read and manage conversations by default. To let another role in, such as a support role that should not have full admin access, grant it one or both of these capabilities with a role editor plugin:
hyve_read_messagesopens the Messages page and allows reading conversations.hyve_manage_messagesadditionally allows deleting and exporting conversations.
Deleting a thread removes it permanently from your site. This cannot be undone.
Exported messages are formatted as CSV and include: hyve_thread_id, sender (user/bot), message content, date, and timestamp.
With Hyve Pro, visitors can also leave their contact details in a form inside the chat, and every submission is listed on the Leads tab of the same page. See Configure Hyve lead capture and webhooks for the setup steps.
Who can read and manage messages
Administrators can read, delete, and export conversations without any extra setup. Other roles have no access until you give it to them.
To give another role access, grant it one or both of these capabilities using a role editor plugin or custom code:
hyve_read_messages— open Hyve > Messages and read conversation threads.hyve_manage_messages— delete and export conversation threads.
Granting hyve_manage_messages lets a role both delete and export conversations, so any role you give it to can download the full message history as CSV.
⚠️ Warning: Conversation threads can contain personal information that visitors typed into the chat, such as names, email addresses, or order details. Grant these capabilities only to roles you trust with that data.
Integrations
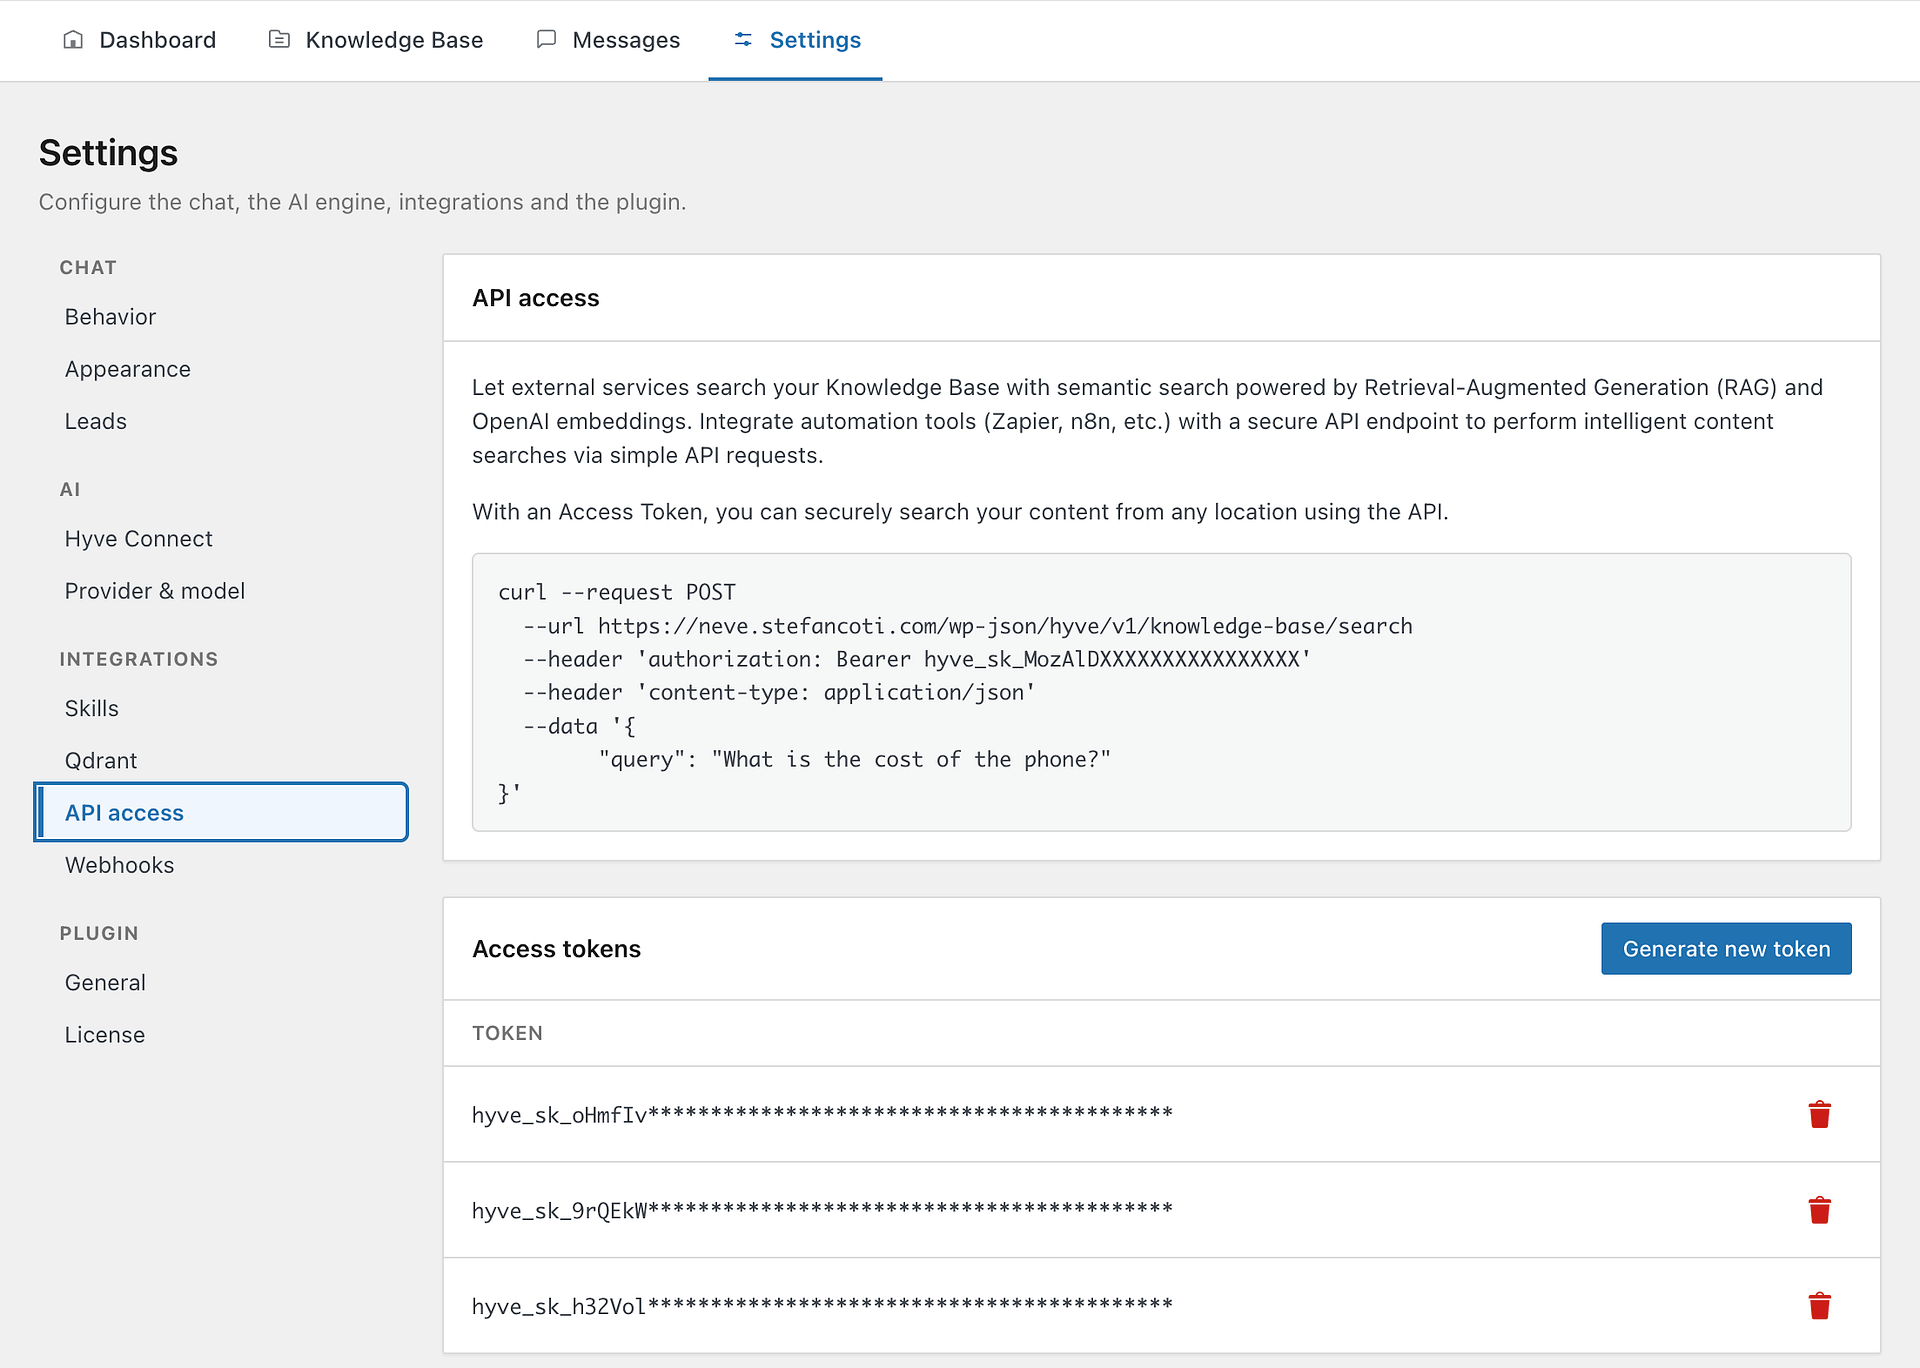
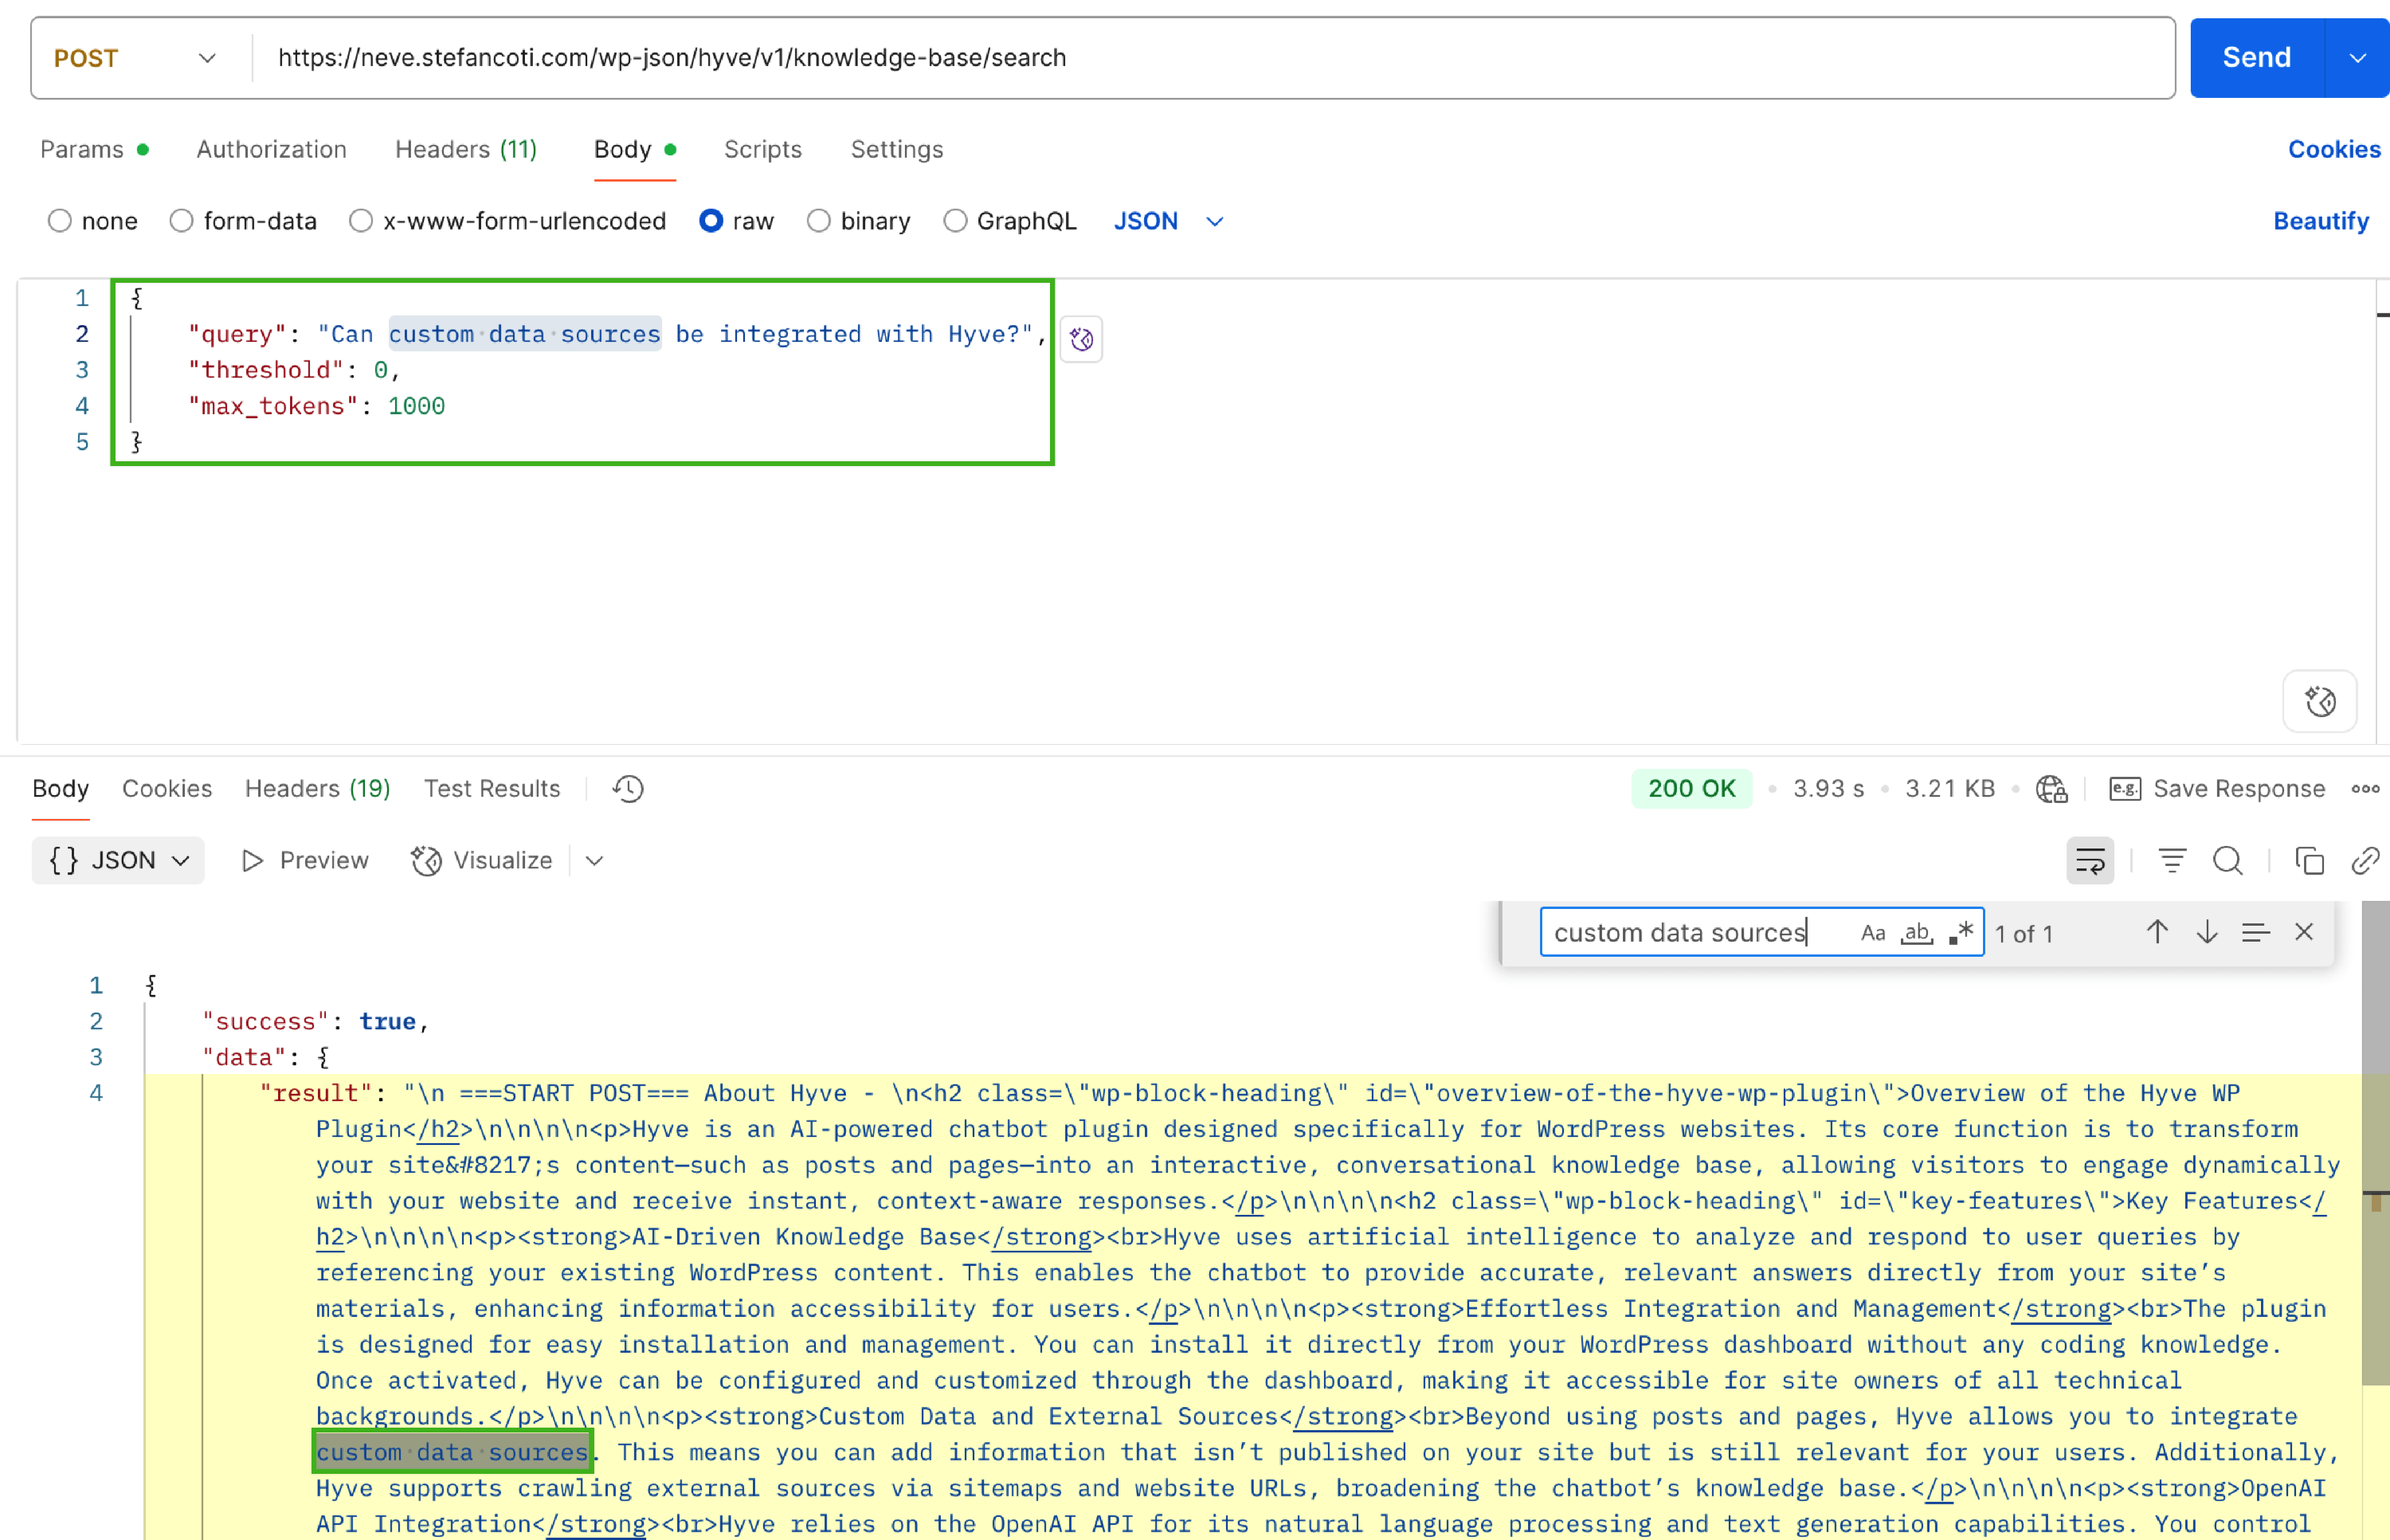
From Hyve > Settings > Integrations > API access, you can let external services search your Knowledge Base using semantic search powered by Retrieval-Augmented Generation (RAG) and embeddings. Integrate automation tools (Zapier, n8n, etc.) with a secure API endpoint to perform intelligent content searches via simple API requests.
1. Generate an Access Token
- Access tokens are required for authentication. Generate your token on the API access panel.
2. Make an API Request
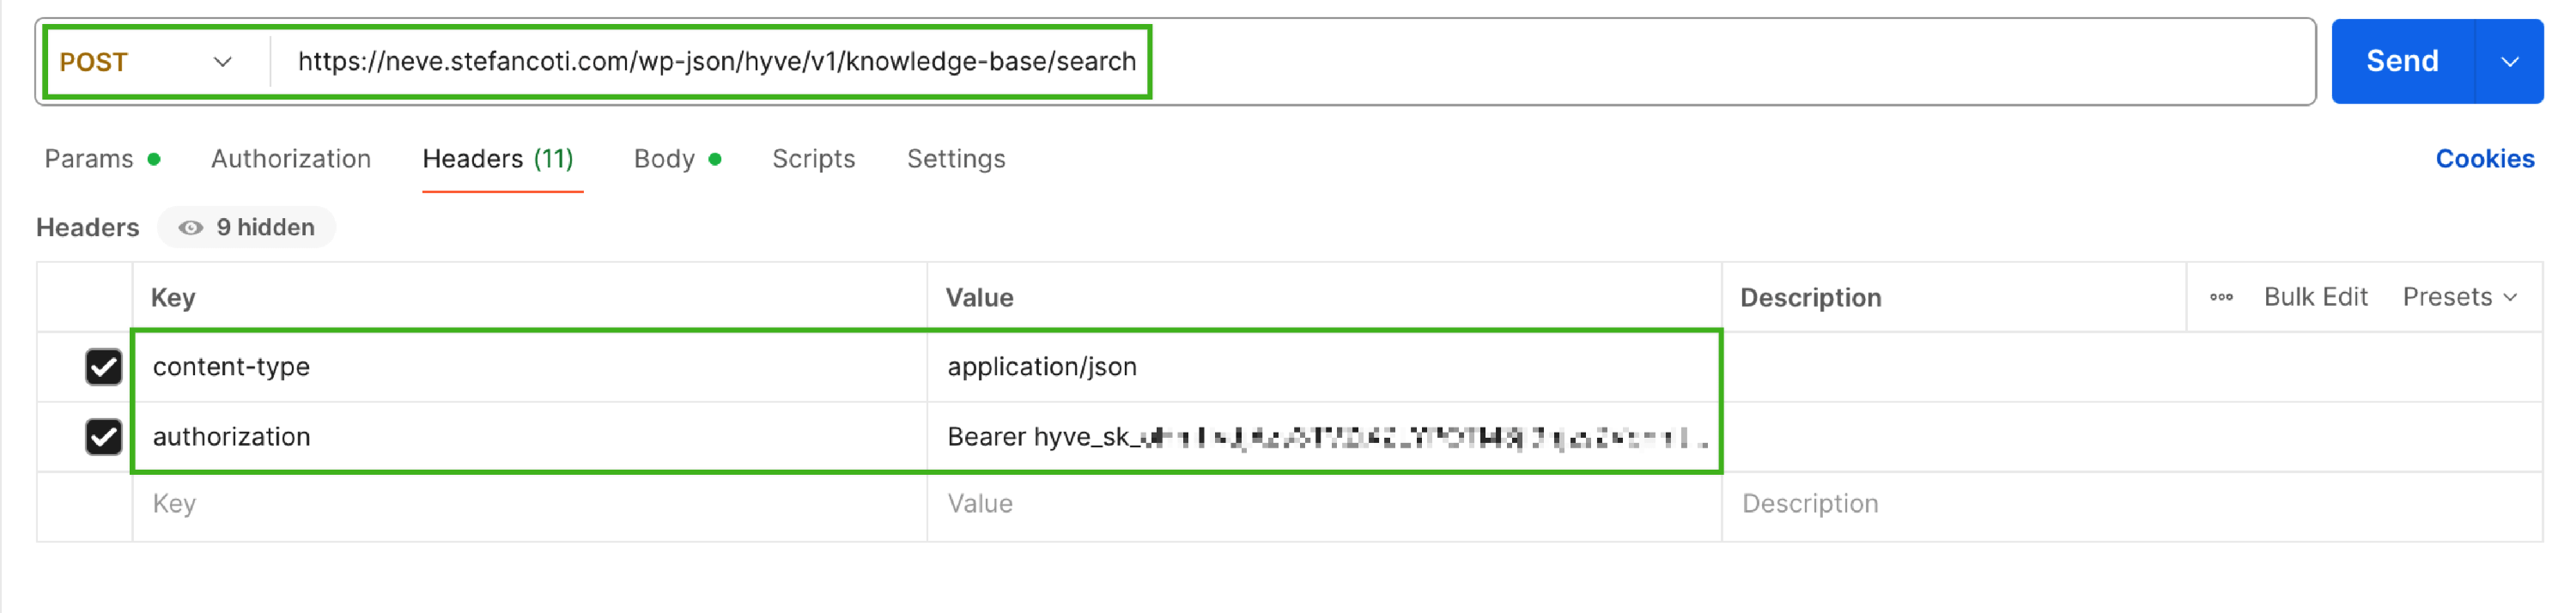
- Use tools like Postman or your preferred HTTP client.
- Refer to the exact request format and endpoint URL shown on the API access panel.
3. Configure Search Parameters
You can customize your search with the following parameters:
| Parameter | Type | Range/Example | Description |
|---|---|---|---|
| threshold | float | -1 to 1 | Sets the minimum cosine similarity between your query and knowledge base entries to be considered a match. If unset, defaults to the Knowledge Base’s Cosine Similarity Threshold setting. |
| max_tokens | integer | e.g. 1000 | Limits the maximum number of tokens (words/characters) in a returned post. If a matching post exceeds this, it is excluded. If not set, no token limit is applied as long as the similarity threshold is met. |
- threshold: Controls how closely the search result must match your query. Higher values (closer to 1) mean stricter matching; lower values (closer to -1) are more permissive. If you do not specify this parameter, Hyve will use the default threshold set in your Knowledge Base settings.
- max_tokens: Prevents very long posts from being returned if they exceed the specified token count. Useful for ensuring concise results. If not specified, all posts that meet the similarity threshold are eligible, regardless of length.
With Hyve Pro you can also let the chatbot look things up on your site while a conversation is happening, instead of answering only from the Knowledge Base. On a WooCommerce store this covers searching your live catalog and returning a signed-in customer's own order status. See Use Hyve Skills for WooCommerce product and order answers.
Troubleshooting
For the chat to work properly, make sure that:
- An AI connection is active, either Hyve Connect or an OpenAI API key with available credit on the account
- At least one source/article was added to Hyve's knowledge base
- The display mode in Hyve > Settings > Chat > Behavior covers the page you are looking at, or the page has a Hyve block or shortcode on it
If you use Hyve Connect and the panel reports that a limit was reached, Hyve stops indexing new content and answering visitors until the allowance resets or a license raises the limit.
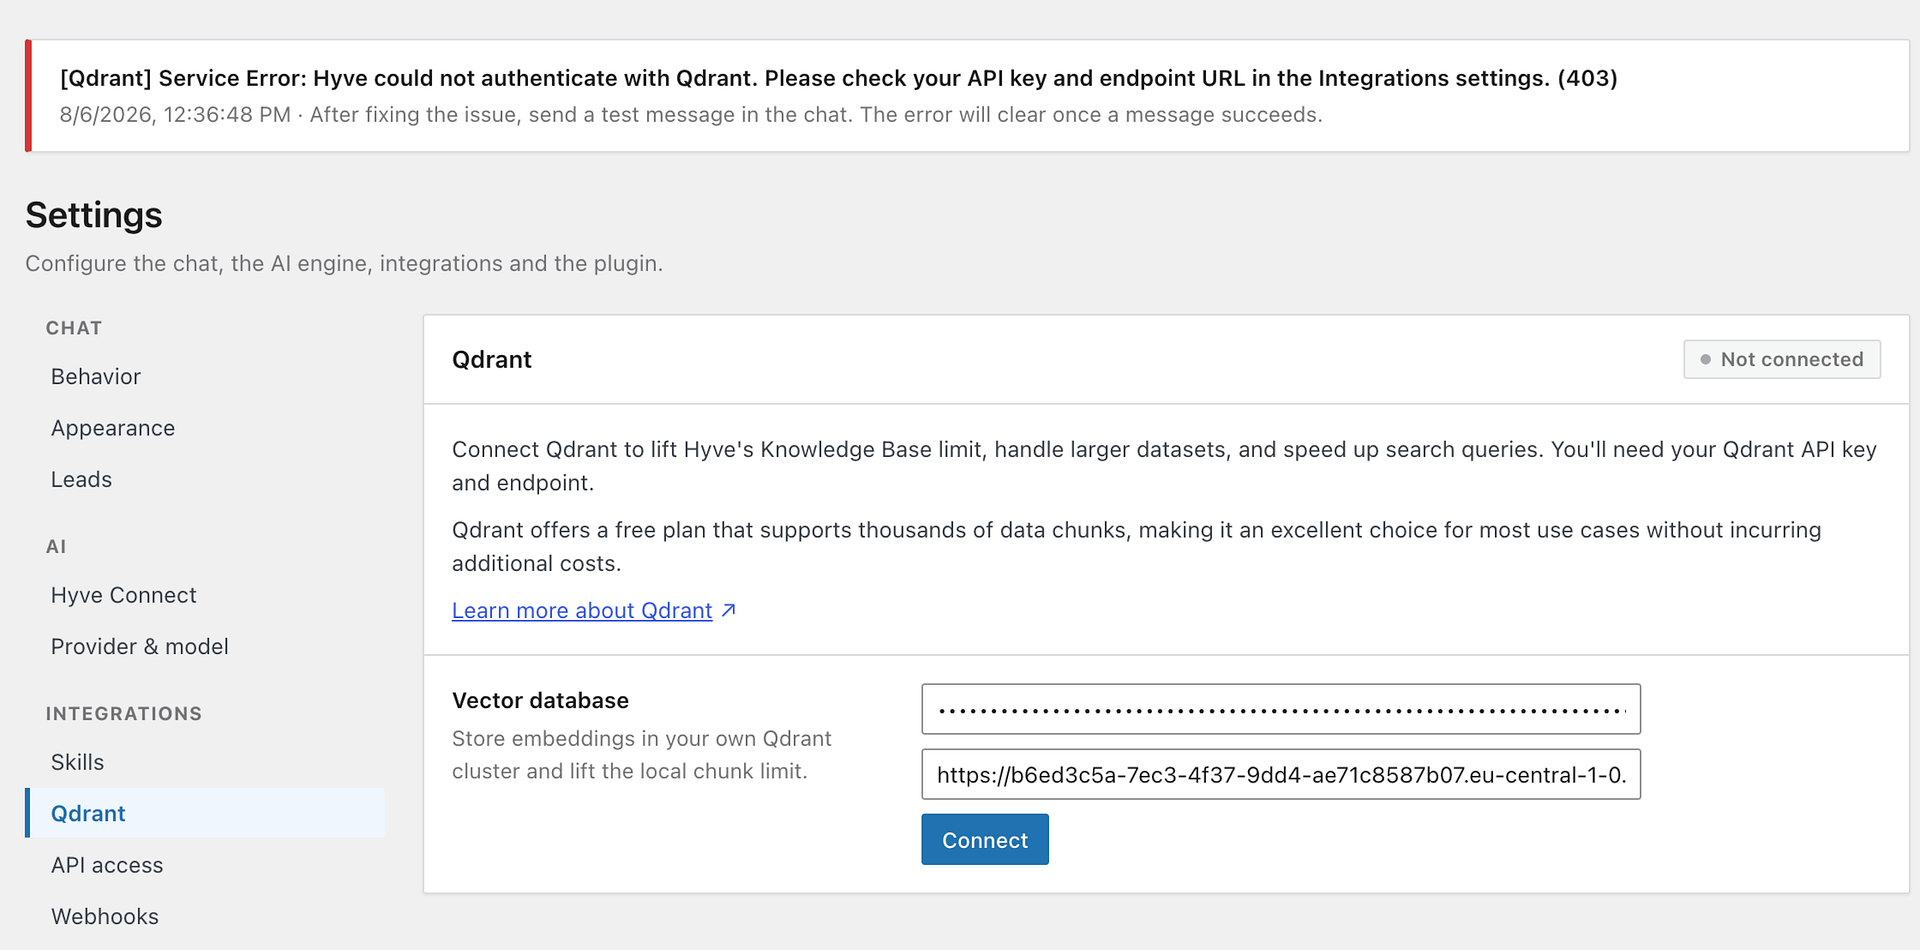
If something critical goes wrong and the chat is not functional, Hyve shows a service error notice at the top of any of its admin screens. The notice names the service that failed, the error message, and when it happened. After you fix the cause, send a test message in the chat: the notice clears once a message goes through. Below is an example of a Qdrant connection failing due to invalid credentials.
Chat Settings
The chat's wording, behavior, and look are configured in Hyve > Settings > Chat.
Behavior
Display mode - Controls where the chat appears. See Enable the chat.
Welcome Message (customizable) - This message will be displayed when the chat is opened.
Default Message (customizable) - This message will return when the chat is unable to find an answer.
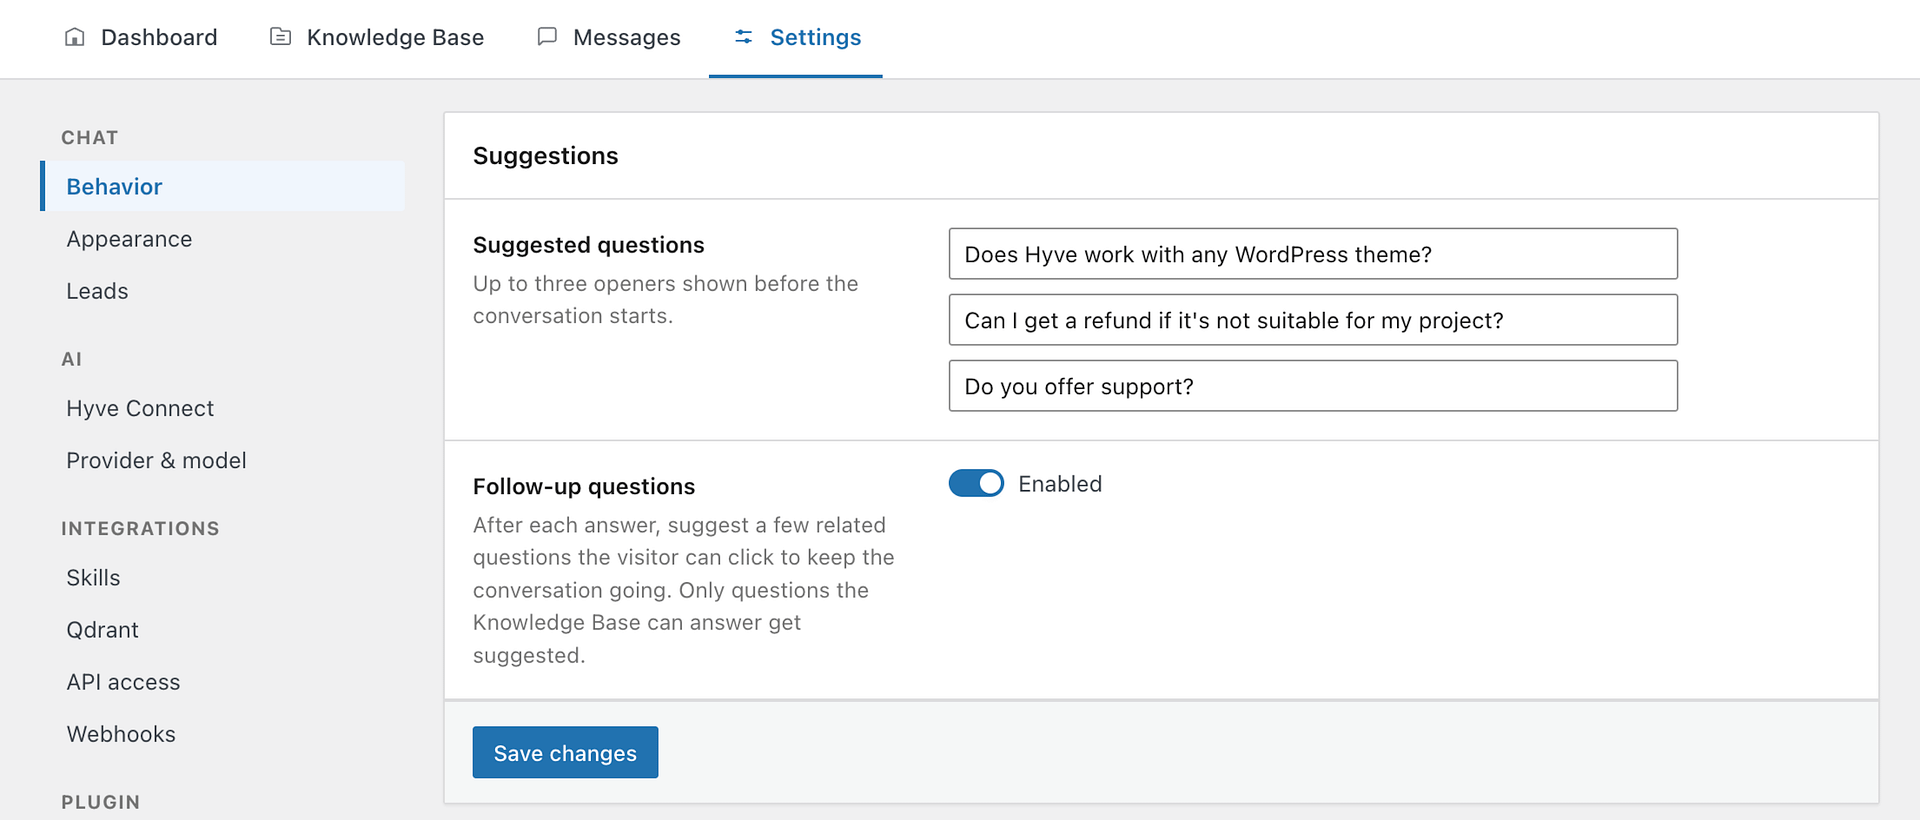
Suggested Questions (customizable pro feature) - These questions will be displayed in the chat to get the conversation started.
Proactive message (customizable pro feature) - Shows a small bubble next to the closed chat button to invite visitors to start a conversation. Under Show it when, choose Disabled, Time on page, Exit intent (desktop only), or Scroll depth. For Time on page, set Seconds on page from 0 to 600. For Scroll depth, set Scroll percentage from 1 to 100. Use Invite message to set the bubble text. Visitors can dismiss the invite, and it appears at most once per browser session.
Source links - When enabled, answers show numbered links to the pages they were based on. Private and password-protected sources are never linked.
Privacy notice - When enabled, the chat shows a short notice linking to your site's privacy policy.
Appearance
Open Hyve > Settings > Chat > Appearance to style the chat widget. The chat bubble in the corner of the settings screen is a live preview, so your changes show up in it as you edit, before you save.
These controls are available in the free version:
- Position - Choose whether the chat button and chat window appear on the left or the right side of the screen.
- Timestamps - Show or hide the time each message was sent.
These controls require Hyve Pro:
- Assistant name - The name shown in the chat header. Leave it empty to use the default.
- Launcher icon - Pick one of the built-in icons for the chat button.
- Custom icon image - Use an image from your Media Library for the chat button and the header avatar.
- Colors - Set the chat background, assistant message background, user message background, and icon background.
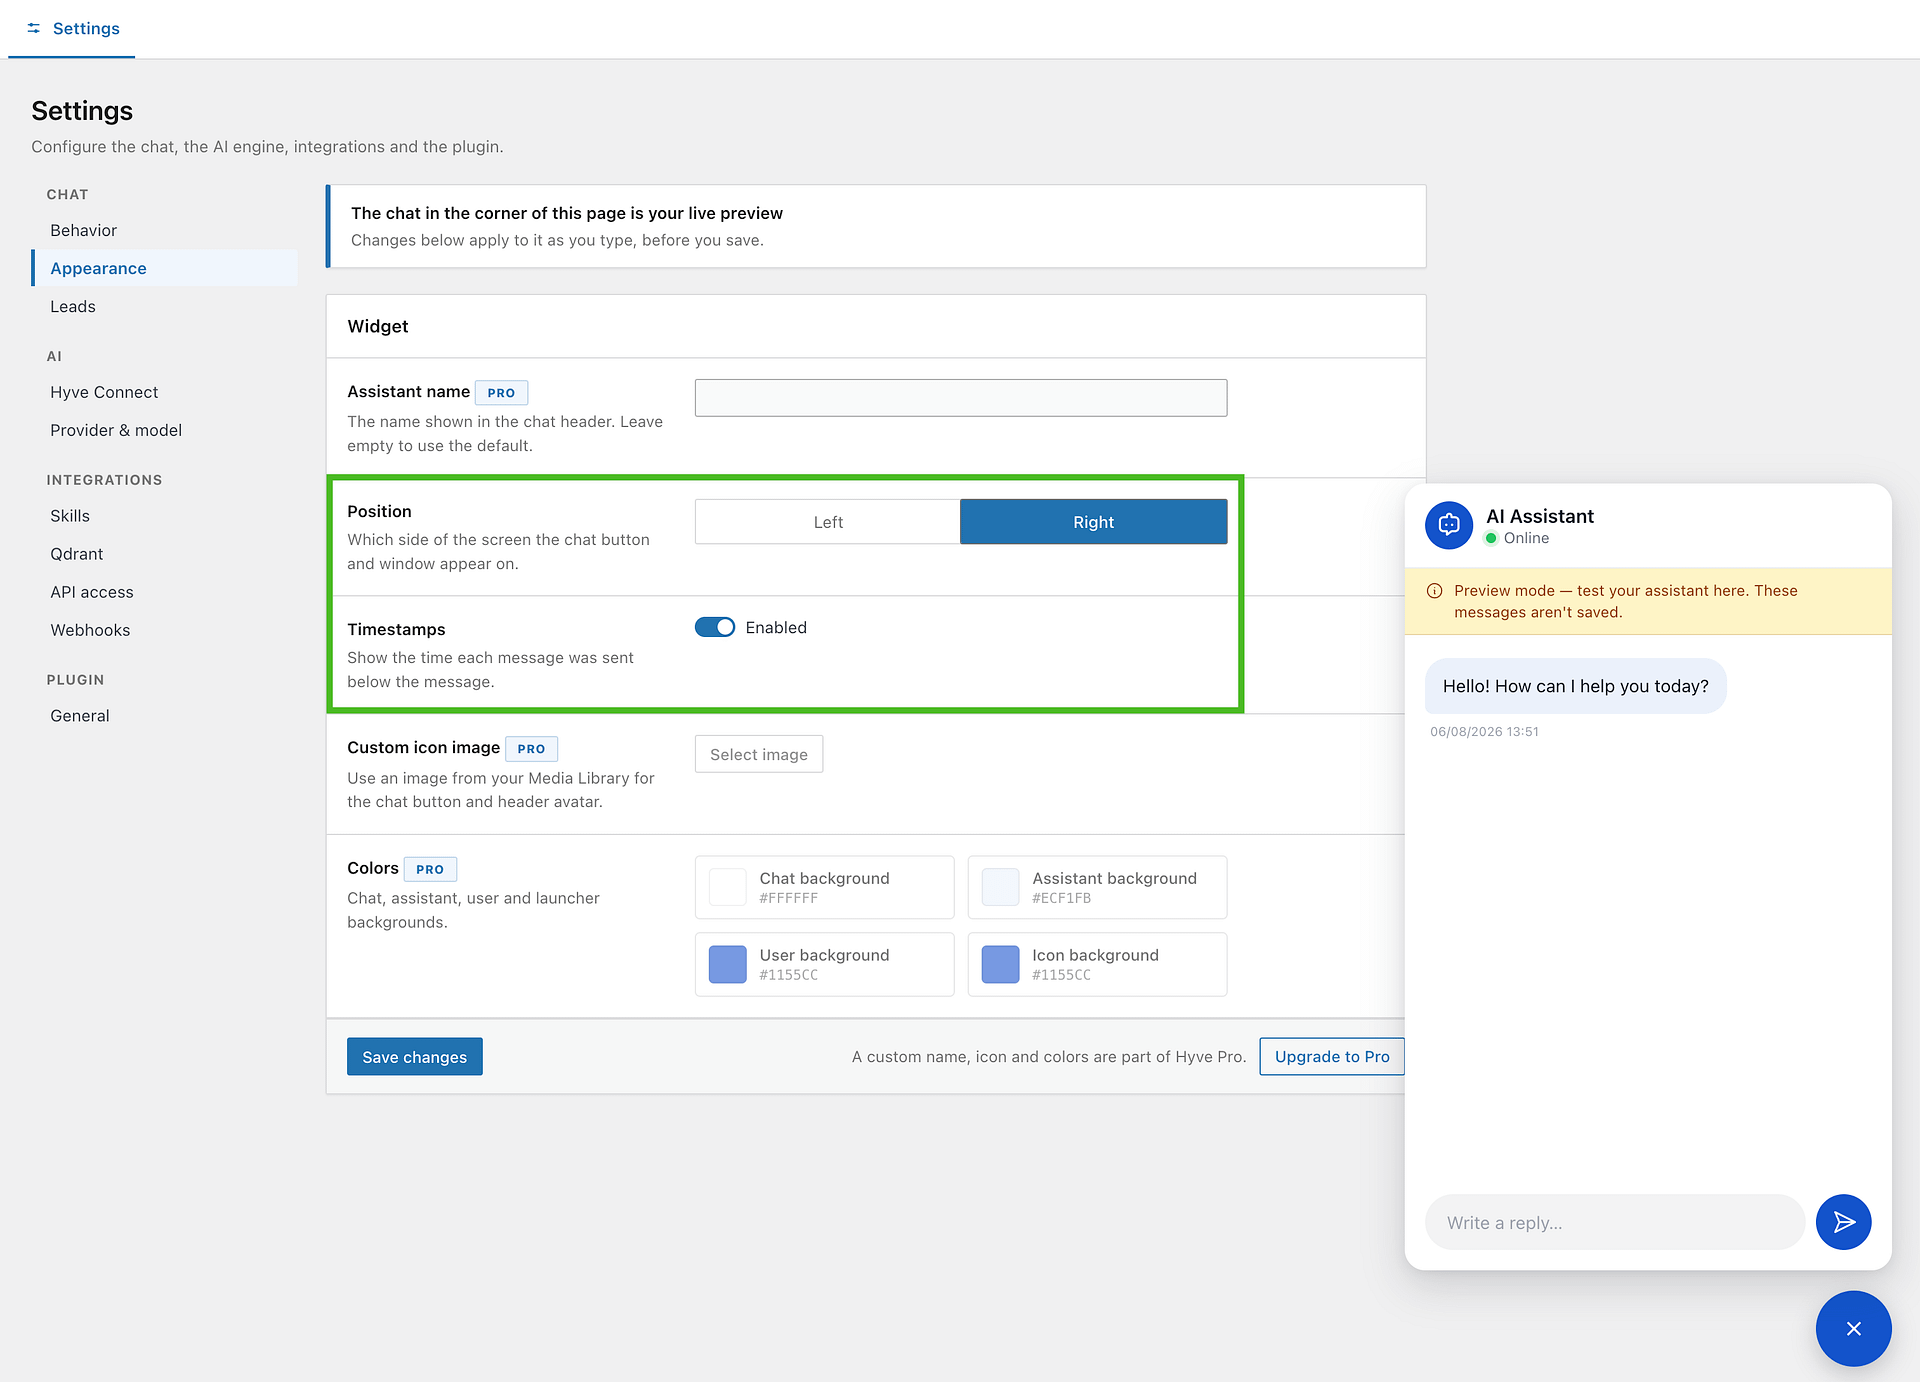
For the changes to apply, make sure to click the Save changes button.
The chat sound is not part of this screen. Turn it on or off with the Chat sound option under Hyve > Settings > Chat > Behavior.
📝 Info: Visitors can mute the chat sound for themselves from the menu inside the chat window. That choice is saved in their own browser and does not change your Chat sound setting.
AI Settings
The AI connection is configured in Hyve > Settings > AI.
Hyve Connect
Turn on Hyve Connect to let Hyve handle the AI for you, without an OpenAI account or API key. There is no key to paste and no account to create, because your site is identified by its domain. Once it is on, the panel shows how much of your Knowledge Base and monthly message allowance you have used. If you are already using your own OpenAI key, the button reads Switch to Hyve Connect instead.
Hyve Connect and a self-hosted API key cannot run at the same time. Hyve Connect and Qdrant also cannot run at the same time — disconnect Qdrant first, then enable Hyve Connect.
⚠️ Warning: Switching modes moves your indexed content. When you turn Hyve Connect on, your Knowledge Base is synced to it. When you disconnect, you choose whether to import that content back or clear it.
Provider & model
Add your OpenAI API key here to run Hyve on your own OpenAI account, and choose the model that powers the chatbot. More capable models produce better answers but cost more per request.
Your key is stored encrypted. If you are running an older model that is no longer offered, Hyve moves you to a current one automatically.
A status chip next to the API key field shows whether the key is Connected, Not connected, or Unsaved.
Moderation
Content added to the Knowledge Base is automatically checked for potentially harmful material before it is stored.
How Moderation Works
- When you add new content to Hyve, it is automatically checked for issues like hate speech, harassment, self-harm, sexual content, and violence.
- If the system detects a problem, you'll see a message explaining which category was triggered and why.
- Sometimes, the system may make mistakes and flag content that doesn't actually violate any rules (these are called "false positives"). In these cases, you can review the content in the Needs attention tab and override the decision if you believe it is safe.
Why Moderation Matters
Moderation helps protect your users and your website by preventing harmful or inappropriate content from being used by the chatbot. It also helps you comply with platform guidelines and legal requirements.
📝 Note: The sensitivity of each moderation category is set by Hyve and is not exposed as a setting. Overriding an individual false positive from the Needs attention tab is the supported way to get legitimate content through. If a whole category is flagged too often, a developer can adjust the thresholds with the hyve_moderation_threshold filter, which receives the category thresholds as an array on a 0-100 scale, where a higher value is more tolerant and 100 effectively disables the category.
Plugin Settings
General
Enable "Add to Hyve" Post Action - When enabled, an "Add to Hyve" button will appear in the post/page row actions. Disable this to remove the option from the posts/pages list, but keep the added posts to the knowledge base.
Telemetry - Enable telemetry to help us improve the plugin by sending anonymous usage data. Data is private and not shared with third-party entities.
Telemetry does not include your conversations, Knowledge Base, FAQ, or any private content—only which plugin options you use. Your privacy is always protected!
License
Available in the premium version. Enter the license key from your account at store.themeisle.com to receive updates and unlock the Pro features.
📝 Note: If Hyve Connect is using your license, disconnect it before deactivating the license.
How to report a security issue?
Plugin security is a core priority for us. If you identify a potential vulnerability, please disclose it responsibly.
Follow the reporting protocols outlined on our Security Page.