How to use Feed to Post feature in Feedzy
📝Note: The Feed to Post feature is available in the free version of Feedzy RSS Feeds, but you can enhance its functionalities with the Pro version, which you can get from here. For more details about the plugin, please check the main documentation first.
What can you do with the Feed to Post feature? You can easily import items from a feed (or more) as posts (or pages) on your websites.
In this article
The imported posts will be listed on the blog page alongside other posts. The styling of the posts is controlled by the WordPress theme you are using. Below is an example of our latest theme, Neve.

Managing import jobs
Import tasks can be created in Dashboard > Feedzy > Import Posts.
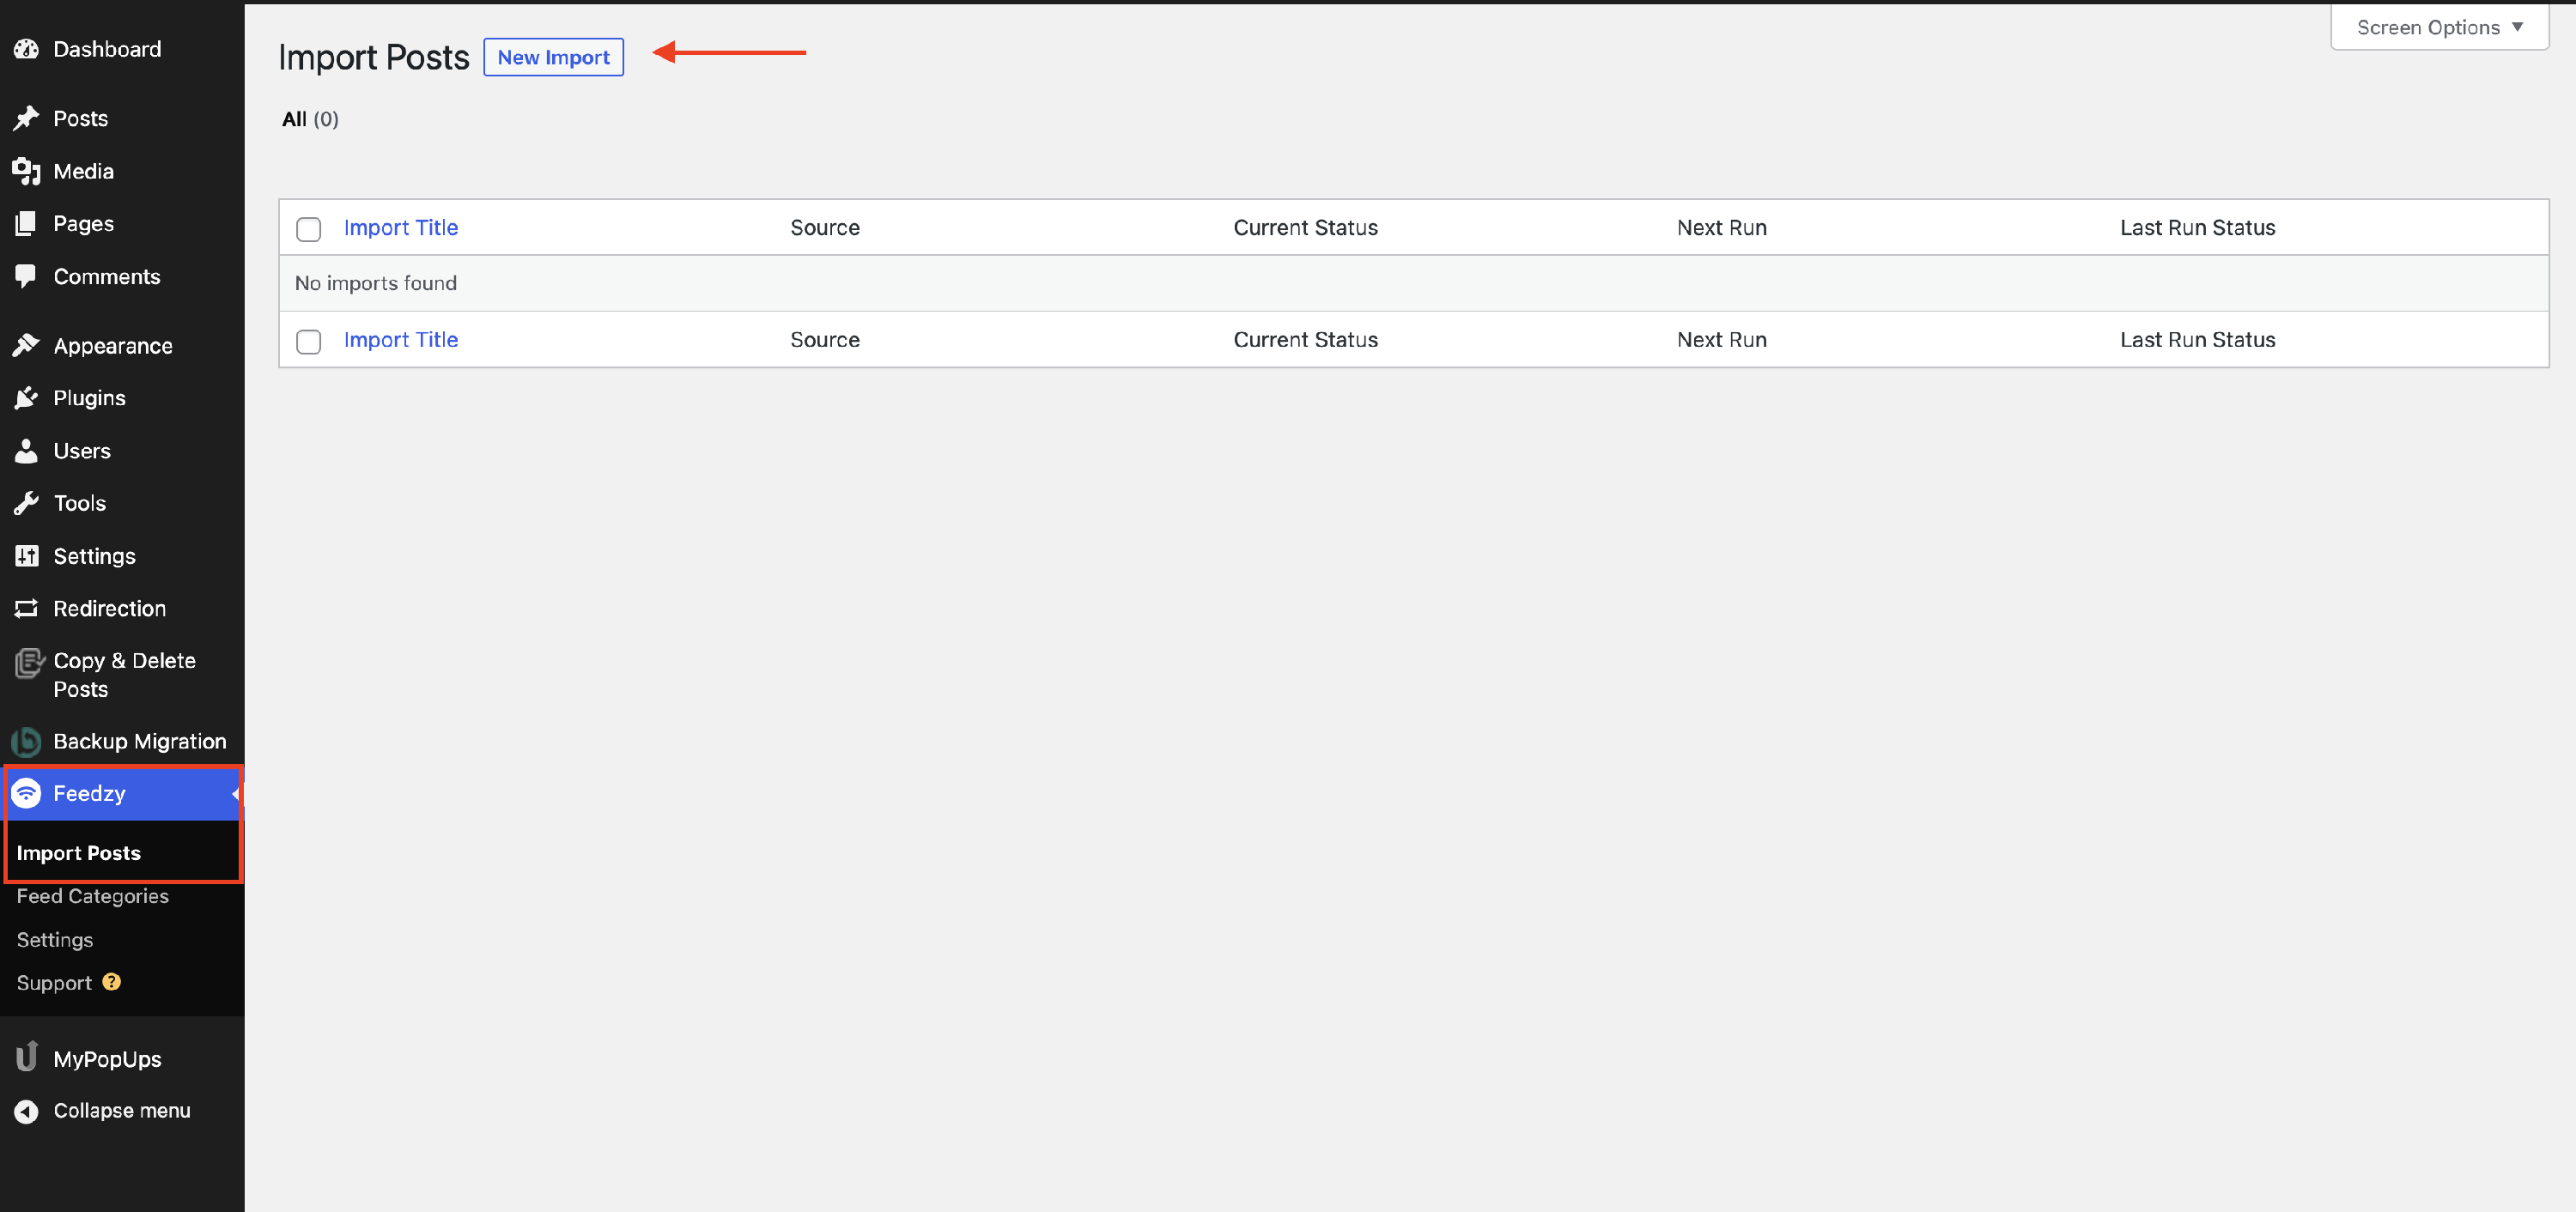
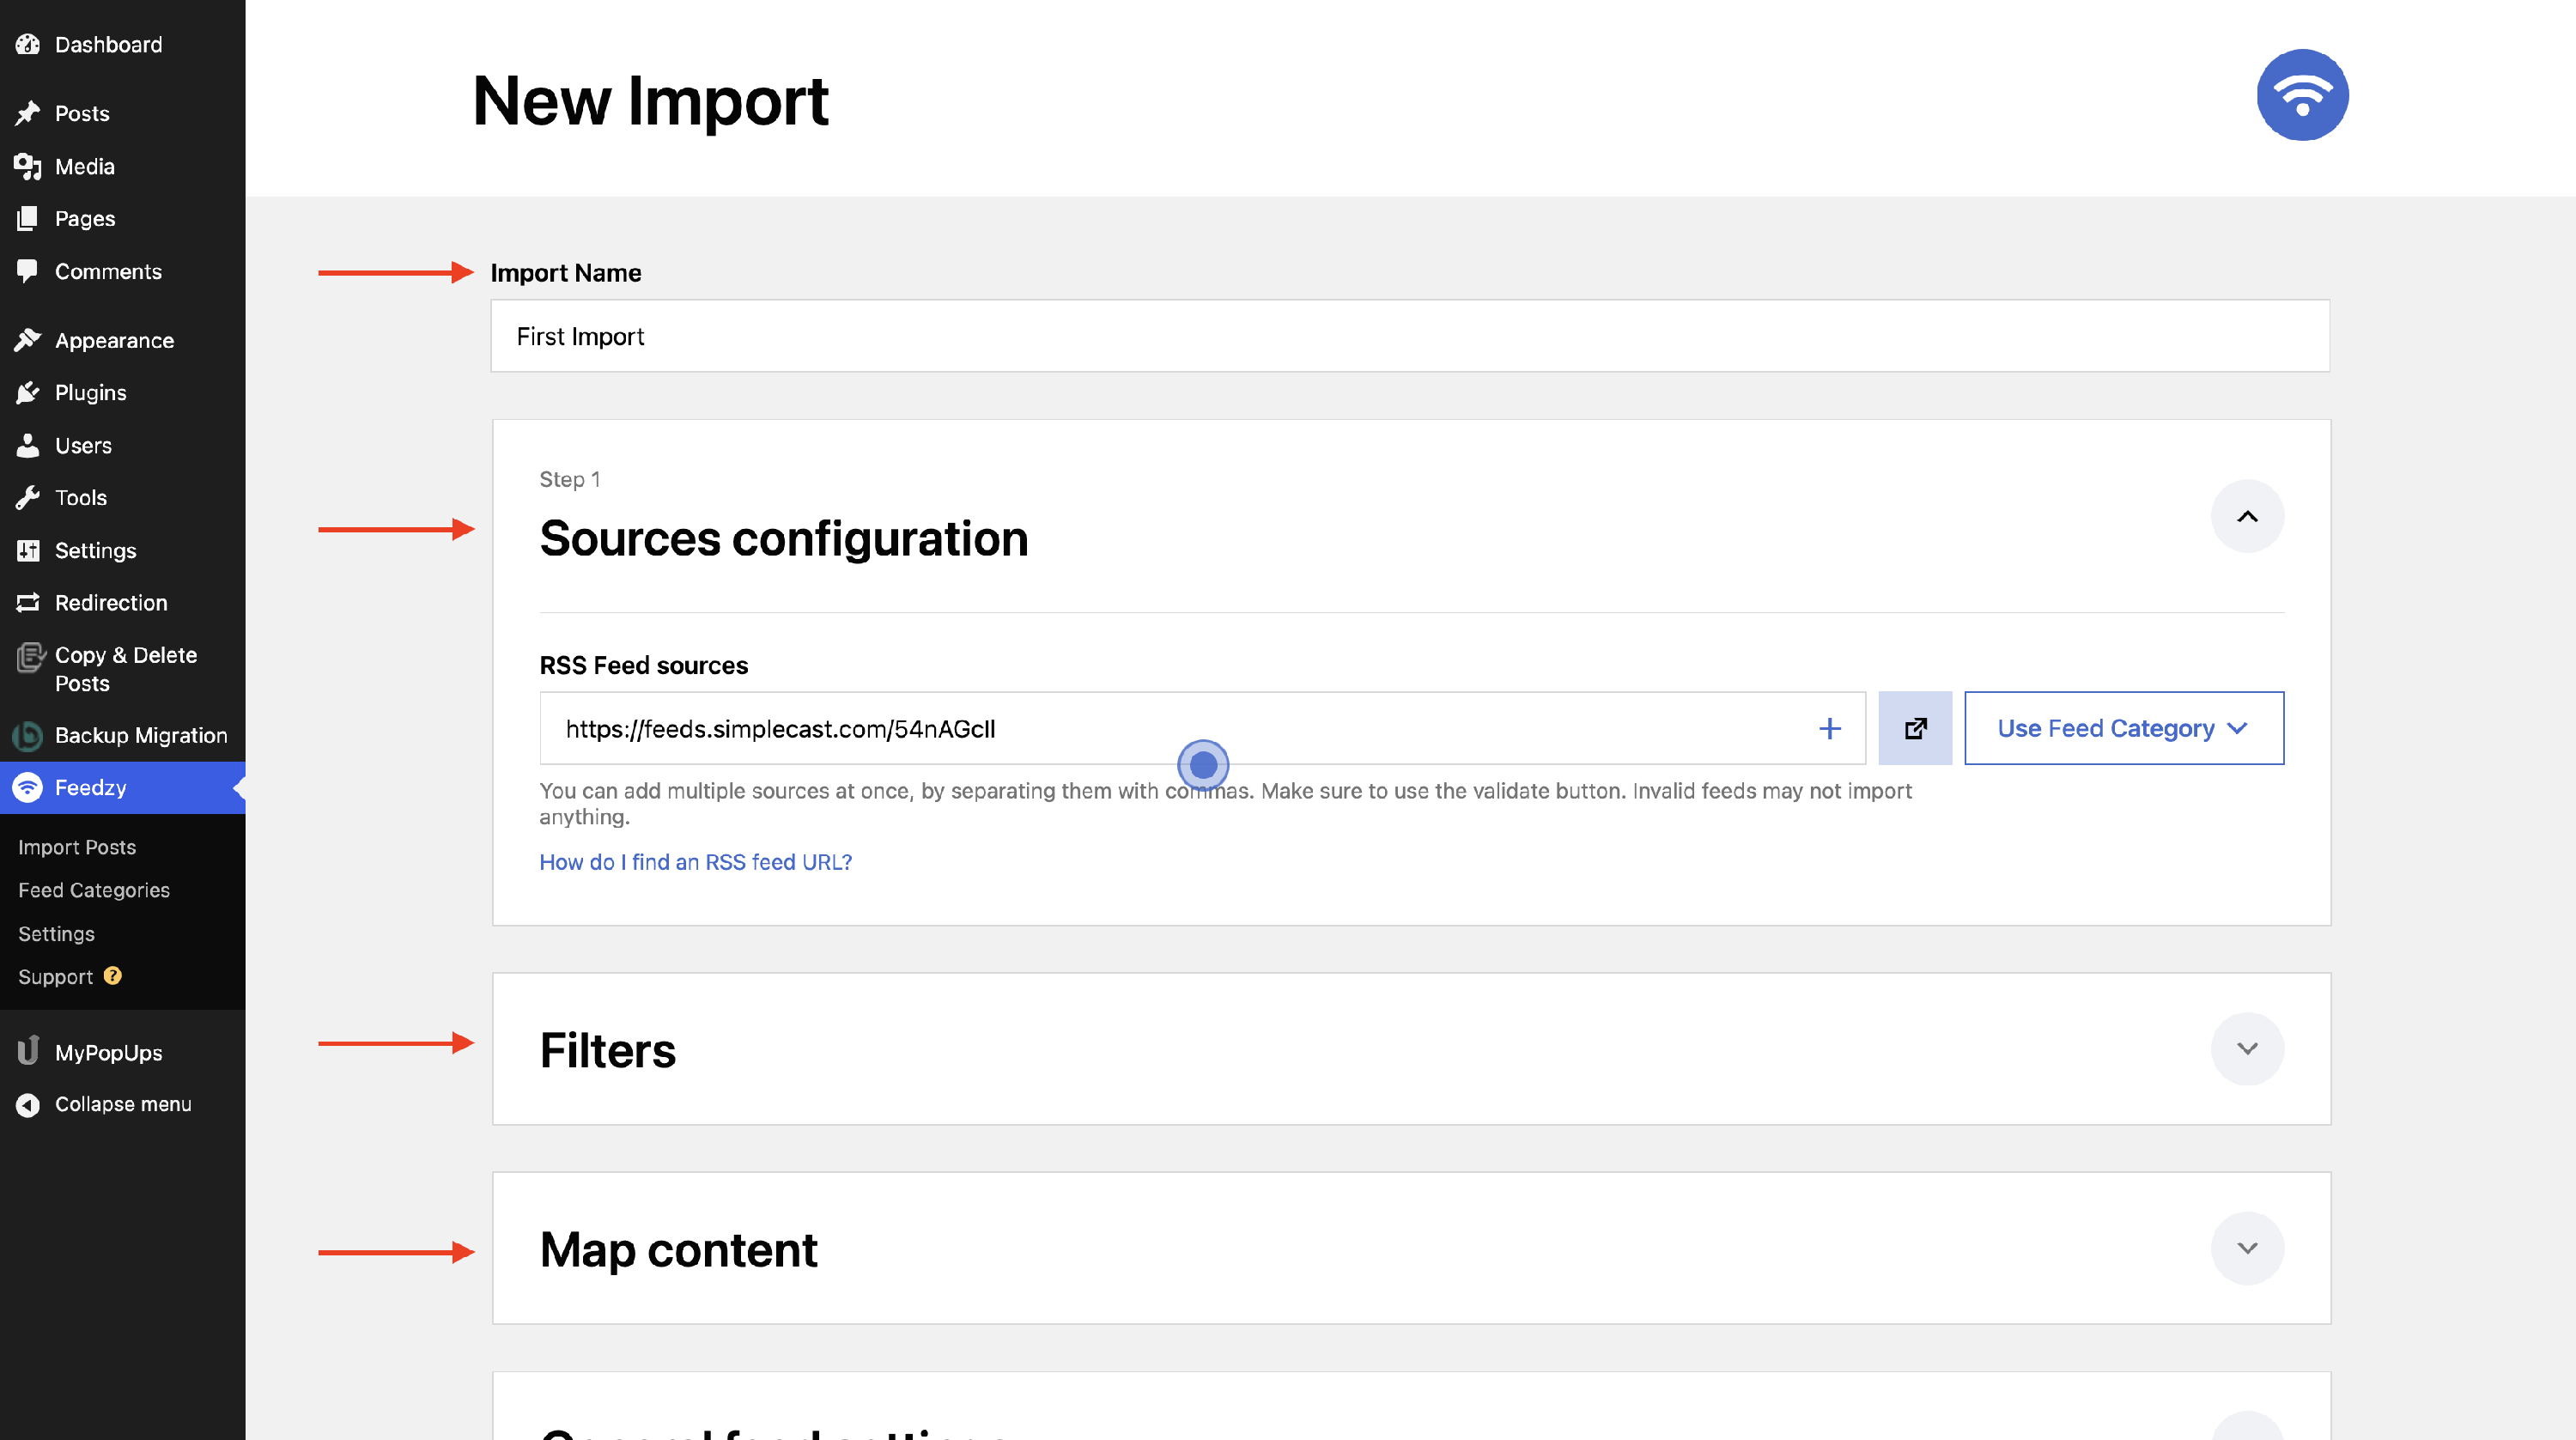
After clicking on New Import, many options will be available:
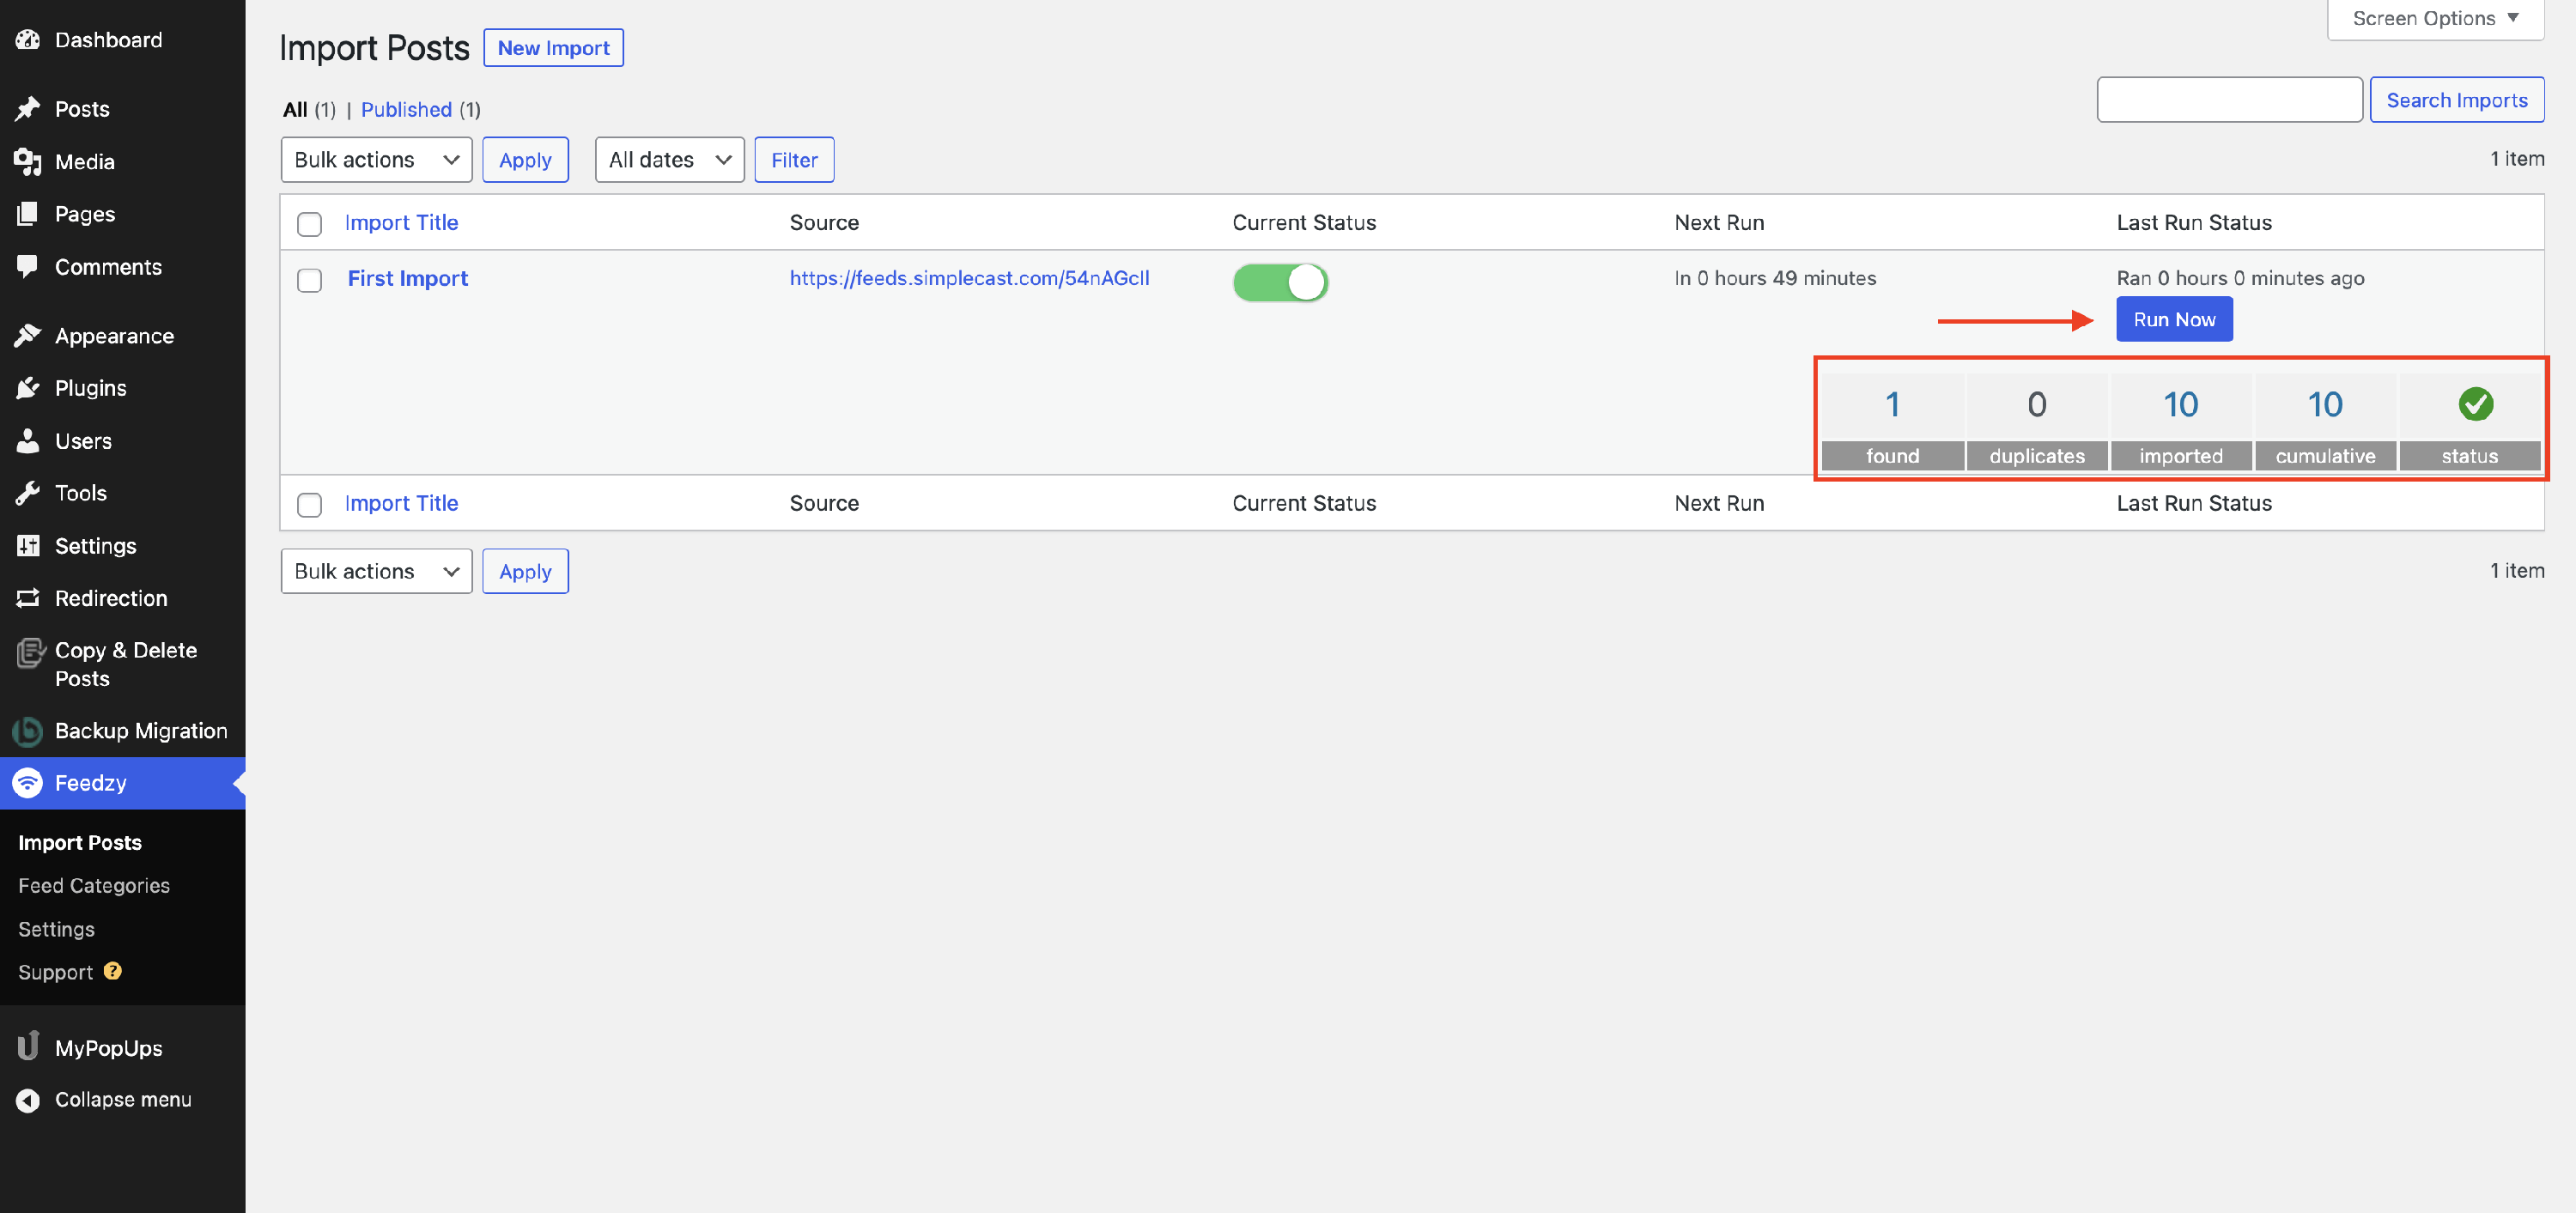
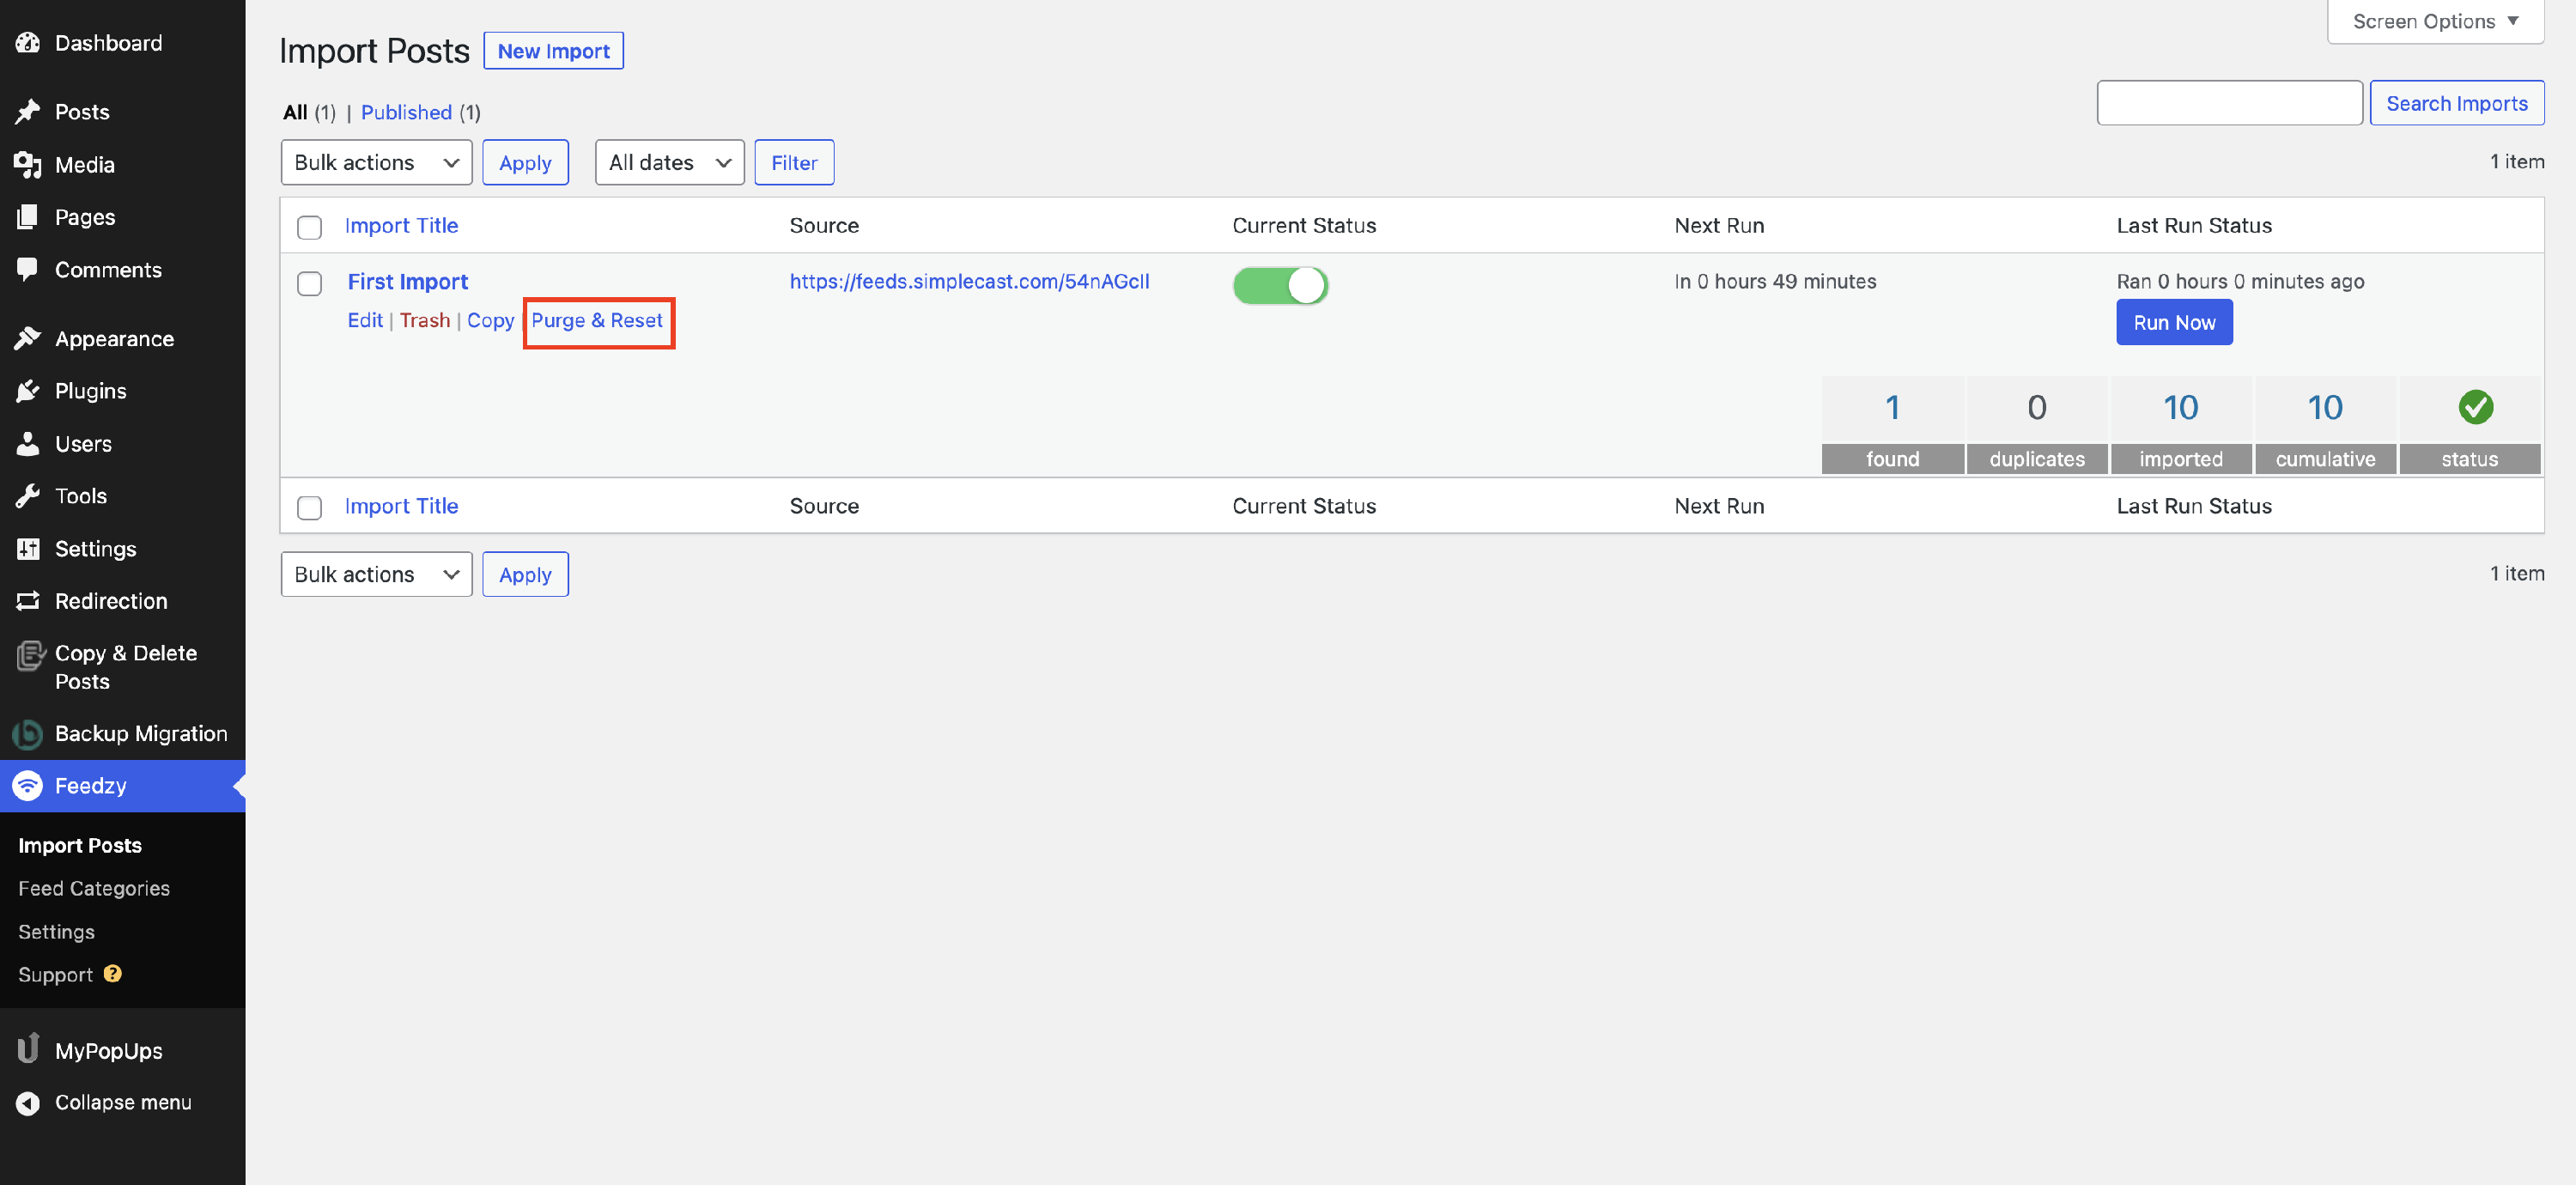
For each import job, after running, you can see the status of the import job in the following format:
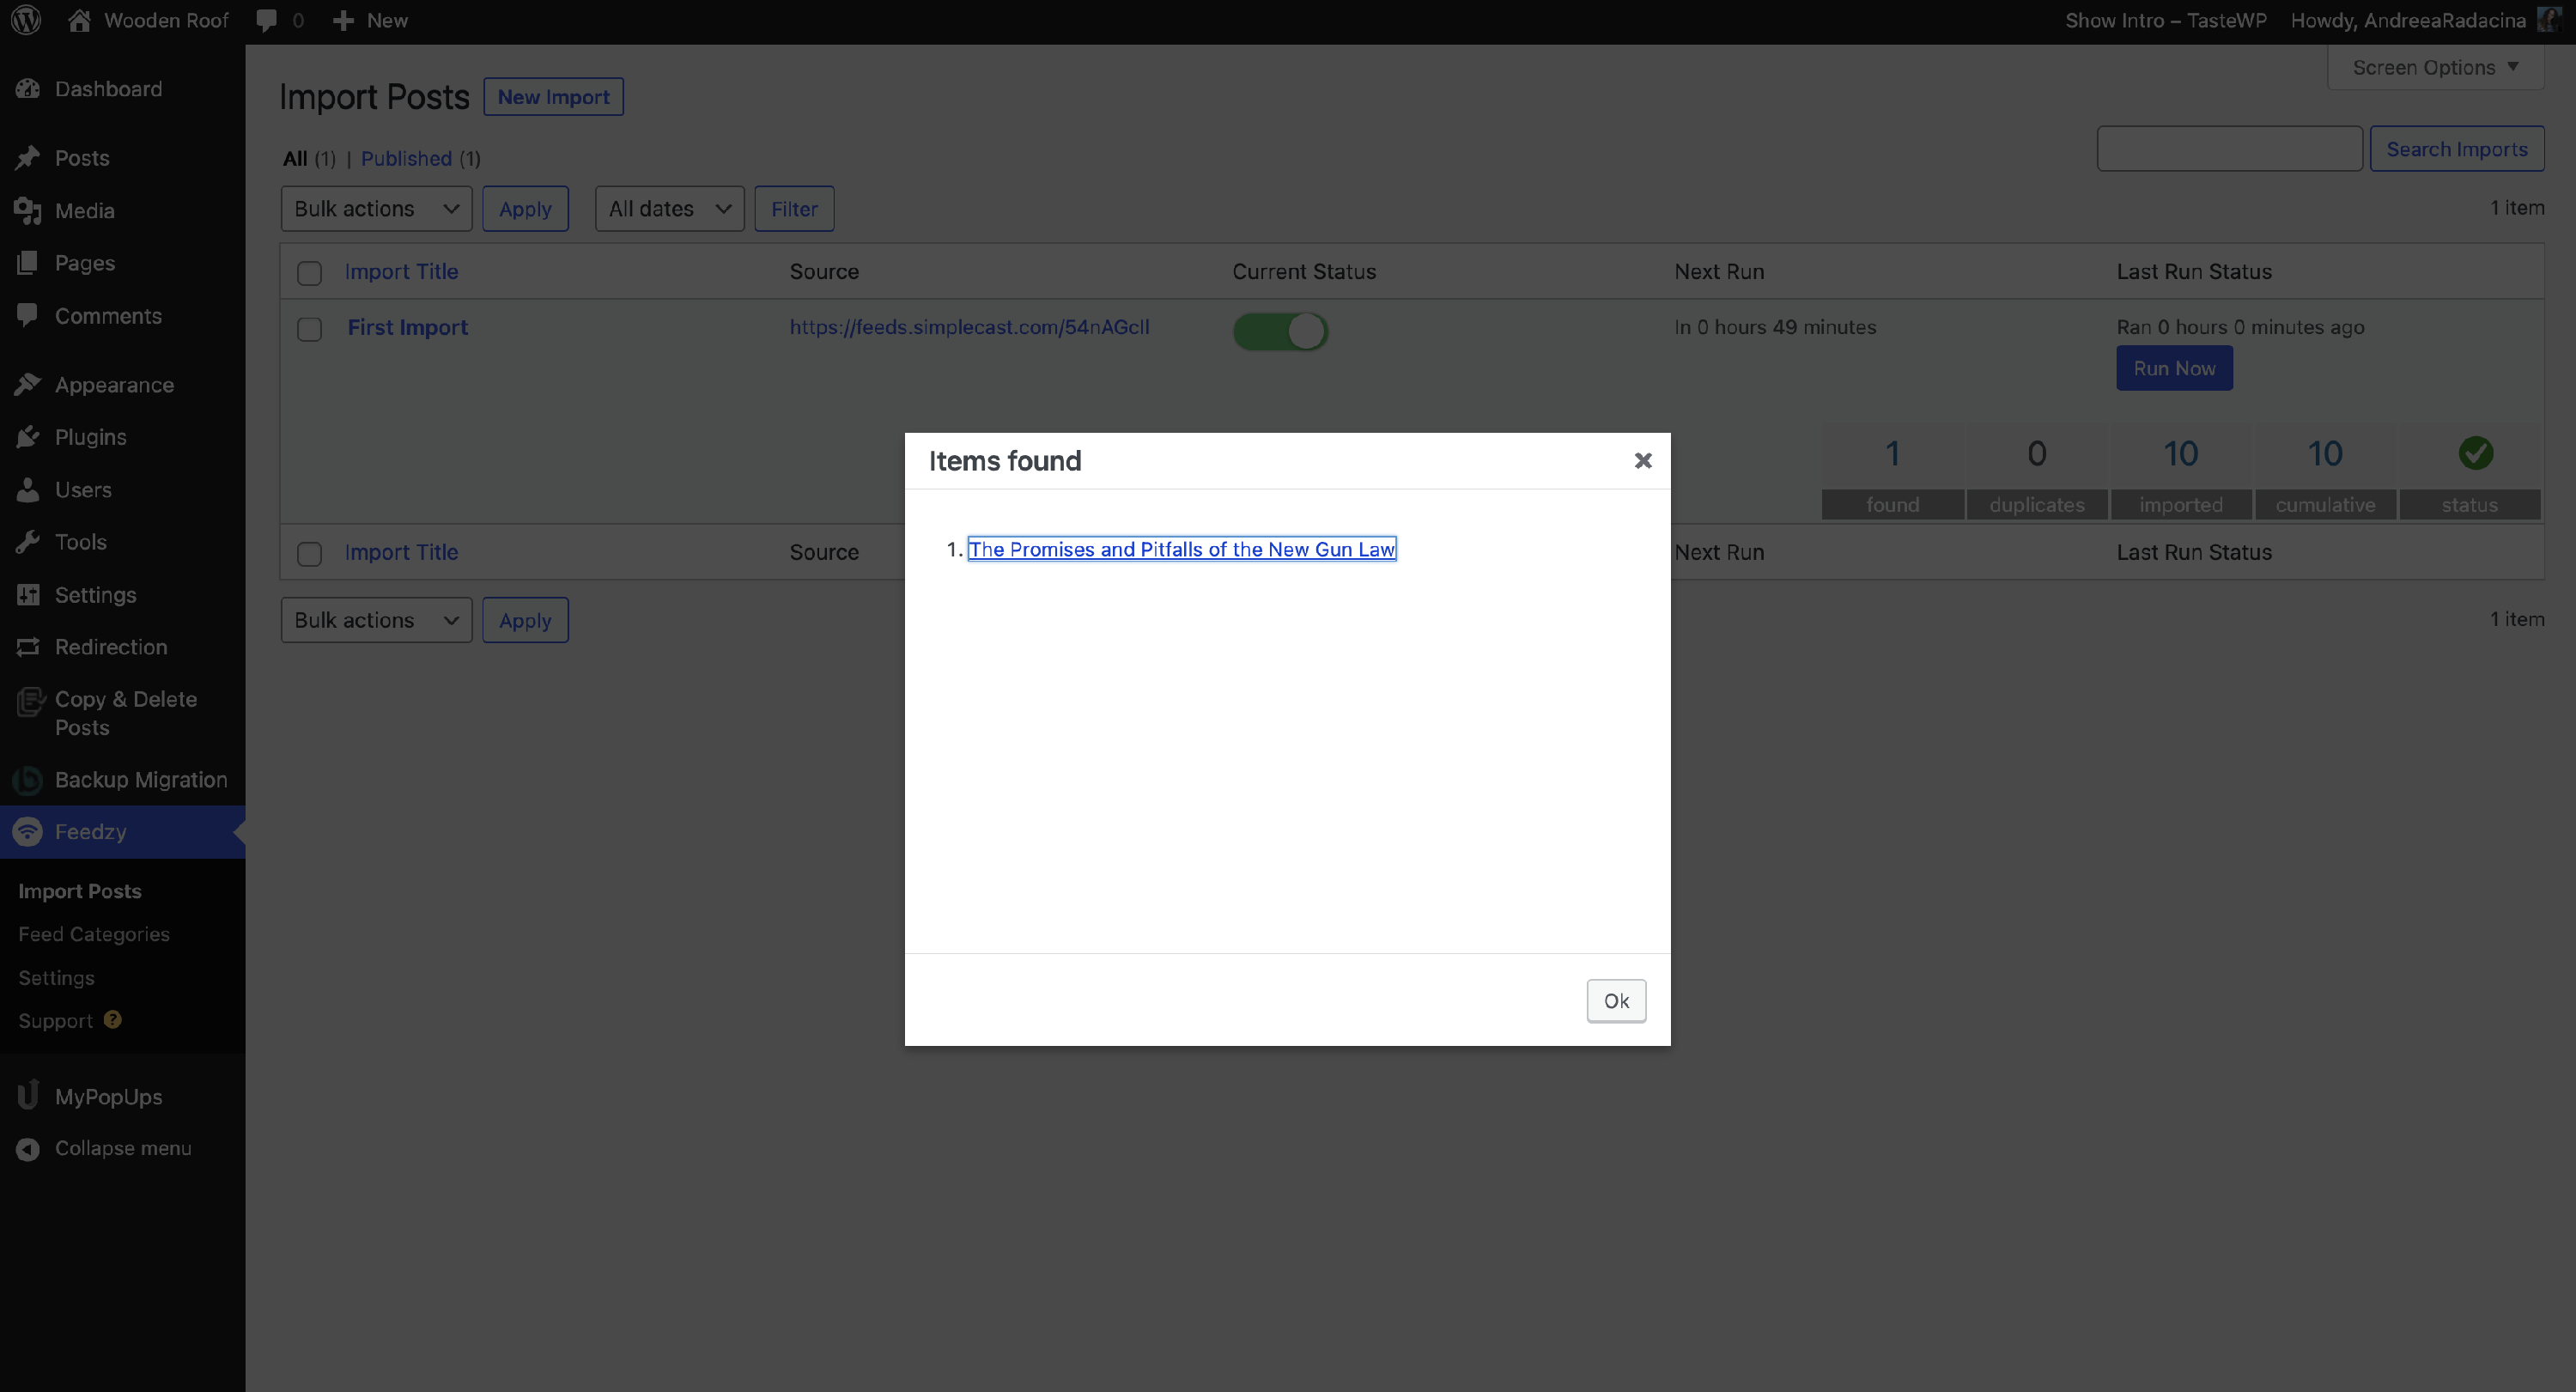
Then, you can click on any element to check the data contained.
- Found (an example here) - list of items found, available for import.
- Duplicates - the number of duplicated items found.
- Imported - the total number of items imported last time.
- Cumulative - the total number of items imported by this job since it's active.
- Status (example here) - working | error.
When a new import job is created and run, the items are imported and cached in the database so the same items cannot be imported again to prevent duplicates. Running the job again will not work the second time. For this case, you can use the Purge & Reset button, which, as its name suggests, will clear the cached data of the import job so items can be imported again using the same import job without creating a new one.
Other available options:
- enable/disable each task
- manually run it before the 60 minutes routine passed
- check how many posts were imported since the process was created
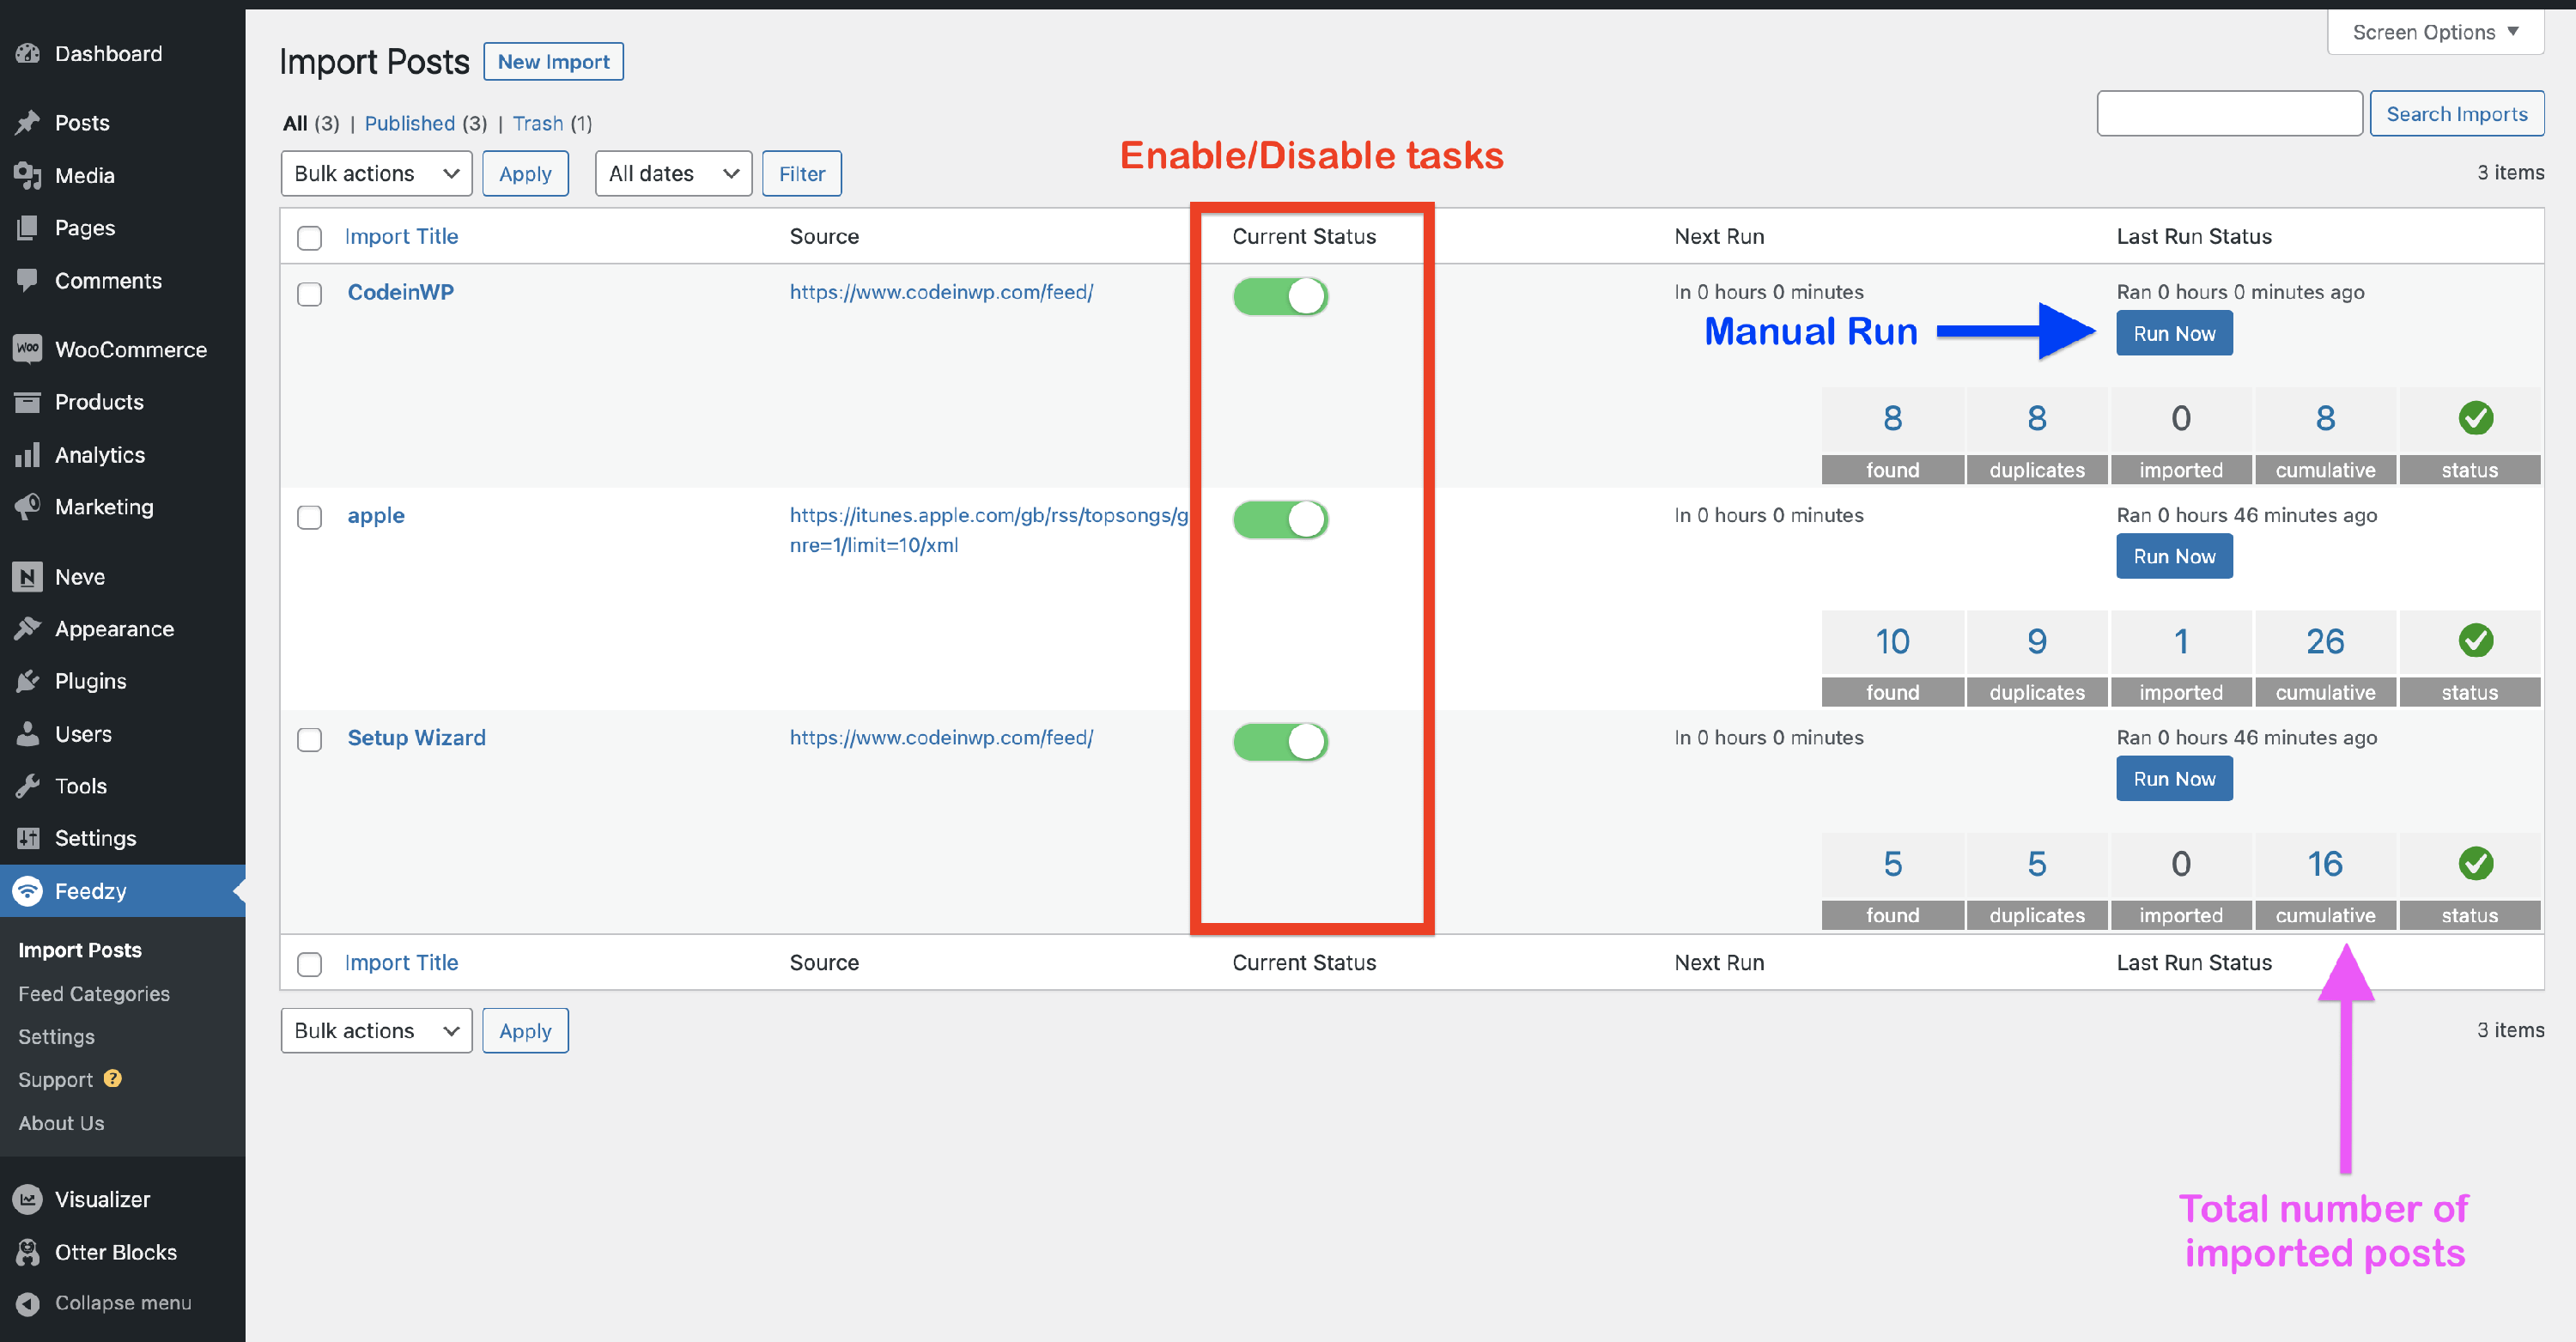
📝 Note: It is not recommended to run an import task before configuring the desired post structure in the third step of the wizard.
Deleting vs deactivating Feedzy
Deactivating Feedzy and deleting (uninstalling) Feedzy are not the same action, and the difference matters for your import jobs:
- Deactivate (Plugins > Installed Plugins > Deactivate) turns Feedzy off but keeps all your data, including your import jobs, feed groups, and settings. Use this when you are troubleshooting, pausing imports, or temporarily disabling the plugin.
- Delete (Plugins > Installed Plugins > Delete) removes the plugin files and runs its uninstall cleanup. Deleting Feedzy Pro permanently removes your saved import jobs and feed groups from the database.
❗ Data loss risk: Deleting Feedzy Pro permanently erases your import jobs and feed groups. This cannot be undone, and reinstalling the plugin will not bring them back. If you only need to pause imports or test for a plugin conflict, deactivate Feedzy instead of deleting it, and always back up your site and database before deleting.
If your import jobs disappeared and you did not change them, check whether Feedzy Pro was deleted (uninstalled) rather than updated or deactivated. A plugin update does not remove your import jobs. To recover jobs lost after deleting the plugin, restore your site or database from a backup taken before the plugin was deleted — reinstalling Feedzy alone does not recreate them.
📝 Note: This is different from the Purge & Reset button described above, which only clears an individual import job's cached and duplicate-tracking data so its items can be imported again. Purge & Reset does not delete the import job itself.
Create and edit import jobs
To create a new import job, navigate to Dashboard > Feedzy > Import Posts and click on Add New. Each step of the wizard can be gradually opened by clicking on the 🔽 icon.
Sources configuration
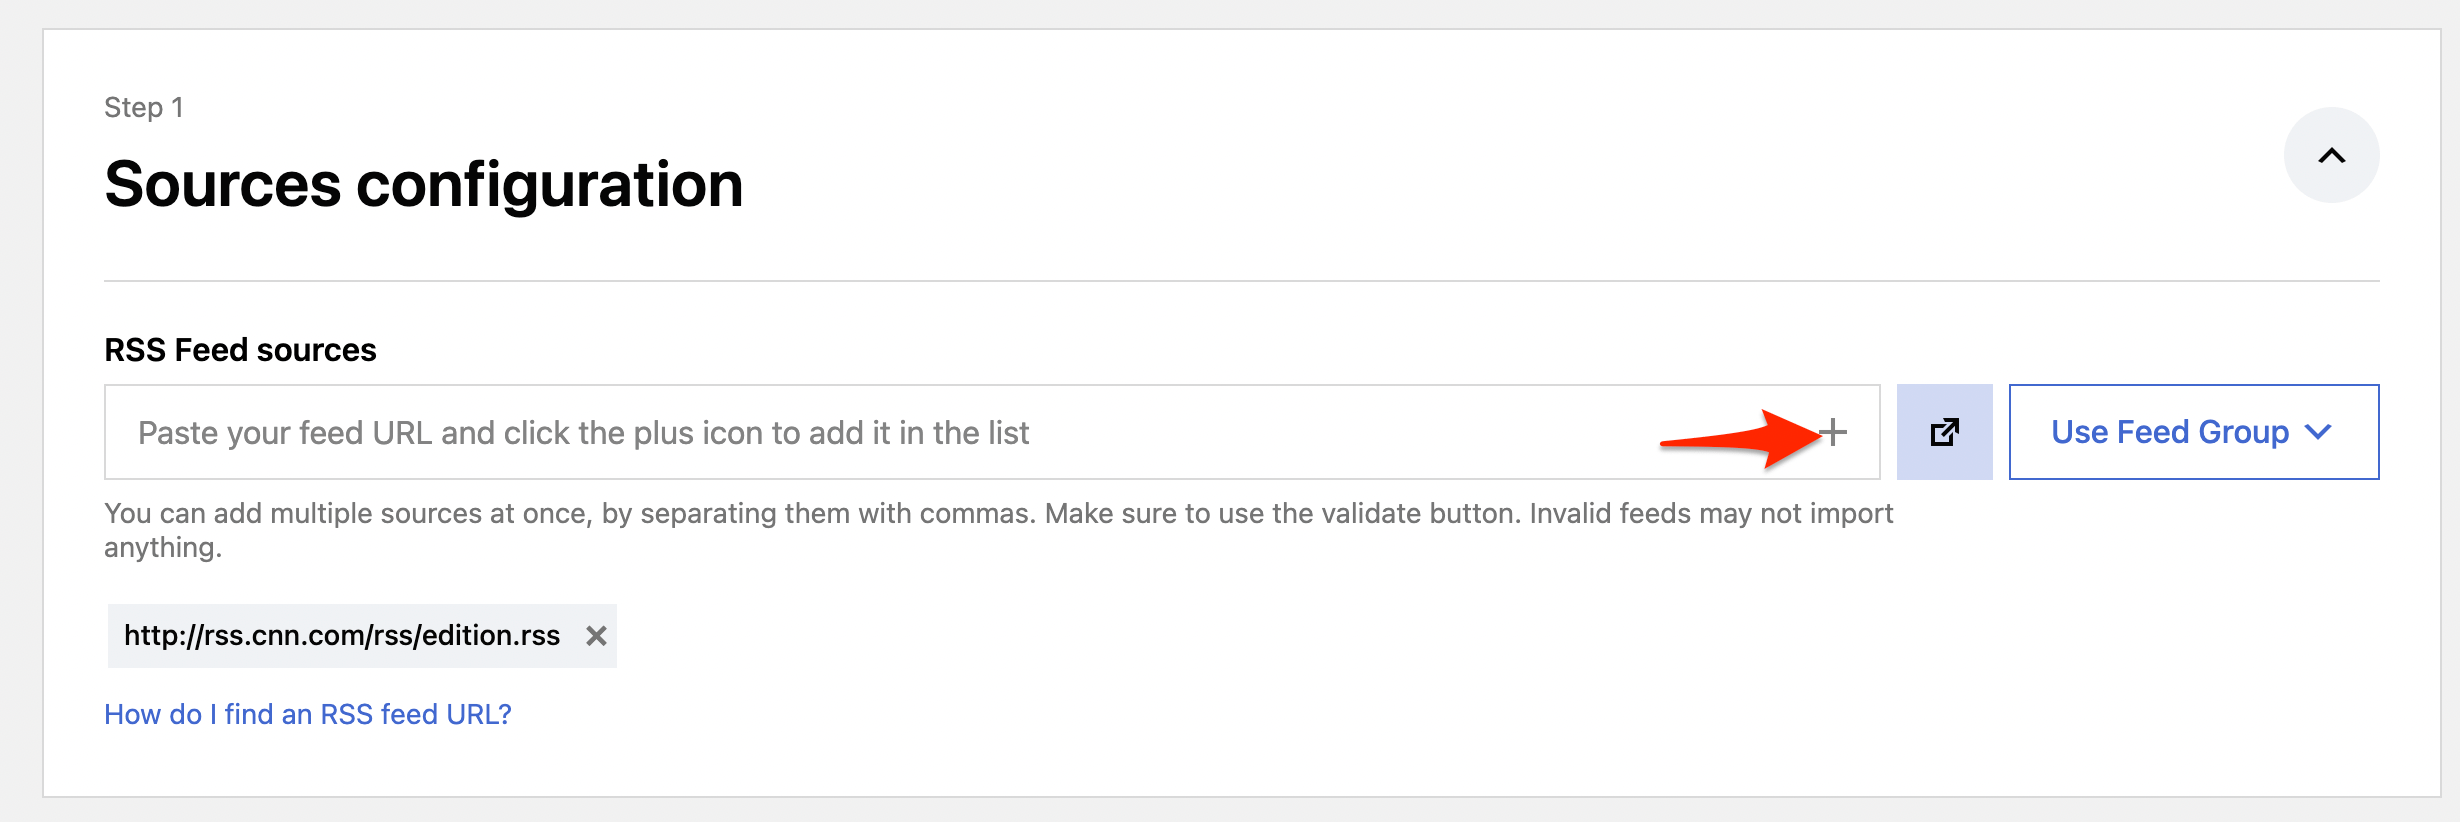
Sources
Here you should paste the URL(s) of the feed you want to use as a source, then click on the ➕ button to add it to the list. You can also test if the source is valid and create/use a Feed Group.
📝Note: If you'd like to use a password-protected feed, you can pass the authentication credentials as parameters in the URL, an example below.
- source: https://www.digitaltrends.com/home/feed/
- authentication parameters: https://myusername:mypassword@www.digitaltrends.com/home/feed/
Filters
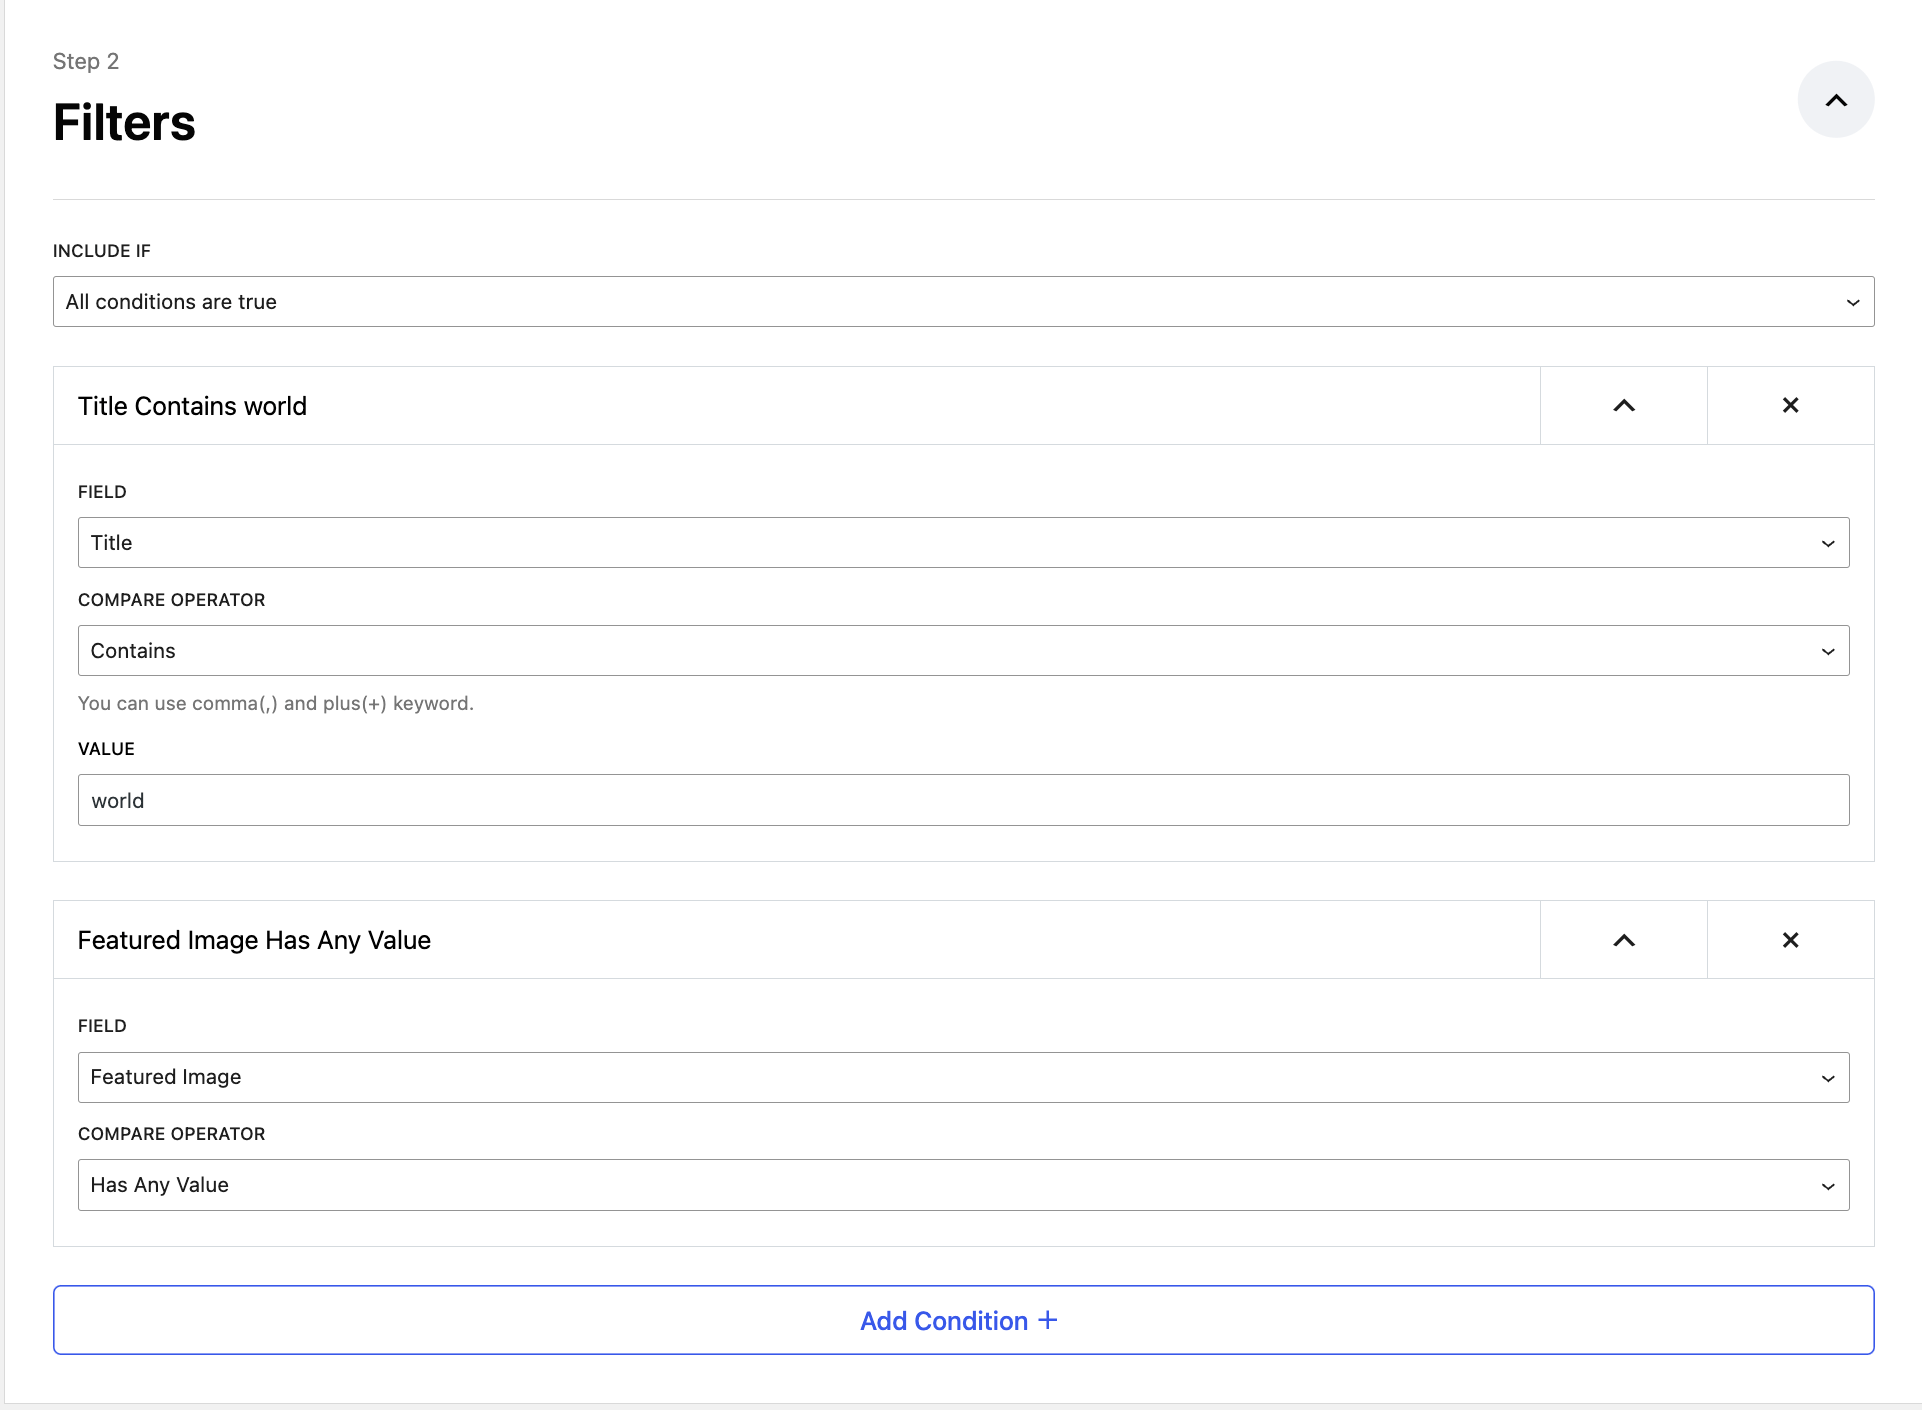
Filters
Posts can now be filtered using flexible conditions. All the fields in the updated filter interface are explained below:
- Include If - Define conditions for including posts in the import process. You can choose:
- All Conditions Are True - Includes posts that satisfy all defined conditions.
- Any Condition Is True - Includes posts that satisfy at least one condition.
- Filter by Field - You can apply filters based on the following fields:
- Title - Filter posts containing specific keywords or phrases.
- Description - Import posts based on keywords within the description.
- Author - Filter posts authored by specific individuals.
- Featured Image - Set conditions to include posts based on the presence or absence of a featured image (or even targeting something more specific)
- Date - Filter posts by their publication date.
- Comparison Operators - Select how you want to compare the field's value:
- Contains / Does Not Contain
- Equals / Not Equals
- Has Any Value / Is Empty
- Greater Than / Less Than
- Matches Regular Expression - Use regex to define complex patterns.
📝 Note: When using the "Matches Regular Expression" operator, ensure your regex is formatted correctly. For example, to match exact words like "word" in titles, use \bword\b .
For a detailed explanation and practical examples of using regular expressions in Feedzy filters, please refer to this guide: Regular Expression Filtering Guide
Map content
This wizard step is divided into General and Advanced options. It is used for magic-tag-based customization of imported posts. Pro-only options and tags are marked with a PRO label, so you can quickly identify which controls require a Pro plan.
General
Map Content
Post Type - the feed items that you import can be imported as posts, pages, etc. However, you can only choose one type. If you need more, create another import task with the same settings except for this one. Depending on the post type that you choose, the imported items will be found in their dedicated panels (e.g., imported posts can be found in Dashboard > Posts, not in Dashboard > Feedzy > Import Posts).
Post Taxonomy - like any post in WordPress, the imported posts can be assigned to a certain category (or categories). Of course, you can manually change that after the import. This field is for automatically assigning a certain category to the posts that will be imported, but you can also retrieve the original source's categories and import them as WordPress categories. Feedzy PRO also supports automatic tagging (dynamically assigning different categories to each post based on the feed source or keywords) — read more in the Dynamic Post Taxonomy section.
Post Status - the new posts can be automatically published, or you can set them to draft so you can check and manually publish them.
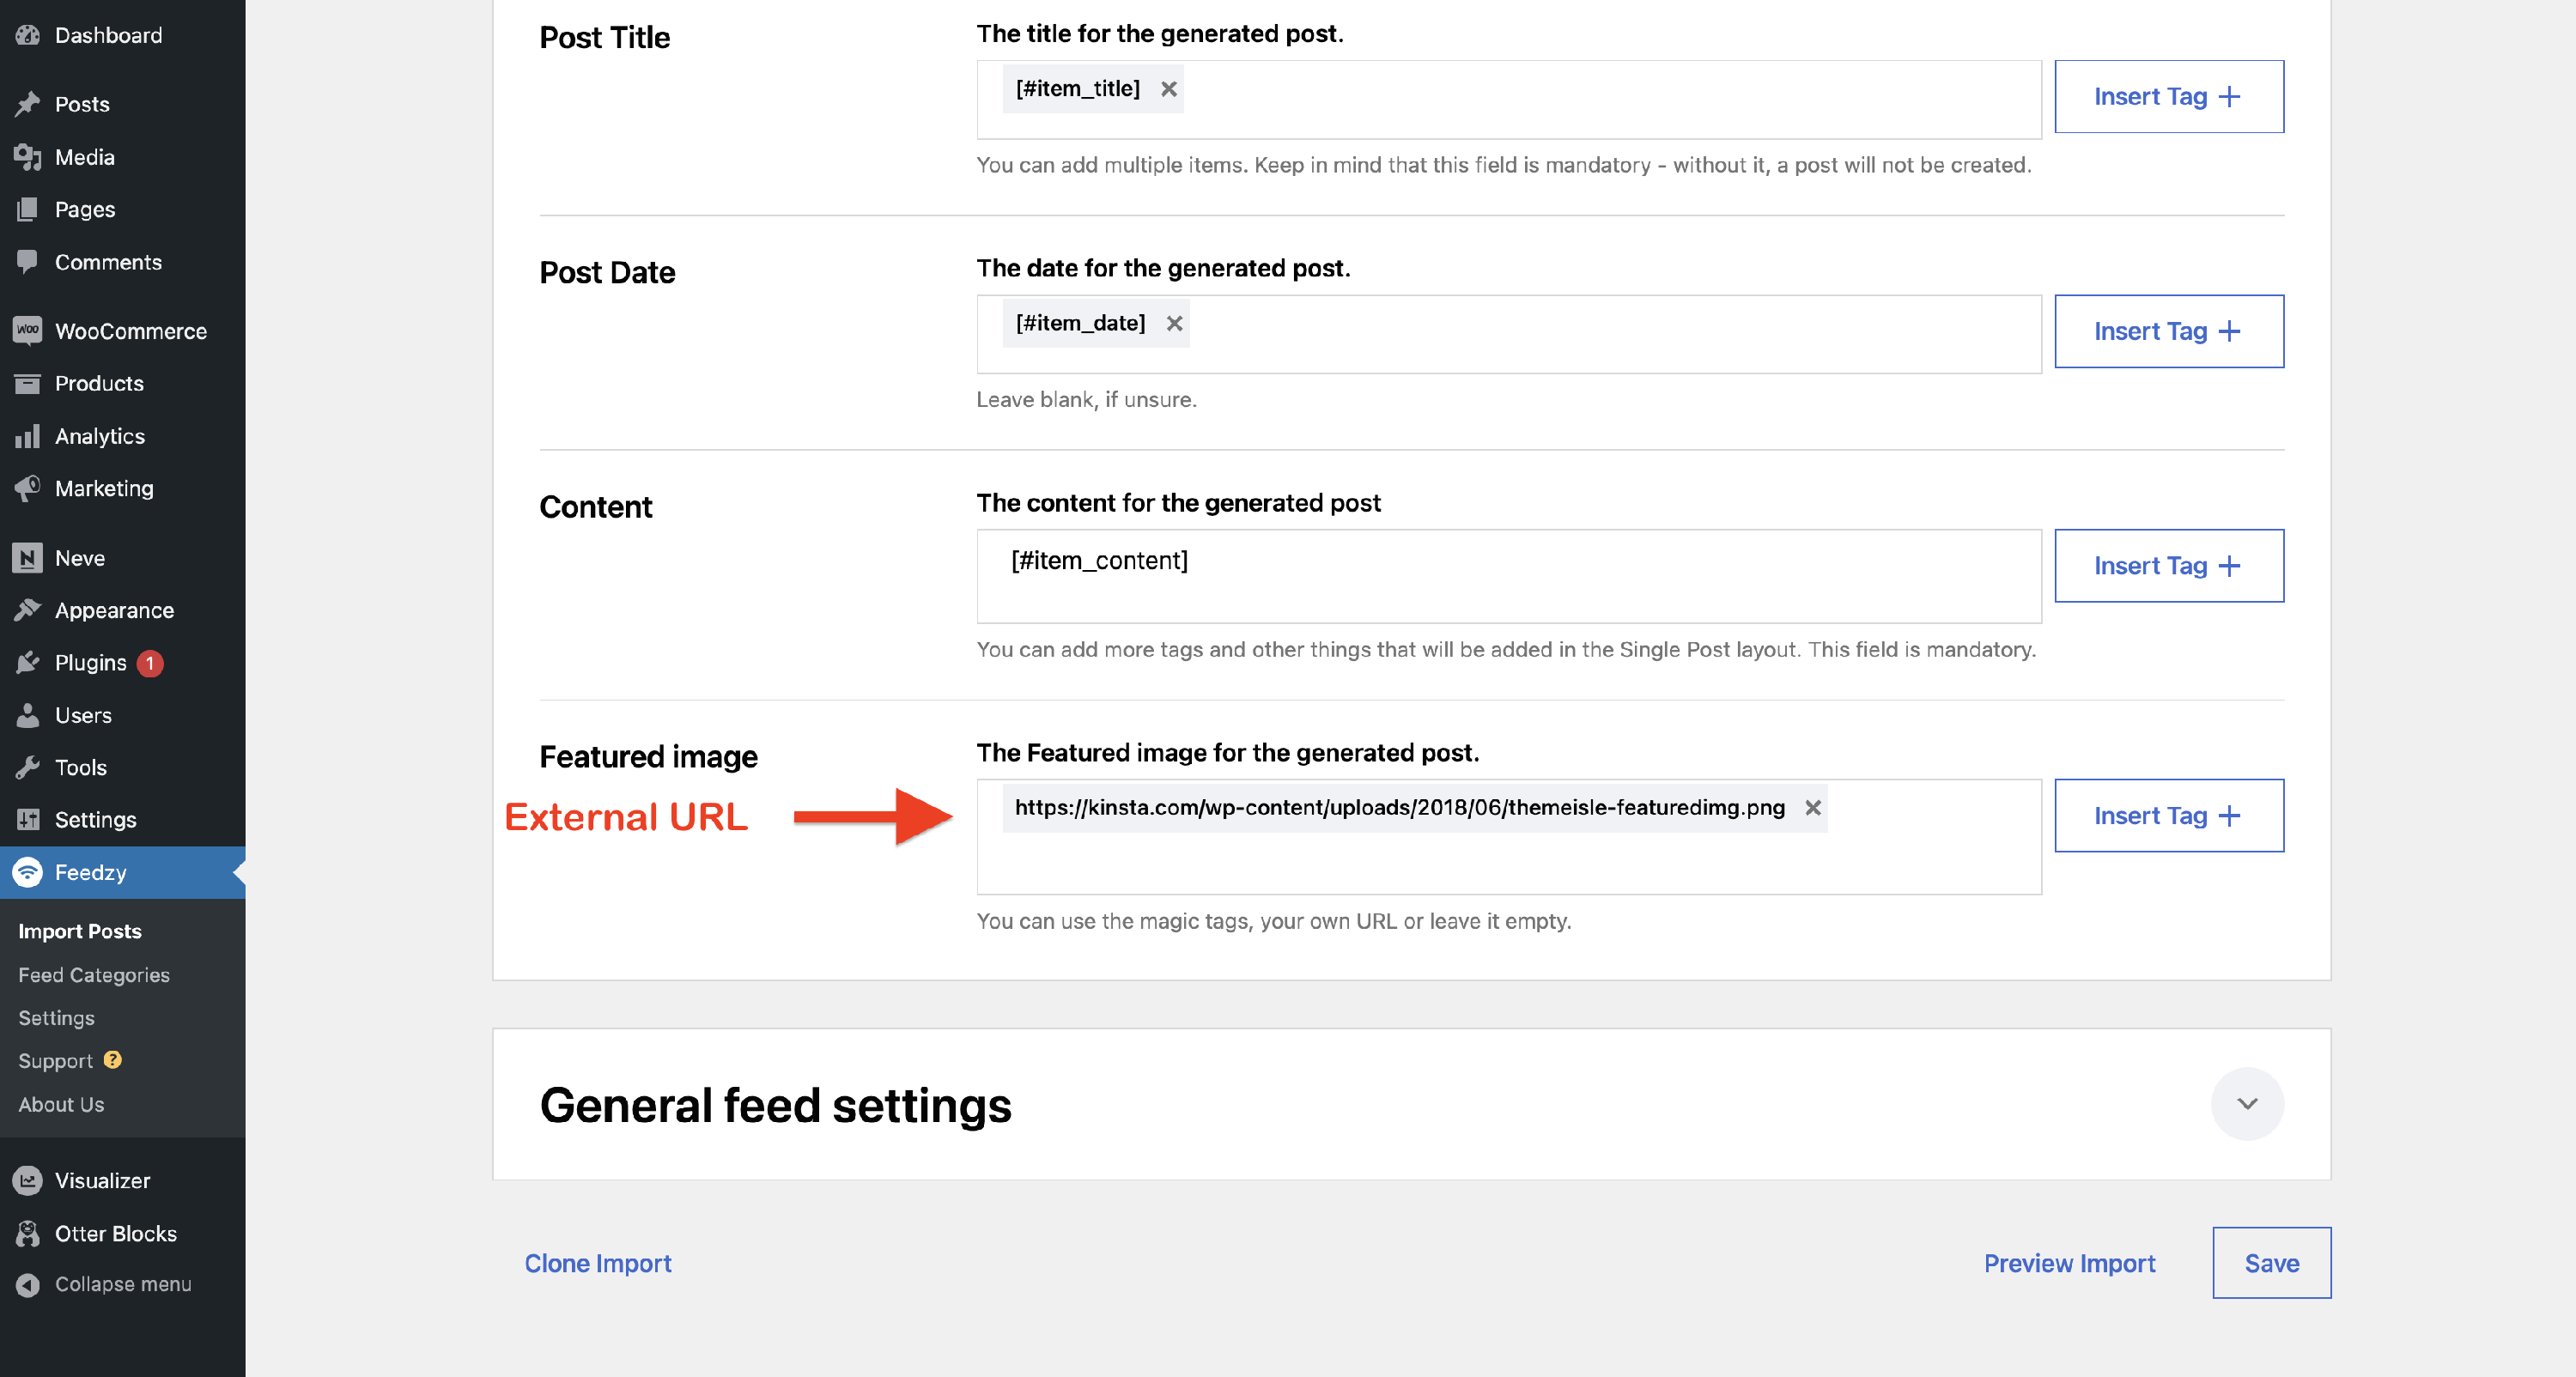
Post Title - choose magic tags to be assigned as the post title. You can add one or more than one using the Insert Tag button, such as [#item_title], [#item_author], [#item_date], [#item_date_local], [#item_date_feed], [#item_source], [#title_feedzy_rewrite], [#title_spinnerchief], [#title_wordai], [#translated_title]. Read more about the available tag actions in this chapter.
Post Date - [#post_date ] is the date when the post was imported to your site, whereas [#item_date] is when the source article was published on the remote website.
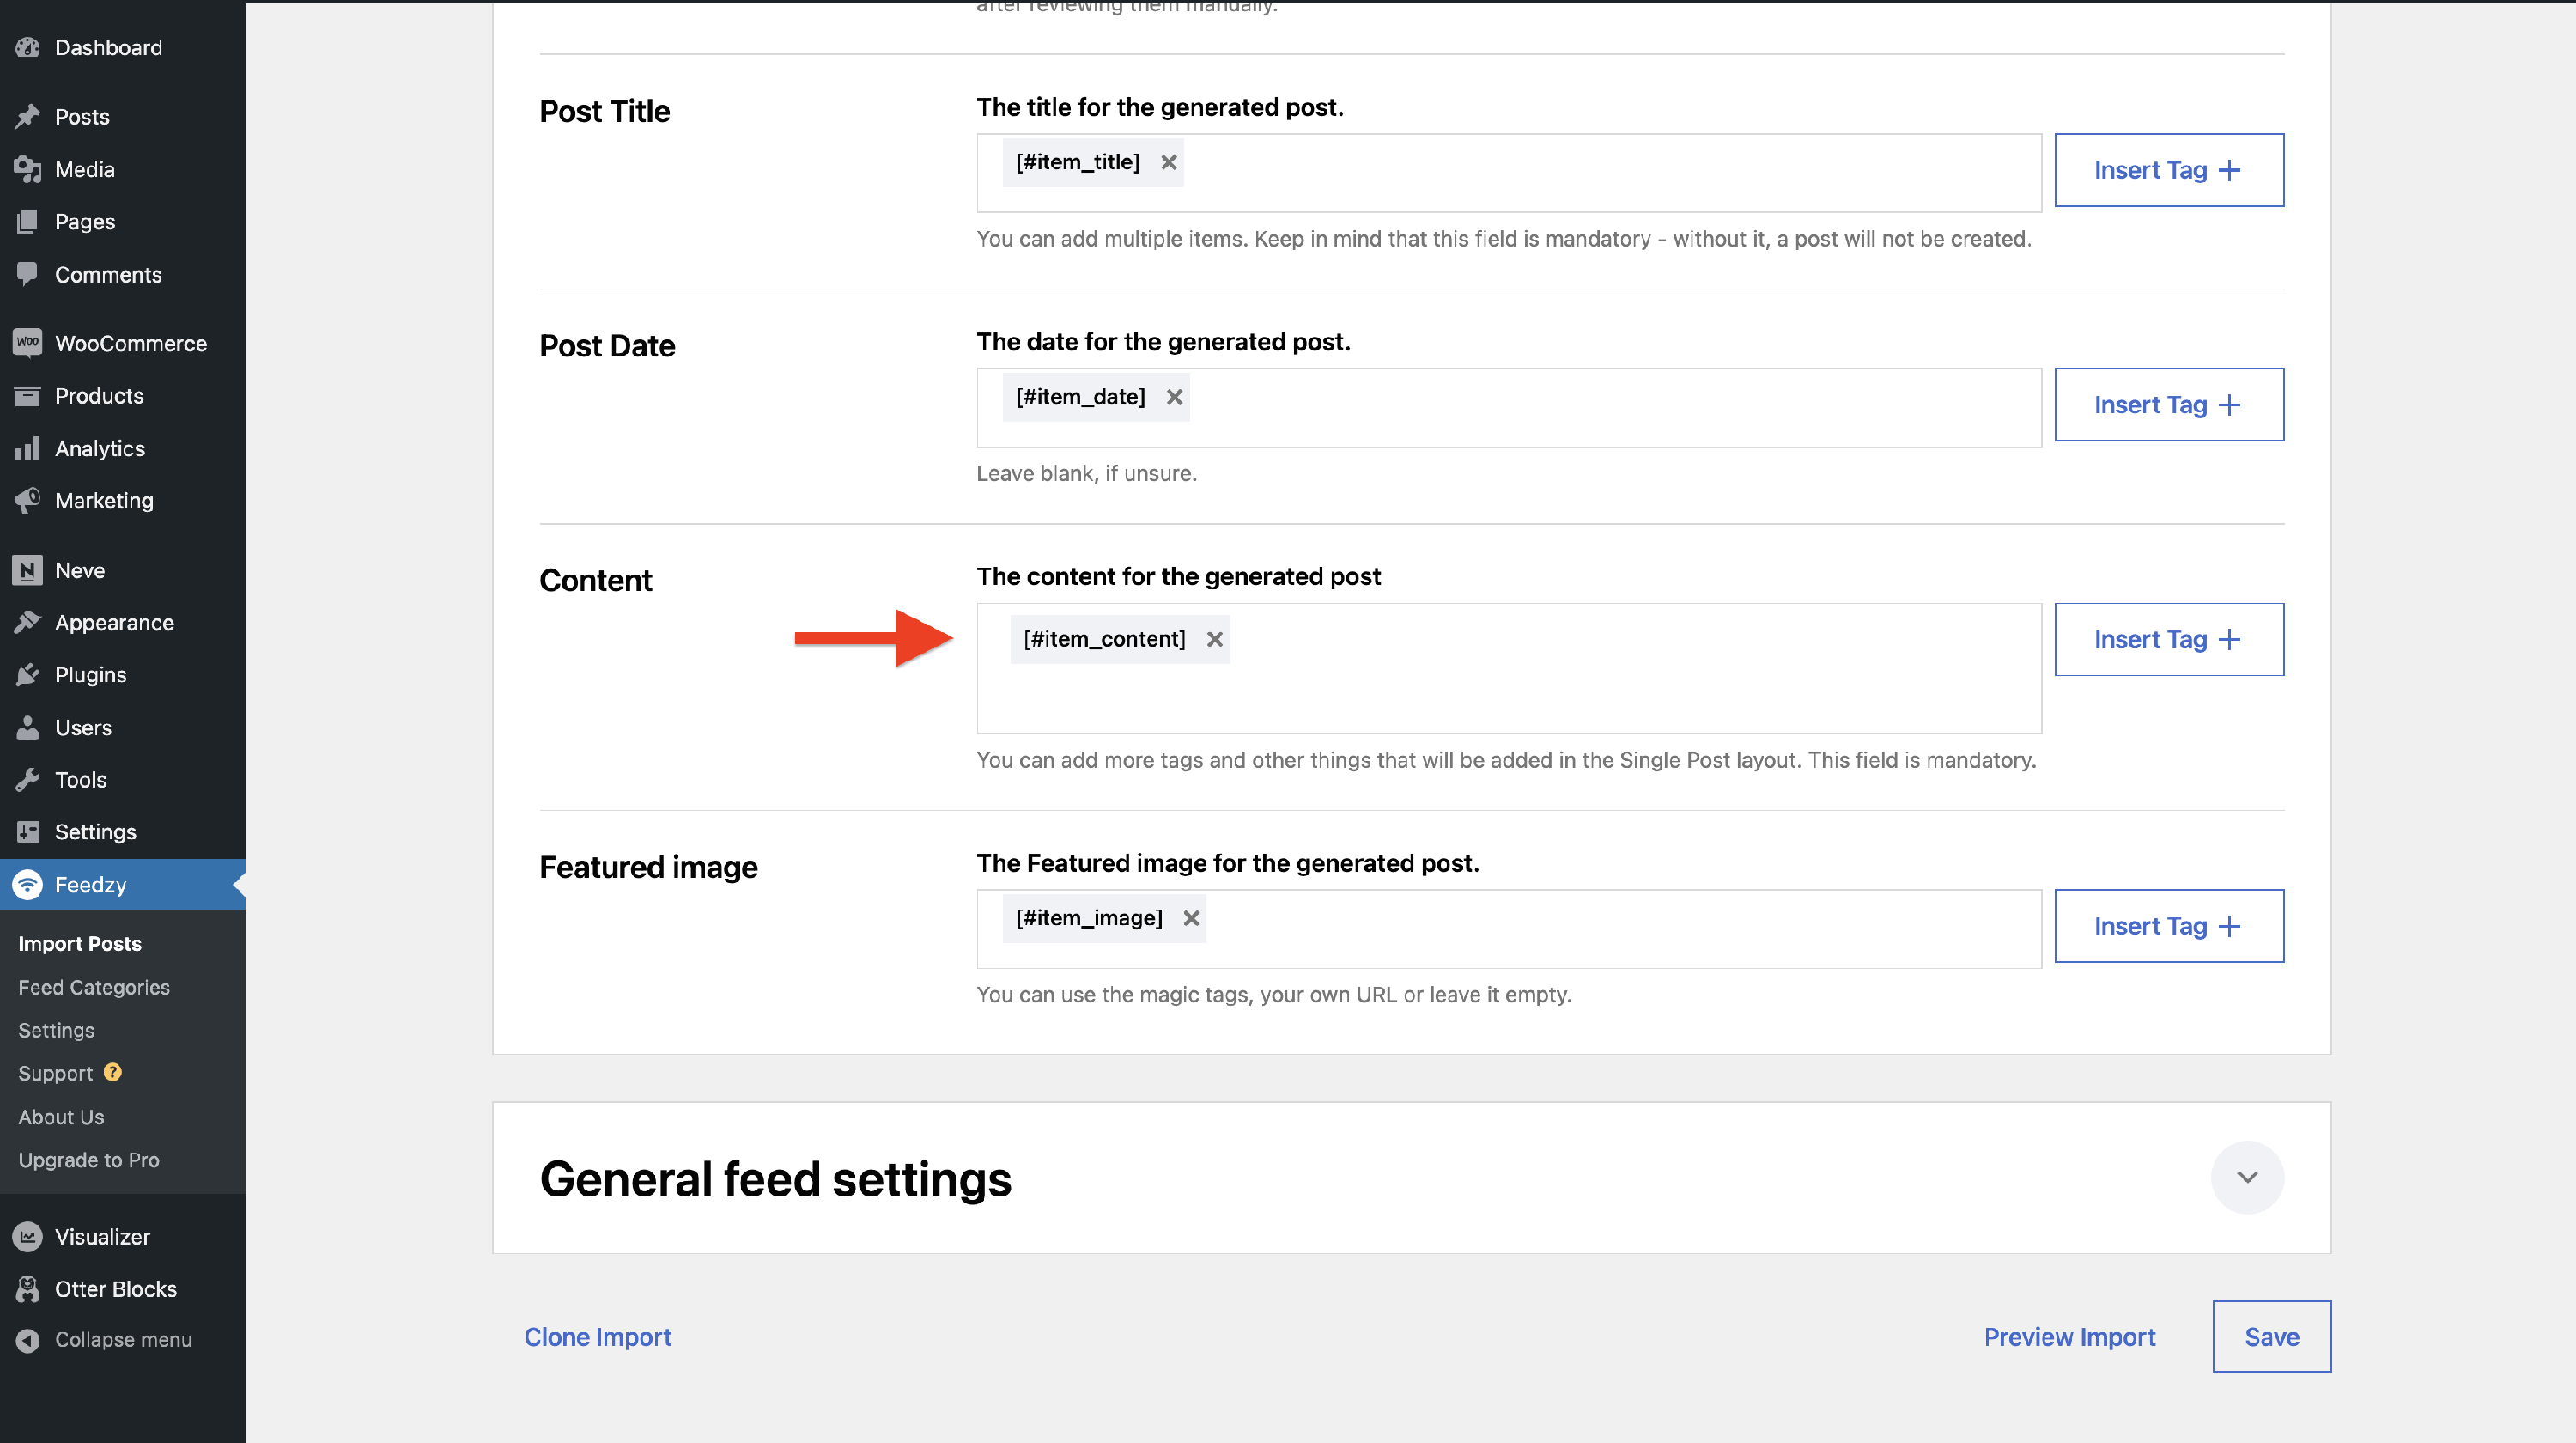
Content - this is the structure of the post content. You can add one or more than one tag using the Insert Tag button: [#item_content], [#item_description], [#item_image], [#item_url], [#item_categories], [#item_source], [#item_full_content]. You can also use the Spintax service here. Read more about the available tag actions in this chapter.
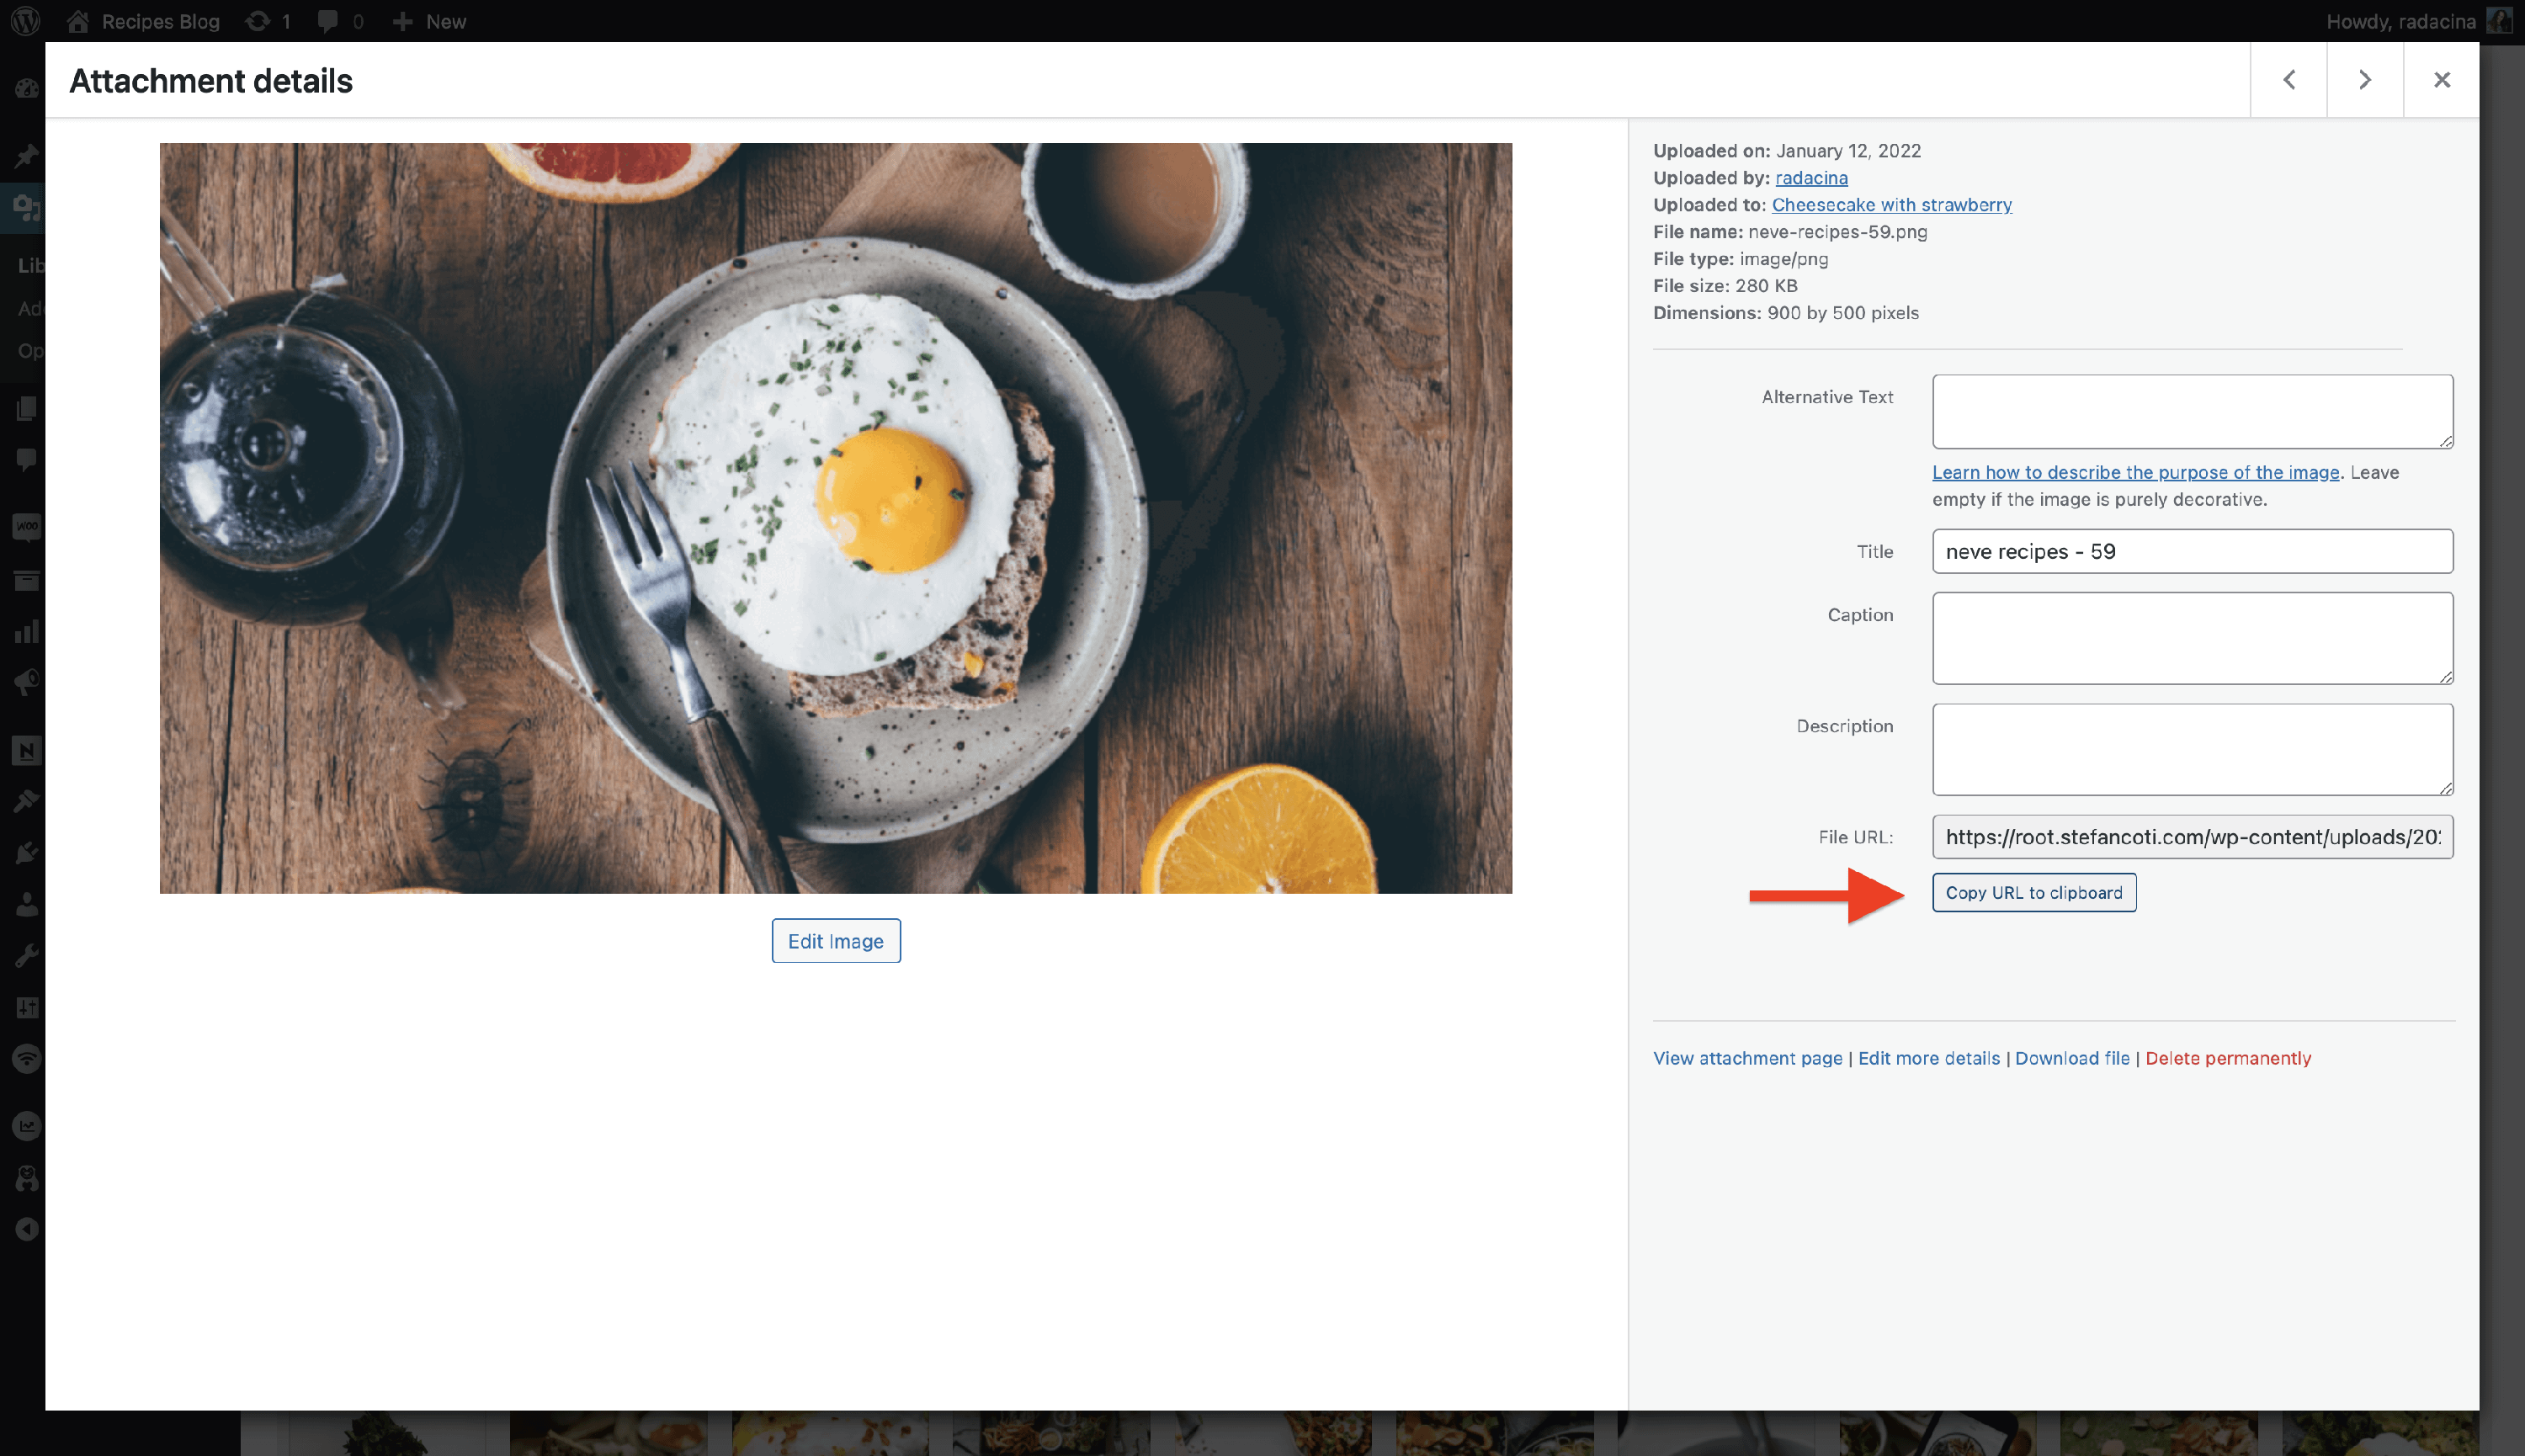
Featured image - if you want the featured image to be imported, use the magic tag to fill in this field; otherwise, leave it empty. You can also assign the same image for all of them by adding a URL in this field (In this case, we recommend using URL of an external image or the image URL from your website's Media Library ).
📝 Note: There are cases when the feed items don't have a featured image. For such cases, you can use the fallback featured image.
Advanced Options
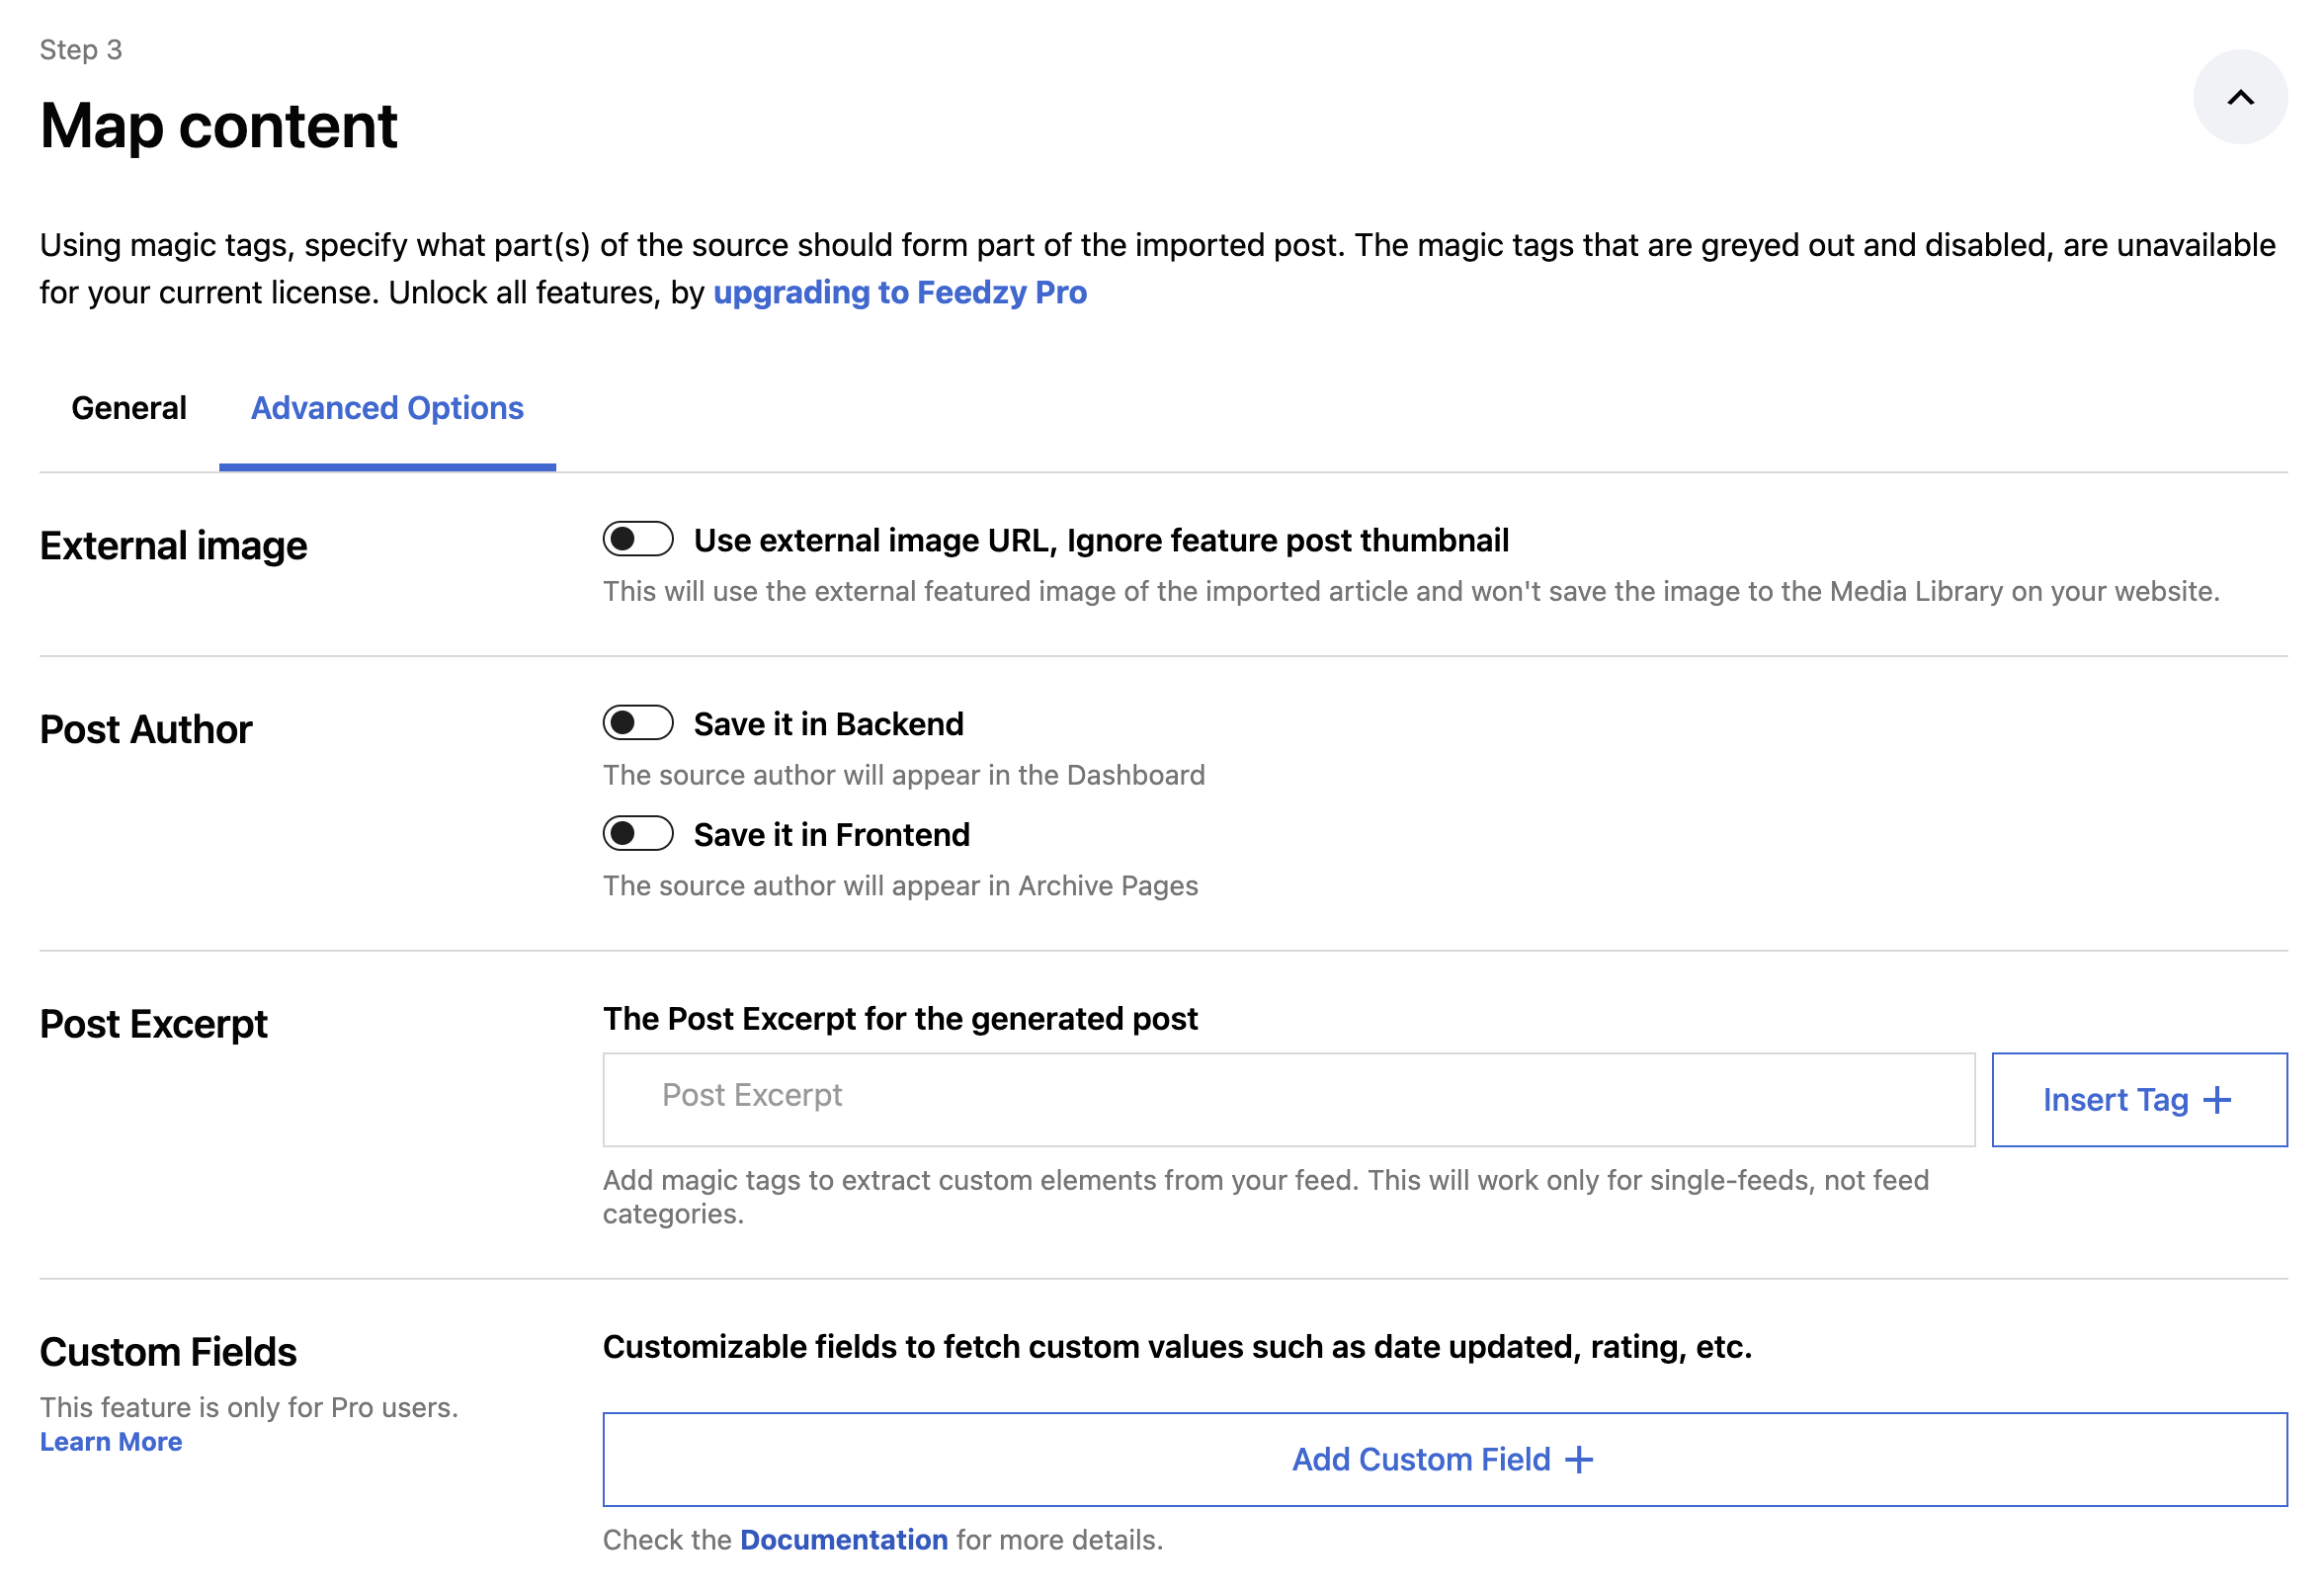
External image - by using the external image that the post has on the remote website, the featured image of the imported article won't be saved to the Media Library on your website anymore. A default fallback featured image can be used for the feeds that don't have one. Once you finish configuring the import job, you can set the fallback featured image in Dashboard > Feedzy > Settings - click for image.
Post Author - inherit the source author to the imported posts in the front-end (Archive Pages) and in the back-end (in the Dashboard).
Post Excerpt - extract certain elements of the content to be displayed on the Archive Page using the available magic tags. Here you can insert the following tags: [#item_title], [#item_content], [#item_description], [#translated_title], [#translated_content], [#translated description]. If you opt for the translated elements, check this doc to learn how to use them.
Custom Fields - populating custom fields created with the ACF plugin is possible by using the Custom Fields option available in the import setup of Feedzy. Once the plugin is installed, create new fields, as in the following example. After that, the fields created can be used in the import setup.
📝 Note: The Custom Fields can be used to extract values from custom tags. Check this doc to learn more about this.
Watch a video on how to use Custom Fields with ACF: link
General feed settings

Auto-Delete - imported posts can be automatically deleted after a set number of days. In current versions of Feedzy Pro, the primary control for this is the global setting at Feedzy > Settings > Miscellaneous > Delete the posts created from all feeds, after a number of days. An Auto-Delete field may also be available inside an individual import job's General feed settings; when set, it takes priority over the global value for posts from that job only. To disable automatic deletion entirely, set both the global value and the per-import field to
0. See Automatic post deletion below for full details, including what to do if this setting appears to have disappeared after a plugin update.Delete Attached Featured Image - a separate but connected setting that ensures featured images are also deleted along with posts, provided the image is not being used as a featured image in any other post. This setting works in conjunction with the Auto-Delete option, streamlining media management and saving storage space.
Remove Duplicates - the option to Remove Duplicates is helpful when multiple sources are added in the same import job and a particular post is available in different sources. During the import, Feedzy checks such duplicates; with this option enabled, only one post of that kind will be imported.
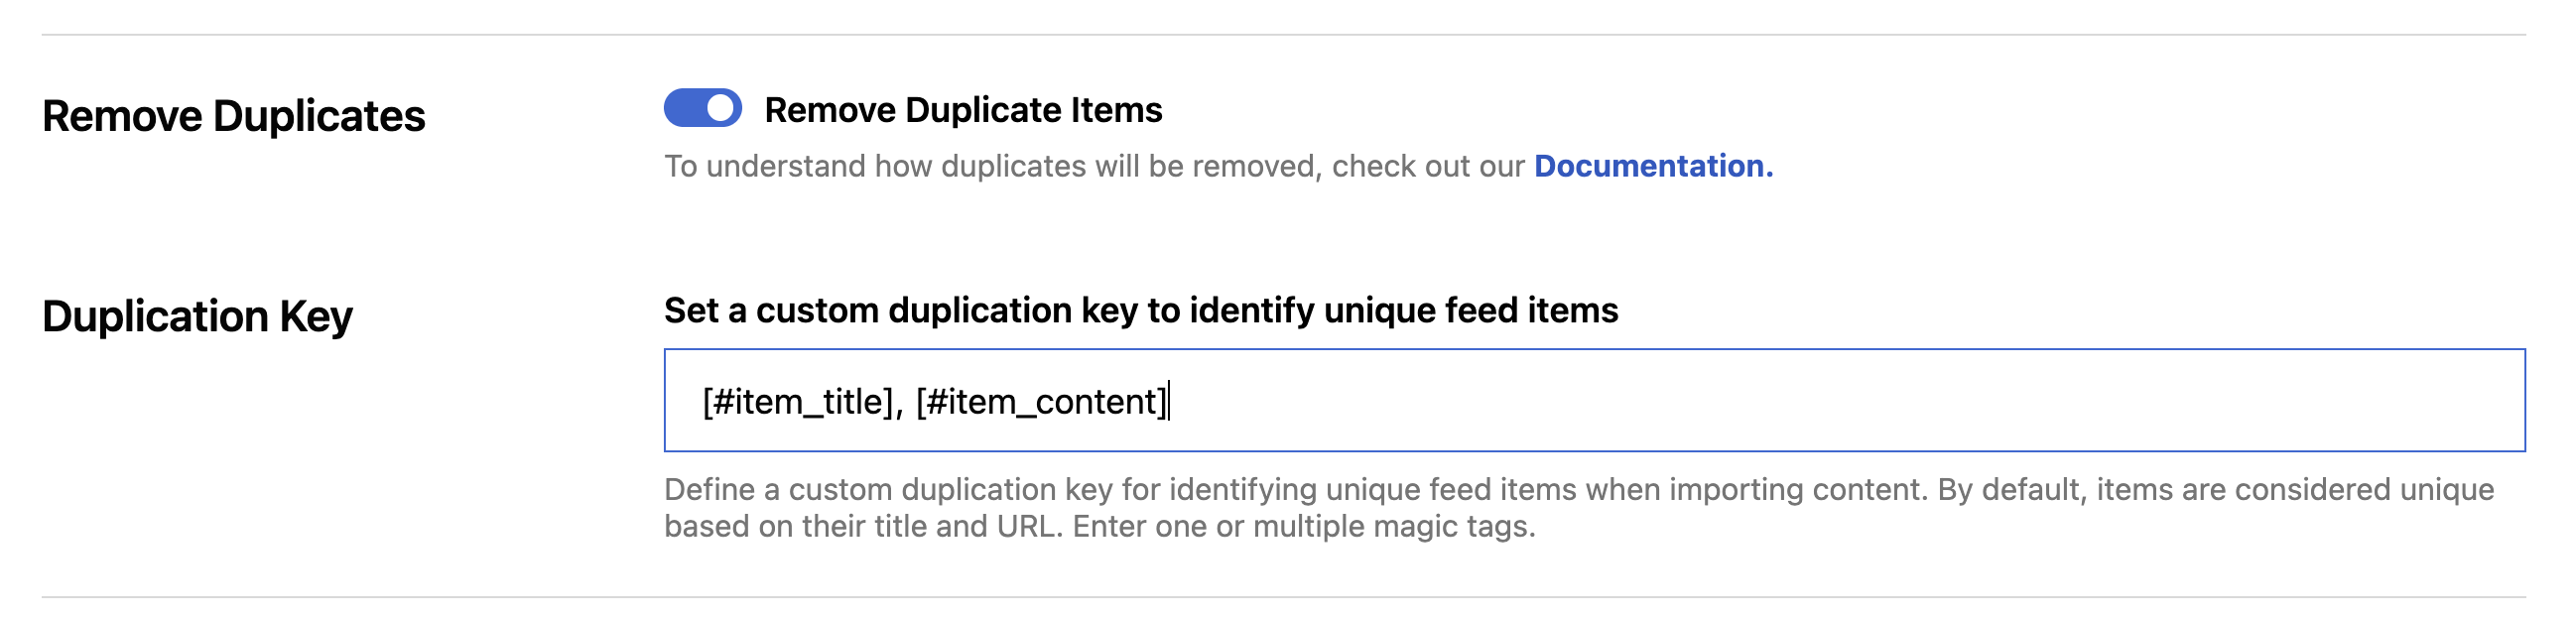
You can also combine the setting with the 'Duplication Key' option and use Magic Tags in this field. It works in such a way that you can add a single or multiple tags. If you add only the [#item_title] tag, it means that if items share the same title, they will be treated as duplicates, and only a single instance of them will be imported. If you add multiple tags, like in the screenshot above ([#item_title], [#item_content]), it means that an item will be treated as a duplicate only if it shares BOTH the title and content with another item.
📝 Note: Please note that the "Duplication Key" feature is part of Feedzy RSS Feeds Pro.
Items Count - choose how many posts you want to be imported each time. Feedzy automatically checks the feed and imports only new posts every 60 minutes. So, by choosing 20 posts, you will get a maximum of 20 posts imported every 60 minutes.
Fallback Image - this feature enables you to assign unique fallback images for individual imports. These images are displayed when specific posts lack their own featured image. If left empty, the global fallback image, if configured, will be used instead. If the global fallback image is not set, the post will not have a featured image. This feature is very helpful when you want to use different fallback images according to the import niche.
Enable automatic translation - is an integrated Feedzy service that allows you to translate titles, content, and excerpts with no external APIs needed. Read more about it here.
Automatic post deletion
Where to find Auto-Delete in current versions
In current versions of Feedzy Pro, automatic post deletion is controlled by a global setting:
Feedzy > Settings > Miscellaneous > Delete the posts created from all feeds, after a number of days
Enter the number of days after which all imported posts should be automatically removed. For example, entering 3 deletes imported posts that are older than three days. Set the value to 0 to disable automatic deletion globally.
A companion option, Delete attached featured image, appears directly below this field when the deletion interval is greater than 0. When enabled, the featured image is also removed from the media library when a post is deleted — as long as that image is not used as the featured image on another post. This helps prevent orphaned images from accumulating in your media library over time.
For the full description of these settings, see the Feedzy Settings Reference — Settings > Miscellaneous.
If Auto-Delete disappeared after an update
If imported posts were previously being deleted automatically but stopped after a plugin update, the most likely cause is that the auto-delete setting moved to the global Feedzy > Settings > Miscellaneous page. Your previous per-import value was not automatically migrated to the new location.
To restore automatic deletion:
- Navigate to Feedzy > Settings > Miscellaneous.
- Find the Delete the posts created from all feeds, after a number of days field.
- Enter your desired deletion interval (for example,
1for 24 hours or3for three days). - Click Save Changes.
📝 Note: If posts are no longer being deleted after an update, check this global setting before assuming there is a problem with your scheduled tasks (cron jobs). This is usually a settings-location change, not a broken cron job.
Custom Scenarios
Giving credit to the original author
When importing posts on your site, one option is to give credit to the original author. That would be on the single post page on your site by using the 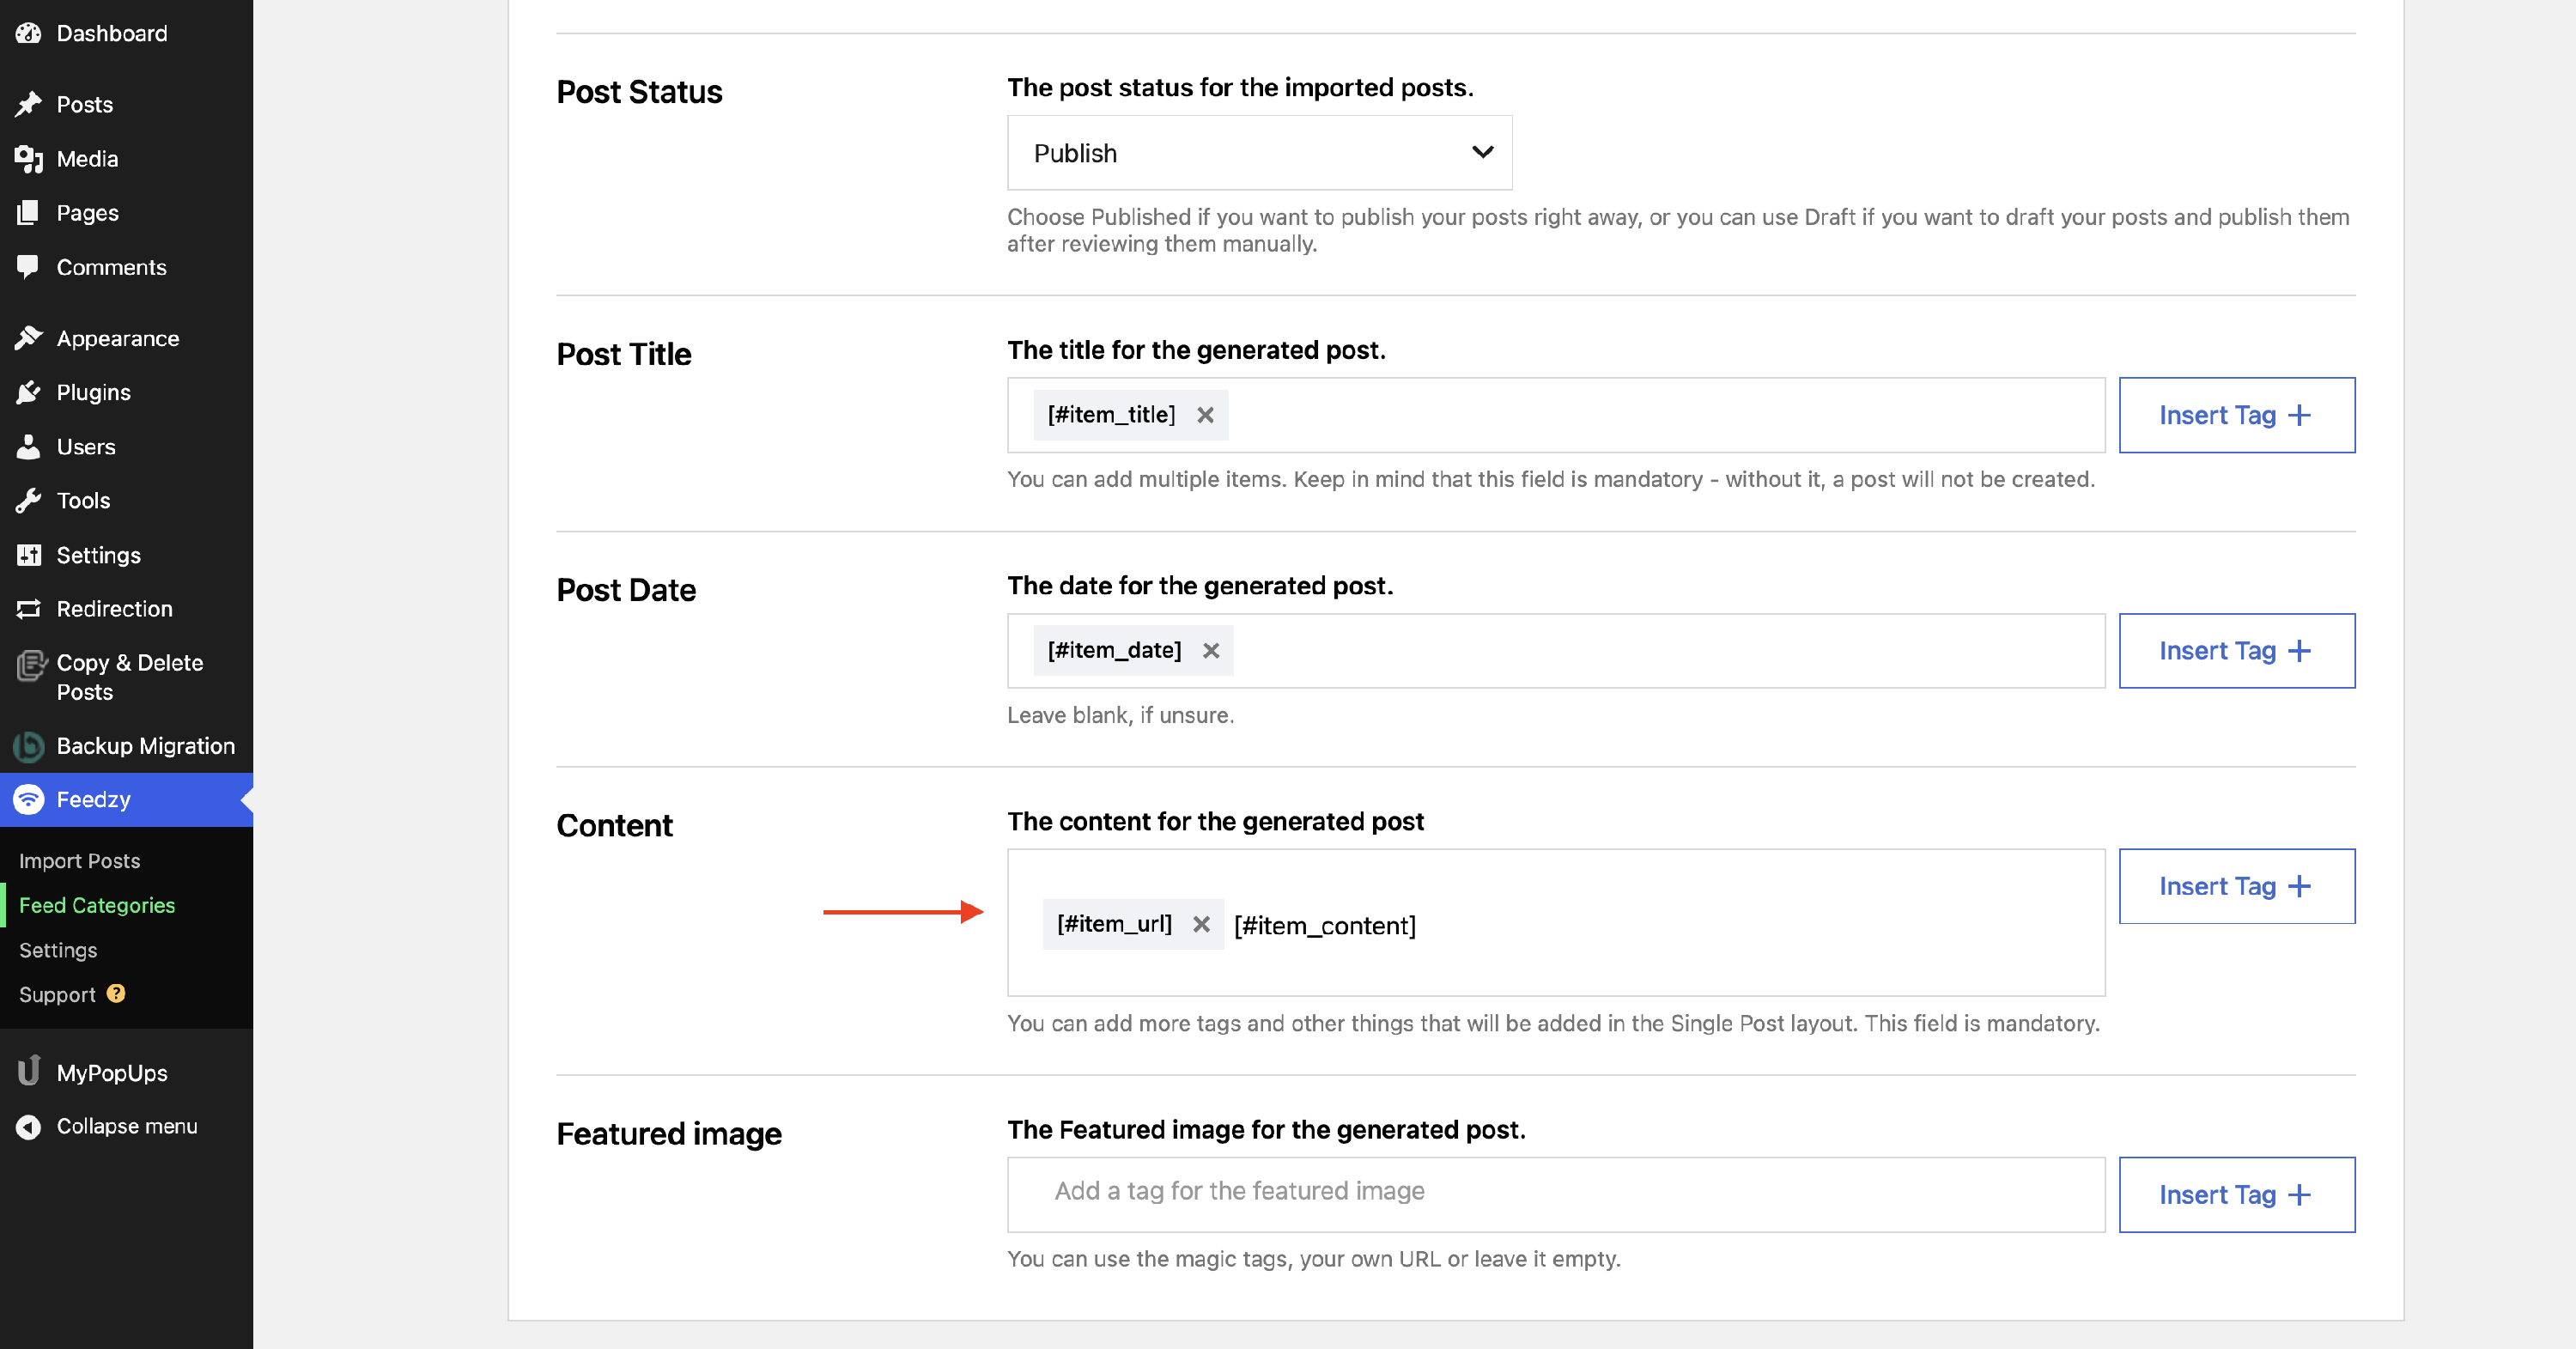 [#item_url] tag in the Map content section while editing the import job - result.
Adding a link when listing posts on the Blog Page
Link imported posts title to the source post - result. Download the zip file on this page and install it as a new plugin. Check out this video that explains how to link the feed title to the original article.
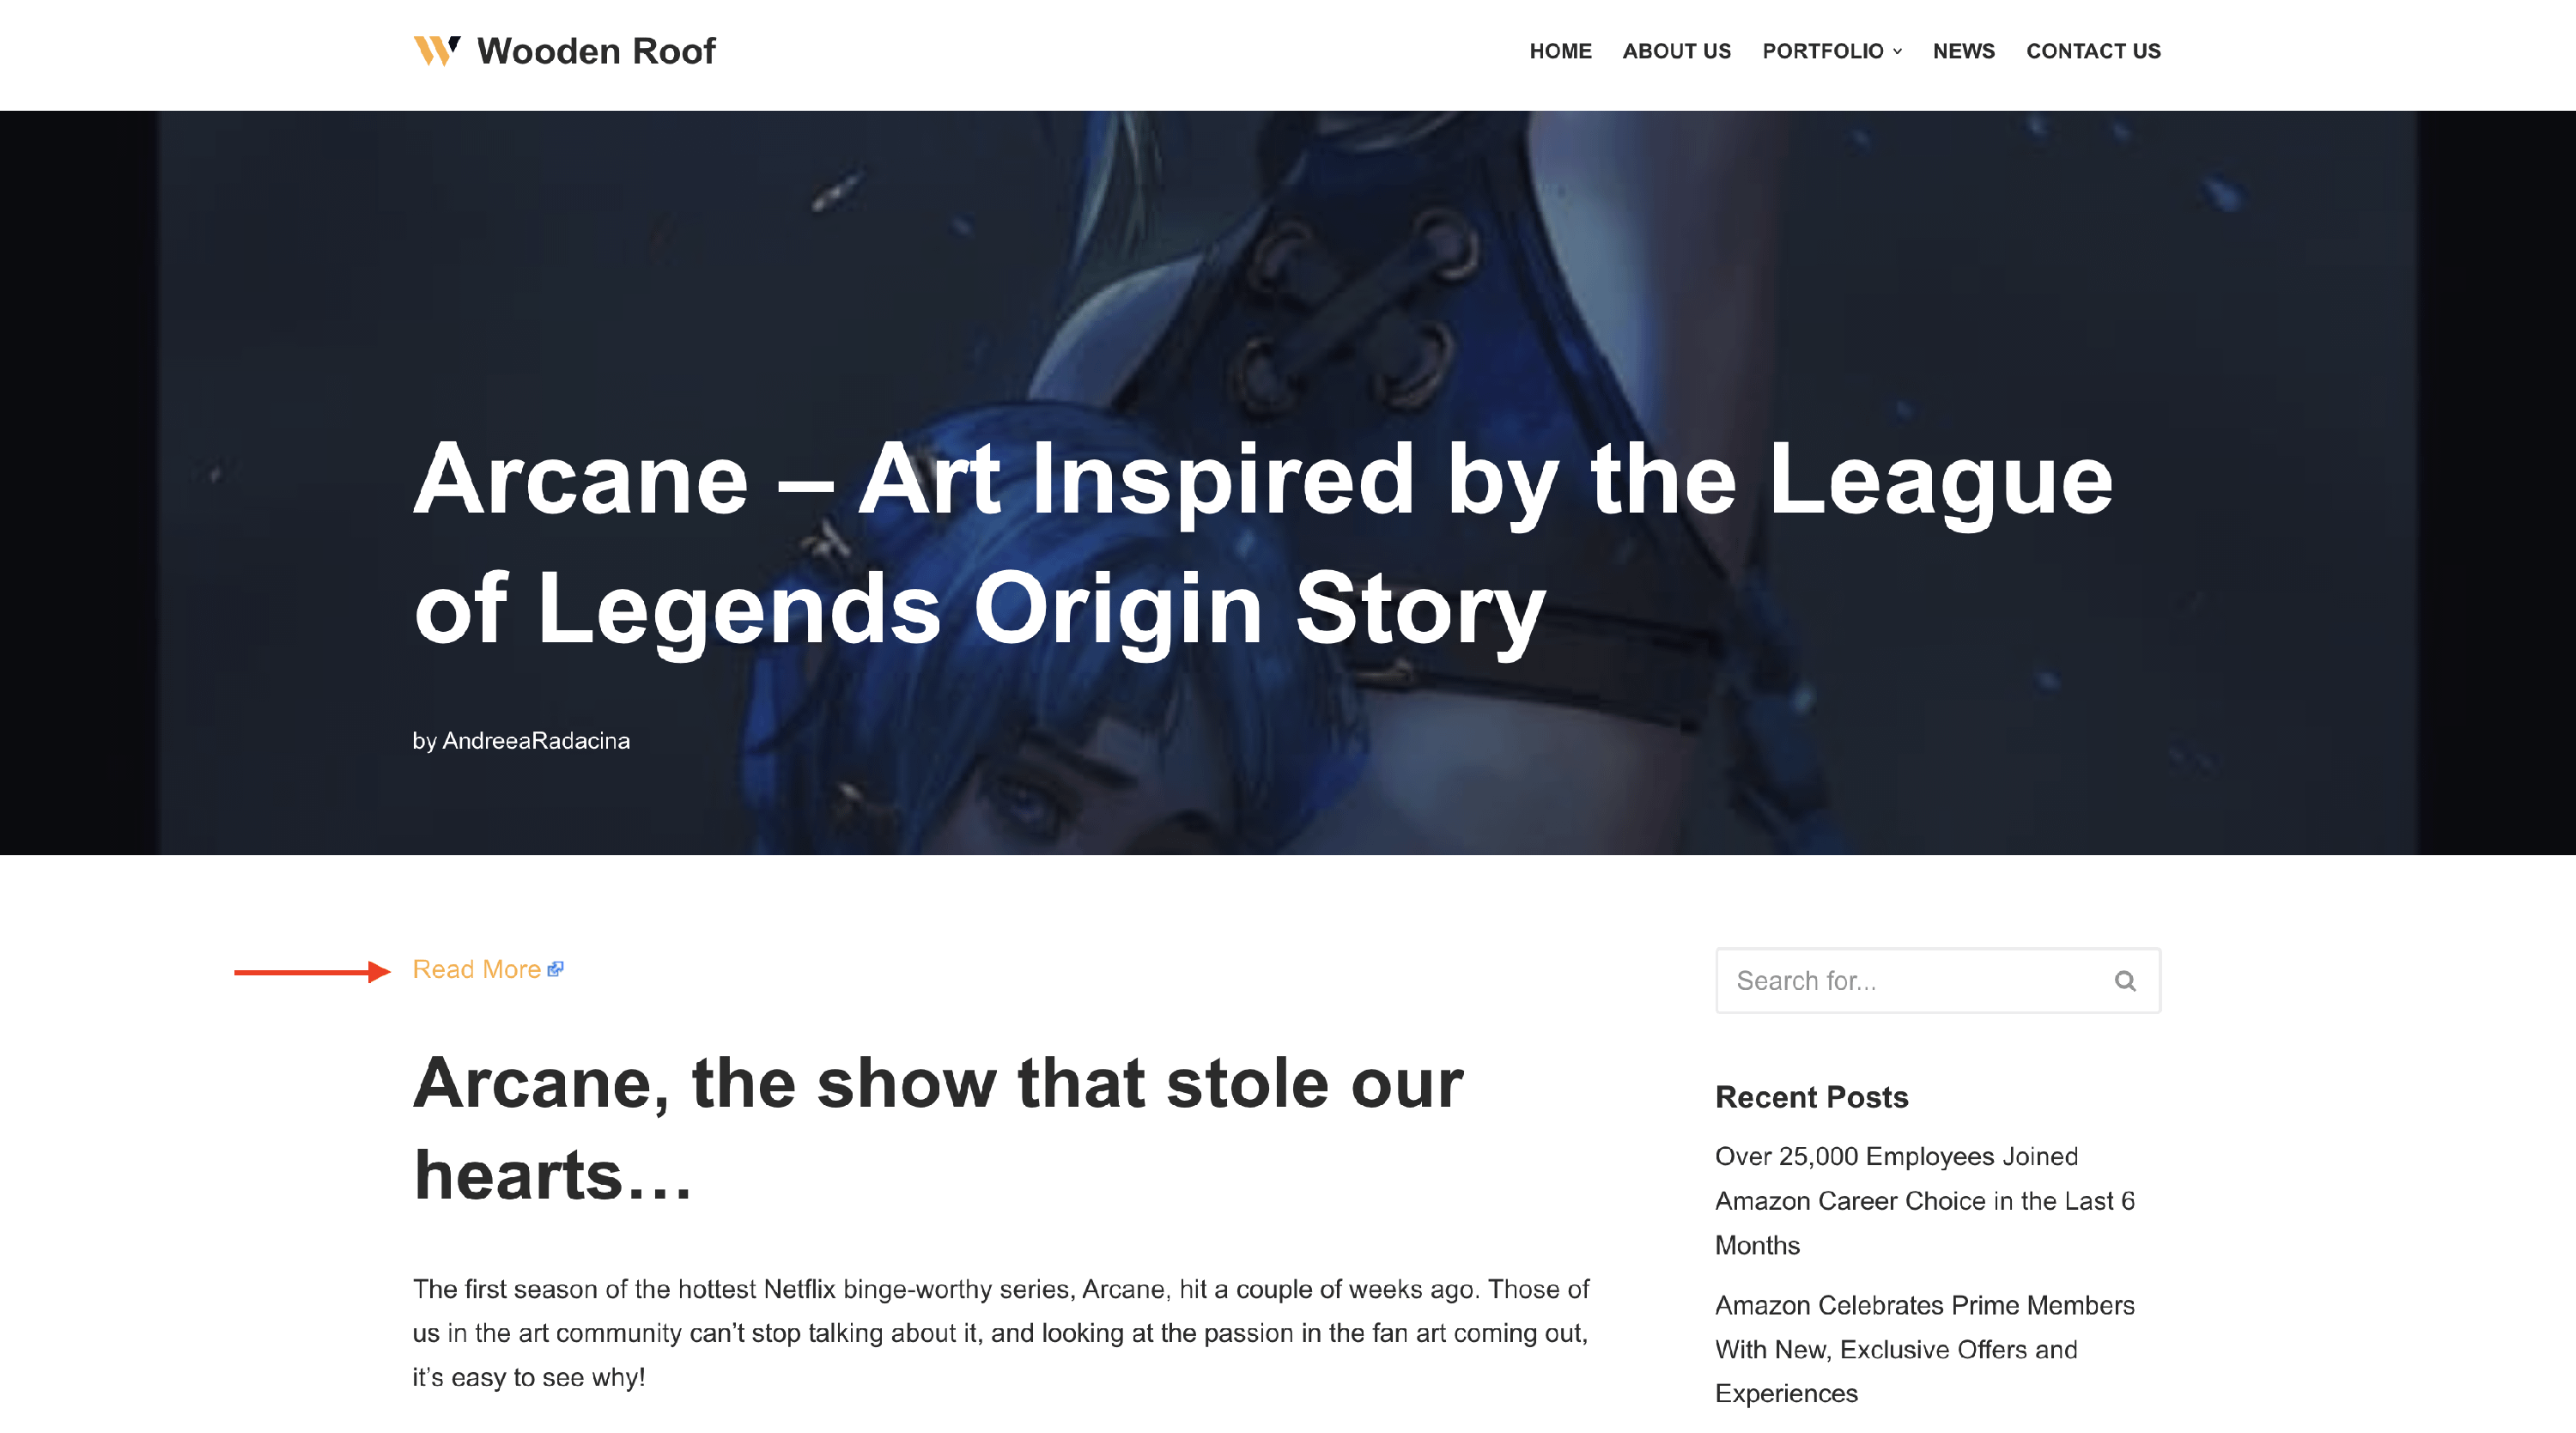
Link the read more button to the source post - result. Download the zip file on this page and install it as a new plugin. This code will not display the button if the theme hides it. It just changes the Read More link.
Change the author of the imported posts - by default, the author of the imported posts is the WordPress user configuring the import wizard. The post's original author with a link to the source website can be listed using the following option available in the
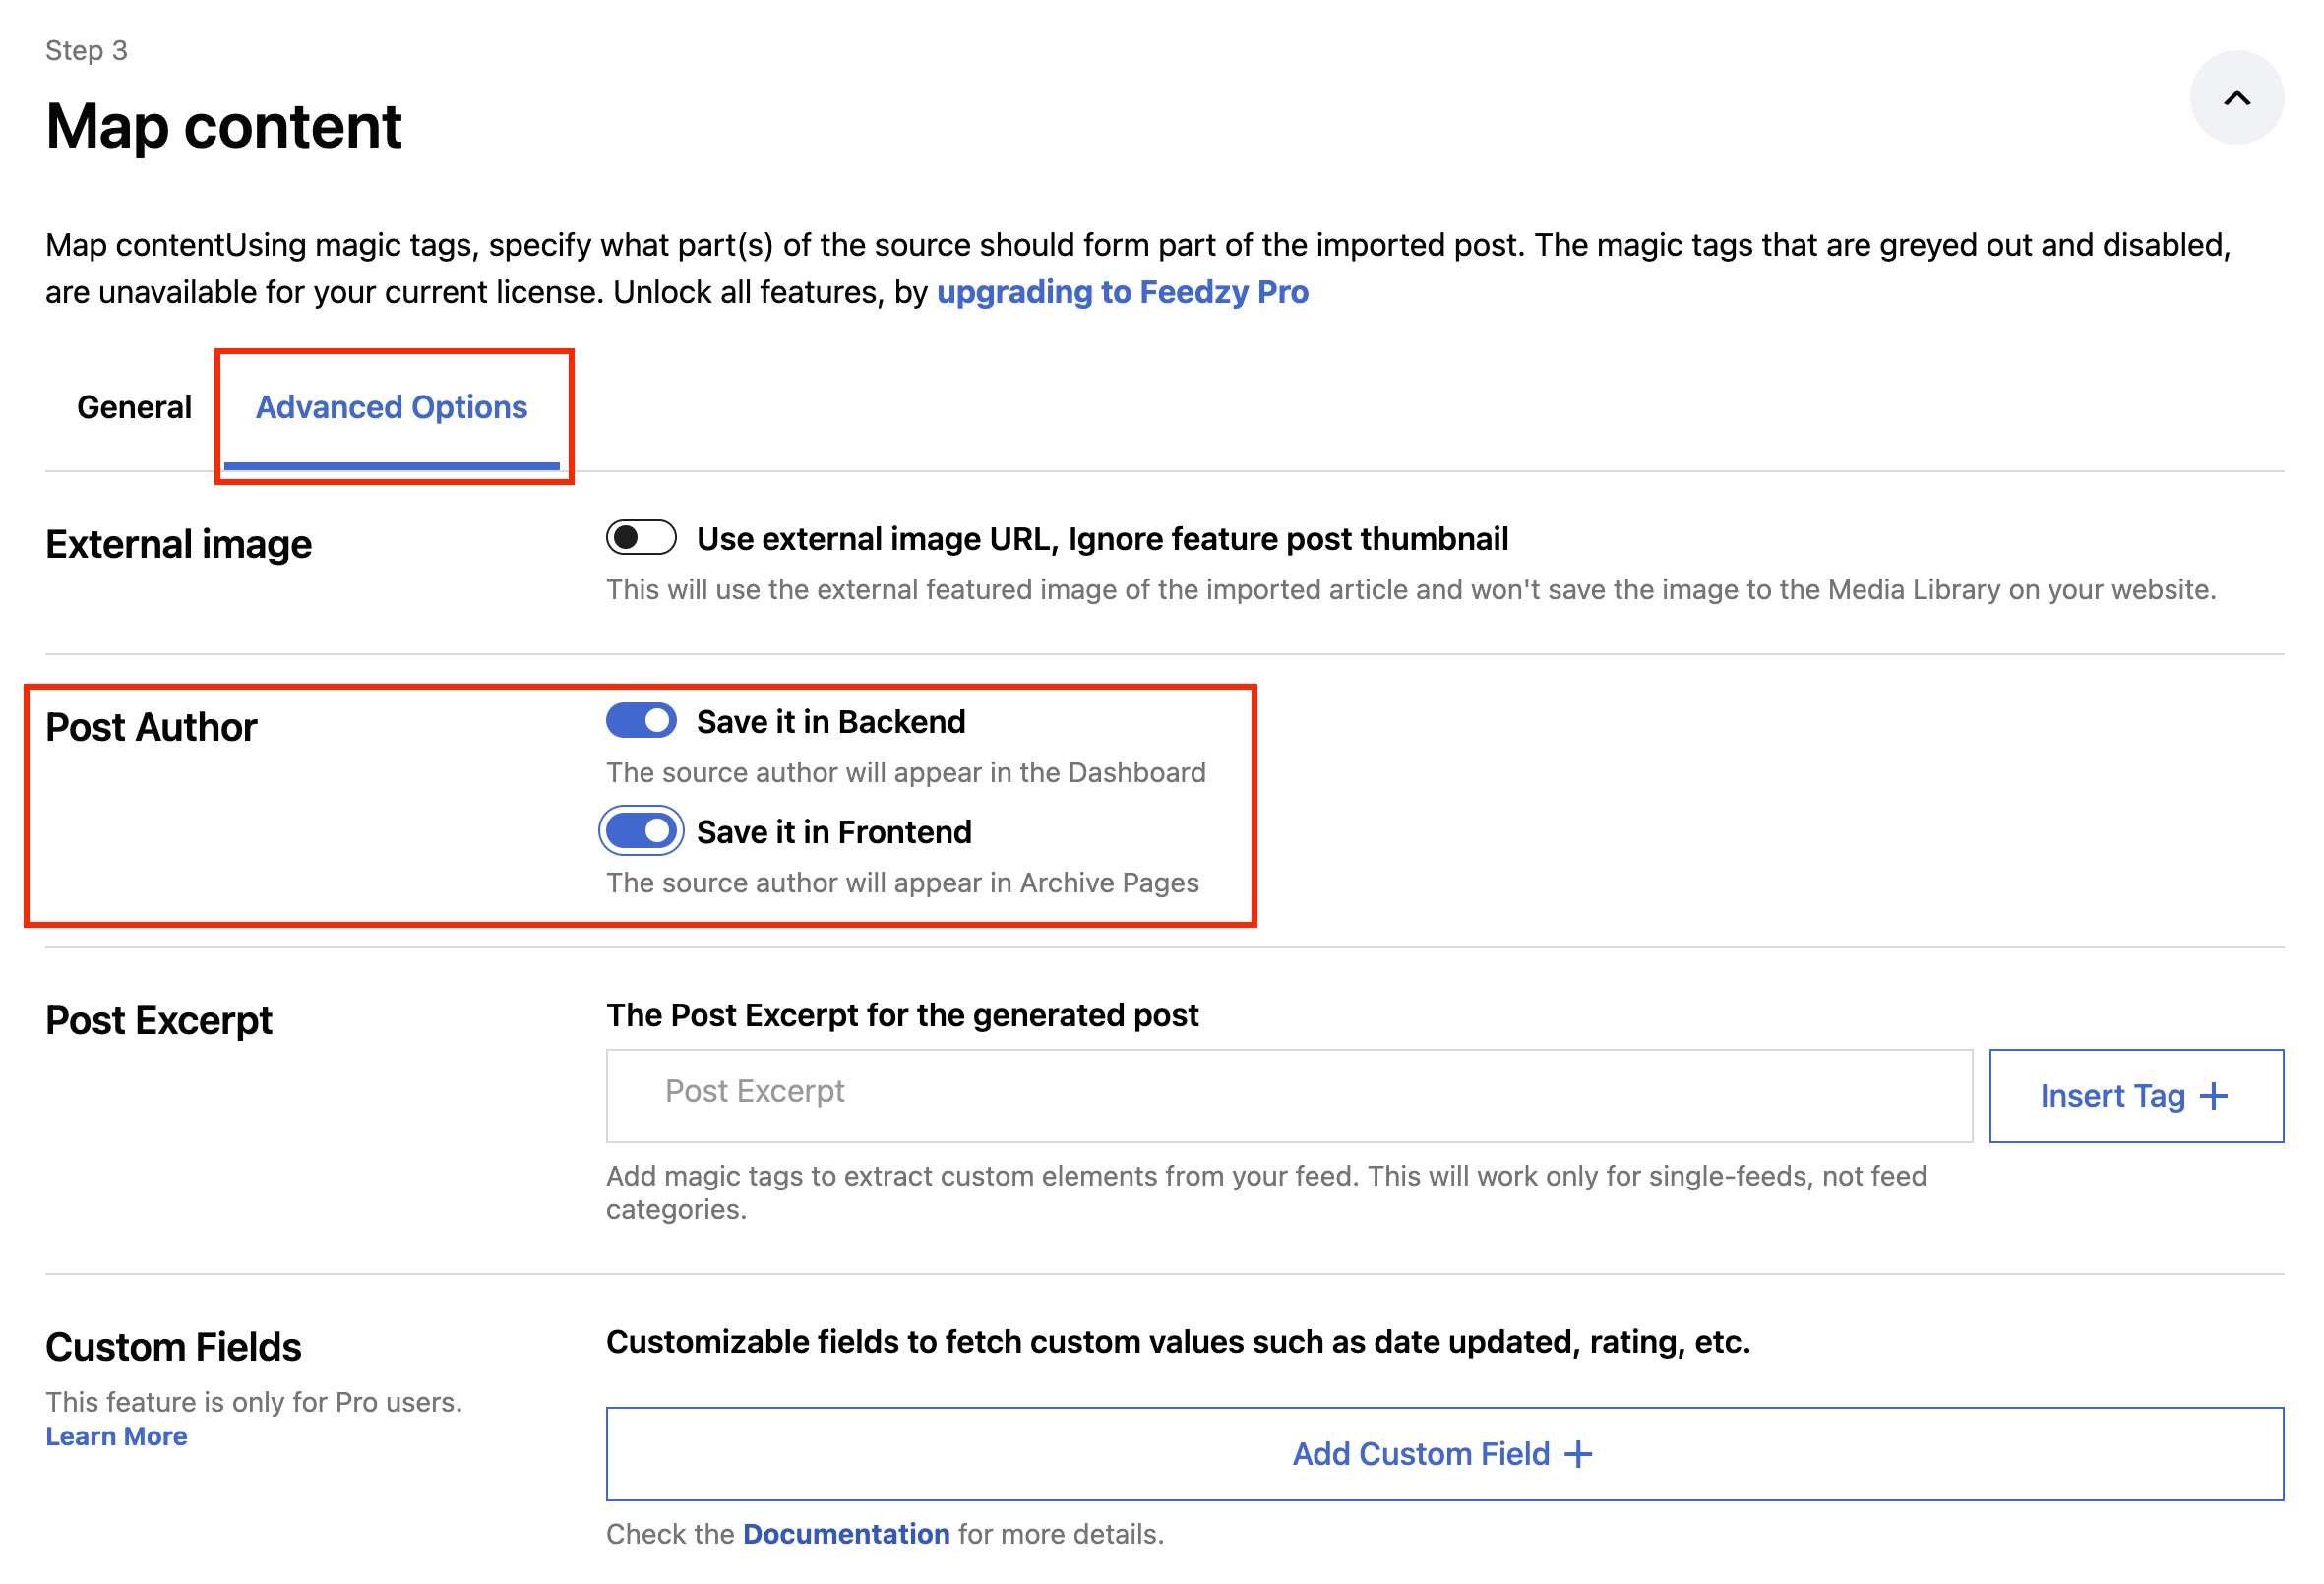 Map content > Advanced Options section while editing the import job - result
More detailed documentation can be found HERE
Built-in Services
- Deeper Amazon integration - allows you to display Amazon products as feed (post or products) using the ASIN numbers or products' URLs - doc.
- Spintax support - helps create randomized content that displays different information every time someone opens an article - doc.
Tag Actions
Feedzy RSS Feeds brings in important tag actions that can enhance the content of your posts:
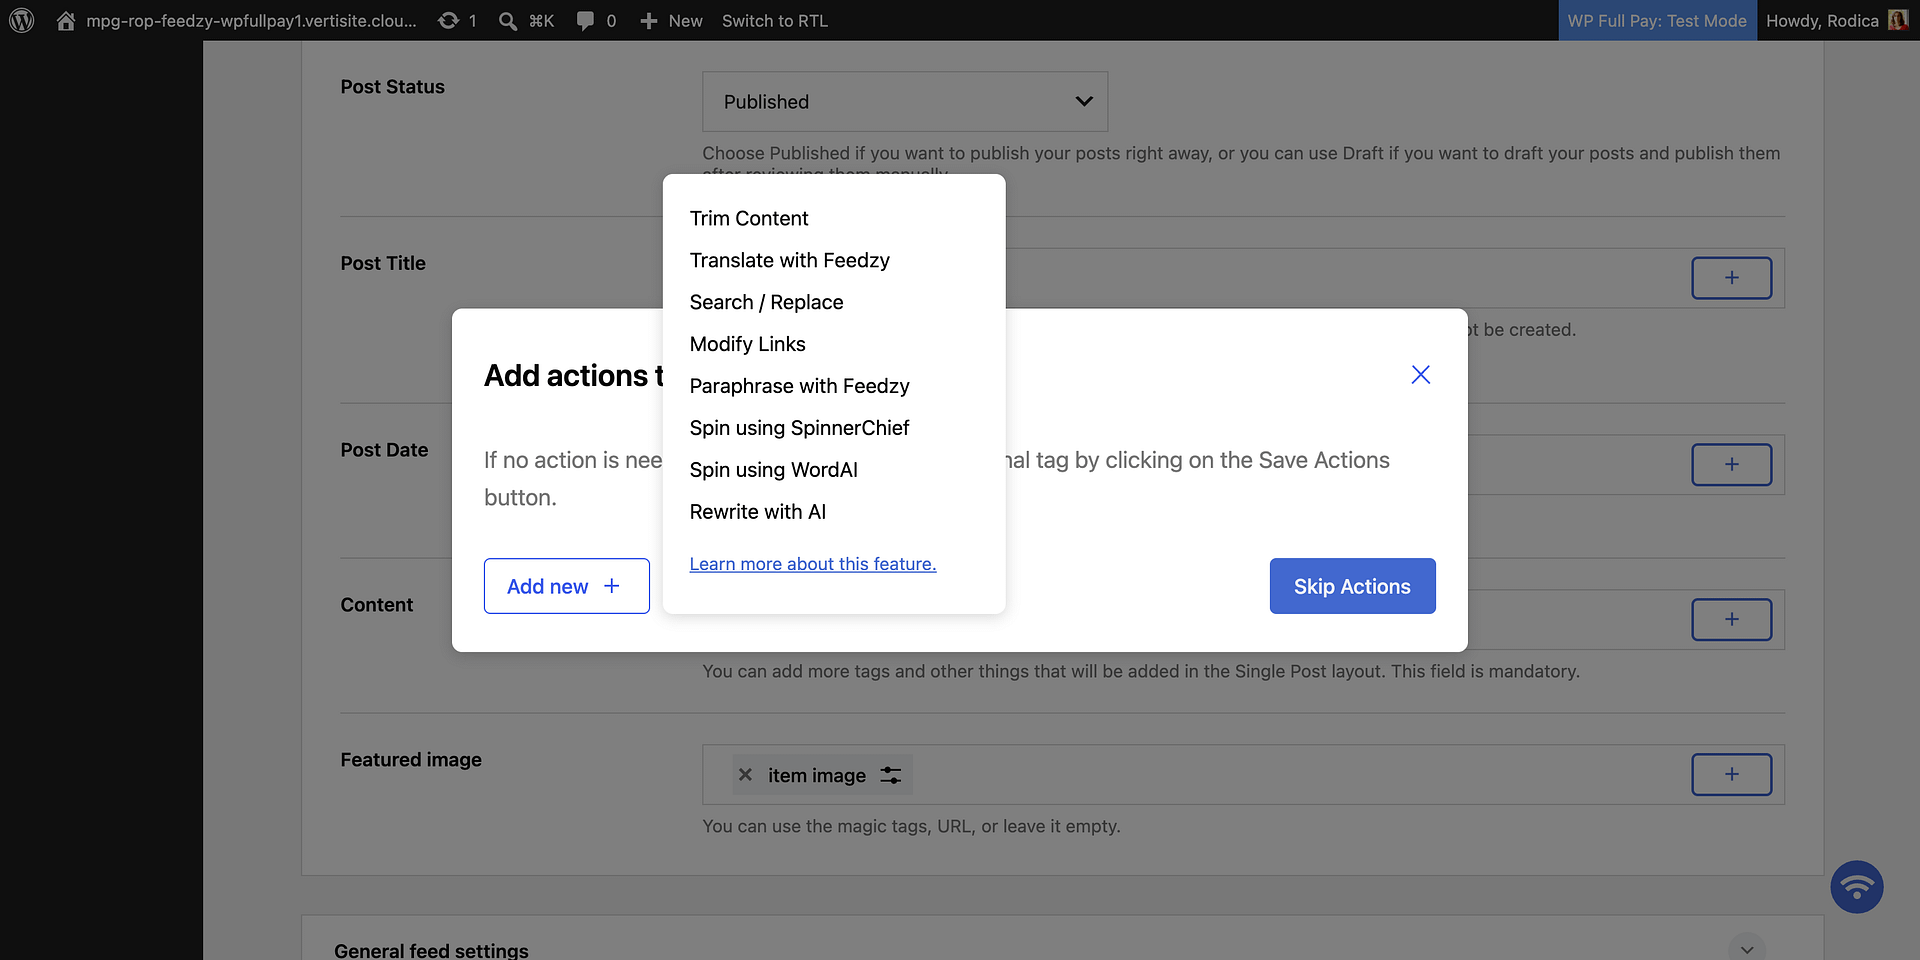
These actions are available for the following tags, and they can differ based on the tag values (for example, categories will not contain the paraphrase action).
Pro-only tags or actions are marked with a PRO label in the dropdown.
- [#item_title]
- [#item_content]
- [#item_full_content]
- [#item_description]
- [#item_categories]
In this way, when you add one of the above tags, the actions modal will appear. If you want to continue with the original tag and skip any action, leave the modal empty and click on Save Actions.
Available tag actions:
- Trim Content - doc
- Translate with Feedzy - doc
- Search/Replace - doc
- Paraphrasing with Feedzy - doc
- Spin using SpinnerChief - doc
- Spin using WordAI - doc
- Rewrite with AI - doc
- Featured image - Generate with OpenAI - doc
📝 Note: If the tag actions modal does not open or the settings page is unresponsive, a JavaScript conflict with another plugin may be the cause. See Admin UI and JavaScript Issues in the Feedzy Troubleshooting Guide for steps to diagnose and resolve this.
One thing that you will note is that in front of each action name, there is a number that represents the order in which the actions will be added to the queue. Using drag and drop, you can easily change their order. In this way, one tag can contain multiple actions, as you can see in the example below:
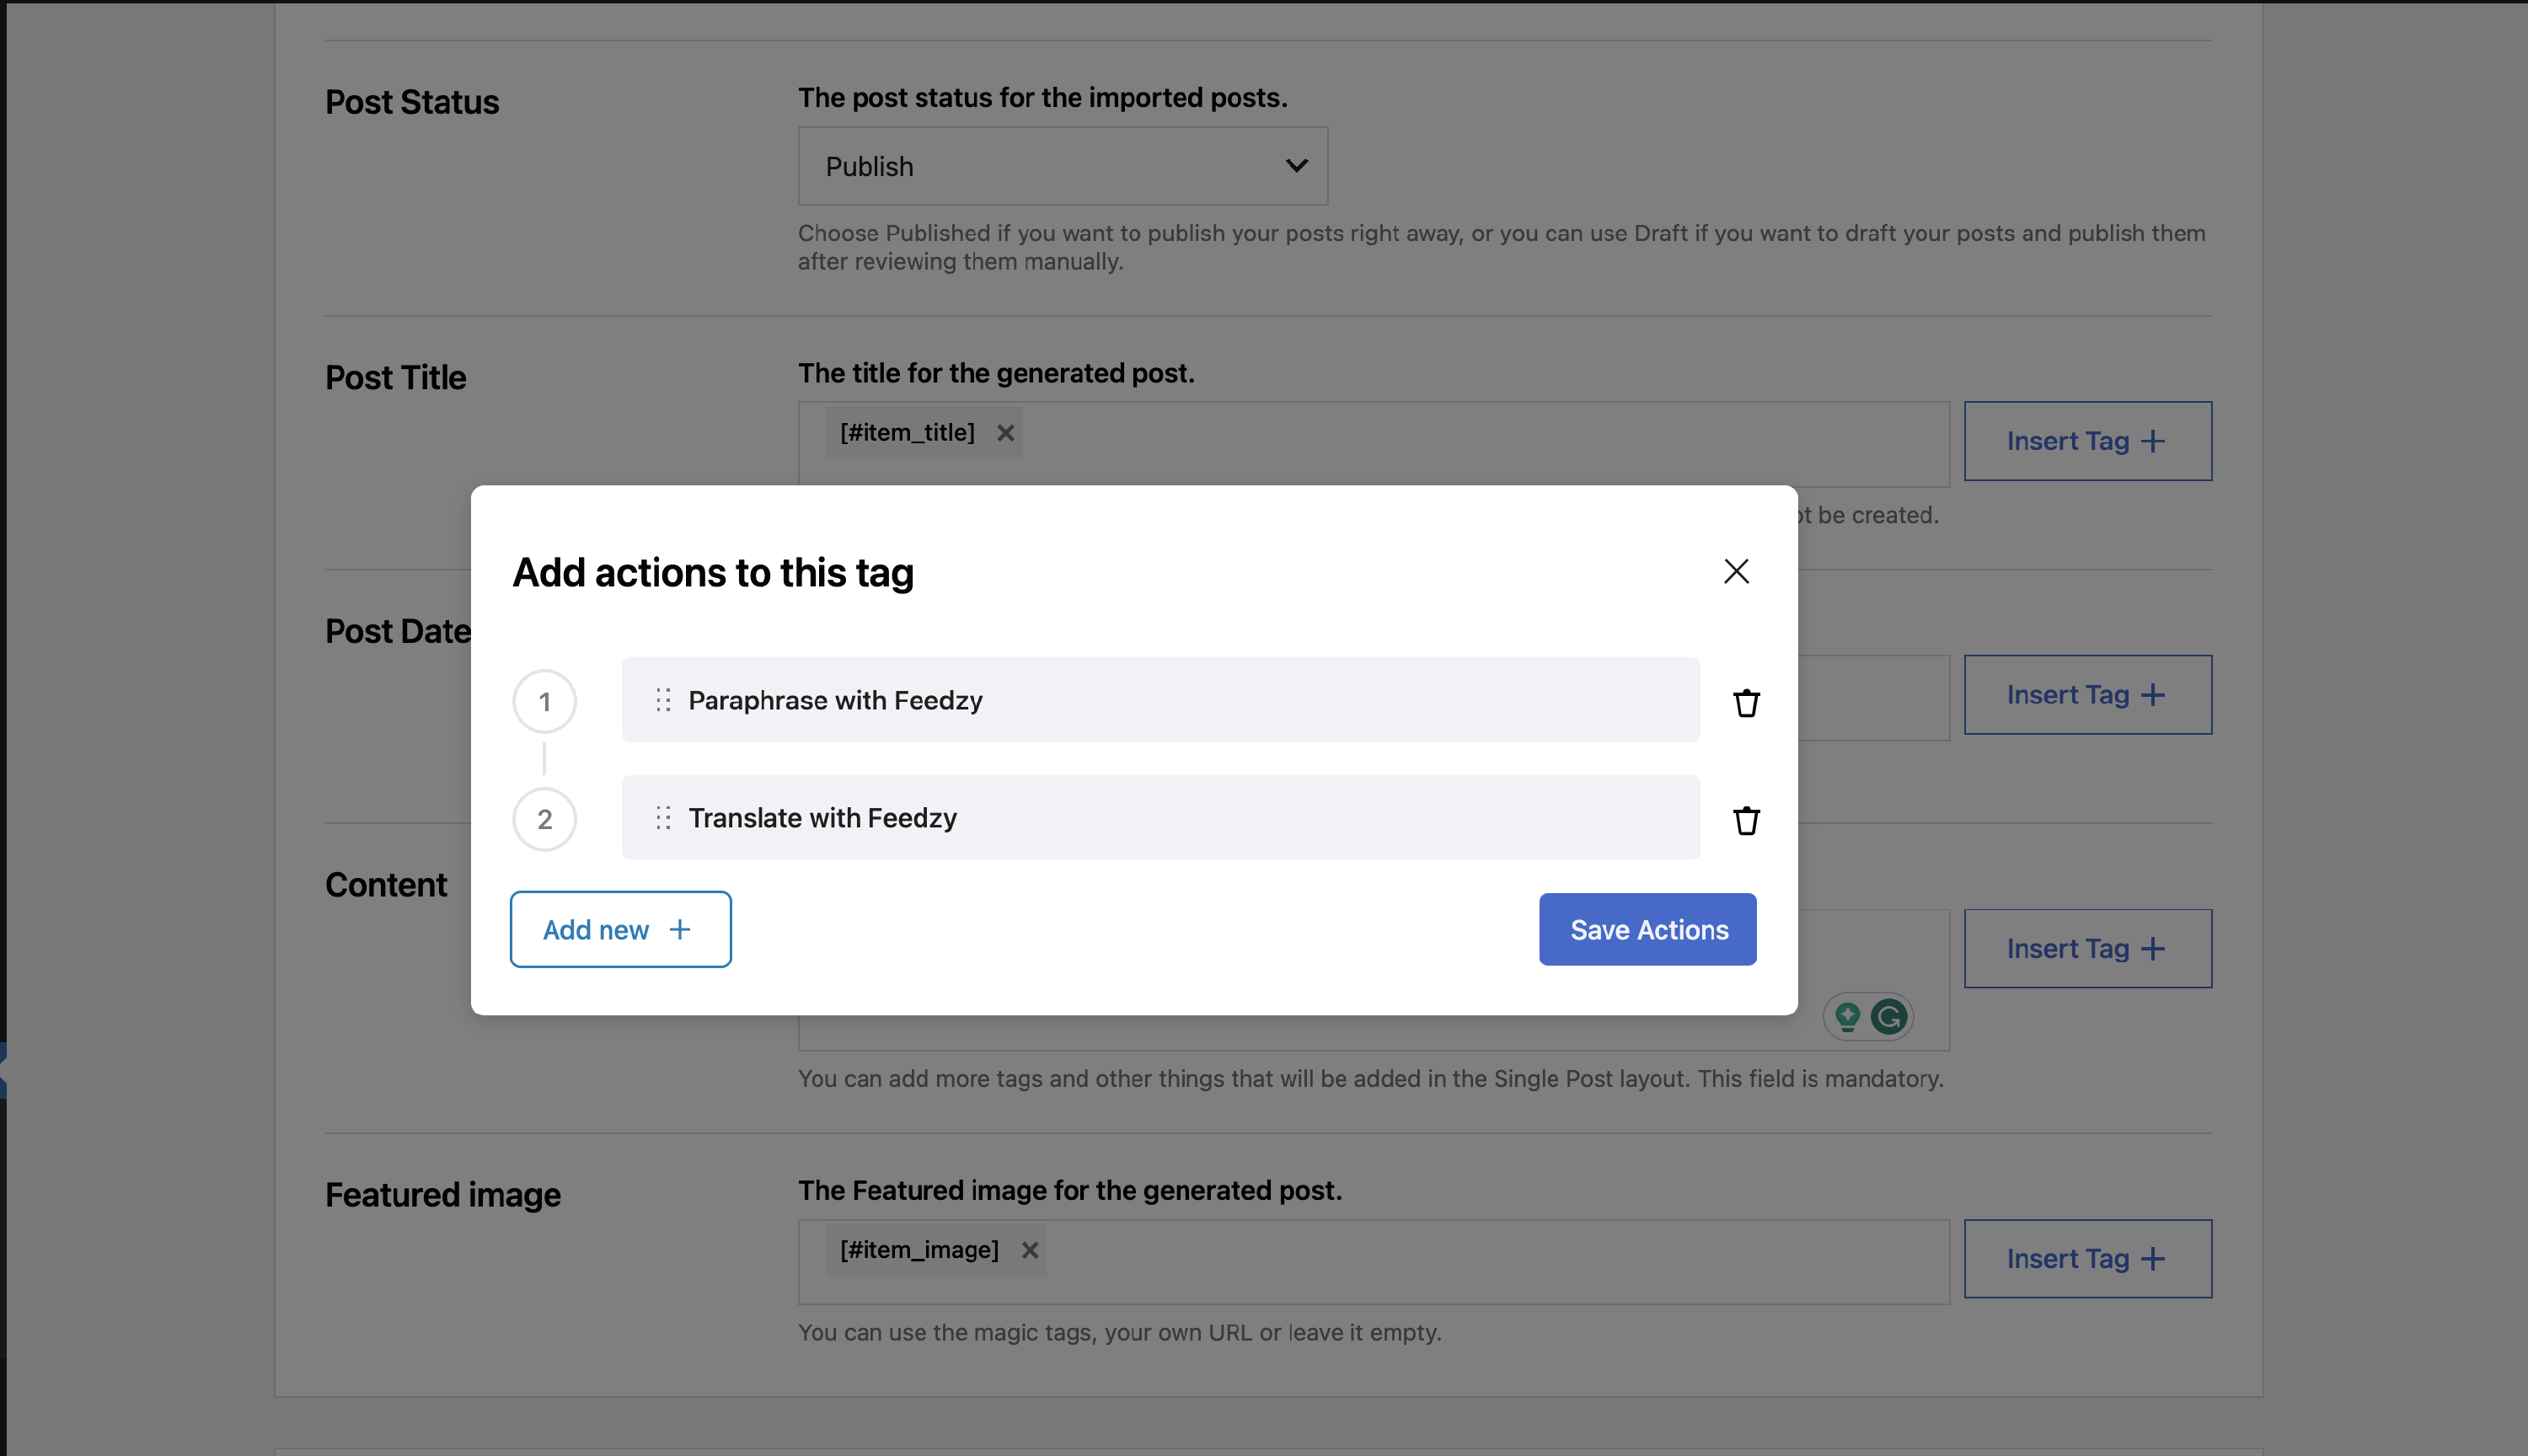
Result

If you want to edit the actions, click on the icon:
Dynamic Post Taxonomy
📝 Note: Please note that this feature is part of Feedzy RSS Feeds Pro.
Feedzy PRO supports automatic tagging — dynamically assigning WordPress categories to each imported post based on source feed categories or keyword rules, rather than applying a fixed category to every import. To configure automatic tagging, insert one of the magic tags below into the Post Taxonomy field of your import job. In the free version, you can only select existing categories statically.
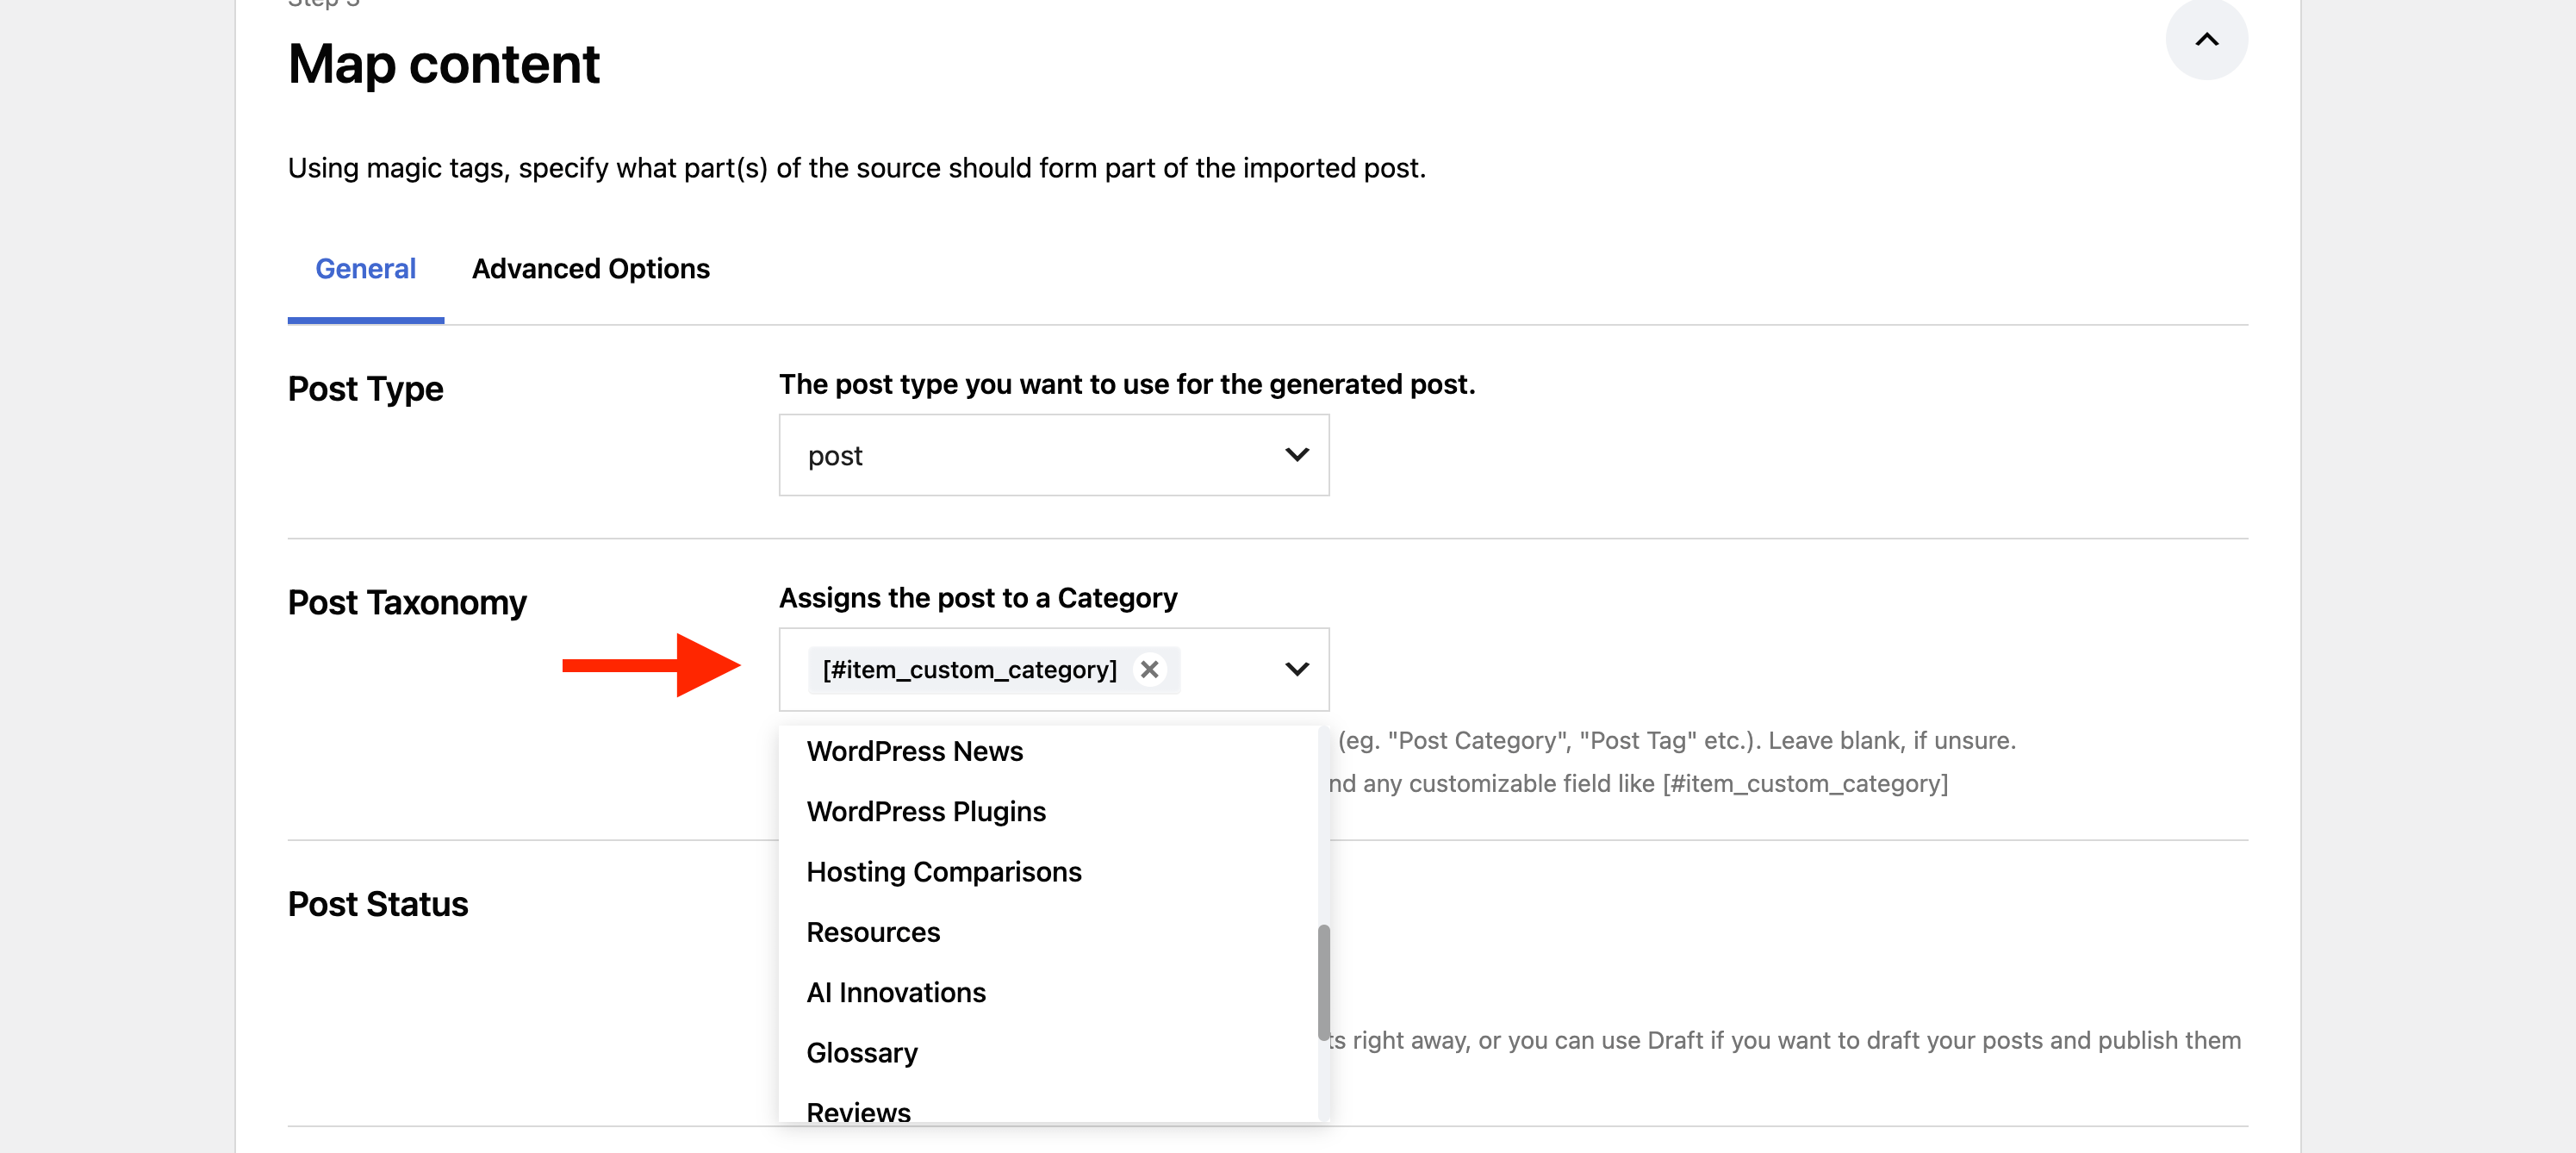
Insert one of the following tags into the Post Taxonomy field:
- [#item_categories] - detects one or more category terms from the RSS feed item and creates them as WordPress categories, then assigns the imported post to those categories.
- [#auto_categories] - The Auto Categories Mapping feature in Feedzy Pro allows you to assign categories to imported posts automatically based on keywords in the post titles. This feature streamlines the process of organizing content by enabling dynamic category assignment during imports. More details on how the keywords can be configured and combined with logical operators are available in this dedicated article.
- [#item_custom_fieldname] - useful when the feed has multiple categories and you want to use only a particular one (first, second, etc.) or the user wants to use a different element (not <category)) and convert it into a WordPress category during the import. Read More about custom tag parsing.
📝 Note: These dynamic options apply to categories only. Feedzy does not automatically generate post tags or map keywords to tags from your feeds — there is no tag equivalent of the Auto Categories Mapping feature. To tag imported posts, select one or more existing tags in the Post Taxonomy field, which assigns them to every post in that import job (see the Feed to Post FAQ), or add tags manually in the post editor after the import.
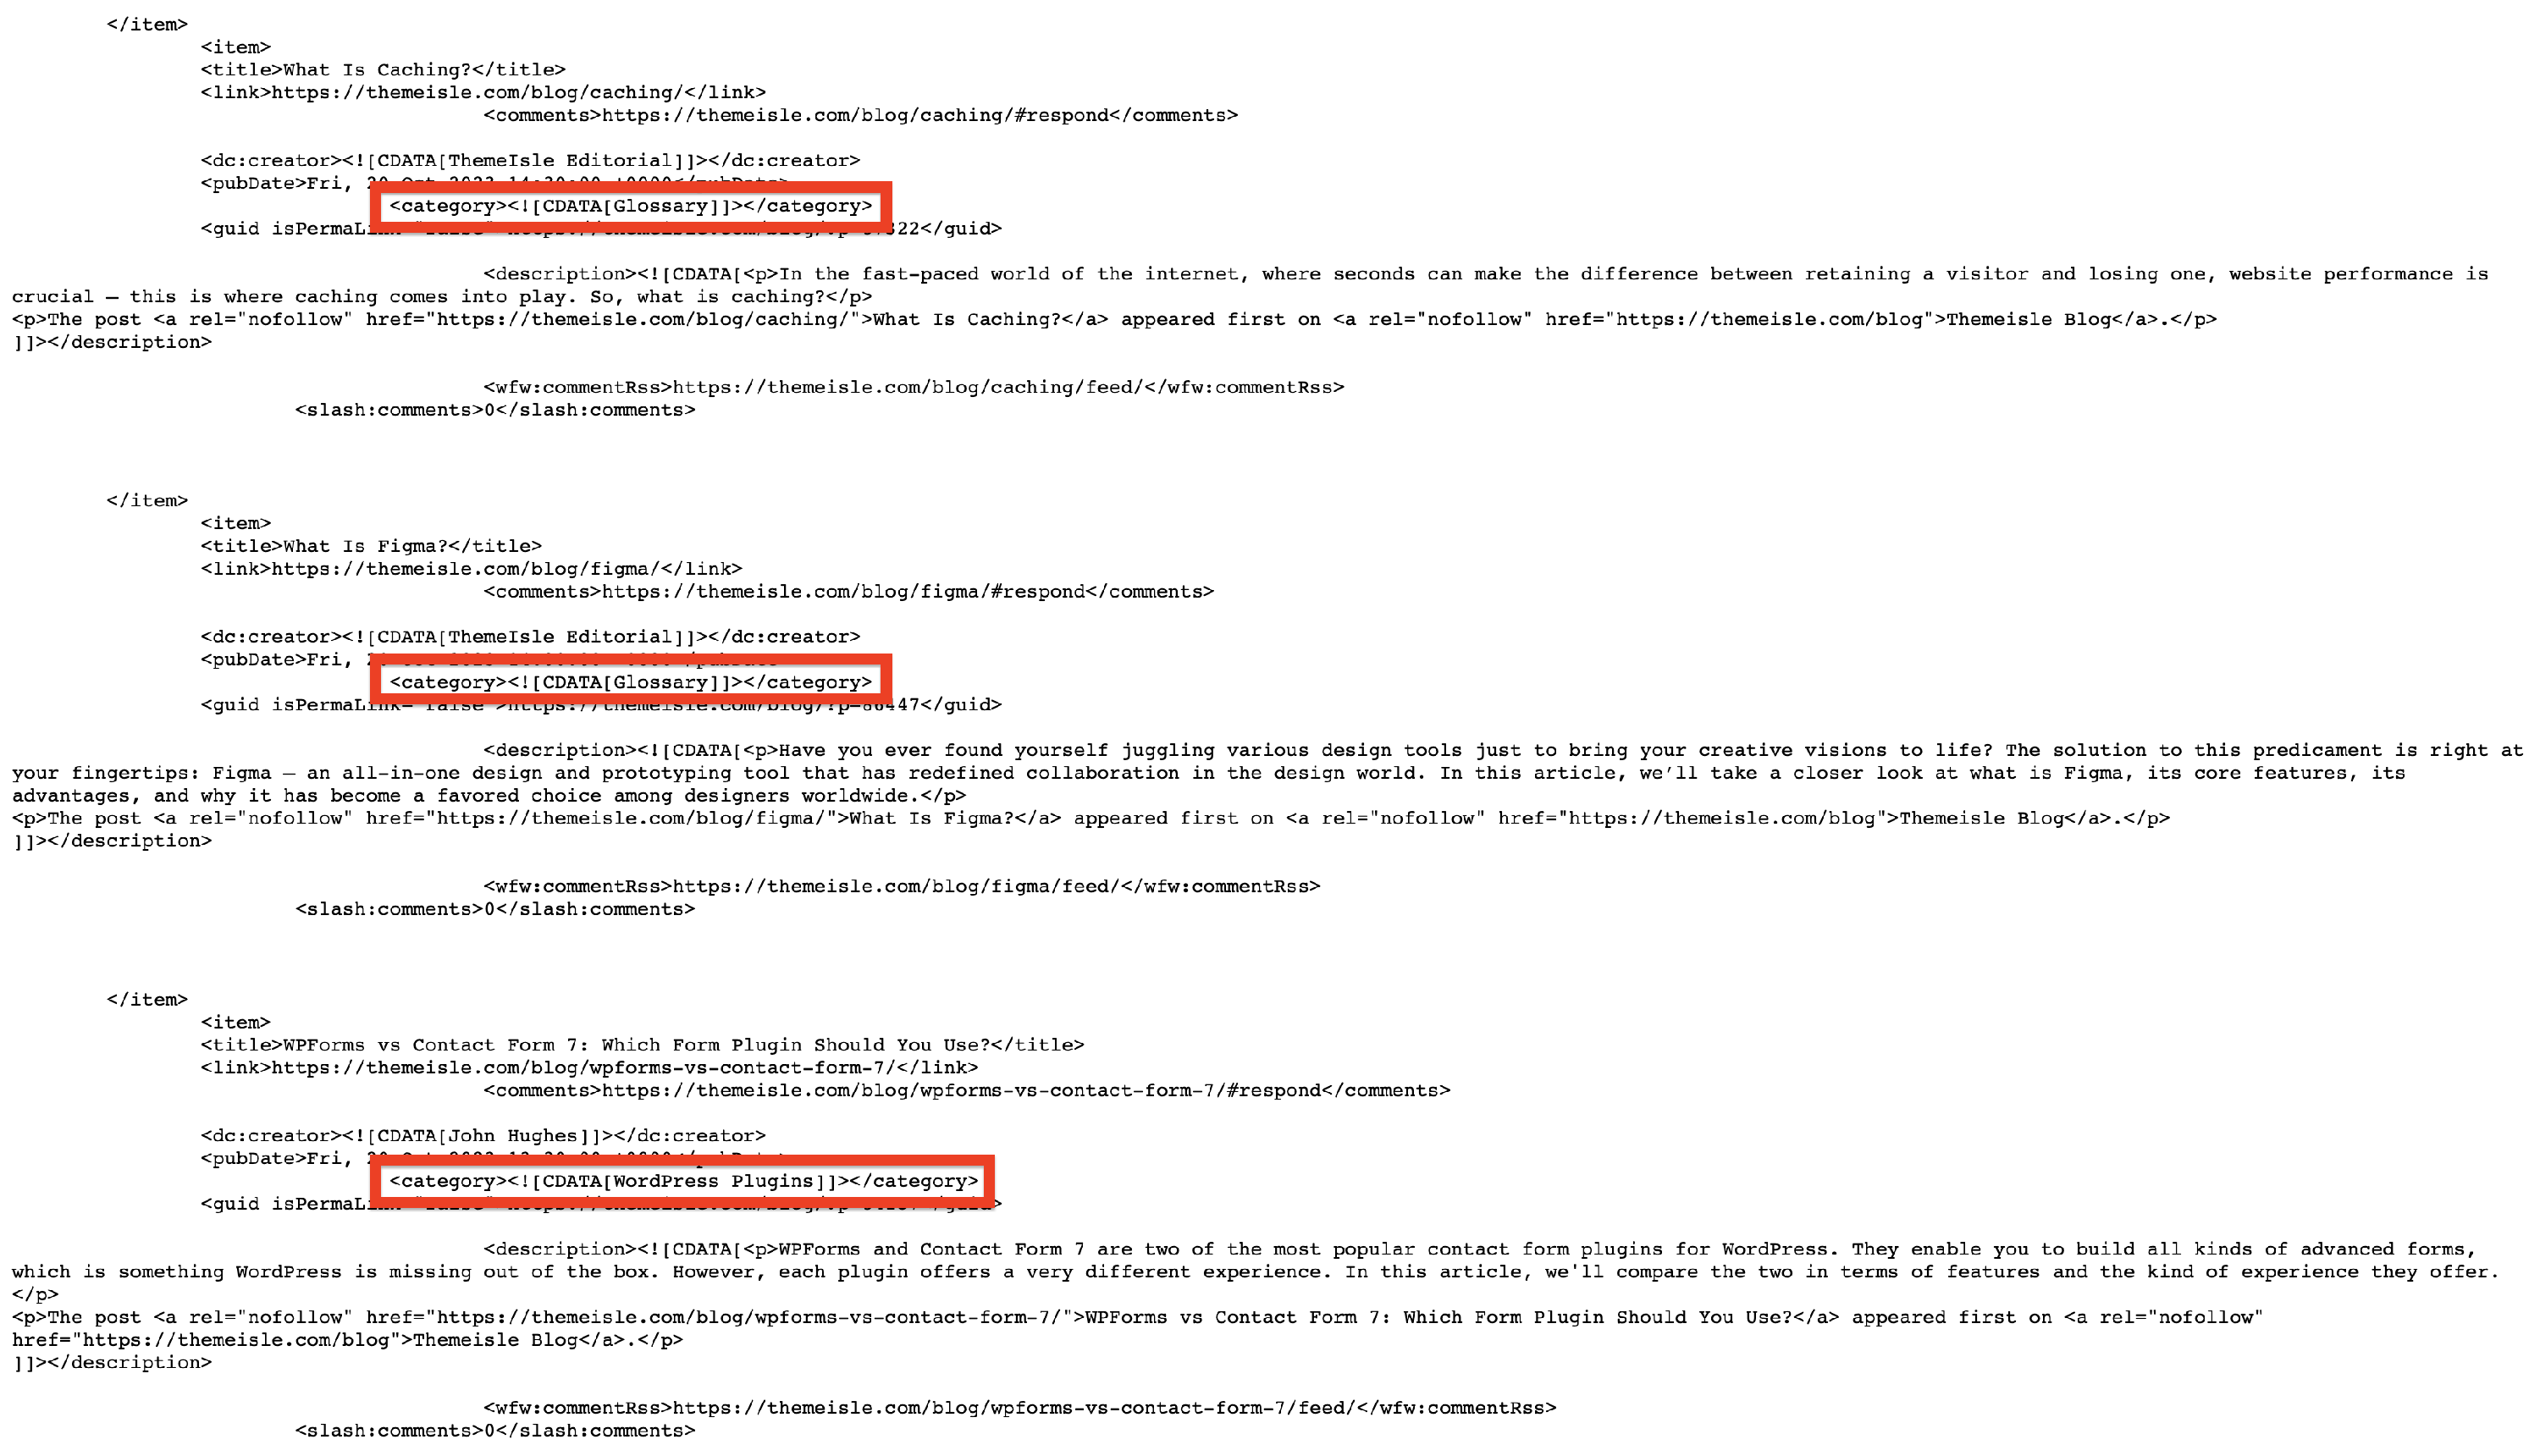
Original Feed Categories
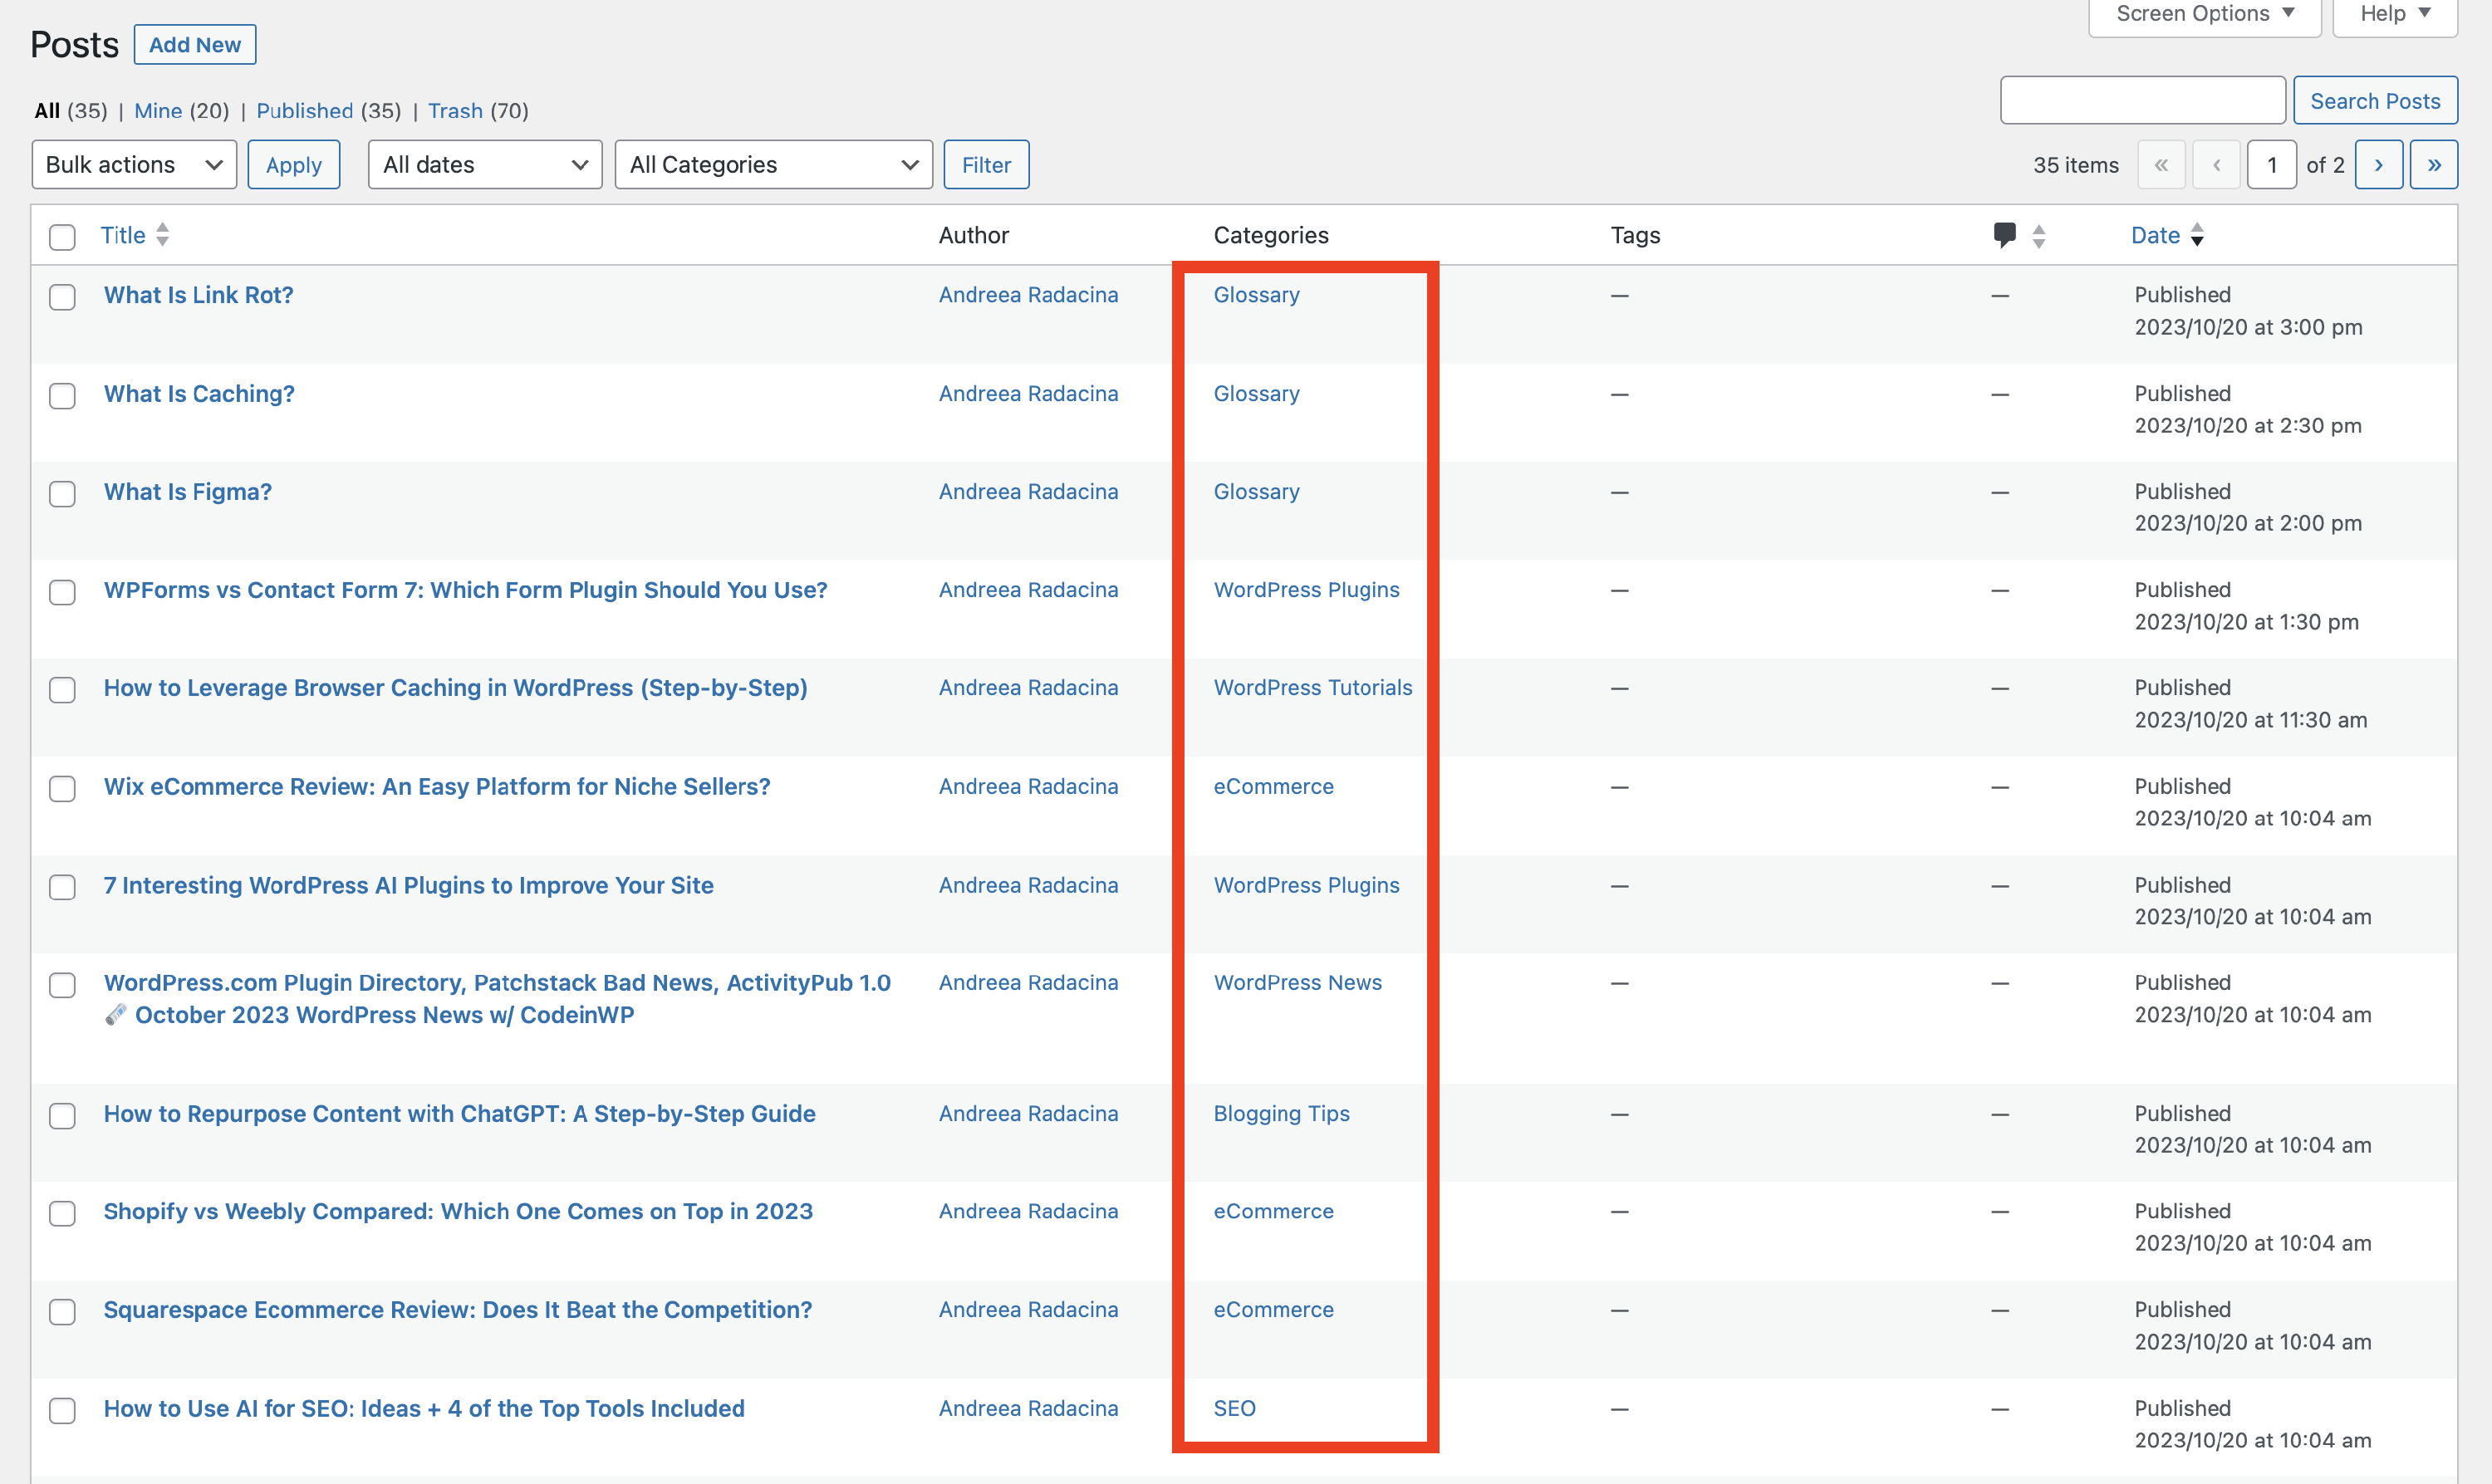
Retrieved categories in WordPress Posts
Use Cases
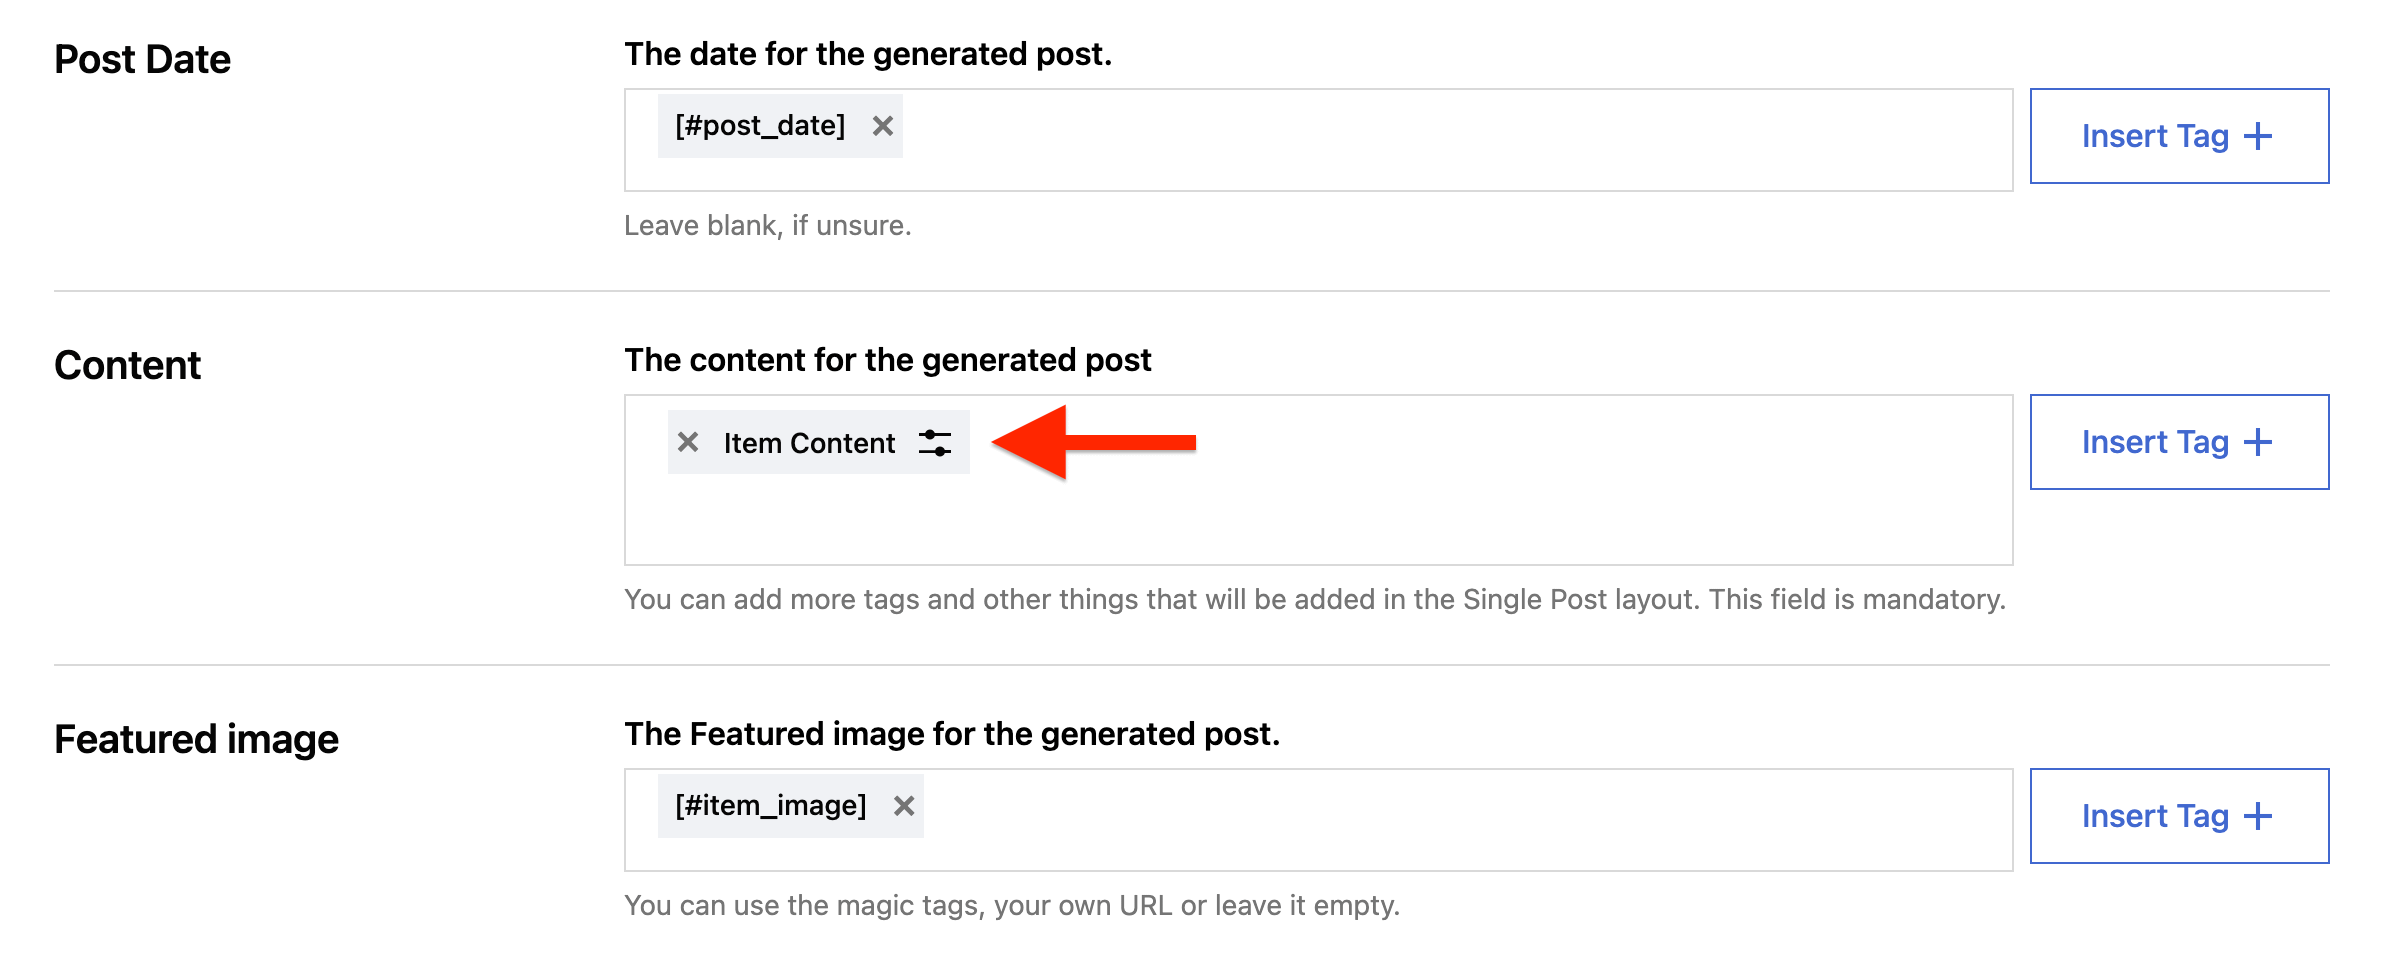
Import item content - Personal license
The content can be fetched by using the [#item_content] magic tag in the Item Content field of the import wizard.
Import item full-content - Developer/Agency license
The full content can be fetched by using the [#item_full_content] magic tag in the Item Content field of the import wizard.
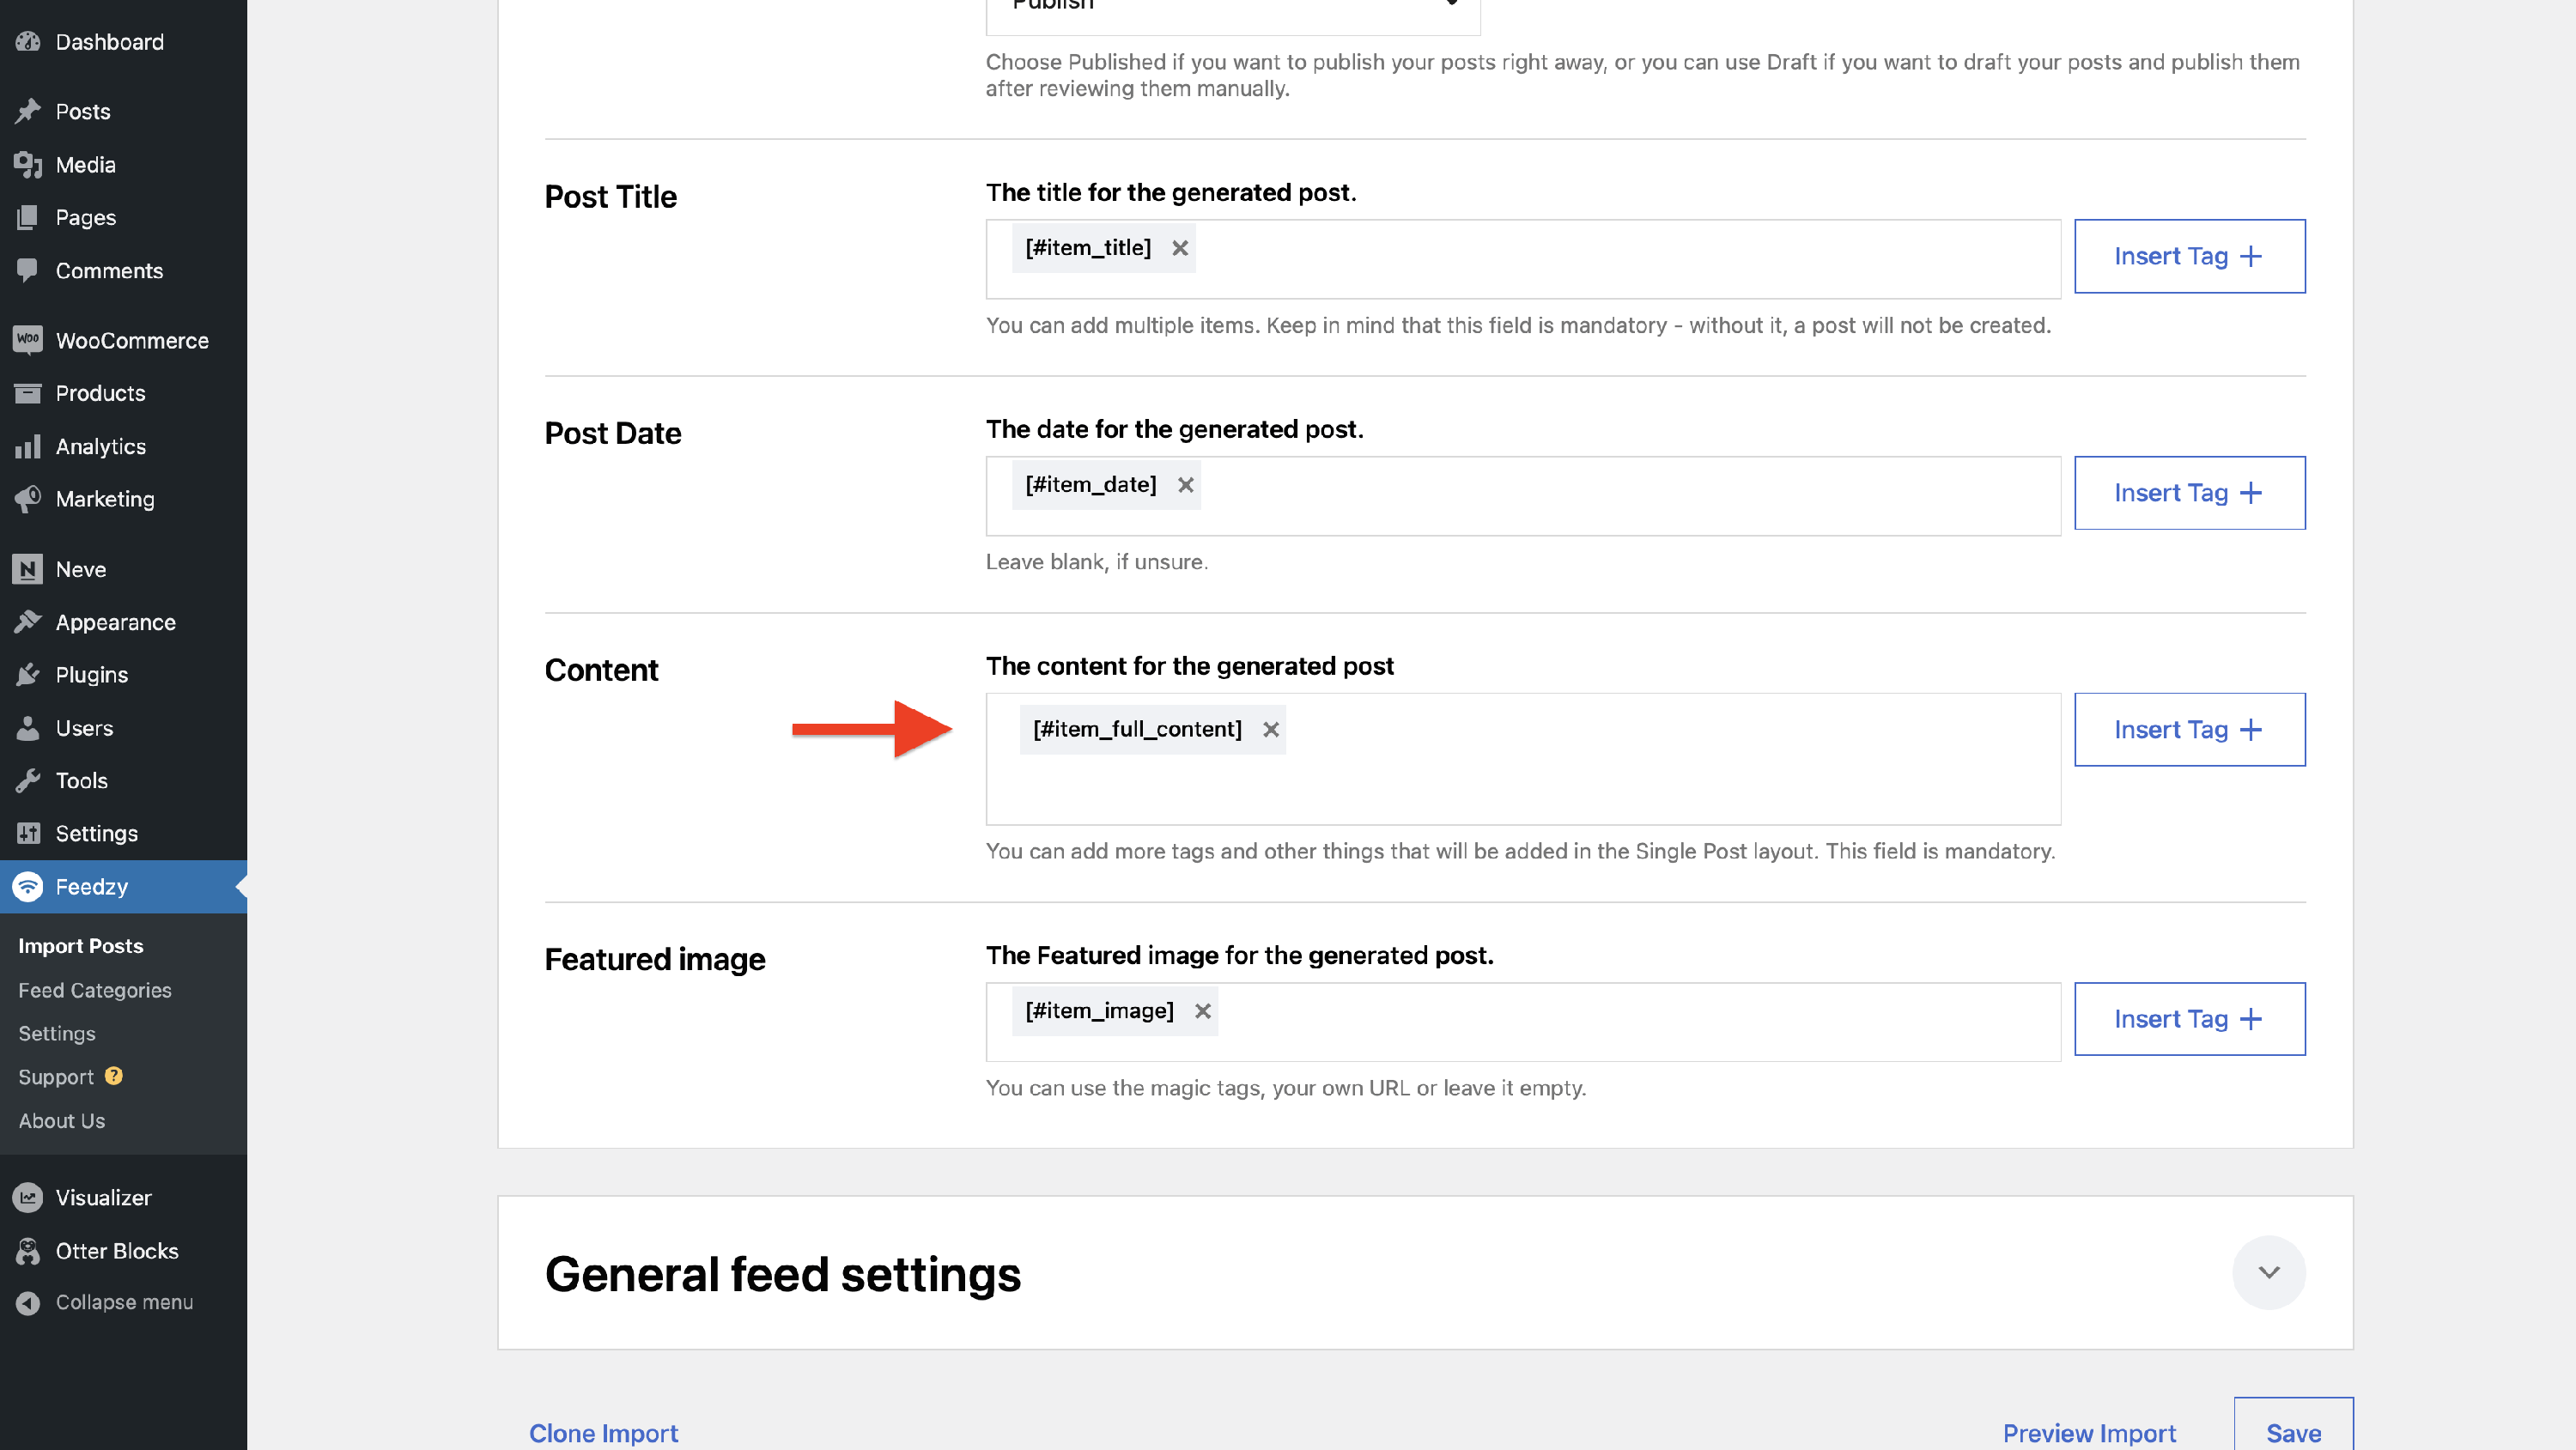
📝 Note: If you want to understand more about the difference between the [#item_content] and [#item_full_content] tags, check this doc.
Fallback Image for Feeds
In some cases, items from the same feed might or might not have featured images. To avoid having an inconsistent appearance of the feeds, you can use a fallback image that will be used for feed items that don't have by default.
📝Note: Read more about the Fallback Image for feeds here.
Import an embedded audio player to your posts
Importing embedded audio players to the feeds using Feedzy RSS Feeds is possible. The user will be able to play it directly from your website.
📝Note: Read more about the Embedded audio players for feeds here.
Useful Resources
Allow specific HTML tags unstripped
📝 Note: When editing Import Jobs, HTML tags in the Content Area are now preserved by default. You no longer need to add any code snippet to keep HTML in imported post content.
If you need to allow other HTML tags to be unstripped globally (for example, in feed widgets or other contexts), it is still possible by adding the following line to the wp-config.php file of your WordPress instance.
define( 'FEEDZY_ALLOW_UNSAFE_HTML', true );Video - Getting Started with Feedzy
Troubleshooting
If something doesn't work as expected, it might be worth checking the Feedzy Troubleshooting guide. It covers the first checks that we perform in such cases.