OpenAI API Setup
Setting up your OpenAI API connection is the first step to using FreshRank. This guide will walk you through getting your API key from OpenAI and connecting it to your WordPress site.
Note on ChatGPT vs OpenAI API access: Subscribing to ChatGPT does not automatically give you access to the OpenAI API. To connect to the API, you must create an OpenAI account, enable API access, and generate an API key. API usage is billed separately from any ChatGPT subscription.
What You'll Need
Before you begin, make sure you have:
- An OpenAI account (you can create one at platform.openai.com)
- Administrator access to your WordPress site
- A payment method added to your OpenAI account (required for API access)
Video Guide
Set up OpenAI by following the video walkthrough below, or use the written guide if you prefer step-by-step instructions.
Step 1: Create Your OpenAI Account and Enable Billing
- Go to platform.openai.com and create an account or log in
- Click the settings/gear icon (top-right corner)
- Open the Billing section in the left sidebar
- Add a credit card or purchase prepaid credits
- Confirm your payment method is active
Once billing is enabled, you can proceed to create your API key.

Step 2: Get Your OpenAI API Key
First, you'll need to create an API key in your OpenAI account.
- Log in to OpenAI Platform
- Go to platform.openai.com
- Sign in with your OpenAI account credentials
- Navigate to API Keys
- Click on the Settings (gear) icon in the top-right corner
- Select API keys from the left sidebar menu
- Create a New API Key
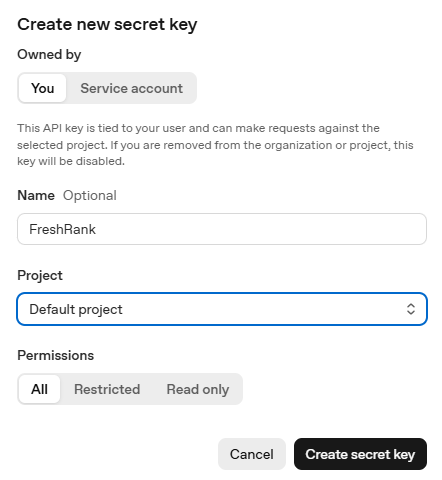
- Click the "Create new secret key" button
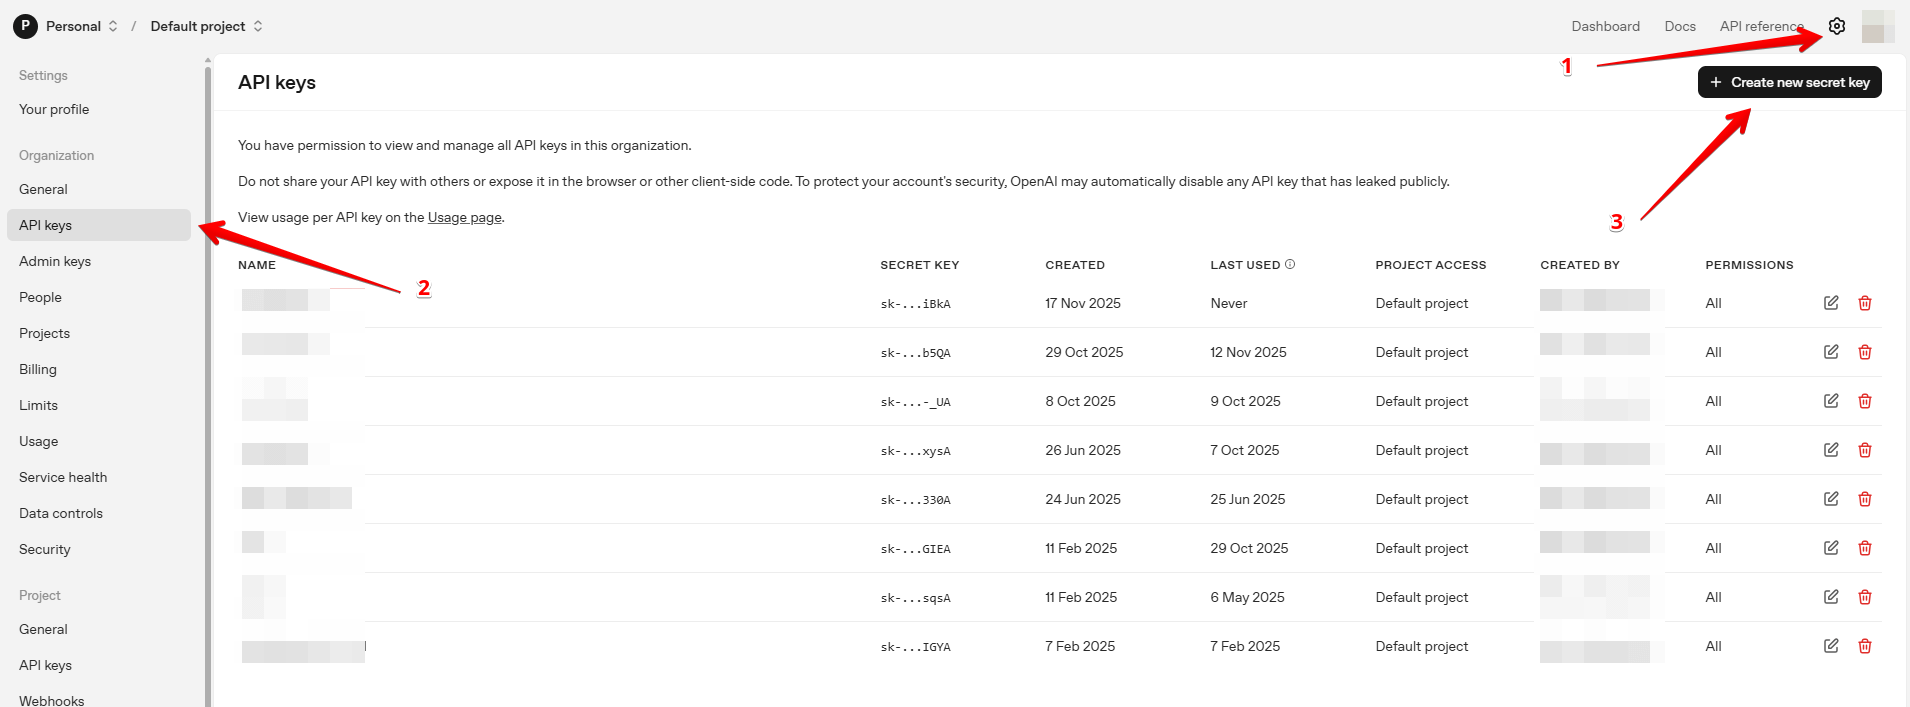
- Give your key a recognizable name (e.g., "FreshRank WordPress")
- Click "Create secret key"
- Copy Your API Key
- OpenAI will display your new API key only once
- Click the copy button to copy the key to your clipboard
- Important: Store this key somewhere safe - you won't be able to see it again
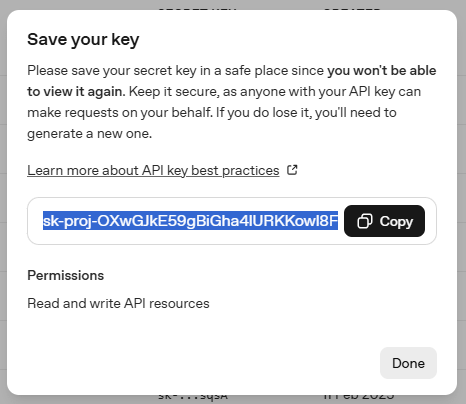
⚠️ Warning: Never share your API key publicly or commit it to version control. Anyone with your key can make API calls that will be charged to your account.
Step 2: Add Your API Key to FreshRank
Now that you have your API key, let's connect it to FreshRank AI.
- Open FreshRank Settings
- In your WordPress admin panel, go to FreshRank AI → Settings
- You'll land on the Settings tab by default
- Locate the AI Configuration Card
- On the Settings page, find the AI Configuration card (it's the first card on the left)
- Enter Your API Key
- Paste your OpenAI API key into the API Key field
- Don't worry - your key will be encrypted and stored securely in your database
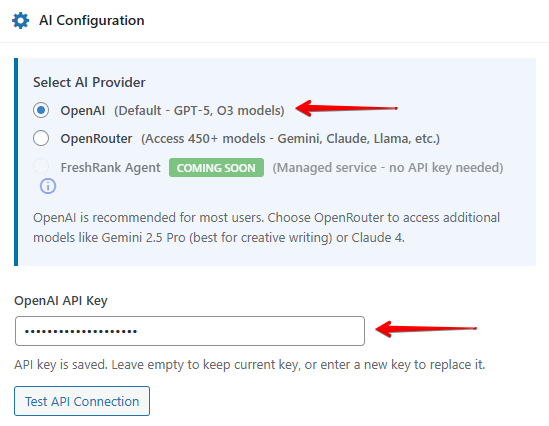
- Select Your AI Model
- Use the Analysis Model and Content Rewrite Model dropdowns to choose which OpenAI model you want to use for analysis and draft creation
- Recommended for most users: GPT-5 (best balance of speed and quality)
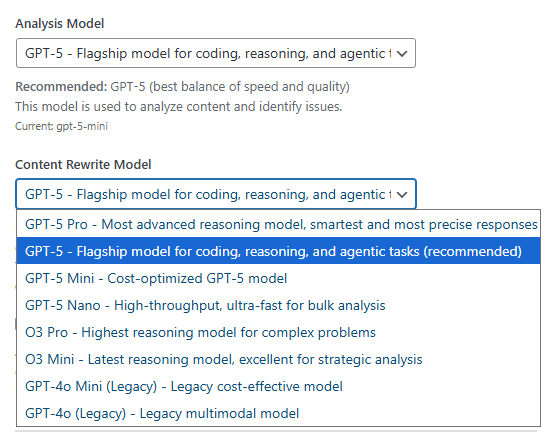
Pro Feature: With the free version of FreshRank you can only use the GPT-5 model. Upgrade to FreshRank Pro to unlock all other OpenAI models.
- Save Your Settings
- Click the "Save Changes" button at the bottom of the page
- You'll see a confirmation message when your settings are saved
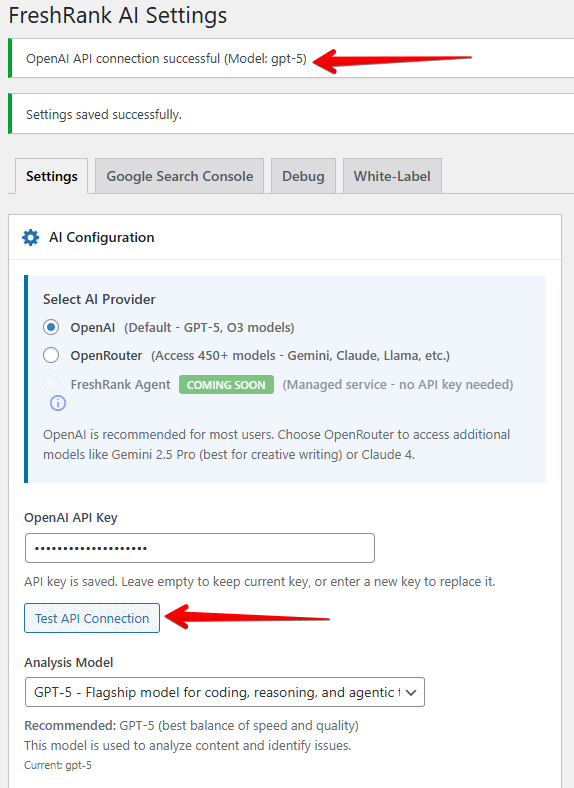
- Test Your Connection
- Click the "Test Connection" button
- If successful, you'll see a green confirmation message
- If there's an error, see the Troubleshooting section below
Note: If you just opened a new account on platfrom.openai.com the ‘Test Connection’ button might show an error even when the key is configured correctly. To test if this is the case, run any AI-powered action in FreshRank (like analysis) and see if it works. If you don’t get an error there, then the connection has been successfully established.
Understanding Model Options
When selecting your model, you'll see several options in the dropdown. Here's a quick overview:
- GPT-5 Series: The latest and most capable models
- GPT-5: Recommended for most users (balanced performance)
- GPT-5 Mini: Faster and more cost-effective for simple content
- GPT-5 Nano: Most affordable option for basic updates
- GPT-5 Pro: Most advanced for complex content (higher cost)
- O3 Series: Specialized reasoning models
- O3 Mini: Advanced reasoning for complex analysis
- O3 Pro: Highest-level reasoning (premium pricing)
- Legacy Models: Older GPT-4o models (still functional but not recommended for new setups)
💡 Tip: Start with GPT-5 and adjust based on your needs. You can change models at any time without losing your settings or data.
What Happens Next?
Once your OpenAI API is connected:
- Analysis Ready: You can now analyze your blog posts for SEO issues and opportunities
- Draft Generation: FreshRank can generate AI-powered content updates
- Usage Tracking: Your token usage will be tracked in the System Status card
Your API key will be used every time you:
- Run an analysis on a blog post
- Generate a draft update for a post
- Use the bulk analysis features
Troubleshooting Common Issues
"OpenAI API key is not configured"
Problem: You're trying to use FreshRank but haven't entered an API key yet.
Solution: Follow Step 2 above to add your API key in the Settings page.
"OpenAI API error (HTTP 401): Invalid API key"
Problem: The API key you entered is incorrect or has been revoked.
Solutions:
- Double-check that you copied the entire key (no extra spaces or missing characters)
- Go back to OpenAI platform and verify the key still exists
- If the key was deleted, create a new one and update FreshRank settings
- Make sure you're copying from the correct OpenAI account (if you have multiple)
"OpenAI API error (HTTP 429): Rate limit exceeded"
Problem: You've made too many API requests in a short time period.
Solutions:
- Wait 5-10 minutes and try again
- Avoid running bulk operations on many posts at once
- Consider upgrading your OpenAI plan for higher rate limits
- If this happens frequently, spread out your analysis tasks throughout the day
💡 Tip: You can check your OpenAI usage and rate limits at platform.openai.com/usage
Test Connection Button Shows an Error
Problem: The test connection fails even though you've entered a valid key.
Possible causes and solutions:
- Network/Firewall Issue
- Your hosting provider may be blocking connections to OpenAI
- Contact your host and ask them to allow connections to api.openai.com
- Insufficient OpenAI Credits
- Make sure you have a payment method added to your OpenAI account
- Check your billing status at platform.openai.com/billing
- PHP cURL Not Enabled
- FreshRank needs the PHP cURL extension to connect to OpenAI
- Contact your hosting provider to enable cURL if it's disabled
- Connection test failed
- If you just opened a new OpenAI account the ‘Test Connection’ button might show a ‘Connection test failed’ error. Try running any AI-powered action in FreshRank (like running an analysis on a single article). If you don’t get an error and analysis completes then you’re all set and your API key is working. After some time the ‘Test Connection’ button will show a success message.
Security Best Practices
To keep your API key secure:
✅ Do:
- Store your API key only in the FreshRank settings (it's encrypted in your database)
- Use a unique API key for each WordPress site
- Regularly monitor your OpenAI usage for unexpected activity
- Revoke and regenerate your key if you suspect it's been compromised
❌ Don't:
- Share your API key in support forums or emails
- Store your API key in plain text files or spreadsheets
- Use the same key across multiple sites or applications
- Commit your API key to GitHub or other version control systems
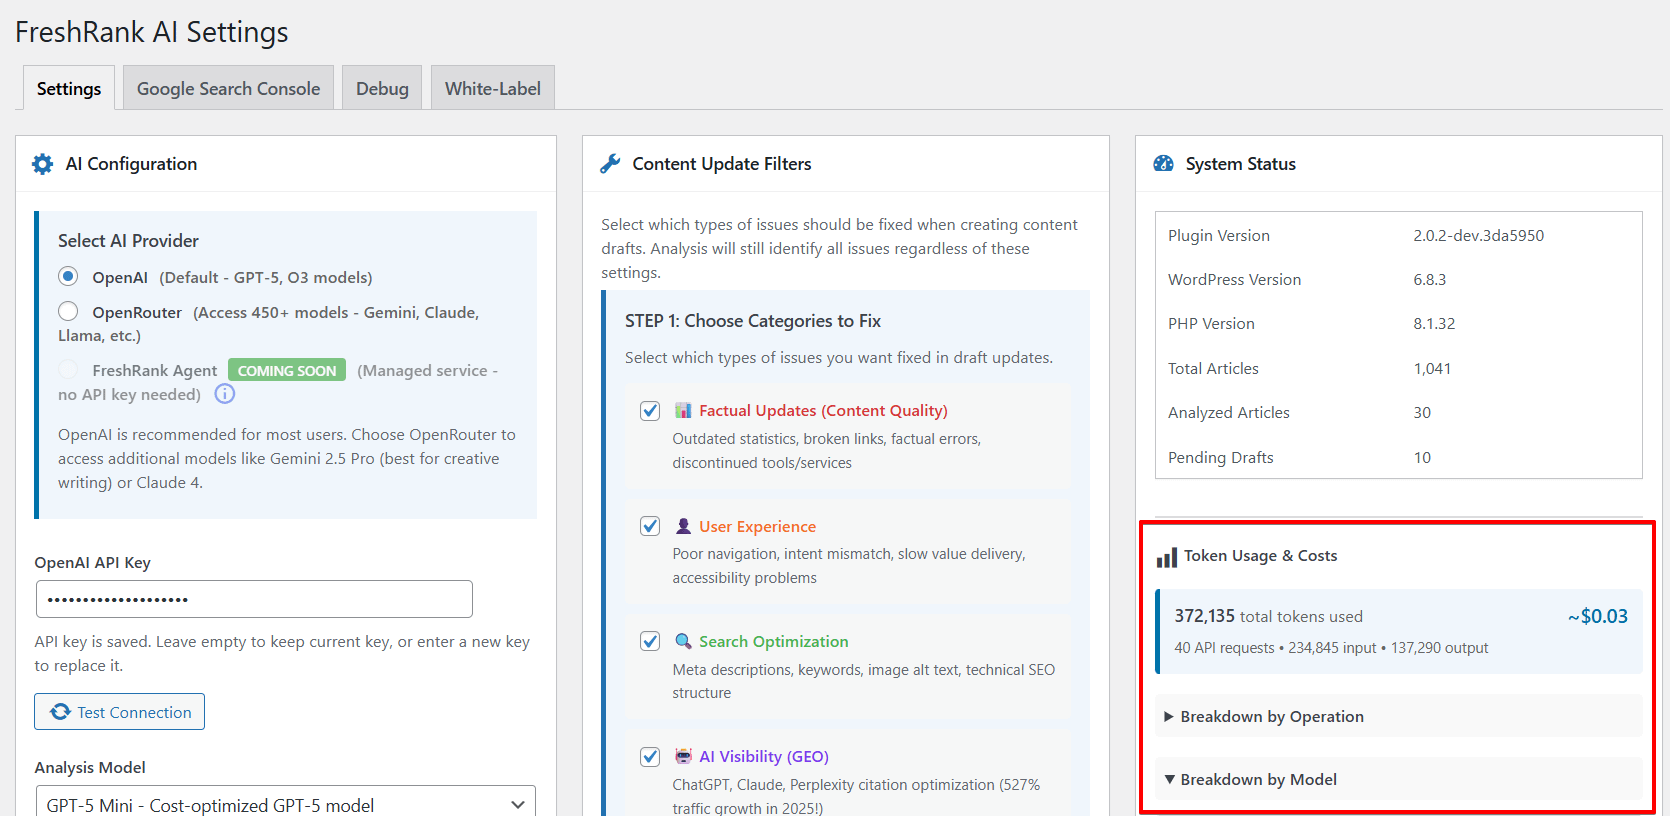
Monitoring Your API Usage
To keep track of your OpenAI costs:
- In FreshRank:
- Go to FreshRank AI → Settings
- Check Token Usage in the System Status card on the right
- You'll see total tokens used and estimated costs
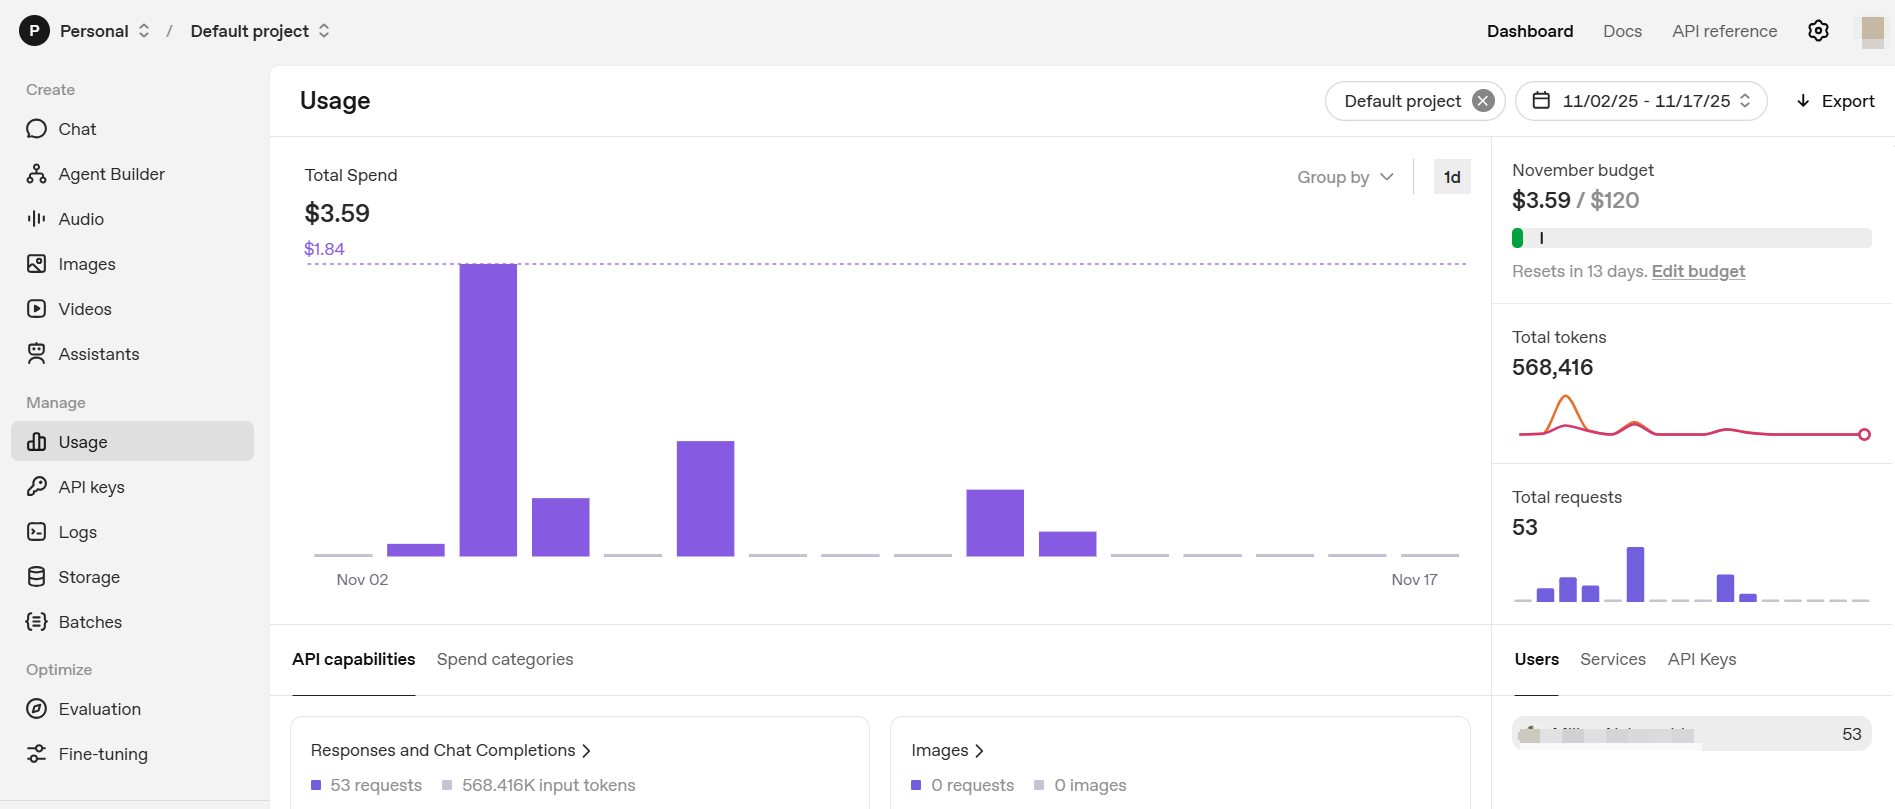
- In OpenAI Platform:
- Visit platform.openai.com/usage
- View detailed breakdowns by day and model
- Set up usage alerts to prevent unexpected charges
Next Steps
Now that your OpenAI API is connected, you're ready to:
- Configure Content Update Filters to control what gets updated
- Connect Google Search Console (optional but recommended for better prioritization)
- Analyze your first post and see what FreshRank finds