Running Content Analysis
Content analysis is where FreshRank AI examines your blog posts and identifies opportunities for improvement. This guide will walk you through selecting posts to analyze and running the analysis.
Understanding Content Analysis
FreshRank AI uses advanced AI to review your content across five key areas:
- User Experience - How well your content serves readers (clarity, structure, readability)
- Factual Updates - Accuracy and currency of information (outdated data, broken links)
- Search Optimization - Technical SEO elements (meta descriptions, keywords, alt text)
- AI Visibility - How well AI platforms like ChatGPT and Claude can cite your content
- Opportunities - Growth ideas for expanding and enhancing your content
Each issue found is marked with a severity level (High, Medium, or Low) to help you prioritize what matters most.
Important: Analysis typically takes 30 seconds to 15 minutes per post, depending on your AI model settings and post length. The plugin stores results so you only need to analyze each post once (unless you want to re-analyze it later).
How to Analyze a Post
Navigate to FreshRank AI → Dashboard in your WordPress admin menu. You'll see a table listing all your blog posts. You can run analysis on a single post, or instead of analyzing posts one at a time, you can analyze several posts simultaneously using bulk actions.
Analyzing a Single Post
To analyze one post at a time:
- Find the post you want to analyze in your dashboard
- Look at the Actions column on the right
- Click the Analyze button
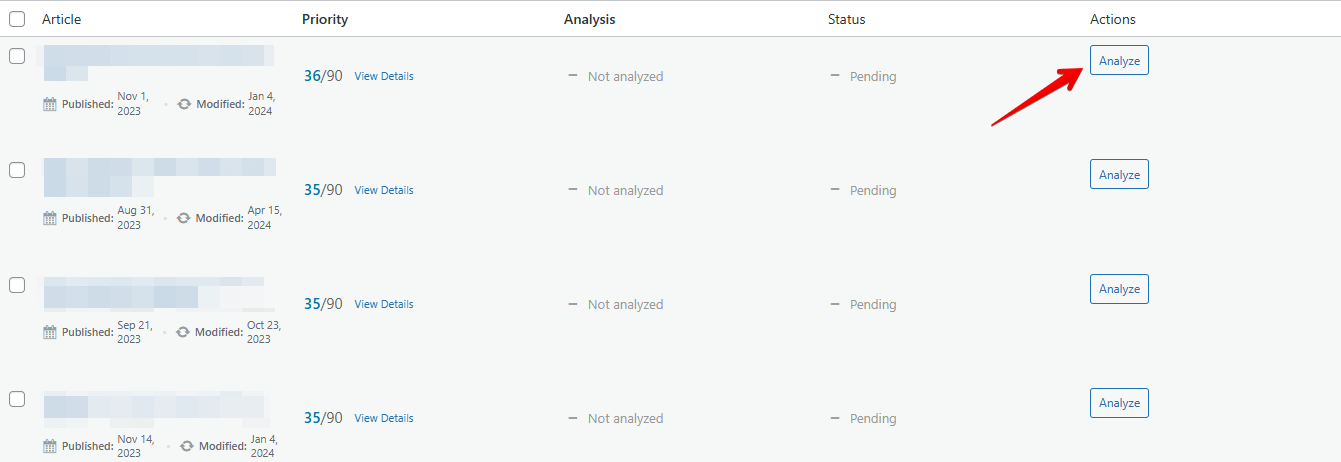
The status badge will change to "Analyzing" (blue) and the plugin will begin examining your content. You can leave this page and come back later—the analysis will continue running in the background.
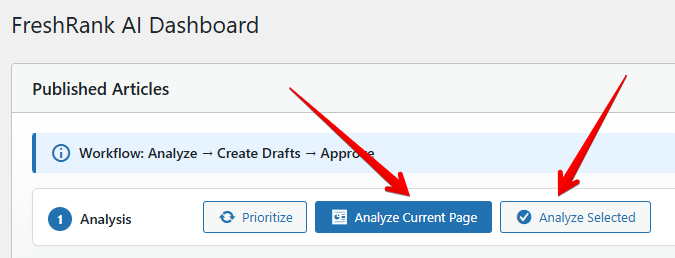
Analyze All Posts on Current Page
To analyze all visible posts at once:
- Make sure the posts you want to analyze are visible (use filters if needed)
- Click the Analyze Current Page button at the top of the dashboard
- The plugin will start analyzing all posts currently displayed on the page
Note: The dashboard shows posts in pages (the default is 25 per page). "Analyze Current Page" only affects the current page, not your entire site.
Analyze Selected Posts
For more control, you can choose specific posts to analyze:
- Check the checkbox next to each post you want to analyze
- Click the Analyze Selected button at the top of the dashboard
- Only the posts you checked will be analyzed
Pro Feature: Bulk analysis is only available in FreshRank Pro.
When Analysis is Complete
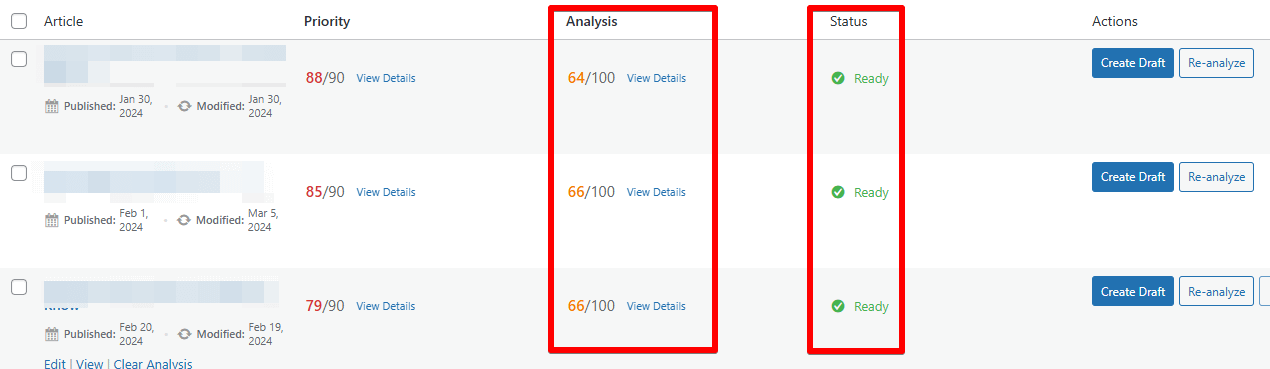
Once finished, the status badge changes to "Ready" (green), and you'll see:
- Analysis Score (for example: 64/100)in the Analysis column
- A View Details link next to the score which you can click to review results
Understanding Post Status
Each post in your dashboard shows a status badge that tells you its current state:
- Pending (gray) - Not yet analyzed
- Analyzing (blue) - Analysis is currently running
- Ready (green) - Analysis is complete and results are available
- Error (red) - Something went wrong during analysis
Re-analyzing a Post
If you've updated your content or want to run a fresh analysis, you can analyze the same post again:
- Find the post with "Ready" status
- Click Re-analyze in the Actions column
- The plugin will overwrite the previous analysis with new results
Note: Re-analyzing is useful after you've manually edited a post or if the original analysis is outdated.
What to Expect During Bulk Analysis
- Each post is analyzed one at a time
- You'll see status badges change from "Pending" → "Analyzing" → "Ready"
- Analyzing many posts at once can take time, so be patient!
Important: Very large bulk operations (analyzing 50+ posts at once) may be slow on some hosting plans. If you have many posts to analyze, consider doing them in smaller batches.
Next: Learn how to interpret your analysis report.