Google Search Console OAuth Setup Guide
This guide walks you through creating OAuth credentials in Google Cloud Console and connecting them to FreshRank AI. The process takes about 10-15 minutes for first-time setup. Follow each step carefully.
What You'll Need
Before you begin:
- A Google account with access to Google Search Console
- Your site verified in Google Search Console
- Owner or Full User permissions in GSC (Restricted Access won't work)
- Administrator access to your WordPress site
- About 10-15 minutes of uninterrupted time
Video Guide
Set up FreshRank by following the video walkthrough below, or use the written guide if you prefer step-by-step instructions.
Overview: What We're Doing
The OAuth setup process involves:
- Creating a Google Cloud project (or using existing one)
- Enabling the Search Console API for your project
- Configuring OAuth consent screen (tells Google what your app does)
- Creating OAuth credentials (Client ID and Secret)
- Adding redirect URI (where Google sends users after authorization)
- Copying credentials to FreshRank (connecting the pieces)
- Authorizing the connection (granting permissions)
Don't worry if this sounds complex - we'll walk through each step with clear instructions.
Step 1: Create or Select a Google Cloud Project
A Google Cloud project is a container for your API credentials. You need one project to connect FreshRank to GSC.
Creating a New Project
- Go to Google Cloud Console
- Visit console.cloud.google.com
- Sign in with your Google account if prompted
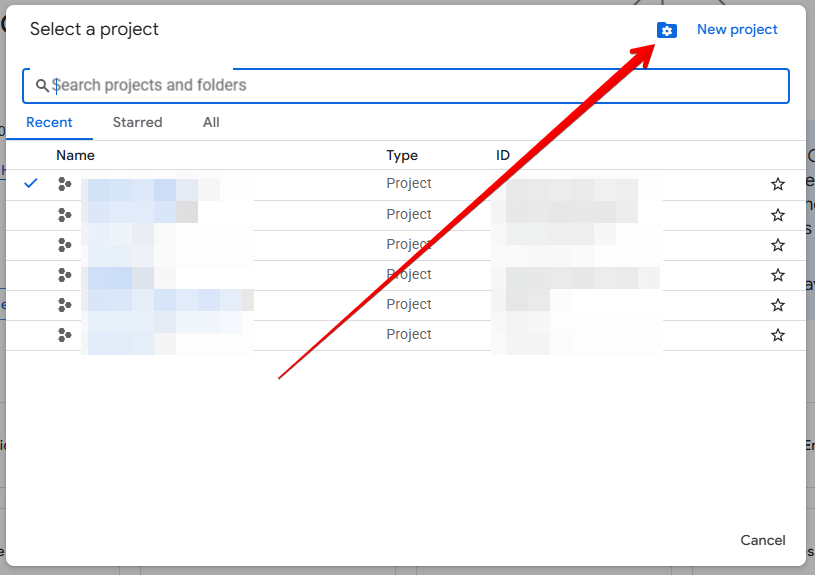
- Open the Project Selector
- Look at the top navigation bar
- Click on the project selector button (next to "Google Cloud" logo)
- This will open a popup with all your existing projects (if any)

- Click "NEW PROJECT"
- Look for the "NEW PROJECT" button in the top-right of the project selector popup
- Click it to open the new project form
- Enter Project Details
- Project name: Enter a descriptive name (e.g., "FreshRank AI GSC Integration")
- Location: Leave as default (or select if you have multiple)
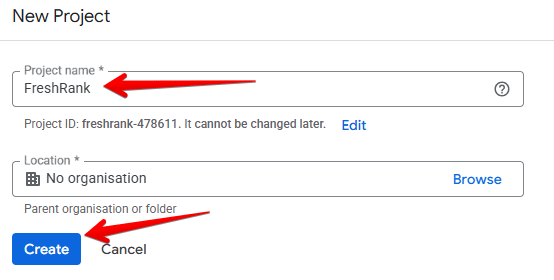
- Click "CREATE"
- Wait 10-20 seconds for the project to be created
- You'll see a notification when it's ready
- The new project will automatically become active
Using an Existing Project
If you already have a Google Cloud project you want to use:
- Click the project selector button at the top of the page
- Select your existing project from the list
- Continue to Step 2 below
⚠️ Note: If you use an existing project that already has other APIs or services, make sure you understand what's in the project. For most users, creating a dedicated project for FreshRank is cleaner and easier to manage.
Step 2: Enable the Google Search Console API
Now that you have a project, you need to enable the Search Console API for it.
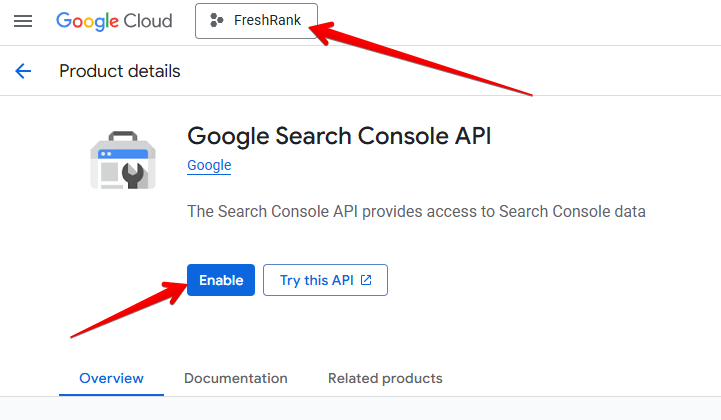
- Go to Search Console API Page
- Visit console.cloud.google.com/apis/library/searchconsole.googleapis.com
- Or search for "Search Console API" in the API Library
- Verify Correct Project
- Check the project selector at the top of the page
- Make sure your new project is selected
- If not, switch to the correct project
- Click "ENABLE"
- Look for the blue "ENABLE" button
- Click it to enable the API
- Wait for Activation
- API activation takes 5-10 seconds
- You'll be automatically redirected to the API/Service details page
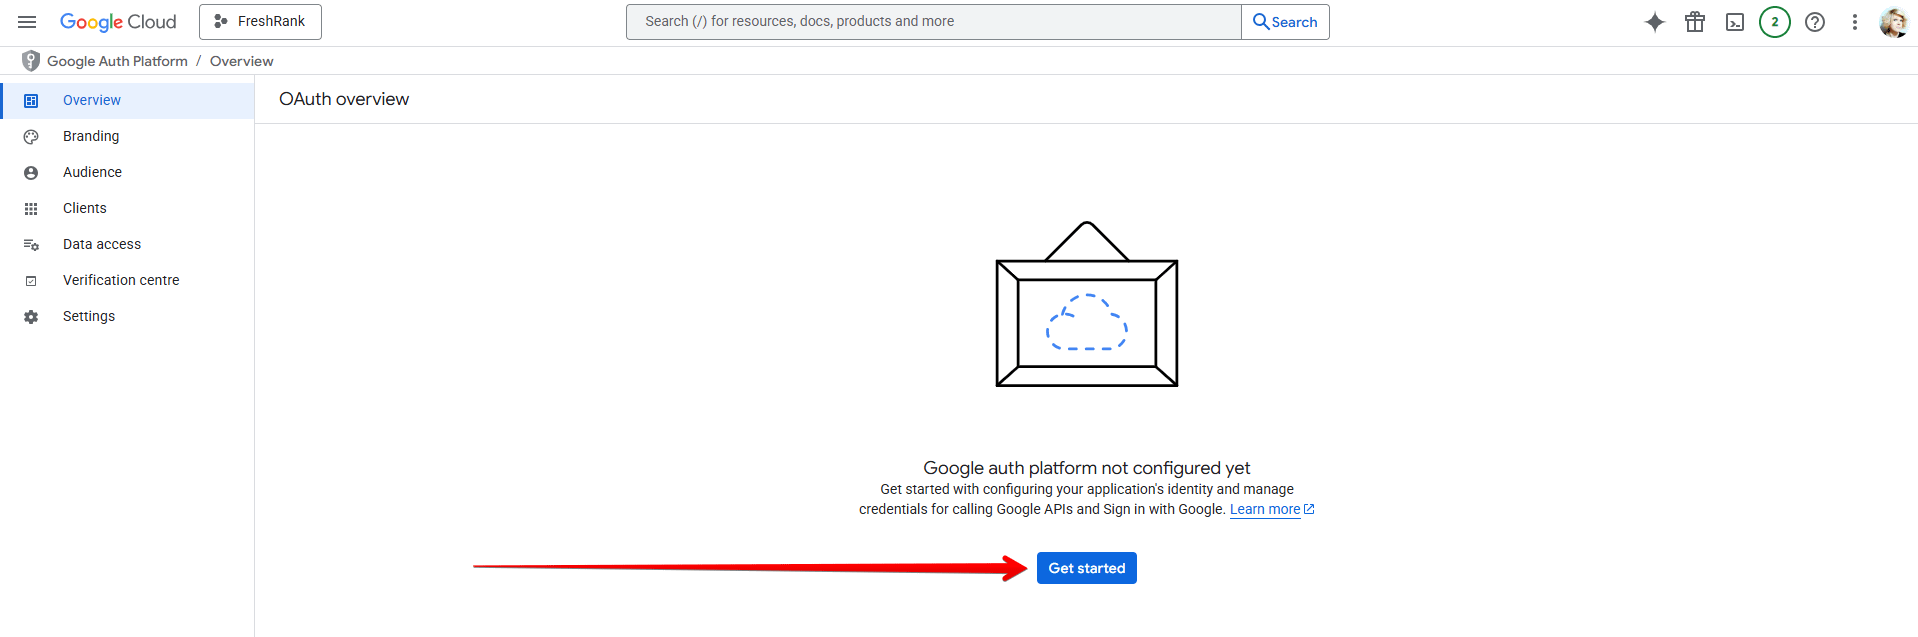
Step 3: Configure OAuth Consent Screen
The OAuth consent screen is what users see when authorizing your application. You need to configure it before creating credentials.
- Go to OAuth Consent Screen
- Click on OAuth consent screen from the left menu
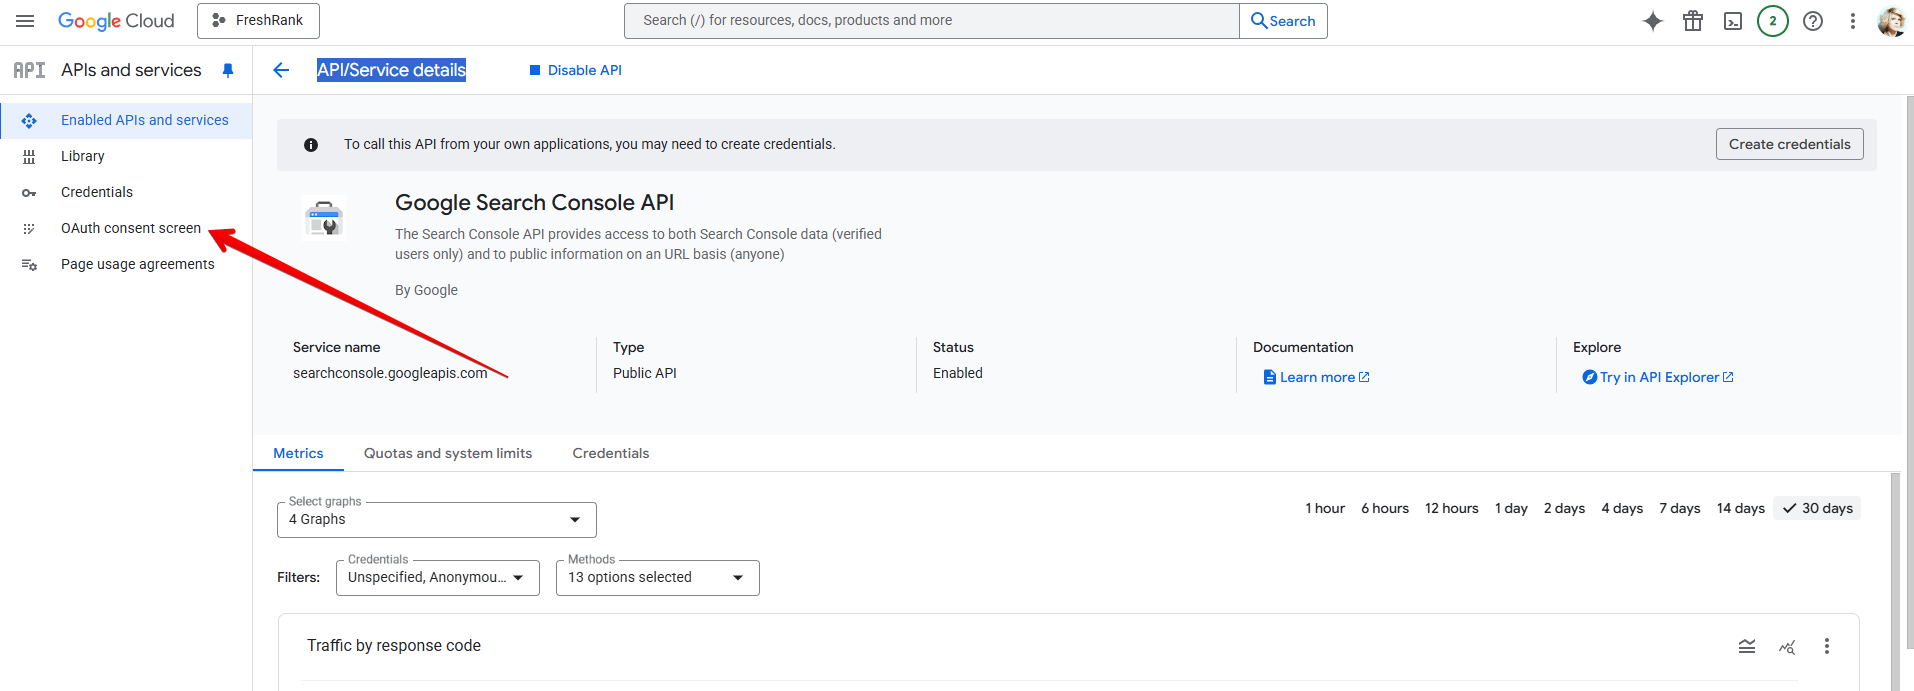
- Click on the Get Started button
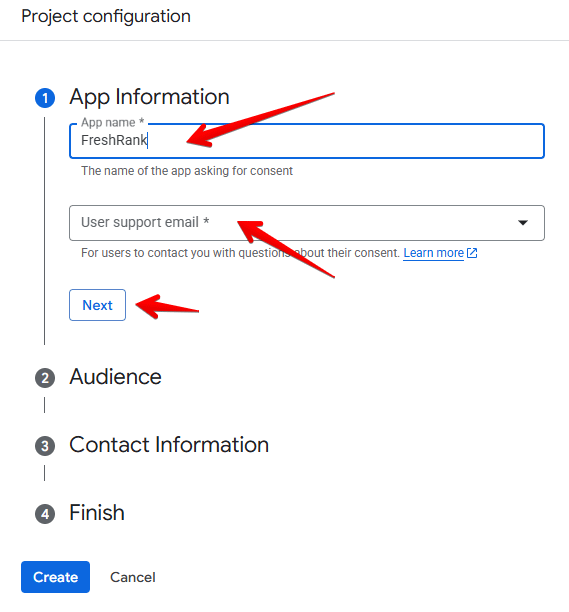
- Fill in App Information
On the "Project configureation" screen, enter:
App Information:
- App name:
FreshRank(or your white-label name) - User support email: Your email address (select from dropdown)
- Click Next
Audience:
- Select External
- Click Next
Contact Information:
- Fill in your email address
- Click Next
Finish Setup:
- Tick the checkbox to agree with Google policies
- Click Continue
- Click Create
Make The App Public:
- Click on Audience in the left sidebar
- Under Publishing Status click Publish app
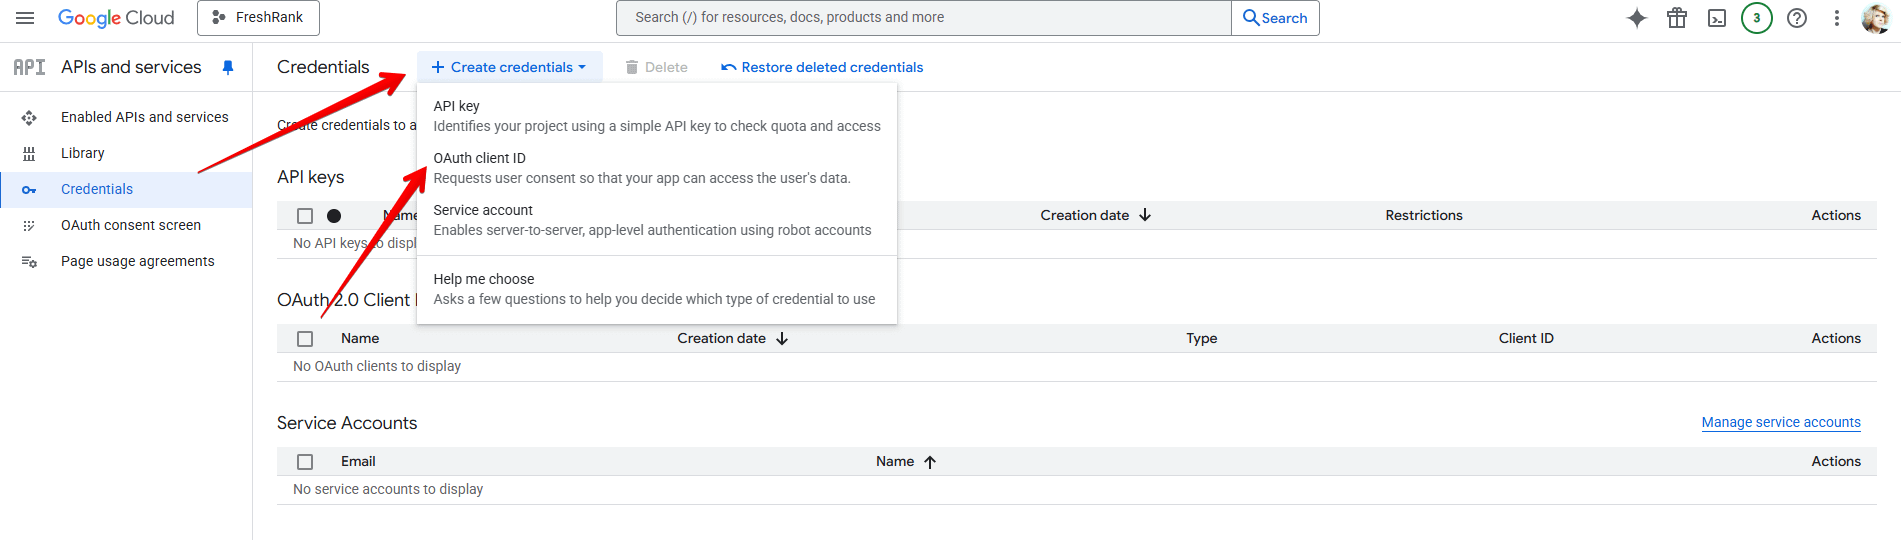
Step 4: Create OAuth 2.0 Credentials
Now you'll create the actual credentials (Client ID and Client Secret) that FreshRank will use.
- Go to Credentials Page
- Visit console.cloud.google.com/apis/credentials
- Or navigate: APIs & Services → Credentials from the left menu
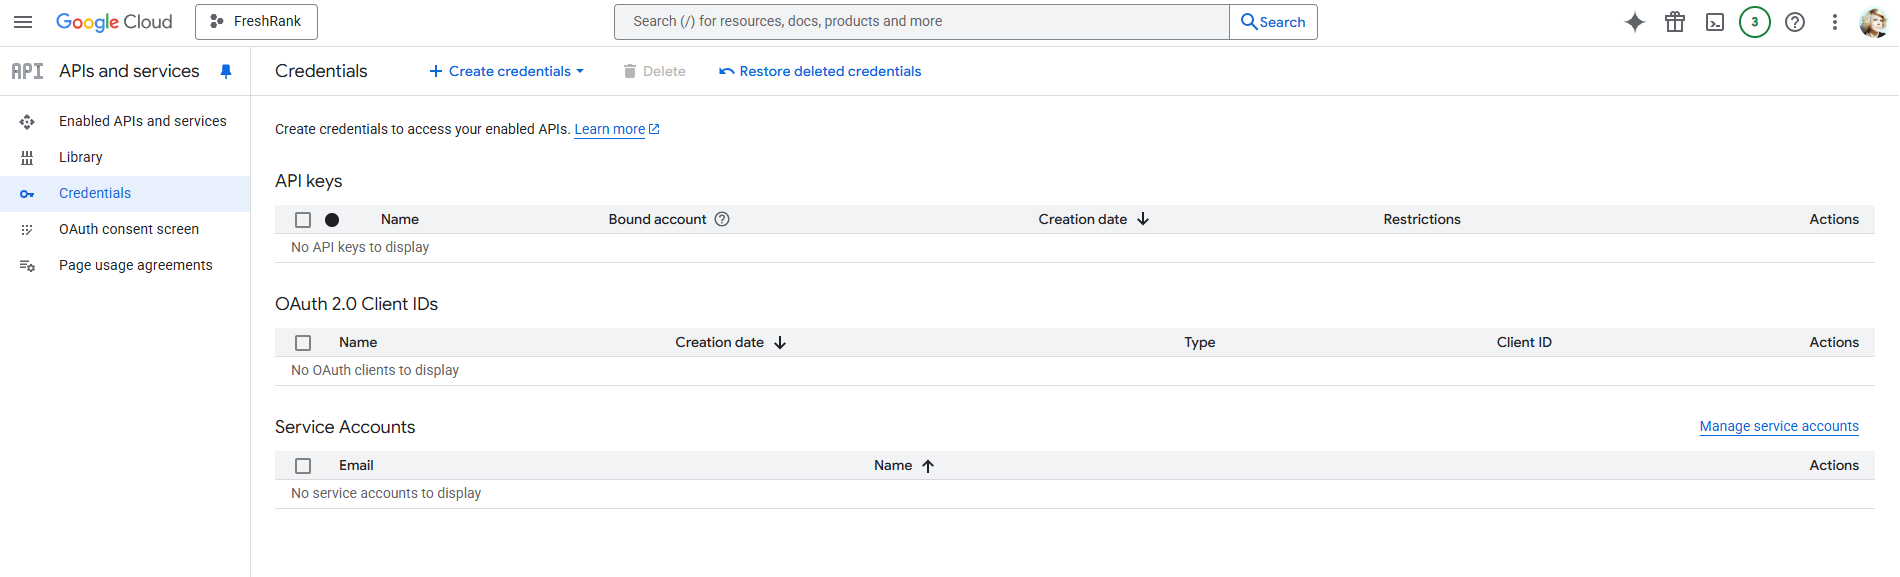
- Click "CREATE CREDENTIALS"
- Look for the "+ CREATE CREDENTIALS" button at the top
- Click it to open the dropdown menu
- Select "OAuth client ID"
- From the dropdown, choose "OAuth client ID"
- You'll be taken to the credential creation form
- Choose Application Type
- Application type: Select "Web application" from the dropdown
- This is required for WordPress integrations
- Enter Credential Name
- Name: Enter a descriptive name (e.g., "FreshRank Client")
- This is just for your reference in Google Cloud Console
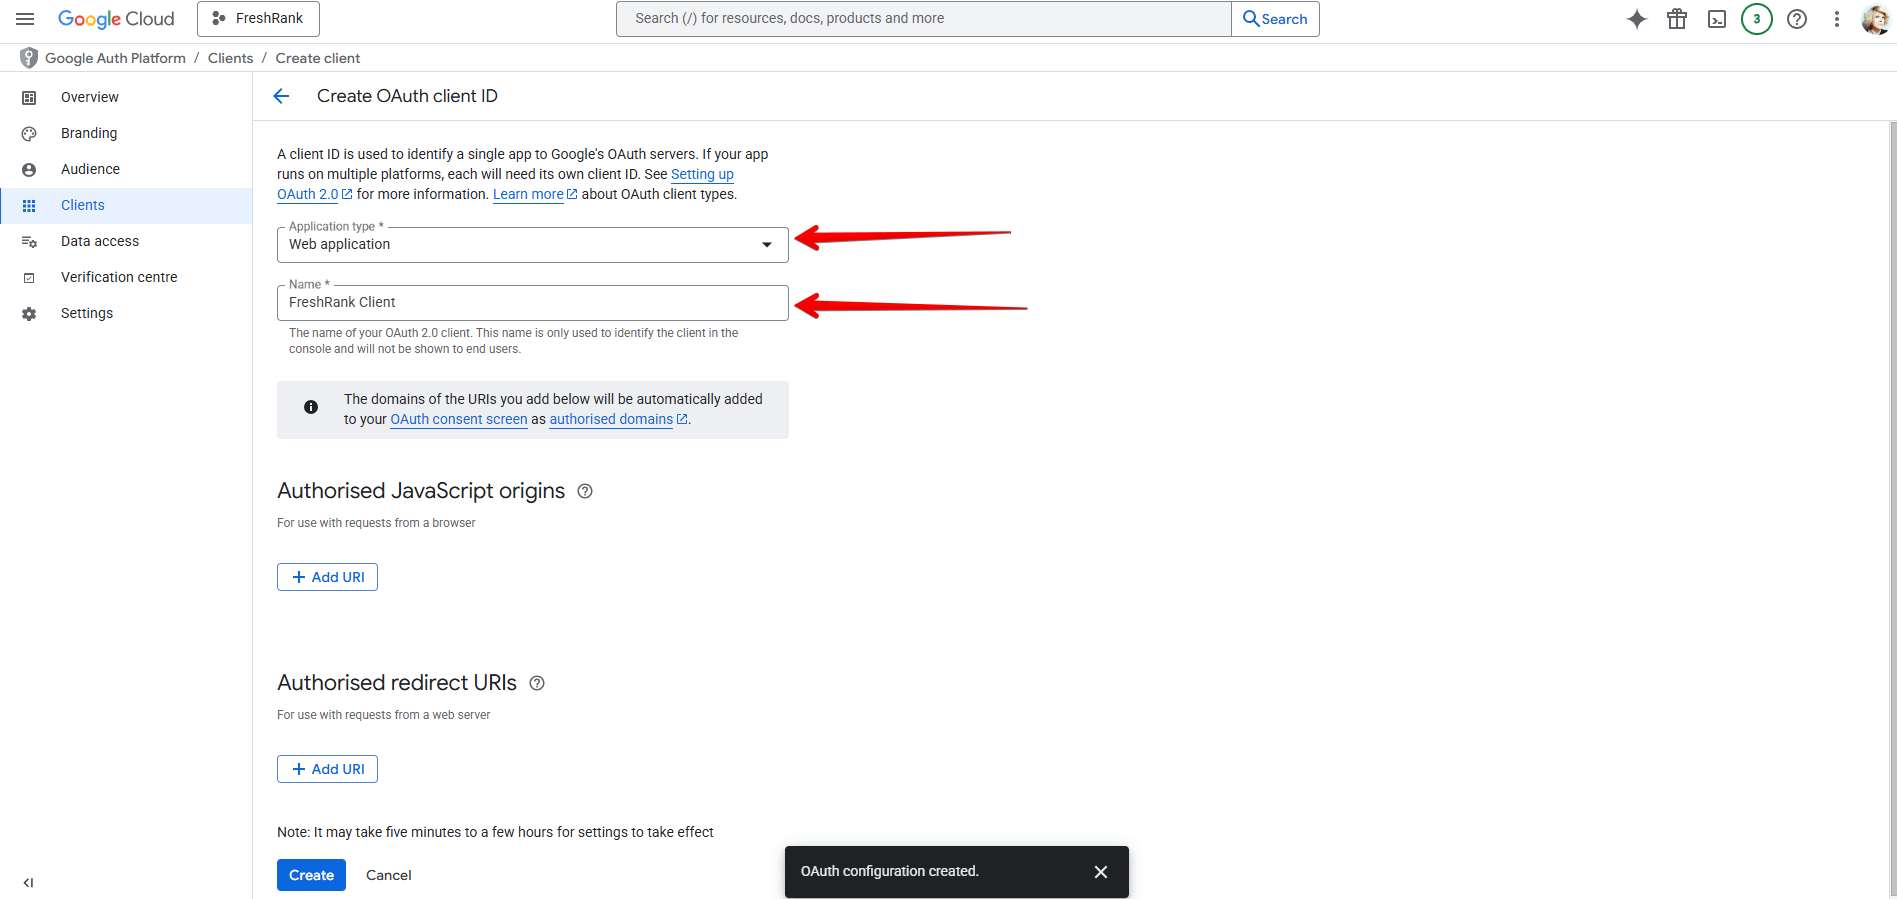
💡 Next: Keep this page open - we need to add the redirect URI in the next step before clicking "CREATE".
Step 5: Add Authorized Redirect URI
The redirect URI tells Google where to send users after they authorize your app. This must match exactly what FreshRank expects.
Getting Your Redirect URI from FreshRank
- Open FreshRank Settings (in a new tab)
- In WordPress admin, go to FreshRank AI → Settings
- Click on the Google Search Console tab
- Look for the "Redirect URI" field under "OAuth Setup"
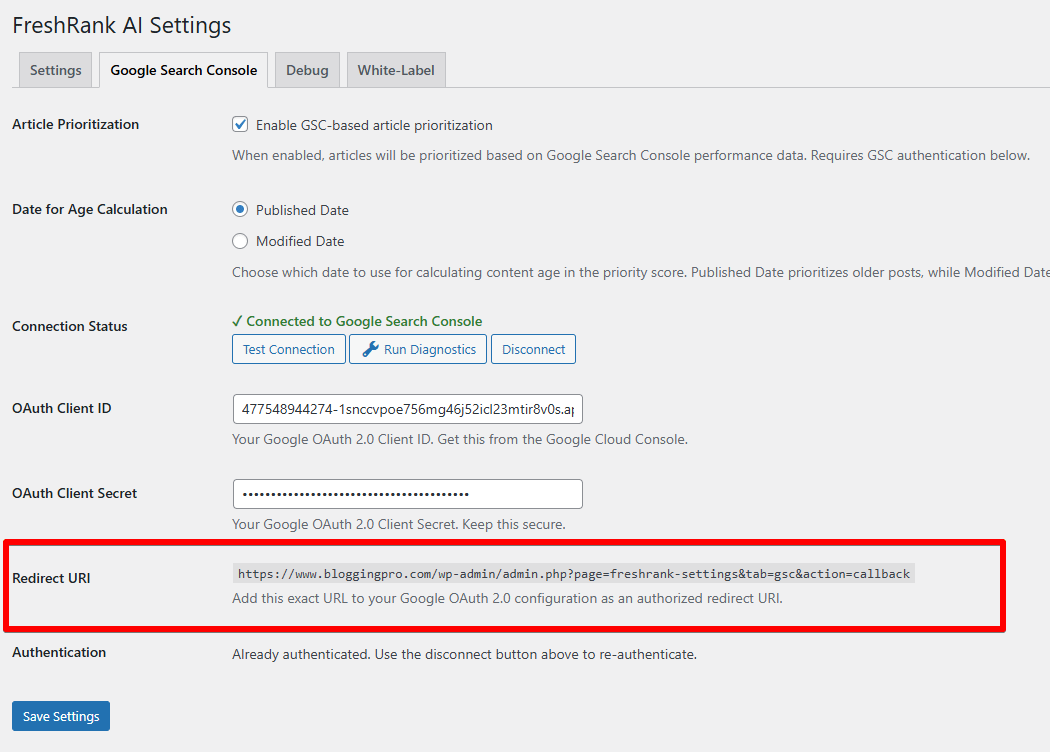
- Copy the Redirect URI
- The URI will look like:
https://yourdomain.com/wp-admin/admin.php?page=freshrank-settings&tab=gsc&oauth=callback - Select and copy the entire URI
- Keep this tab open - you'll need it again soon
- The URI will look like:
- Return to Google Cloud Console Tab
- Scroll down to the "Authorized redirect URIs" section
- Click "ADD URI"
- Look for the "+ ADD URI" button
- Click it to add a new URI field
- Paste Your Redirect URI
- Paste the redirect URI you copied from FreshRank
- Double-check that it's complete and correct
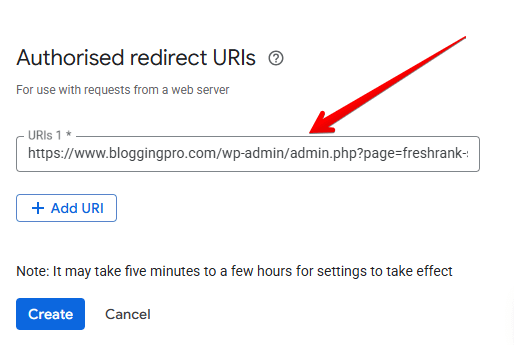
Important: The URI must match exactly - including https:// , domain, and all parameters. If the redirect URI doesn't match exactly, the OAuth flow will fail with a "redirect_uri_mismatch" error. This is the most common setup mistake.
- Verify the URI
- Check for common mistakes:
- ❌ Missing
https:// - ❌ Wrong domain
- ❌ Missing or incorrect parameters
- ❌ Extra spaces before or after
- ✅ Complete, exact match from FreshRank
- ❌ Missing
- Check for common mistakes:
- Click "CREATE"
- Once the redirect URI is added, click the blue "CREATE" button at the bottom
- Wait a few seconds for credentials to be generated
Step 6: Copy Your Credentials
After clicking "CREATE", a popup appears with your OAuth credentials.
- Credentials Popup Appears
- You'll see a popup titled "OAuth client created"
- It displays your Client ID and Client Secret

- Copy Your Client ID
- Client ID: Long string ending in
.apps.googleusercontent.com - Click the copy icon next to the Client ID or manually select and copy it
- Paste it somewhere safe temporarily (or directly into FreshRank)
- Client ID: Long string ending in
- Copy Your Client Secret
- Client Secret: Shorter random string
- Click the copy icon next to the Client Secret or manually select and copy it
- Paste it somewhere safe temporarily
- Click "OK" to close the popup
- Don't worry - you can always retrieve these credentials later
💡 Finding Credentials Later: If you need to find these credentials again, go to console.cloud.google.com/apis/credentials, find your OAuth 2.0 Client ID in the list, and click on it to view details.
Step 7: Add Credentials to FreshRank
Now you'll connect your Google OAuth credentials to FreshRank.
- Return to FreshRank Settings
- Go back to your WordPress admin tab
- Navigate to FreshRank AI → Settings → Google Search Console (if not already there)
- Enable GSC Integration
- Check the box "Enable Google Search Console Integration"
- Paste Client ID
- Find the "OAuth Client ID" field
- Paste the Client ID you copied from Google Cloud Console
- Make sure there are no extra spaces
- Paste Client Secret
- Find the "OAuth Client Secret" field
- Paste the Client Secret you copied from Google Cloud Console
- Make sure there are no extra spaces
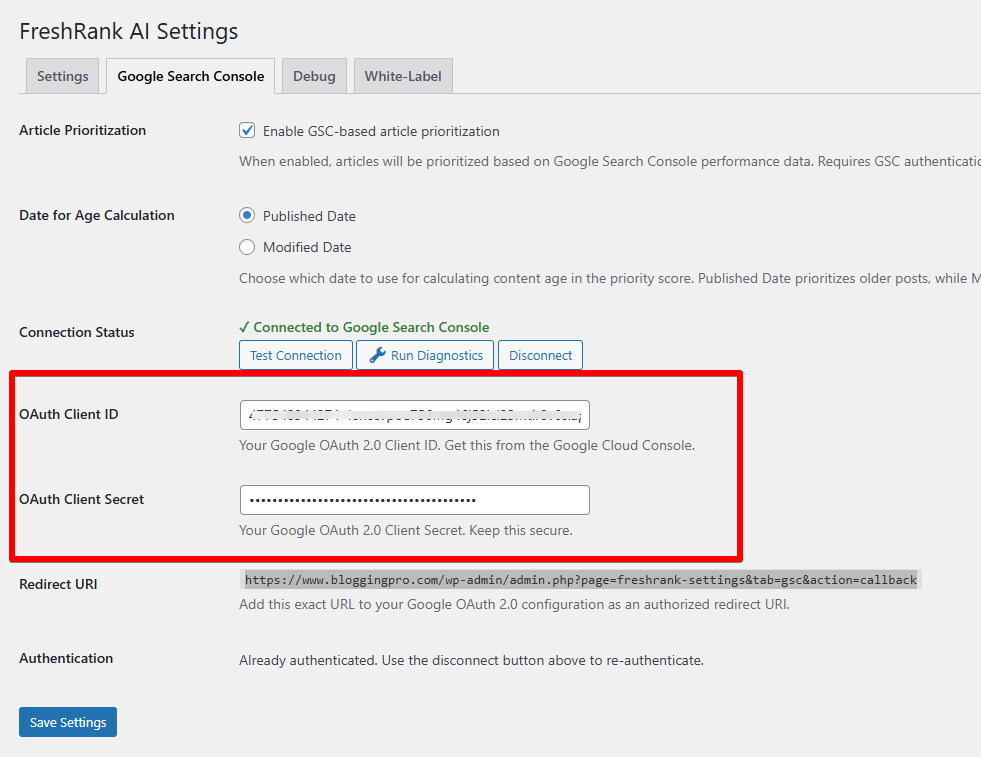
- Click "Save Changes"
- Scroll to the bottom of the page
- Click the "Save Changes" button
- Wait for confirmation message: "Settings saved successfully"
Step 8: Authorize FreshRank
The final step is authorizing FreshRank to access your Google Search Console data.
- Click "Connect to Google Search Console"
- After saving your credentials, find the blue "Connect to Google Search Console" button
- It should be visible in the Connection Status section
- Click the button

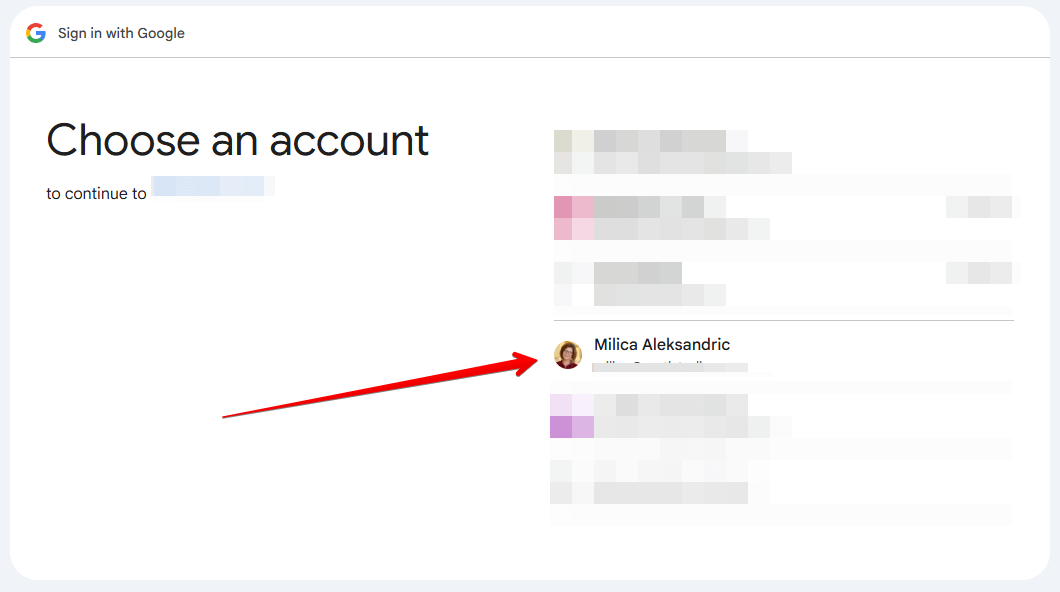
- Google Authorization Page Opens
- A new tab/window opens with Google's authorization page
- You'll see: "FreshRank AI wants to access your Google Account"
- Choose Your Google Account
- Select the Google account that has access to your Search Console
- If already signed in, it may skip this step
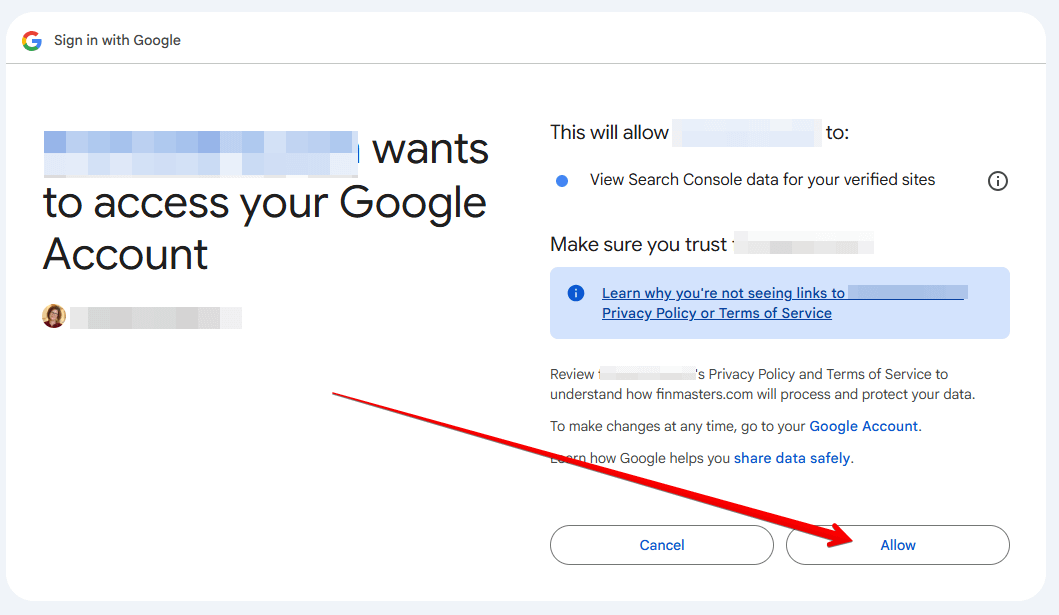
- Review Permissions
- Google shows what FreshRank is requesting access to:
- ✅ "View Search Console data for your verified sites"
- This is read-only access - FreshRank cannot modify anything
- Google shows what FreshRank is requesting access to:
- Click "Allow"
- Review the permissions
- Click the "Allow" button to grant access
- Do NOT click "Deny" or close the window
- Redirect Back to FreshRank
- After clicking "Allow", Google redirects you back to FreshRank Settings
- You'll see a success message: "Google Search Console connected successfully"
- The connection status should show "Connected" with a green badge
- Automatic Property Matching
- FreshRank automatically finds your site in Google Search Console
- It matches your WordPress site URL to a GSC property
- If multiple properties exist, it selects the best match
✅ Success! Your Google Search Console is now connected to FreshRank. Priority scores will start appearing within 24 hours.
Verifying Your Connection
After authorization, verify everything is working:
Test Connection
- Click "Test Connection" Button
- In FreshRank Settings → Google Search Console
- Click the "Test Connection" button

- Check Result
- ✅ Success: "GSC connection is working properly"
- ❌ Error: See our GSC troubleshooting guide
Run Diagnostics
For more detailed verification:
- Click "Run Diagnostics" Button
- In FreshRank Settings → Google Search Console
- Click the "Run Diagnostics" button
- Review Diagnostic Report
- OAuth token status: Should show "Valid"
- API access: Should show "Working"
- Property match: Shows which GSC property is connected
- Recent data fetch: Shows last successful data sync