Hestia Basic Mega Menu Setup
NOTE: This is only available on the Primary Menu. Doing this for other menus might yield unexpected results.
Creating a basic mega menu in Hestia
We've made it easy to set up a basic mega menu within the theme itself by using classes. First of all, you must create a new menu. Go under Dashboard > Appearance > Menus. Click on Screen Options at the top and make sure that the CSS Classes option is enabled. If it's not, make sure you enable it. Head on down and click on create a new menu.

Elements Anatomy
We have styled specific classes to allow the user to create beautiful menus directly from the dashboard. These classes are listed below, along with relevant examples.
- hestia-mega-menu - this class acts as a wrapper for the mega-menu.
- hestia-mm-col - this class is a wrapper for the columns of the menu. The contents are not shown, this is just a wrapper.
- hestia-mm-heading - styles the item as a heading. The contents are shown and can also have a link.
We also have an element called divider. You can insert one between your menu items by simply adding a menu item with a link value of # and with the title divider, and the CSS class divider.
Link descriptions also show up. So anything you insert in the Description field of the menu item will be shown right below it.

Creating the menu
This functionality can be extended to much more than this, but, for demonstration purposes, we're going to reproduce the example above.
The Root Item
First of all, we're going to add the root element for the menu. Click on Custom Links and use # for the URL and Menu for the link text. Then click on Add to Menu.
Make sure that after you've added the Item to the Menu you add the class hestia-mega-menu to it, just like in the image below.

The Columns
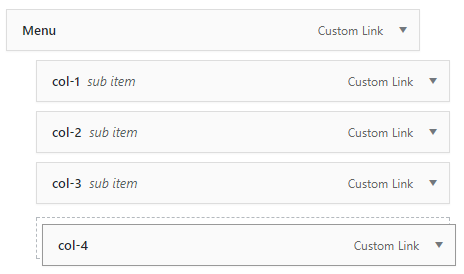
Now that we have our root element set up, we will be adding the four columns to our menu. Go ahead and add four custom links to the menu. The URL should be # and the link text should be suggestive - remember that these show up in the dashboard but don't show on the front end of the site because they are just wrappers. I am going to name them col-1, col-2, col-3 and col-4.
Make sure you add the hestia-mm-col class to all four of them, just like we did for the root Item. And then make them children under the Menu root item. If you did this right, you should end up with something that looks like the image below.
Headings (optional)
Bear in mind that headings can also have a link, but it's not required. They can be used as a presentation mean as well. If you don't want them to act as links, you should make them point to #.
Go ahead and create four more menu items that will be acting as headers: Seating, Tables, Cabinets and Mirrors. I don't want to link them to anything, so I'll just add # as URL.Make sure that you add hestia-mm-heading under CSS Classes for each of them and place them inside the previously created columns as children. You should be looking at something like in the image below.

Dividers (optional)
I'm going to add dividers under each of the headings. Keep in mind that these can be added anywhere and not only under the headings.
Adding a divider is as simple as adding a Custom Link item, pointing to # with the link text divider.

Basic Menu Items
Basic menu items can be added just like you do with a normal menu. The only thing you want to do is have them as children of the columns. After adding some items, this is what we get on the front end and the final menu structure:


Spicing Things Up With Icons
You can use this along with the Menu Icons plugin to make things even more appealing.

Descriptions
Link descriptions show up in the menu, so let's add some for the sake of example.

Other Use Cases
You can have more than one hestia-mega-menu class in your menu. Though things will get a bit harder to manage. A useful example of this case would be structuring a drop-down menu into columns like below:

In the example above, we have two hestia-mega-menu items - Clothing and Music.